In this post I will show how to construct a car reverse parking sensor alarm circuit using arduino, ultrasonic sensor and 2.4 GHz transceiver module. This project can be add-on feature for your car if it doesn’t sport a build-in parking sensors.
Introduction
The proposed project has similar functionality as traditional car parking sensor has, such as distance between car and obstacle on a LCD display and audio beep alert.
The proposed project can be used as stationary parking sensor i.e. the sensor placed on you garage or mobile parking sensor i.e. sensor placed on the back of your car if you are ready to take a small risk of wiring the project with car’s electrical system.
However, the motivation this project is to build a stationary parking sensor which can be built with zero risk.
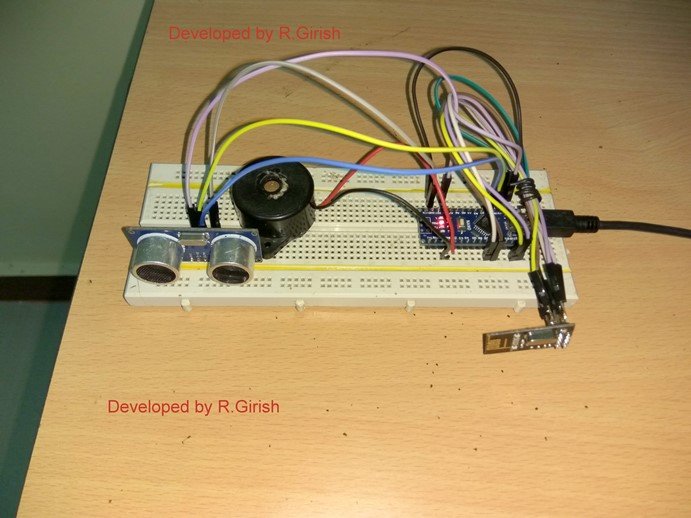
The car parking sensor alarm project using Arduino has two parts, the transmitter which consists of ultrasonic sensor, arduino, buzzer and 2.4 GHz transceiver module. This circuit will measure the distance between the car and obstacle.
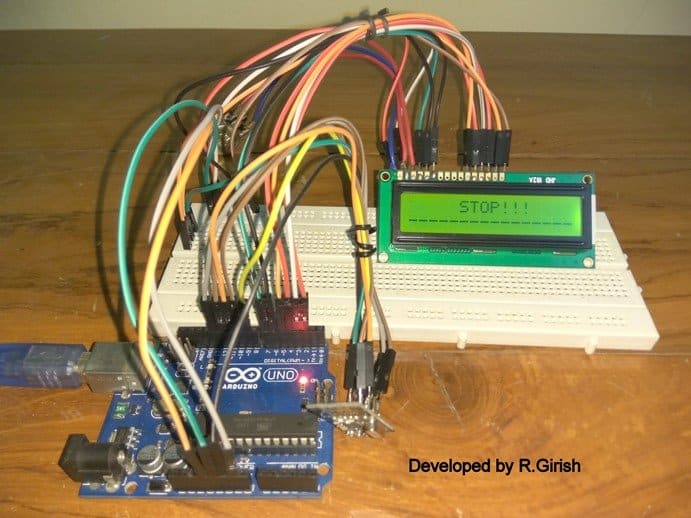
The receiver consists of 2.4 GHz transceiver module, arduino and 16x2 LCD display.
The receiver circuit will be placed inside the car with 9V battery as power supply. The receiver will display the distance between the car and obstacle in meters.
The transmitter will transmit the sensor data to the receiver inside the car via 2.4 GHz link. The communication link is established using NRF24L01 module.
Now let’s see the overview of NRF24L01 module.
Illustration of NRF24L01:
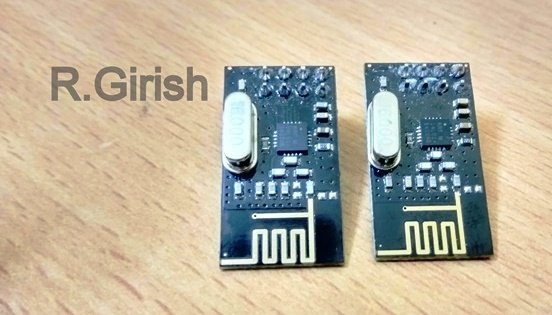
This module is designed to establish bi-directional communication link between two microcontrollers. It works on SPI communication protocol. It has 125 different channels and has maximum data rate of 2Mbps. It has theoretical maximum range of 100 meter.
Pin configuration:
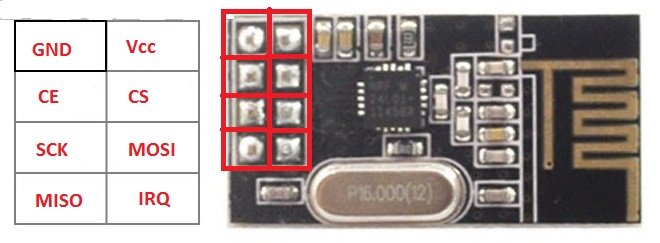
It operates on 3.3V, so 5 volt on Vcc terminal can kill it. However, it can accept 5V data signals from microcontrollers.
Now let’s move on to the transmitter of the project.
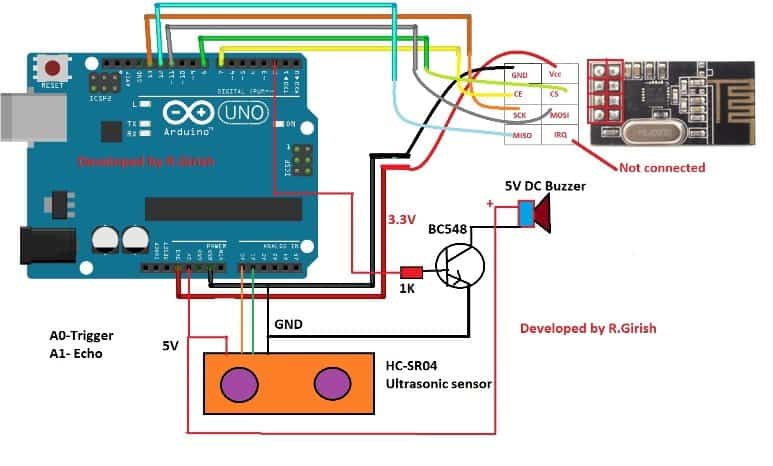
The circuit is wired with NRF24L01 module with 5 wires connected to digital I/O pins of arduino and rest of the two to 3.3V and ground. Pin #2 is connected to base of the transistor which will power the buzzer.
The ultrasonic sensor’s power terminals are connected to 5V and GND and A0 is connected to trigger pin and A1 is connected to echo pin of the sensor.
The sensor’s distance data is transmitted via NRF24L01 module to the receiver.
------------------------------
Program for Transmitter:
//----------Program Developed by R.Girish-------------//
#include <RF24.h>
#include <SPI.h>

RF24 radio(7, 8);

const byte address[][6] = {"00001", "00002"};

const int trigger = A0;
const int echo    = A1;
const int buzzer  = 2;

float distance;
float result;
unsigned long Time;

boolean state = false;
boolean dummystate = 0;

void setup()
{
  pinMode(trigger, OUTPUT);
  pinMode(echo, INPUT);
  pinMode(buzzer, OUTPUT);

  radio.begin();
  radio.openWritingPipe(address[1]);
  radio.openReadingPipe(1, address[0]);
  radio.setChannel(100);
  radio.setDataRate(RF24_250KBPS);
  radio.setPALevel(RF24_PA_MAX);

  radio.startListening();

  while (!radio.available());
  radio.read(&dummystate, sizeof(dummystate));

  radio.stopListening();

  // FIXED: removed accidental semicolon
  if (dummystate == HIGH)
  {
    for (int j = 0; j < 10; j++)
    {
      const char text[] = "Connection:OK !!!";
      radio.write(&text, sizeof(text));
      delay(100);
    }
  }

  // Initial trigger pulse
  digitalWrite(trigger, LOW);
  delayMicroseconds(2);
  digitalWrite(trigger, HIGH);
  delayMicroseconds(10);
  digitalWrite(trigger, LOW);

  delay(1000);
}

void (*resetFunc)(void) = 0;

void loop()
{
  // Ultrasonic trigger
  digitalWrite(trigger, LOW);
  delayMicroseconds(2);
  digitalWrite(trigger, HIGH);
  delayMicroseconds(10);
  digitalWrite(trigger, LOW);

  Time = pulseIn(echo, HIGH);
  distance = Time * 0.034;
  result = distance / 200;

  if (result > 2.00)
  {
    const char text[] = "CAR NOT IN RANGE";
    radio.write(&text, sizeof(text));
  }

  if (result <= 2.00 && result > 1.90)
  {
    const char text[] = "Distance = 2.0 M";
    radio.write(&text, sizeof(text));
  }

  if (result <= 1.90 && result > 1.80)
  {
    const char text[] = "Distance = 1.9 M";
    radio.write(&text, sizeof(text));
  }

  if (result <= 1.80 && result > 1.70)
  {
    const char text[] = "Distance = 1.8 M";
    radio.write(&text, sizeof(text));
  }

  if (result <= 1.70 && result > 1.60)
  {
    const char text[] = "Distance = 1.7 M";
    radio.write(&text, sizeof(text));
  }

  if (result <= 1.60 && result > 1.50)
  {
    const char text[] = "Distance = 1.6 M";
    radio.write(&text, sizeof(text));
  }

  if (result <= 1.50 && result > 1.40)
  {
    const char text[] = "Distance = 1.5 M";
    radio.write(&text, sizeof(text));
  }

  if (result <= 1.40 && result > 1.30)
  {
    const char text[] = "Distance = 1.4 M";
    radio.write(&text, sizeof(text));
  }

  if (result <= 1.30 && result > 1.20)
  {
    const char text[] = "Distance = 1.3 M";
    radio.write(&text, sizeof(text));
  }

  if (result <= 1.20 && result > 1.10)
  {
    const char text[] = "Distance = 1.2 M";
    radio.write(&text, sizeof(text));
  }

  if (result <= 1.10 && result > 1.00)
  {
    const char text[] = "Distance = 1.1 M";
    radio.write(&text, sizeof(text));
  }

  if (result <= 1.00 && result > 0.90)
  {
    state = true;
    const char text[] = "Distance = 1.0 M";
    radio.write(&text, sizeof(text));

    while (state)
    {
      digitalWrite(buzzer, HIGH);
      delay(700);
      digitalWrite(buzzer, LOW);
      delay(700);

      digitalWrite(trigger, HIGH);
      delayMicroseconds(10);
      digitalWrite(trigger, LOW);

      Time = pulseIn(echo, HIGH);
      distance = Time * 0.034;
      result = distance / 200;

      if (result < 0.90 || result > 1.00)
        state = false;
    }
  }

  if (result <= 0.90 && result > 0.80)
  {
    state = true;
    const char text[] = "Distance = 0.9 M";
    radio.write(&text, sizeof(text));

    while (state)
    {
      digitalWrite(buzzer, HIGH);
      delay(600);
      digitalWrite(buzzer, LOW);
      delay(600);

      digitalWrite(trigger, HIGH);
      delayMicroseconds(10);
      digitalWrite(trigger, LOW);

      Time = pulseIn(echo, HIGH);
      distance = Time * 0.034;
      result = distance / 200;

      if (result < 0.80 || result > 0.90)
        state = false;
    }
  }

  if (result <= 0.80 && result > 0.70)
  {
    state = true;
    const char text[] = "Distance = 0.8 M";
    radio.write(&text, sizeof(text));

    while (state)
    {
      digitalWrite(buzzer, HIGH);
      delay(500);
      digitalWrite(buzzer, LOW);
      delay(500);

      digitalWrite(trigger, HIGH);
      delayMicroseconds(10);
      digitalWrite(trigger, LOW);

      Time = pulseIn(echo, HIGH);
      distance = Time * 0.034;
      result = distance / 200;

      if (result < 0.70 || result > 0.80)
        state = false;
    }
  }

  if (result <= 0.70 && result > 0.60)
  {
    state = true;
    const char text[] = "Distance = 0.7 M";
    radio.write(&text, sizeof(text));

    while (state)
    {
      digitalWrite(buzzer, HIGH);
      delay(400);
      digitalWrite(buzzer, LOW);
      delay(400);

      digitalWrite(trigger, HIGH);
      delayMicroseconds(10);
      digitalWrite(trigger, LOW);

      Time = pulseIn(echo, HIGH);
      distance = Time * 0.034;
      result = distance / 200;

      if (result < 0.60 || result > 0.70)
        state = false;
    }
  }

  if (result <= 0.60 && result > 0.50)
  {
    state = true;
    const char text[] = "Distance = 0.6 M";
    radio.write(&text, sizeof(text));

    while (state)
    {
      digitalWrite(buzzer, HIGH);
      delay(300);
      digitalWrite(buzzer, LOW);
      delay(300);

      digitalWrite(trigger, HIGH);
      delayMicroseconds(10);
      digitalWrite(trigger, LOW);

      Time = pulseIn(echo, HIGH);
      distance = Time * 0.034;
      result = distance / 200;

      if (result < 0.50 || result > 0.60)
        state = false;
    }
  }

  if (result <= 0.50 && result > 0.40)
  {
    state = true;
    const char text[] = "Distance = 0.5 M";
    radio.write(&text, sizeof(text));

    while (state)
    {
      digitalWrite(buzzer, HIGH);
      delay(200);
      digitalWrite(buzzer, LOW);
      delay(200);

      digitalWrite(trigger, HIGH);
      delayMicroseconds(10);
      digitalWrite(trigger, LOW);

      Time = pulseIn(echo, HIGH);
      distance = Time * 0.034;
      result = distance / 200;

      if (result < 0.40 || result > 0.50)
        state = false;
    }
  }

  if (result <= 0.40 && result > 0.30)
  {
    state = true;
    const char text[] = "Distance = 0.4 M";
    radio.write(&text, sizeof(text));

    while (state)
    {
      digitalWrite(buzzer, HIGH);
      delay(100);
      digitalWrite(buzzer, LOW);
      delay(100);

      digitalWrite(trigger, HIGH);
      delayMicroseconds(10);
      digitalWrite(trigger, LOW);

      Time = pulseIn(echo, HIGH);
      distance = Time * 0.034;
      result = distance / 200;

      if (result < 0.30 || result > 0.40)
        state = false;
    }
  }

  if (result <= 0.30)
  {
    const char text[] = "STOP!!!";
    radio.write(&text, sizeof(text));

    digitalWrite(buzzer, HIGH);
    delay(3000);
    digitalWrite(buzzer, LOW);

    resetFunc();
  }

  delay(200);
}
//----------Program Developed by R.Girish-------------//
That concludes the transmitter.
Receiver:
The Receiver has 16x2 LCD display for displaying the distance measurement. The display connection is given below:
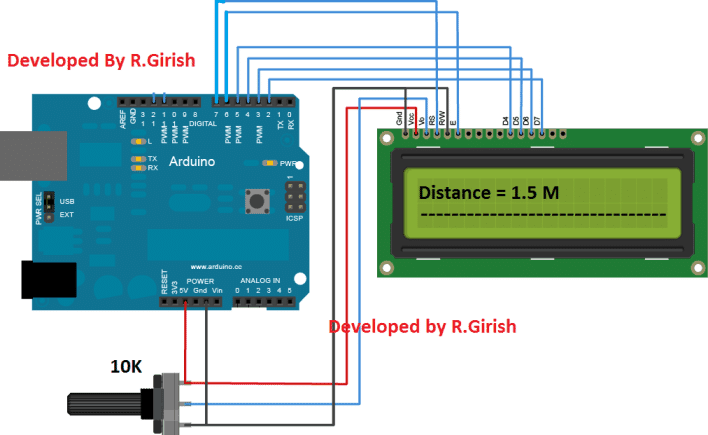
Adjust the 10K potentiometer for better viewing contrast.
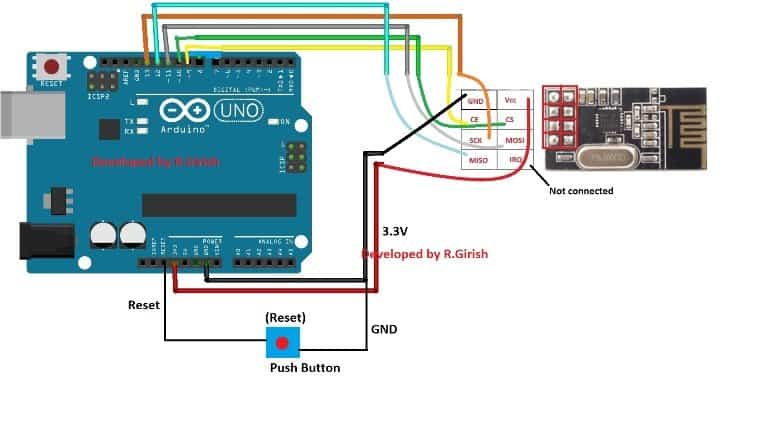
The above schematic is rest of the receiver circuit. A push button is provided for resetting the arduino in case of the 2.4 GHz link connection is not established.
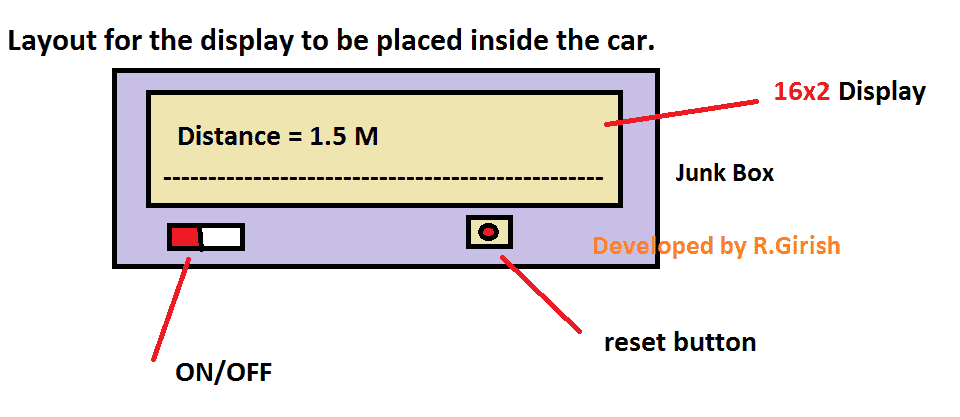
The receiver circuit is placed inside the car; it can be power from a 9V battery. The receiver may be placed in a junk box which might make your car look good. The junk box may be placed in your car above the instrument cluster or any convenient place you wish.
Program for Receiver:
//--------Program Developed by R.Girish-------//

#include <LiquidCrystal.h>
#include <RF24.h>
#include <SPI.h>

LiquidCrystal lcd(7, 6, 5, 4, 3, 2);
RF24 radio(9, 10);

const byte address[][6] = {"00001", "00002"};
const int dummy = A0;
bool dummystate = 0;

void setup()
{
  Serial.begin(9600);

  lcd.begin(16, 2);
  delay(100);

  pinMode(dummy, INPUT);
  digitalWrite(dummy, HIGH);   // Enable internal pull-up

  radio.begin();
  radio.openReadingPipe(1, address[1]);
  radio.openWritingPipe(address[0]);
  radio.setChannel(100);
  radio.setDataRate(RF24_250KBPS);
  radio.setPALevel(RF24_PA_MAX);

  radio.stopListening();

  dummystate = digitalRead(dummy);   // FIXED BUG
  radio.write(&dummystate, sizeof(dummystate));
  delay(10);

  radio.startListening();

  if (!radio.available())
  {
    lcd.clear();
    lcd.setCursor(0, 0);
    lcd.print("Connection not");
    lcd.setCursor(0, 1);
    lcd.print("established");
    delay(50);
  }
}

void loop()
{
  if (radio.available())
  {
    char text[32] = {0};   // Ensure clean string
    radio.read(&text, sizeof(text));

    lcd.clear();
    lcd.setCursor(0, 0);
    lcd.print(text);
    lcd.setCursor(0, 1);
    lcd.print("----------------");
  }
}

//--------Program Developed by R.Girish-------//
Now, that concludes the receiver.
How to place sensor as stationary parking sensor:
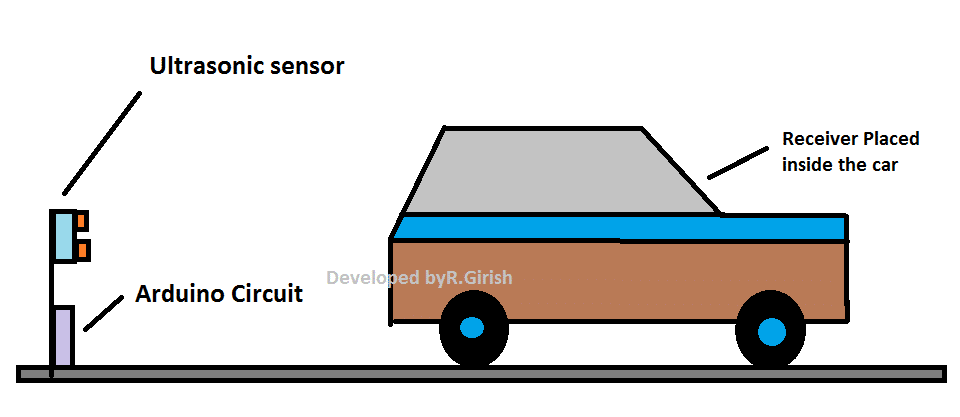
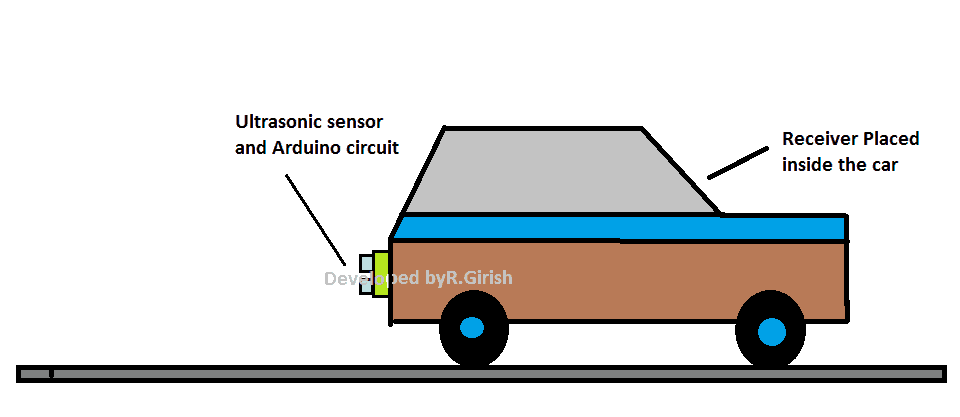
How to place sensor as mobile parking sensor:
In mobile parking sensor the transmitter’s ultrasonic sensor is placed at back side of the car, the power is provided from car’s battery. It should be wired in such a way that when you turn off the ignition the arduino must disconnect from the supply.
The receiver may be placed insider the as mentioned before.
How to operate this Car Parking sensor project (Stationary type)
• Power the Transmitter ON first, go to your car and turn on the receiver. If the connection between transmitter and receiver is established it will display “Connection: OK” and shows the distance between the car and sensor.
• If it displays” Connection not established” press the push button provided on the receiver.
• It may display” Car not in range” if your can is far away from the ultrasonic sensor.
• Gently take your car reverse or forward to your parking plot.
• As the distance between car and sensor gets less than 1.0 meter the buzzer beeps.
• As you approach the sensor closer the rate of beep increases, once the car reaches 1 foot or 0.3 meter, the display prompt to stop the car and you must stop.
• The transmitter will reset and go to idle automatically. Turn off the receiver in your car. If you powered the transmitter by battery, turn off it too.
How to operate this car parking sensor alarm circuit (Mobile Parking sensor)
• It is similar previously stated instruction; if the receiver displays “Car not in range” your car is far away from the obstacle.
• When you turn off the engine, the transmitter circuit must turn off. Turn off the receiver circuit manually.
Author’s Prototype:
Transmitter:
Receiver:


Questions & Answers
Awesome project.
Can you help me with a project on MicroController Based Timer Socket?
I will be glad. Thanks
Hi oyekunle,
I am already designing one, hopefully it will be published soon.
Regards
Thanks, If possible we'll try to post it for you…