• Skip to main content
  • Skip to primary sidebar

Homemade Circuit Projects

Need circuit help? Post them in the comments! I've answered over 50,000!

Blog | Categories | About | Hire Me | Contact | Calculators-online
You are here: Home / Electronics Theory / Emitter-Stabilized BJT Bias Circuit

Emitter-Stabilized BJT Bias Circuit

Last Updated on May 20, 2026 by Swagatam 3 Comments

A configuration in which a bipolar junction transistor or a BJT is reinforced with an emitter resistor for enhancing its stability with regards to changing ambient temperatures, is called an emitter stabilized bias circuit for BJT.

Table of Contents
  • Applying Emitter Stabilized Bias Circuit
  • Base-Emitter Loop
  • Collector–Emitter Loop
    • Determining Saturation level

We have already studied what is DC biasing in transistors, now let's move ahead and learn how an emitter resistor can be used for improving the stability of a BJT DC bias network.

Applying Emitter Stabilized Bias Circuit

The inclusion of the emitter resistor to the dc bias of the BJT delivers superior stability, meaning, the dc bias currents and voltages continue to be more close to where they had been fixed by the circuit considering external parameters, such as variations in temperature, and transistor beta (gain),

The below given figure shows a transistor DC bias network having an emitter resistor for enforcing an emitter-stabilized biasing on the existing fixed bias configuration of the BJT.

BJT Bias Circuit with Emitter Resistor

Figure 4.17 BJT Bias Circuit with Emitter Resistor

In our discussions we'll begin our analysis of the design by first inspecting the loop around the base-emitter region of the circuit, and then use the results for further investigating the loop around the collector-emitter side of the circuit.

Base-Emitter Loop

base emitter loop

We can redraw the above base-emitter loop in the way shown below in Fig 4.18, and if we apply Kirchhoff's voltage law on this loop in the clockwise direction, helps us to get the following equation:

+Vcc = IBRB - VBE - IERE = 0 -------(4.15)

From our previous discussions we know that: IE = (β+1)IB -------(4.16)

Substituting the value of IE in Eq.(4.15) provides the following result:

Vcc = IBRB - VBE - (β+1)IBRE = 0

Putting the terms in their respective groups yields the following:

If you recall from our previous chapters, the fixed bias equation was derived in the following form:
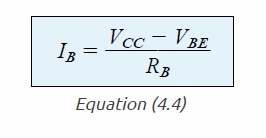
If we compare this fixed bias equation with the (4.17) equation we find the only difference between the two equation for current IB is the the term (β+1)RE.

When the equation 4.17 is used for drawing a series based configuration we are able to extract an interesting result, which actually is the similar to equation 4.17.

Take the example of the following network in Fig 4.19:

If we solve the system for current IB, results in the same equation obtained in Eq. 4.17. Observe that besides the voltage from base to emitter VBE, the resistor RE could be seen appearing again at the input of the base circuit by a level  (β+1). 

Meaning, the emitter resistor which forms a part of the collector-emitter loop shows up as (β+1)RE in the base-emitter loop.

Assuming that β could be mostly above 50 for most BJTs, the resistor at the  emitter of the transistors could be significantly bigger in the base circuit. Hence, we are able to derive the following general equation for the Fig.4.20:

Ri = (β+1)RE ------(4.18)

You will find this equation quite handy while solving many future networks. Actually, this equation facilitates memorizing equation 4.17 in an easier way.

As per Ohm's law we know that the current through a network is the voltage divided by the resistance of the circuit.
The voltage for a base-emitter design is = Vcc - VBE

The resistances seen in the 4.17 are RB + RE, which is reflected as (β+1), and the result is what we have in Eq 4.17.

Collector–Emitter Loop

Collector–Emitter Loop

The figure above shows the collector-emitter loop, applying Kirchhoff's law to the indicated loop in the clockwise direction, we get the following equation:

+IERE + VCE + ICRC - VCC  = 0
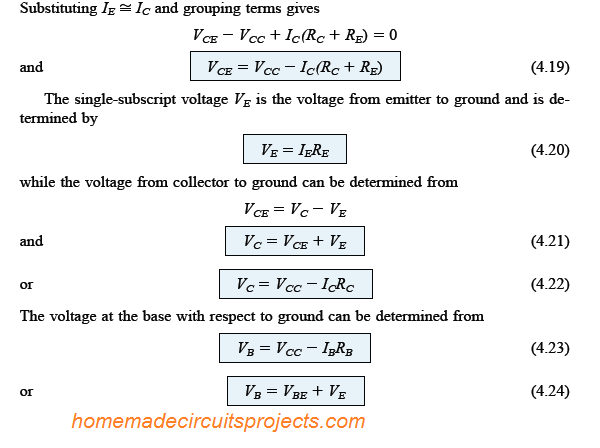
applying Kirchhoff's law to the BJT collector-emitter loop

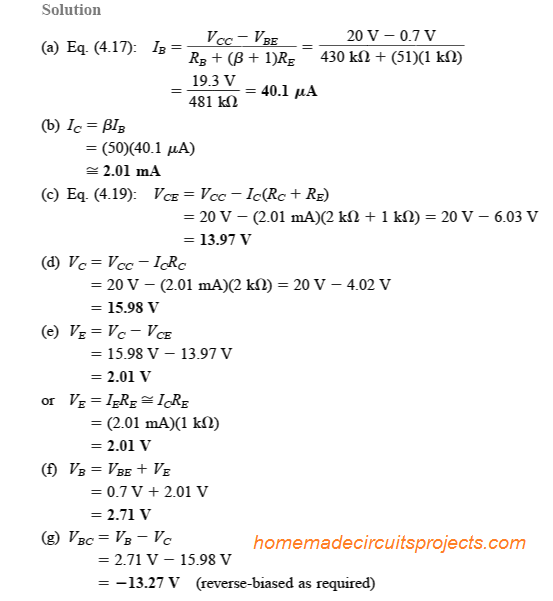
Solving a practical example for an emitter stabilized bias circuit as given below:


For the emitter bias network as given in the above figure 4.22, evaluate the following:

  1. IB
  2. IC
  3. VCE
  4. VC
  5. VE
  6. VB
  7. VBC

Determining Saturation level

Determining saturation current in a emitter stabilized BJT circuit

The maximum collector current which becomes the collector saturation level for an emitter bias network could be calculated by employing the identical strategy which had been applied for our earlier fixed bias circuit.

It may be implemented by creating a short circuit across the collector and emitter leads of the BJT, as indicated in the above diagram 4.23, and then we can evaluate the resulting collector current using the following formula:

Example problem for solving saturation current in an emitter stabilized BJT circuit:

solving saturation current in a emitter stabilized BJT circuit


Load Line Analysis

The load-line analysis of the emitter-bias BJT circuit is quite similar to our earlier discussed fixed-bias configuration.

The only difference being the level of IB [as derived in our Eq.(4.17)] defines the level of IB on the characteristics as shown in the following Fig. 4.24 (indicated as IBQ).

load-line analysis of the emitter-bias BJT circuit

You'll also like:

  • transformer workingHow Transformers Work
  • What is Transistor Saturation
  • Varicap characteristics C pF versus VRHow Varactor (Varicap) Diodes Work
  • imageBJT Transfer Characteristics

Filed Under: Electronics Theory Tagged With: Bias, BJT, Emitter, Stabilized

About Swagatam

I am an electronics engineer and doing practical hands-on work from more than 15 years now. Building real circuits, testing them and also making PCB layouts by myself. I really love doing all these things like inventing something new, designing electronics and also helping other people like hobby guys who want to make their own cool circuits at home.

And that is the main reason why I started this website homemade-circuits.com, to share different types of circuit ideas..

If you are having any kind of doubt or question related to circuits then just write down your question in the comment box below, I am like always checking, so I guarantee I will reply you for sure!


[ajax_load_more]
Previous Post: « Load-Line Analysis in BJT Circuits
Next Post: Voltage-Divider Bias in BJT Circuits – More Stability without beta Factor »

Reader Interactions

Questions & Answers

Total Posts: 3
Newest Oldest
moataz khan
April 27, 2020 • 6 years ago #78210

Regarding the input impedance,
I failed to understand why the base resistance is bigger than “(beta +1)Re” in your example
of Rb= 430k Ohms, and Re= 1k Ohms, when you need the base resistance to be around 100 times smaller than “(beta+1)Re”. what I understood is that if base resistance is small enough, the collector current will be almost independent of Beta or changes in temperatures to the resistor. Ic=beta*Ib
Can you please clarify this for me, as I don’t quit understand this part fully?
Thank you in advance.

Reply
Hamdy Elhinnawy
April 10, 2023 • 3 years ago #141692

 I use a transistor to drive a 12 volts relay. I use a resistor to stabilize the emitter. Yet, whenever I change the value of the resistor voltages change at the emitter as well as at the collector and there is difficulty getting that level of voltage I put a LED to indicate the output. Rather confusing is that if the position of the transistor changed and the emitter is connected to the Vcc rather than being grounded the circuit still gives output. I noticed also that Vb may be smaller or bigger than the assumed 0.7 voltage drop and this doesn’t disrupt the output. There a way to fix these issues but here I’ll appreciate help.

Reply
SwagatamAdmin
April 10, 2023 • 3 years ago #141698

I have never used a emitter resistor for a relay driver transistor? What happens if you remove the emitter resistor and connect the emitter directly to the ground?

Reply

Need Help? Please Leave a Comment! We value your input—Kindly keep it relevant to the above topic! Cancel reply

Your email address will not be published. Required fields are marked *

Primary Sidebar

My YouTube Channel

Circuit Simulator: Draw and Simulate Schematics

circuit simulator image


Categories

  • Arduino Projects (95)
  • Audio and Amplifier Projects (134)
  • Automation Projects (18)
  • Automobile Electronics (104)
  • Battery Charger Circuits (90)
  • Datasheets and Components (109)
  • Electronics Theory (151)
  • Energy from Magnets and Earth (43)
  • Games and Sports Projects (11)
  • Grid and 3-Phase (20)
  • Health related Projects (27)
  • Home Electrical Circuits (13)
  • Indicator Circuits (16)
  • Inverter Circuits (98)
  • Lamps and Lights (161)
  • Meters and Testers (72)
  • Mini Projects (28)
  • Motor Controller (68)
  • Oscillator Circuits (30)
  • Pets and Pests (15)
  • Power Supply Circuits (91)
  • Remote Control Circuits (50)
  • Security and Alarm (65)
  • Sensors and Detectors (107)
  • SMPS and Converters (46)
  • Solar Controller Circuits (62)
  • Temperature Controllers (44)
  • Timer and Delay Relay (51)
  • Voltage Control and Protection (44)
  • Water Controller (37)
  • Wireless Circuits (31)


Subscribe to get New Circuits in your Email


Other Links

  • Privacy Policy
  • Cookie Policy
  • Disclaimer
  • Copyright
  • Videos
  • Sitemap

People also Search

555 Circuits | 741 Circuits | LM324 Circuits | LM338 Circuits | 4017 Circuits | Ultrasonic Projects | SMPS Projects | Christmas Projects | MOSFETs | Radio Circuits | Laser Circuits | PIR Projects |


Recent Comments

  • Swagatam on Simple Capacitive Discharge Ignition (CDI) Circuit
  • Swagatam on Remote Controlled Toy Car using 433 MHz Remote Modules
  • James M on Simple Capacitive Discharge Ignition (CDI) Circuit
  • Uchechukwu on Remote Controlled Toy Car using 433 MHz Remote Modules
  • Swagatam on How to Connect IC 4066 in a Circuit

Social Profiles

  • Twitter
  • YouTube
  • Instagram
  • Pinterest
  • My Facebook-Page
  • Stack Exchange
  • Linkedin

Calculators

  • ZVS Induction Heater + Tank Calculator Tool
  • Zener Diode Calculator
  • Wire Current and Thickness Calculator (Ampacity Calculator)
  • Voltage Divider Calculator
  • Transistor Base Resistor Calculator
  • Transistor Astable Multivibrator Calculator
  • TL431 Calculator
  • Solar Panel, Inverter, Battery Calculator
  • Ferrite Core Air Gap Calculator Tool
  • Parallel MOSFET Calculator Tool: How to Connect MOSFETs in Parallel Safely
  • LC Resonance Calculator for EV Battery Charger Circuits
  • LED String Series Resistor Calculator
  • PFC (Power Factor Correction) Calculator Tool: 3kW
  • Passive Power Factor Correction (PFC) Calculator
  • LM567 IC Calculator Tool
  • SMPS Flyback Boost Converter Calculator
  • Shunt Resistor Calculator for Ammeters
  • SCR and Triac Gate Resistor Calculator
  • Battery Back up Time Calculator
  • Boost Converter Calculator (Non-Isolated)
  • Bootstrap Capacitor Calculator
  • Buck Converter Calculator
  • Buck-Boost Converter Calculator
  • Capacitance Reactance Calculator
  • DCM Flyback Transformer & Wire Gauge Wire Size Calculator Tool
  • Filter Capacitor Calculator
  • IC 4047 Calculator (Frequency and PWM)
  • IC 4060 Calculator
  • IC 555 Astable Calculator
  • IC 555 Monostable Calculator
  • IC SG3525, SG3524 Calculator
  • Inductance Calculator
  • Induction Heater Inductor and Resonant Frequency Calculator
  • Induction Heater Work Coil Calculator
  • Inverter LC Filter Calculator
  • LC Resonance Calculator
  • LED Current Calculator
  • LM317, LM338, LM396 Calculator
  • NAND/NOT Gate RC Values Calculator
  • NOT, NAND Gate Frequency Calculator
  • Notch Filter Calculator Tool
  • Ohm’s Law Calculator
  • Phase Angle Phase Shift Calculator
  • Power Factor (PF) Calculator
  • RC Filter Calculator
  • Reactance Calculator
  • Sine Table Calculator for SPWM Arduino Code
  • Small Signal Transistor(BJT) and Diode Quick Datasheet
  • SMPS Calculator for Toroidal Ferrite Transformers
  • SMPS Flyback Transformer Calculator – Design by Target Duty Cycle
  • TL431 Calculator
  • Op-Amp Hysteresis Resistor Calculator

© 2026 · Swagatam Innovations