• Skip to main content
  • Skip to primary sidebar

Homemade Circuit Projects

Need circuit help? Post them in the comments! I've answered over 50,000!

Blog | Categories | About | Hire Me | Contact | Calculators-online
You are here: Home / Arduino Projects / Playing a Melody Using Arduino

Playing a Melody Using Arduino

Last Updated on May 15, 2026 by Swagatam 2 Comments

In this Arduino tutorial we will learn how to execute the tone() command for producing musical notes. The configuration will play a tiny musical tone that could be familiar to you.
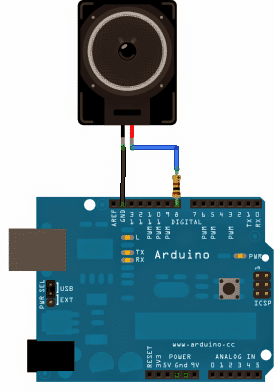
Table of Contents
  • Required Hardware for the Project
    • Procedure:
    • Arduino Code
    • The Programming Code Explanation


Required Hardware for the Project

Arduino BoardLoud speaker – 8 Ohm 1 inchResistor – 100 ohmsHook-up wires

Procedure:

It’s rather too straightforward and requires one of the speaker wires to be integrated with  pin8 via the 100 ohm resistor, and the other wire to the ground or the negative rail of the supply, as indicated the following schematic:
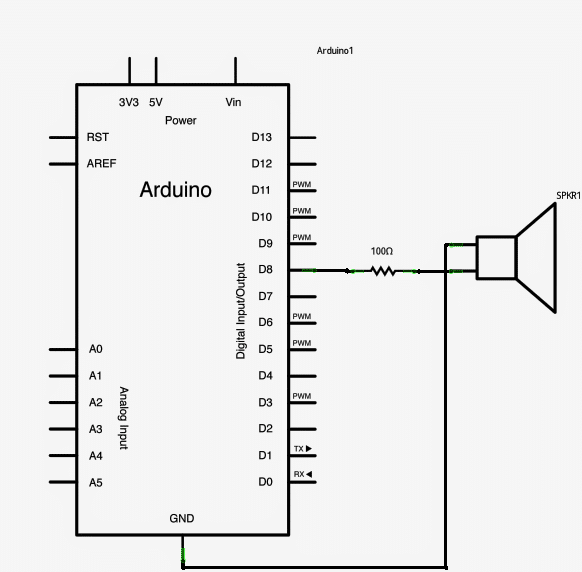
Image Courtesy: https://arduino.cc/en/Tutorial/Tone

Arduino Code

#include "pitches.h"

int melody[] = {
  NOTE_C4, NOTE_G3, NOTE_G3, NOTE_A3, NOTE_G3, 0, NOTE_B3, NOTE_C4
};

int noteDurations[] = {
  4, 8, 8, 4, 4, 4, 4, 4
};

void setup() {
  for (int thisNote = 0; thisNote < 8; thisNote++) {
    int noteDuration = 1000 / noteDurations[thisNote];
    tone(8, melody[thisNote], noteDuration);
    int pauseBetweenNotes = noteDuration * 1.30;
    delay(pauseBetweenNotes);
    noTone(8);
  }
}

void loop() {
  // nothing here because melody plays once
}

The Programming Code Explanation

Now let us talk about the programming code because that is important. So first of all you will see an extra file called pitches.h being included in the main code.

This file is already preprogrammed, meaning that someone already put many values of tone pitch of some standard musical tunes into it.

That is useful because we do not need to define every tone from scratch. Instead, we just use the defined names like NOTE_C4, which is middle C, and NOTE_FS4 which means F sharp in the same manner. These constants help us to easily understand which tone we are producing without remembering the frequency numbers.

Then we should know that this whole note table was originally created by some person named Brett Hagman, and later the tone() command was designed based on it.

That is handy because whenever we want Arduino to produce some sound, we just call tone(pin, frequency, duration) and the Arduino does the rest. So you do not have to be an electronics expert to produce sound from Arduino.

Now let me explain the fundamental sketch, step by step. First, we declare an integer array called melody[] and in it, we place some musical notes like NOTE_C4, NOTE_G3, and so on.

Then another array noteDurations[] is defined, where numbers like 4 and 8 mean quarter note and eighth note respectively. That way we can control how long each note lasts.

Then in the setup() function, we use a for loop which starts from zero and goes up to 7, because there are eight notes in the melody.

Now in every iteration, we calculate the note duration by doing simple math: 1000 divided by the note duration type like 1000/4 or 1000/8.

Then we call tone(8, melody[thisNote], noteDuration); which makes Arduino play the sound on digital pin 8.

But since if we do not leave some time between notes, they would sound like a mess, so we must calculate a pause between notes.

That is done by taking the note duration and multiplying by 1.30, meaning 30 percent extra time. Then we call delay(pauseBetweenNotes); so Arduino does not move to next note too fast.

After playing each note, we call noTone(8); so that the tone stops playing before the next one begins.

In the loop() function, we do nothing because the melody only plays once when Arduino starts, and does not repeat itself.

Now let us see how we can create the pitches.h file by ourselves. We just click the “new Tab” button in Arduino IDE and paste a long list of #define NOTE_XXX frequency_value.

For example #define NOTE_B0 31, #define NOTE_C1 33, and so on. These are public constants so that we can use them anywhere in our program.

Then this file goes on for many lines until NOTE_DS8 4978. Each line is very simple and crude: #define NOTE_C4 262. That means whenever we use NOTE_C4 in our code, Arduino knows it should use frequency 262 Hz.

That is very easy to use but very important because without that, we would have to manually write frequency numbers every time.

So now you understand that by including pitches.h, and writing a simple melody array plus note duration array, we can make Arduino play any tune we want. That is useful in many projects where sound alert or music generation is needed.

You'll also like:

  • piezodrivercircuit1Simplest Piezo Driver Circuit Explained
  • BD5460GUL3.7 V Class D Speaker Amplifier Circuit for Differential Analog Input
  • stethescopeampMaking a Stethoscope Amplifier Circuit
  • simplemusicalgreetingcardcircuitMake this Musical Greeting Card Circuit

Filed Under: Arduino Projects, Audio and Amplifier Projects Tagged With: Arduino, function, Melody, Playing, Tone

About Swagatam

I am an electronics engineer and doing practical hands-on work from more than 15 years now. Building real circuits, testing them and also making PCB layouts by myself. I really love doing all these things like inventing something new, designing electronics and also helping other people like hobby guys who want to make their own cool circuits at home.

And that is the main reason why I started this website homemade-circuits.com, to share different types of circuit ideas..

If you are having any kind of doubt or question related to circuits then just write down your question in the comment box below, I am like always checking, so I guarantee I will reply you for sure!

Previous Post: « Making a Wireless Doorbell Circuit
Next Post: 5kva Ferrite Core Inverter Circuit – Full Working Diagram with Calculation Details »

Reader Interactions

Questions & Answers

Total Posts: 2
Newest Oldest
Krish
December 7, 2014 • 12 years ago #27512

Will using a 8 Ohm speaker be better than using a piezo speaker that is usually used? Thanks.

Reply
SwagatamAdmin
December 8, 2014 • 12 years ago #27528

it can be tried, i am not sure which one would produce better results

Reply

Need Help? Please Leave a Comment! We value your input—Kindly keep it relevant to the above topic! Cancel reply

Your email address will not be published. Required fields are marked *

Primary Sidebar

My YouTube Channel

Circuit Simulator: Draw and Simulate Schematics

circuit simulator image

Categories

  • Arduino Projects (95)
  • Audio and Amplifier Projects (134)
  • Automation Projects (18)
  • Automobile Electronics (104)
  • Battery Charger Circuits (90)
  • Datasheets and Components (109)
  • Electronics Theory (151)
  • Energy from Magnets and Earth (43)
  • Games and Sports Projects (11)
  • Grid and 3-Phase (20)
  • Health related Projects (27)
  • Home Electrical Circuits (13)
  • Indicator Circuits (16)
  • Inverter Circuits (98)
  • Lamps and Lights (161)
  • Meters and Testers (72)
  • Mini Projects (28)
  • Motor Controller (68)
  • Oscillator Circuits (30)
  • Pets and Pests (15)
  • Power Supply Circuits (91)
  • Remote Control Circuits (50)
  • Security and Alarm (65)
  • Sensors and Detectors (107)
  • SMPS and Converters (46)
  • Solar Controller Circuits (62)
  • Temperature Controllers (44)
  • Timer and Delay Relay (51)
  • Voltage Control and Protection (44)
  • Water Controller (37)
  • Wireless Circuits (31)

Subscribe to get New Circuits in your Email

Other Links

  • Privacy Policy
  • Cookie Policy
  • Disclaimer
  • Copyright
  • Videos
  • Sitemap

People also Search

555 Circuits | 741 Circuits | LM324 Circuits | LM338 Circuits | 4017 Circuits | Ultrasonic Projects | SMPS Projects | Christmas Projects | MOSFETs | Radio Circuits | Laser Circuits | PIR Projects |

Recent Comments

  • Swagatam on Touch Dimmable LED Light Bar Circuit
  • Swagatam on DC to DC Converter Circuits using SG3524 [Buck, Boost Designs]
  • Swagatam on 3 Best Joule Thief Circuits
  • Swagatam on EGS002 Datasheet, Circuit Diagram Explained
  • Swagatam on Vehicle Parking Lot Counter Circuit

Social Profiles

  • Twitter
  • YouTube
  • Instagram
  • Pinterest
  • My Facebook-Page
  • Stack Exchange
  • Linkedin

Calculators

  • ZVS Induction Heater + Tank Calculator Tool
  • Zener Diode Calculator
  • Wire Current and Thickness Calculator (Ampacity Calculator)
  • Voltage Divider Calculator
  • Transistor Base Resistor Calculator
  • Transistor Astable Multivibrator Calculator
  • TL431 Calculator
  • Solar Panel, Inverter, Battery Calculator
  • Ferrite Core Air Gap Calculator Tool
  • Parallel MOSFET Calculator Tool: How to Connect MOSFETs in Parallel Safely
  • LC Resonance Calculator for EV Battery Charger Circuits
  • LED String Series Resistor Calculator
  • PFC (Power Factor Correction) Calculator Tool: 3kW
  • Passive Power Factor Correction (PFC) Calculator
  • LM567 IC Calculator Tool
  • SMPS Flyback Boost Converter Calculator
  • Shunt Resistor Calculator for Ammeters
  • SCR and Triac Gate Resistor Calculator
  • Battery Back up Time Calculator
  • Boost Converter Calculator (Non-Isolated)
  • Bootstrap Capacitor Calculator
  • Buck Converter Calculator
  • Buck-Boost Converter Calculator
  • Capacitance Reactance Calculator
  • DCM Flyback Transformer & Wire Gauge Wire Size Calculator Tool
  • Filter Capacitor Calculator
  • IC 4047 Calculator (Frequency and PWM)
  • IC 4060 Calculator
  • IC 555 Astable Calculator
  • IC 555 Monostable Calculator
  • IC SG3525, SG3524 Calculator
  • Inductance Calculator
  • Induction Heater Inductor and Resonant Frequency Calculator
  • Induction Heater Work Coil Calculator
  • Inverter LC Filter Calculator
  • LC Resonance Calculator
  • LED Current Calculator
  • LM317, LM338, LM396 Calculator
  • NAND/NOT Gate RC Values Calculator
  • NOT, NAND Gate Frequency Calculator
  • Notch Filter Calculator Tool
  • Ohm’s Law Calculator
  • Phase Angle Phase Shift Calculator
  • Power Factor (PF) Calculator
  • RC Filter Calculator
  • Reactance Calculator
  • Sine Table Calculator for SPWM Arduino Code
  • Small Signal Transistor(BJT) and Diode Quick Datasheet
  • SMPS Calculator for Toroidal Ferrite Transformers
  • SMPS Flyback Transformer Calculator – Design by Target Duty Cycle
  • TL431 Calculator
  • Op-Amp Hysteresis Resistor Calculator

© 2026 · Swagatam Innovations