In this Arduino tutorial we will learn how to execute the tone() command for producing musical notes. The configuration will play a tiny musical tone that could be familiar to you.
Required Hardware for the Project
Arduino BoardLoud speaker – 8 Ohm 1 inchResistor – 100 ohmsHook-up wires
Procedure:
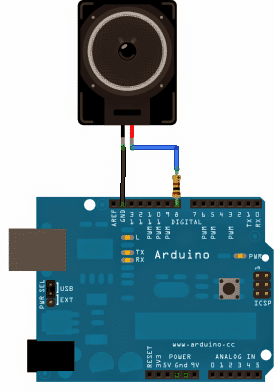
It’s rather too straightforward and requires one of the speaker wires to be integrated with pin8 via the 100 ohm resistor, and the other wire to the ground or the negative rail of the supply, as indicated the following schematic:
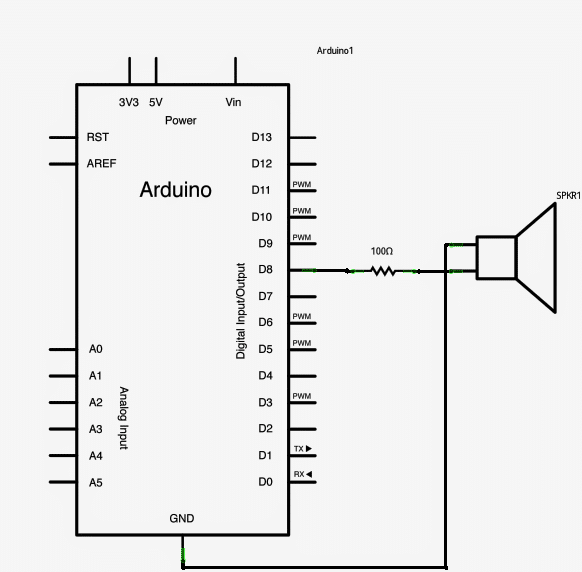
Image Courtesy: https://arduino.cc/en/Tutorial/Tone
Arduino Code
#include "pitches.h"

int melody[] = {
  NOTE_C4, NOTE_G3, NOTE_G3, NOTE_A3, NOTE_G3, 0, NOTE_B3, NOTE_C4
};

int noteDurations[] = {
  4, 8, 8, 4, 4, 4, 4, 4
};

void setup() {
  for (int thisNote = 0; thisNote < 8; thisNote++) {
    int noteDuration = 1000 / noteDurations[thisNote];
    tone(8, melody[thisNote], noteDuration);
    int pauseBetweenNotes = noteDuration * 1.30;
    delay(pauseBetweenNotes);
    noTone(8);
  }
}

void loop() {
  // nothing here because melody plays once
}
The Programming Code Explanation
Now let us talk about the programming code because that is important. So first of all you will see an extra file called pitches.h being included in the main code.
This file is already preprogrammed, meaning that someone already put many values of tone pitch of some standard musical tunes into it.
That is useful because we do not need to define every tone from scratch. Instead, we just use the defined names like NOTE_C4, which is middle C, and NOTE_FS4 which means F sharp in the same manner. These constants help us to easily understand which tone we are producing without remembering the frequency numbers.
Then we should know that this whole note table was originally created by some person named Brett Hagman, and later the tone() command was designed based on it.
That is handy because whenever we want Arduino to produce some sound, we just call tone(pin, frequency, duration) and the Arduino does the rest. So you do not have to be an electronics expert to produce sound from Arduino.
Now let me explain the fundamental sketch, step by step. First, we declare an integer array called melody[] and in it, we place some musical notes like NOTE_C4, NOTE_G3, and so on.
Then another array noteDurations[] is defined, where numbers like 4 and 8 mean quarter note and eighth note respectively. That way we can control how long each note lasts.
Then in the setup() function, we use a for loop which starts from zero and goes up to 7, because there are eight notes in the melody.
Now in every iteration, we calculate the note duration by doing simple math: 1000 divided by the note duration type like 1000/4 or 1000/8.
Then we call tone(8, melody[thisNote], noteDuration); which makes Arduino play the sound on digital pin 8.
But since if we do not leave some time between notes, they would sound like a mess, so we must calculate a pause between notes.
That is done by taking the note duration and multiplying by 1.30, meaning 30 percent extra time. Then we call delay(pauseBetweenNotes); so Arduino does not move to next note too fast.
After playing each note, we call noTone(8); so that the tone stops playing before the next one begins.
In the loop() function, we do nothing because the melody only plays once when Arduino starts, and does not repeat itself.
Now let us see how we can create the pitches.h file by ourselves. We just click the “new Tab” button in Arduino IDE and paste a long list of #define NOTE_XXX frequency_value.
For example #define NOTE_B0 31, #define NOTE_C1 33, and so on. These are public constants so that we can use them anywhere in our program.
Then this file goes on for many lines until NOTE_DS8 4978. Each line is very simple and crude: #define NOTE_C4 262. That means whenever we use NOTE_C4 in our code, Arduino knows it should use frequency 262 Hz.
That is very easy to use but very important because without that, we would have to manually write frequency numbers every time.
So now you understand that by including pitches.h, and writing a simple melody array plus note duration array, we can make Arduino play any tune we want. That is useful in many projects where sound alert or music generation is needed.


Comments
Will using a 8 Ohm speaker be better than using a piezo speaker that is usually used? Thanks.
it can be tried, i am not sure which one would produce better results