• Skip to main content
  • Skip to primary sidebar

Homemade Circuit Projects

Need circuit help? Post them in the comments! I've answered over 50,000!

Blog | Categories | About | Hire Me | Contact | Calculators-online
You are here: Home / Arduino Projects / How to Drive High Watt LEDs with Arduino

How to Drive High Watt LEDs with Arduino

Last Updated on June 1, 2026 by Swagatam 1 Comment

In this post I have explained the method of incorporating high watt LEDs with Arduino through external high voltage supplies. The question was put forth by Mr. Cole.

Table of Contents
  • The Circuit Question
    • The Circuit Solution:

The Circuit Question

I stumbled upon your blog and I love it! So much great information and great ideas Right now I am trying to figure out exactly how to separately control several 1 watt leds from the arduino ,

I understand c language and have no problem with the arduino, I just don't really understand how to run higher voltage through the arduino since it puts out 5v I understand a little about mosfets and planned on using logic level mosfets to control these leds..

they will only be flashing a few times a minute for about 30 minutes a day..do you see any problem running them through mosfets? Will I need 9 mosfets to separately control 9 leds?

Do I need resistors as well or do the mosfets make up for that?

Any help would be much appreciated! Thanks again!

Cole

The Circuit Solution:

For controlling 9nos of 1 watt LEDs together through an Arduino, the following simple set up may be incorporated through a 12V external supply:
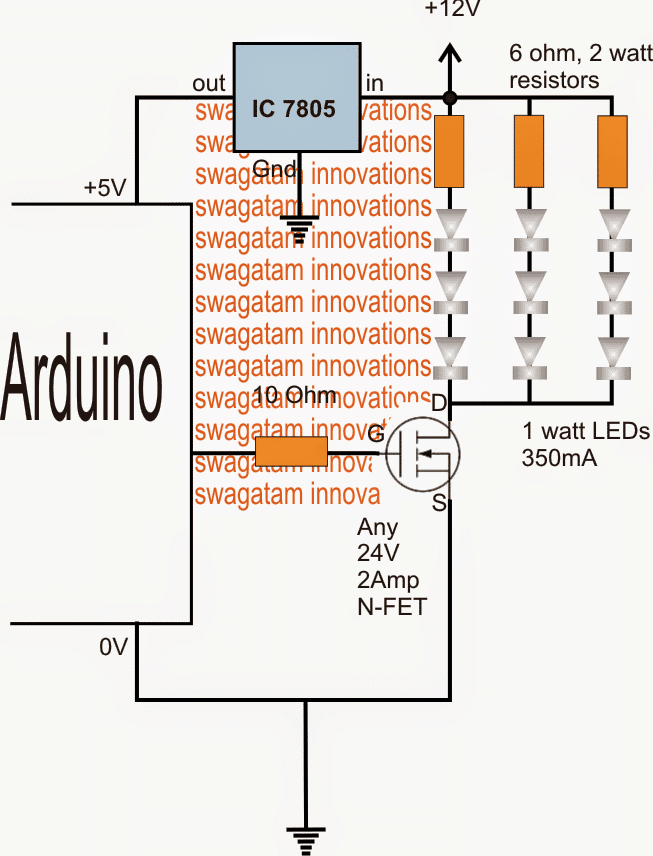
For controlling single LEDs or multiple LEDs from separate Arduino outputs, individual mosfets may be required as given below:
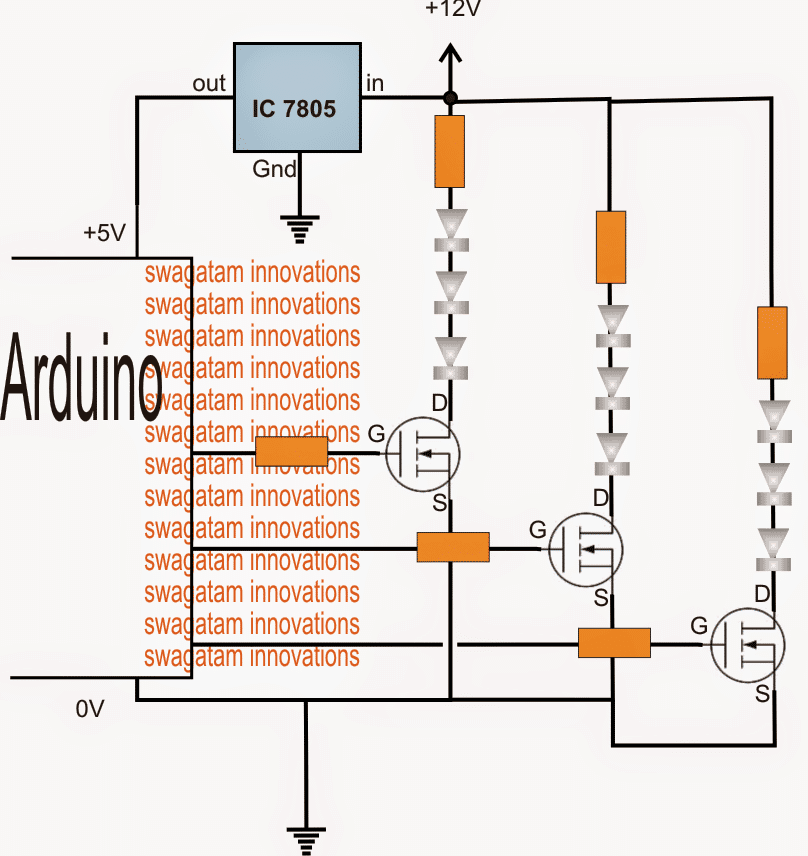
The LED resistors may be calculated using the following formula:

R = (U - LEDfwdV)/LED Current

where U is the supply voltage

LEDfwdV is the LED forward operating voltage of the particular series

LED current is the ampere rating specs of the LEDs used

Therefore here U = 12V

LEDfwdV = 3.3V x 3 = 9.9V since 3nos are there in each series and 3.3V being the forward voltage spec of each LED

LED current = 350mA, let's take it 300mA or 0.3Amp to keep things cooler.

Substituting these in the formula:

R = (U - LEDfwdV)/LED Current

= 12 - 9.9/0.3

= 7 ohm

watts may be calculated as

Watts = LEDfwdV x LED current = 9.9 x 0.3 = 2.97 watts or 3 watts

You'll also like:

  • delay ON timer compressedCube Light Circuits
  • Converting Ordinary Rice Bulb String Light to LED String Light
  • Flasher4060 1 compressed3 Glittering LED Christmas Tree Light Circuits Explored
  • mart street light circuitSmart Street Lamp Circuit with Motion Sensor

Filed Under: Arduino Projects, Lamps and Lights Tagged With: Arduino, Drive, High, LEDs, Watt

About Swagatam

I am an electronics engineer and doing practical hands-on work from more than 15 years now. Building real circuits, testing them and also making PCB layouts by myself. I really love doing all these things like inventing something new, designing electronics and also helping other people like hobby guys who want to make their own cool circuits at home.

And that is the main reason why I started this website homemade-circuits.com, to share different types of circuit ideas..

If you are having any kind of doubt or question related to circuits then just write down your question in the comment box below, I am like always checking, so I guarantee I will reply you for sure!


Previous Post: « How to Make an Industrial Delay Timer Circuit
Next Post: Model Locomotive Infrared Controller Circuit »

Reader Interactions

Questions & Answers

Total Posts: 1
Newest Oldest
El W@?TIN
January 5, 2016 • 11 years ago #37301

what mosfet you are using??? thanks

Reply

Need Help? Please Leave a Comment! We value your input—Kindly keep it relevant to the above topic! Cancel reply

Your email address will not be published. Required fields are marked *

Primary Sidebar


My Youtube Channel

Circuit Simulator

circuit simulator image


Subscribe to get New Circuits in your Email


Categories

  • Arduino Projects (95)
  • Audio and Amplifier Projects (134)
  • Automation Projects (18)
  • Automobile Electronics (103)
  • Battery Charger Circuits (88)
  • Datasheets and Components (109)
  • Electronics Theory (149)
  • Energy from Magnets and Earth (40)
  • Games and Sports Projects (11)
  • Grid and 3-Phase (20)
  • Health related Projects (27)
  • Home Electrical Circuits (13)
  • Indicator Circuits (16)
  • Inverter Circuits (99)
  • Lamps and Lights (162)
  • Meters and Testers (72)
  • Mini Projects (28)
  • Motor Controller (68)
  • Oscillator Circuits (28)
  • Pets and Pests (15)
  • Power Supply Circuits (91)
  • Remote Control Circuits (50)
  • Security and Alarm (65)
  • Sensors and Detectors (107)
  • SMPS and Converters (45)
  • Solar Controller Circuits (60)
  • Temperature Controllers (43)
  • Timer and Delay Relay (50)
  • Voltage Control and Protection (44)
  • Water Controller (37)
  • Wireless Circuits (31)


Other Links

  • Privacy Policy
  • Cookie Policy
  • Disclaimer
  • Copyright
  • Videos
  • Sitemap

People also Search

555 Circuits | 741 Circuits | LM324 Circuits | LM338 Circuits | 4017 Circuits | Ultrasonic Projects | SMPS Projects | Christmas Projects | MOSFETs | Radio Circuits | Laser Circuits | PIR Projects |


Recent Comments

  • Swagatam on True MPPT Solar Controller Circuit using IC 555
  • Swagatam on Electronic Circuit Projects, Tutorials, and Practical Engineering Solutions
  • Swagatam on Simple 20 watt Amplifier Circuits
  • Miracle on RC Helicopter Remote Control Circuit
  • Dale on Simple 20 watt Amplifier Circuits

Social Profiles

  • Twitter
  • YouTube
  • Instagram
  • Pinterest
  • My Facebook-Page
  • Stack Exchange
  • Linkedin

© 2026 · Swagatam Innovations