• Skip to main content
  • Skip to primary sidebar

Homemade Circuit Projects

Need circuit help? Post them in the comments! I've answered over 50,000!

Blog | Categories | About | Hire Me | Contact | Calculators-online
You are here: Home / Grid and 3-Phase / Simple 3 Phase Inverter Circuit

Simple 3 Phase Inverter Circuit

Last Updated on May 21, 2026 by Swagatam 259 Comments

In this post I have explained how to make a 3 phase inverter circuit which can be used in conjunction with any ordinary single phase square wave inverter circuit. The circuit was requested by one of the interested readers of this blog.

Table of Contents
  • The 3 Phase Generator using IC 4035
    • MAIN PARTS USED:
    • Full Circuit Diagram
    • HOW THIS THING WORKS, STEP-BY-STEP:
      • (1) Power Supply Side
      • (2) 555 Timer Section
      • (3) CD4035 Shift Register Section
    • OUTPUT WAVEFORMS:
    • IMPORTANT POINTS:
    • The 3-Phase Full-Bridge Driver Stage
    • Using IC IR2103
    • Simplifying the Above Designs
  • Making a Solar 3 Phase Inverter Circuit
    • Inverter Basic Requirement
    • How it Works
      • Using IC 555 Based Flyback Buck/Boost Converter

UPDATE: Looking for an Arduino based design? You may find this one useful:

Arduino 3 phase inverter


The 3 Phase Generator using IC 4035

The 3 phase inverter circuits explained in the subsequent sections of the article, will all basically need a good 3 phase generator circuit. One such good 3 phase generator circuit can be built using the IC 4035,. Let us understand how to do implement it with the following explanation:

This circuit creates 3 square wave outputs, each 120° out of phase, just like a 3-phase AC supply but in digital (square wave) form. It is good for testing 3-phase inverter circuits, BLDC motor drivers, or simulating 3-phase logic.

MAIN PARTS USED:

PartFunction
IC 555Works like a clock – generates fast square pulses.
CD4035A4-bit shift register – shifts logic “1” and gives 3-phase signals.
MJE340 + ZenerGives stable 12V to ICs even if input DC is high.
NOT gates (N1, N2)Helps reset and invert signals properly.

Full Circuit Diagram

HOW THIS THING WORKS, STEP-BY-STEP:

(1) Power Supply Side

  • The top side of the circuit says “+12V to +100V DC” — this means input can be any voltage from 12V to 100V.
  • That high voltage passes through a 10k, 1 watt resistor, then to the Zener diode (12V).
  • The Zener clamps the voltage to exactly 12V, and the MJE340 transistor supplies regulated 12V to all ICs.

So no matter what voltage we feed (12V to 100V), the circuit ICs will only see 12V. Nice trick!

(2) 555 Timer Section

  • The 555 is in astable mode means it keeps oscillating on its own, making square waves.
  • The frequency is set by R1, R2, and C, this tells how fast the 3-phase signal rotates.
  • Pin 3 of the 555 outputs these pulses, this goes into the clock pin of CD4035A.
  • That pulse pushes the shift register forward each time, like "step forward" on each beat.

(3) CD4035 Shift Register Section

Now the magic happens here…

  • CD4035 is a 4-bit shift register so each clock pulse pushes the logic “1” from Q1 → Q2 → Q3 → Q4 → repeat.
  • But here only Q1, Q2, Q3 are used as outputs. These are taken as:
  • Q1 = phase#1
  • Q2 = phase#2 (inverted by N2 for better phase shift)
  • Q3 = phase#3

Each of these are 120° apart from each other (as long as we consider each clock pulse = 120°).

  • N1 is used for reset logic or pulse shaping (basic inverter from IC 4049).
  • N2 inverts the second output so that the phase shift looks cleaner so Q1, !Q2, Q3 → gives better symmetry.

OUTPUT WAVEFORMS:

  • All outputs are square waves.
  • Frequency is same but each is delayed from the other by 120°.
  • You get a digital-style 3-phase signal...

IMPORTANT POINTS:

  • N1 and N2 are NOT gates, from IC 4049.
  • You must pulse the SER input (pin 10) once at start (logic HIGH) or just connect it HIGH permanently.
  • If nothing appears at output then check:
  • 555 oscillation.
  • Reset pin of CD4035 (must be LOW).
  • Proper pull-ups on output lines.

The 3-Phase Full-Bridge Driver Stage

In the following 3 phase inverter diagram, remember the HIN, LIN pinouts must be fed with alternating pulses, which can be done using NOT gates from the IC 4049, or simply using a BJT BC547 stage.

3-Phase Full-Bridge Driver Stage circuit diagram

In the above 3 phase generator circuit (second last diagram) using a sine wave doesn't make sense because the 4049 would ultimately convert it into square waves, and moreover the driver ICs in the last design employ digital ICs which will not respond to sine waves.

Therefore a better idea is to use a 3 phase square wave signal generator for feeding the last driver stage.

You may refer the article which explains how to make a 3 phase solar inverter circuit for understanding the 3 phase signal generator stage functioning and implementation details.

Using IC IR2103

A relatively simpler version of the above 3 phase inverter circuit can be studied below, using the IC IR2103 half bridge driver ICS. This version lacks the shut down feature, therefore if you do not wish to incorporate the shut down feature, you can try the following simpler design.
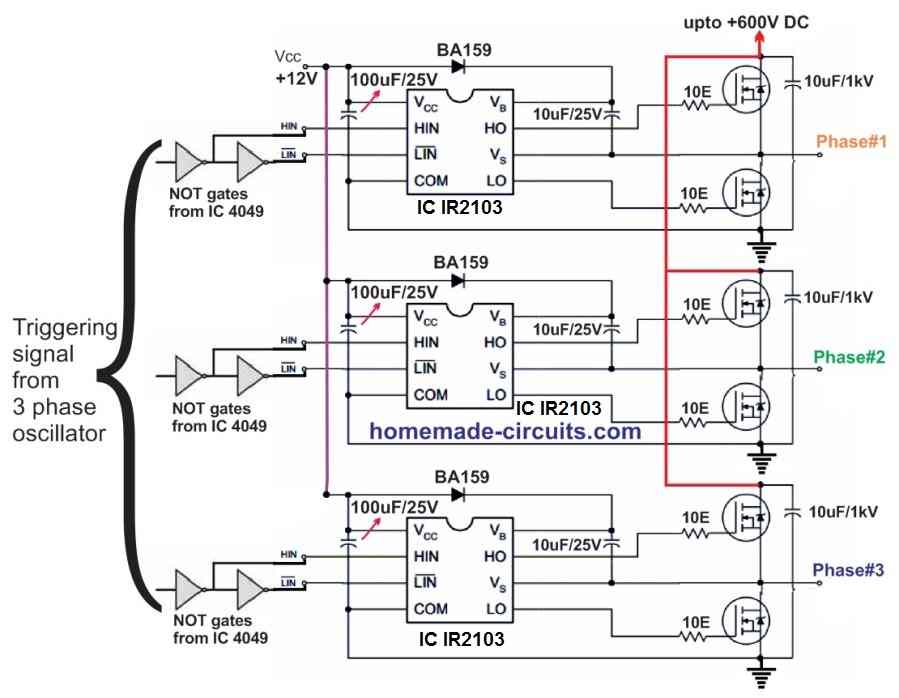
3 phase inverter circuit diagram circuit using IC IR2103

Simplifying the Above Designs

In the above explained 3-phase inverter circuit, the 3-phase generator stage looks unnecessarily complex, and therefore I decided to look for an alternative easier option for replacing this specific section.

After some searching I found the following interesting 3 phase generator circuit which looks pretty easy and and straightforward with its settings.
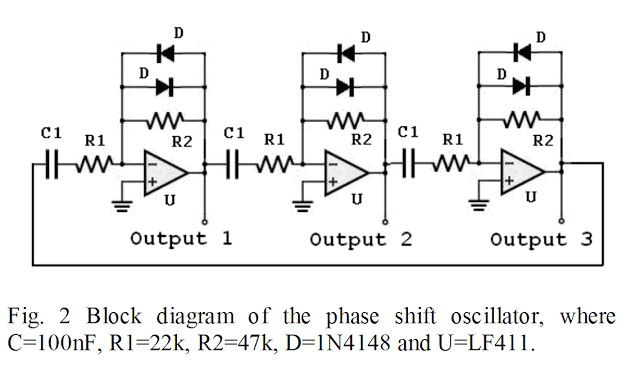
opamp 120 degree phase shift 3 phase generator circuit diagram

Therefore now you can simply replace the earlier explained IC 4047 and the opamp section entirely and integrate this design with HIN, LIN inputs f the 3 phase driver circuit.

But remember you will have to still use the N1----N6 gates between this new circuit and the full bridge driver circuit.

Making a Solar 3 Phase Inverter Circuit

So far we have learned how to make a basic 3 phase inverter circuit, now we'll see how a solar inverter with a 3 phase output can be built using very ordinary ICs and passive components.

The concept is basically the same, I have just changed the 3 phase generator stage for the application.

Inverter Basic Requirement

For acquiring a 3 phase AC output from any single phase or a DC source we would require three fundamental circuit stages:

  1. A 3 phase generator or processor circuit
  2. A 3 phase driver power stage circuit.
  3. A boost converter circuit
  4. Solar Panel (appropriately Rated)

To learn how to match a solar panel with battery and inverter, you can read the following tutorial:

Calculate solar Panels for Inverters


One good example may be studied in this article which explains a simple 3 phase inverter circuit

In the present design we too incorporate these three basic stages, let's first learn regarding the 3 phase generator processor circuit from the following discussion:
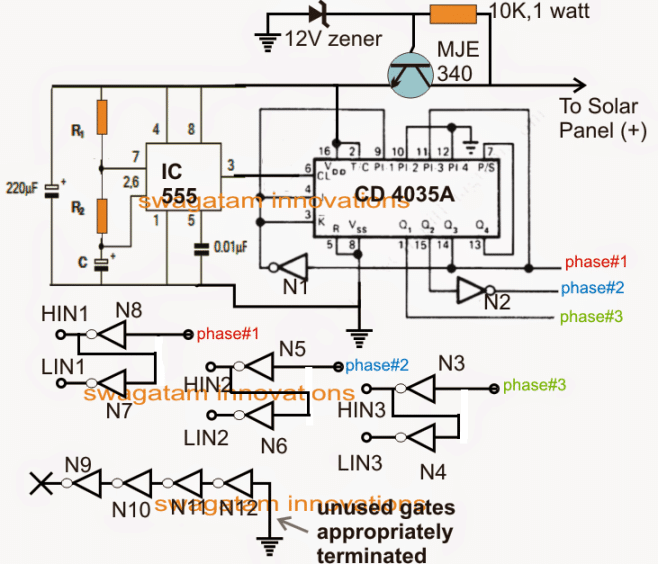
CD 4035 based 3 phase converter oscillator circuit diagram

How it Works

The diagram above shows the basic processor circuit which looks complex but actually it's not. The circuit is made up of three sections, the IC 555 which determines the 3 phase frequency (50 Hz or 60 Hz), the IC 4035 which splits the frequency into the required 3 phases separated by a phase angle of 120 degrees.

R1, R2 and C must be appropriately selected for acquiring a 50 Hz or 60 Hz frequency at 50% duty cycle.

8 numbers NOT gates from N3 to N8 can be seen incorporated simply for splitting the generated three phases into pairs of high and low logic outputs.

These NOT gates may be acquired from two 4049 ICs.

These pairs of high and low outputs across the shown NOT gates become essential for feeding our next 3 phase driver power stage.

The following explanation details the solar 3 phase power mosfet driver circuit
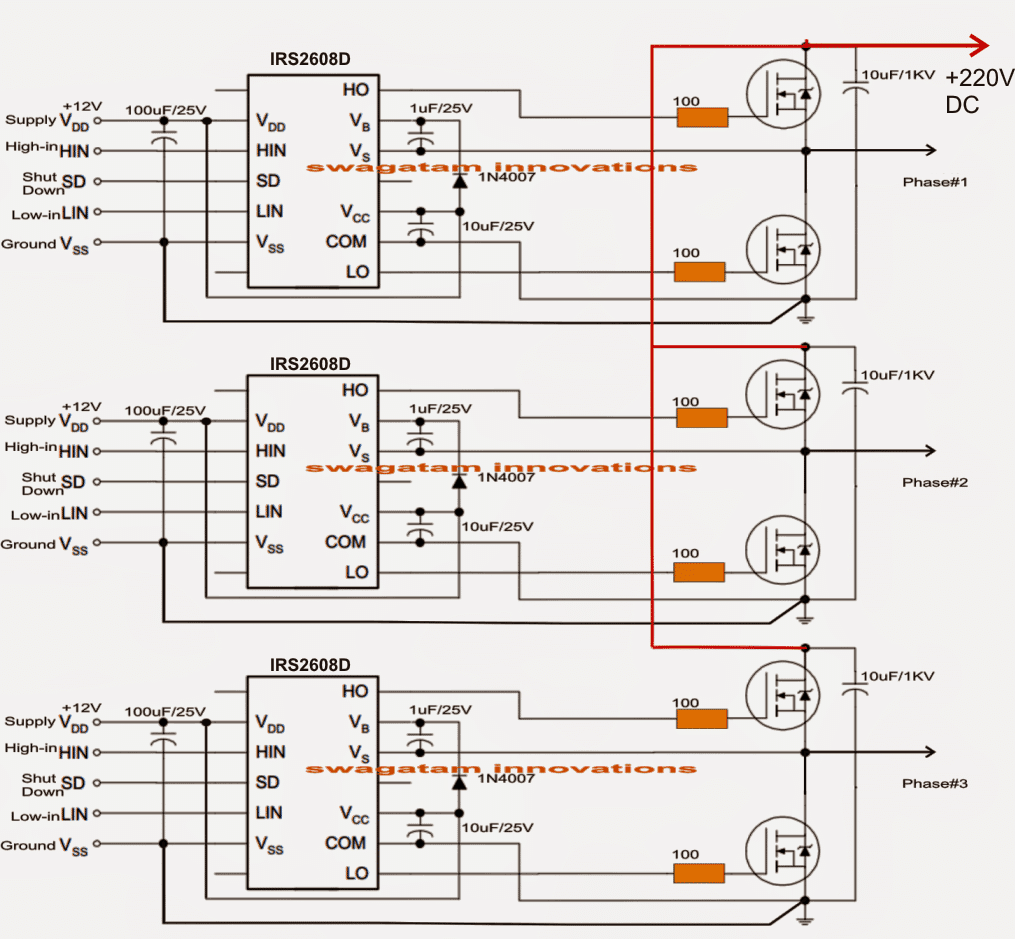
solar 3 phase inverter circuit diagram

Note: The shut down pin must be connected to the ground line if not used, otherwise the circuit will not work

As may be seen in the above figure, this section is built across 3 separate half bridge driver ICs using IRS2608 which are specialized for driving high side and low side mosfet pairs.

The configuration looks quite straightforward, thanks to this highly sophisticated driver IC from International rectifier.

Each IC stage has its own HIN (high In) and LIN (low In) input pins and also their respective supply Vcc/ground pins.

All the Vcc are required to be joined together and connected with the 12V supply line of the first circuit (pin4/8 of IC555), so that all the circuit stages become accessible to the 12V supply derived from the solar panel.

Similarly all the ground pins and lines must be made into a common rail.

The HIN and LIN should be joined with the outputs generated from the NOT gates as specified in the second diagram.

The above arrangement takes care of the 3 phase processing and amplification, however since the 3 phase output should be at the mains level and a solar panel could be rated at a maximum of 60V, we must have an arrangement that would enable boosting this low 60 volts solar panel to the required 220V or 120V level.

Using IC 555 Based Flyback Buck/Boost Converter

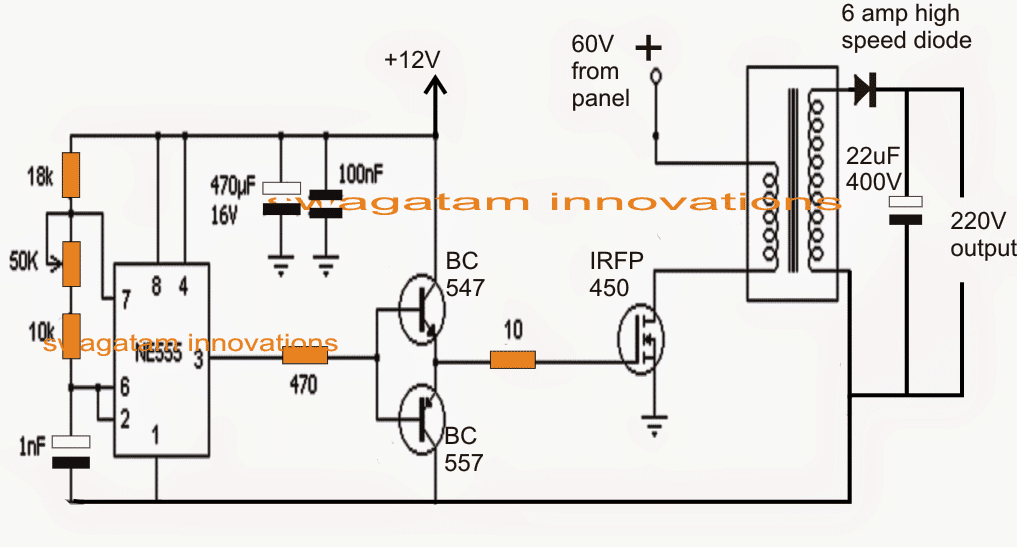
This can be easily implemented through a simple 555 IC based boost converter circuit as may be studied below:
flyback boost converter for solar 3 phase inverter circuit diagram

Again, the shown configuration of the 60V to 220V boost converter looks not so difficult, and can be constructed using very ordinary components.

The IC 555 is configured as an astable with a frequency of approximately 20 to 50 kHz. This frequency is fed to the gate of a switching mosfet via a push pull BJT stage.

The heart of the boost circuit is formed with the help of a compact ferrite core transformer which receives the driving frequency from the mosfet and converter the 60V input into the required 220V output.

This 220V DC is finally attached with the previously explained mosfet driver stage across the drains of the 3 phase mosfets for achieving the 220V 3 phase output.

The boost converter transformer can be built on any suitable EE core/bobbin assembly using 1mm 50 turns primary (two 0.5mm bifilar magnet wire in parallel), and secondary using o.5 mm magnet wire with 200 turns

You'll also like:

  • no2Bload2Bcut2BoffNo Load Detector and Cut-off Circuit for Inverters
  • Automatic Inverter Fan Switch ON while Charging and Inverting Modes
  • 1500 watt inverter1500 watt PWM Sinewave Inverter Circuit
  • 3 Phase Brushless (BLDC) Motor Driver Circuit

Filed Under: Grid and 3-Phase, Inverter Circuits Tagged With: Inverter, Phase, Simple

About Swagatam

I am an electronics engineer and doing practical hands-on work from more than 15 years now. Building real circuits, testing them and also making PCB layouts by myself. I really love doing all these things like inventing something new, designing electronics and also helping other people like hobby guys who want to make their own cool circuits at home.

And that is the main reason why I started this website homemade-circuits.com, to share different types of circuit ideas..

If you are having any kind of doubt or question related to circuits then just write down your question in the comment box below, I am like always checking, so I guarantee I will reply you for sure!


Previous Post: « 12V, 24V, 1 Amp MOSFET SMPS Circuit
Next Post: Simple FM Radio Circuit Using a Single Transistor »

Reader Interactions

Questions & Answers

Total Posts: 259
Newest Oldest
Igor Konovalov
April 26, 2026 • 4 months ago #205857

Hi Swagatam,

thank you for your nice article. There is a small mistake at IR2103 buffers, their inputs Hin amd Lin should be simply connected together, because Lin is already inverted in the IC. I am going to try your solution to drive the motor of a turbomolecular pump.

Reply
SwagatamAdmin
April 26, 2026 • 4 months ago #205872

Hey Igor, thanks, but no you cannot connect the HIN, LIN together…although LIN has internal inversion logic, HIN and LIN should not be directly tied together. Proper complementary signals must be externally generated to ensure safe switching and to avoid shoot-through in the MOSFETs. Sure, you can try it, let me know if you face any issues…

Reply
Igor Konovalov
July 9, 2026 • 1 month ago #209600

Hi Swagatam,

I tested your circuit with 4035 + IR2103 and HIN, LIN tied together and it works perfectly. My turbopump revvs up to 61000 rpm with this circuit. Although the mistake had to be corrected, I found your schematic very helpful, thank you!

Igor.

Reply
SwagatamAdmin
July 9, 2026 • 1 month ago #209616

You are most welcome Igor, I am glad your circuit is working and you found the above article helpful, please keep up the good work…

Reply
Igor Konovalov
April 27, 2026 • 4 months ago #205940

Look at Fig. 1 in the datasheet, if the signals _LIN_ and HIN are tied together, then only one output transistor is open at any time. If the inputs are drived alternatively to each other, the output transistors remain boch closed (protective feature).

Reply
SwagatamAdmin
April 27, 2026 • 4 months ago #205962

Please see this internal block diagram:
IR2103 functional block diagram

Reply
Kadir
January 30, 2026 • 7 months ago #199888

What dampens the energy at the +and-igbt common ends

Reply
Mircea Sarbu
October 7, 2025 • 10 months ago #187764

Yes, in pin 6, the duty cycle can be changed, but the three phases do not have a sinusoidal signal. I asked if a signal with a frequency of 5-10khz can be applied to the outputs of the three phases before the igbt drivers.

Reply
SwagatamAdmin
October 8, 2025 • 10 months ago #187864

To get sine wave output, you can consider chopping the low side devices with SPWM, as explained in the following article:
https://www.homemade-circuits.com/convert-any-h-bridge-inverter-to-sine-wave-h-bridge-inverter/

Reply
Mircea Sarbu
October 6, 2025 • 10 months ago #187689

Hello, can you please tell me if a PWM signal can be applied to the CD4035 inverter to have a sinusoidal output signal similar to the single-phase PWM circuit? Thank you.

Reply
SwagatamAdmin
October 7, 2025 • 10 months ago #187716

The duty cycle of the PWM can be varied at its pin#6…

Reply
Onur
July 22, 2025 • 1 year ago #184687

Hello, I want to make an invertor to drive 380 V, 10 KW motor. Can you help me abouth it? Thank you so much.

Reply
SwagatamAdmin
July 22, 2025 • 1 year ago #184692

Please provide the full specifications of your requirement, i will try to help!

Reply
Onur
July 24, 2025 • 1 year ago #184743

I want to 10 KW DC/AC inverter. It has 96 V DC input, 380 V Ac output. This will works to drive 10 KW AC motor with 96 V Batary. And also I will use motor driver. So this conver dosn’t need to control motor speed or direction. Just it should be 96 V DC to 380 V AC 10KW inverter. Thank you for help

Reply
SwagatamAdmin
July 24, 2025 • 1 year ago #184748

Let me figure out the circuit, I will let you know soon.

Reply
Angel DG
March 24, 2025 • 1 year ago #170205

Hello, this last three-phase generator circuit needs a +/- source or a simple source, and if the frequency can be varied

Reply
SwagatamAdmin
March 24, 2025 • 1 year ago #170242

Hi, A single supply should also work according to me, dual supply may not be required..

Reply
Deepak Agrawal
September 28, 2024 • 2 years ago #161927

sIR,

CAN WE VARY THE FREQUENCY OF THIS OSCILLATOR FROM 0 TO 50HZ AND THIS CIRCUIT BE USED AS A
AC DRIVE TO DRIVE 3 PHASE 440V MOTORS?

Reply
SwagatamAdmin
September 28, 2024 • 2 years ago #161932

Deepak,
Varying the frequency will not vary the motor speed, to vary the motor speed you must vary the PWM at the input side of the NOT gates.

Reply
Vijay mohan
February 19, 2024 • 2 years ago #149290

sir, you have explained the inverter circuits in a simple easy to understand manner. My sincere appreciations to you. My question is , to run a 10 KW, 210 volts, 3 phase PMAC motor of electric car, what would be the open circuit voltage of the battery power pack .
further, instead of MOSFET, can I use IGBT transistors.

Reply
SwagatamAdmin
February 19, 2024 • 2 years ago #149296

Thank you Vijay, glad you found the post helpful.
For a 210AC motor the DC bus voltage for the 3 phase inverter will be exactly the same, that is 210V. Yes, MOSFETS can be replaced with IGBTs.

Reply
Anton Koch
March 12, 2024 • 2 years ago #150141

Good day

Thank you for your update on the input to the IC4049 side. This seems simpler. I can however not see where to connect the source voltage to the updated circuit and what the source should be. I am referring to the section “simplifying the above designs” could you perhaps indicate the source on the same sketch ?

Kind Regards
Anton Koch

Reply
SwagatamAdmin
March 13, 2024 • 2 years ago #150166

Hi, The inputs of the NOT gates must be connected to the oscillator circuit which produces the 3 phase signals.

For example in the following circuit, the output 1, output2, output3 will go to the inputs of the NOTs gates sequentially.

oscillator

Reply
Anton Koch
March 13, 2024 • 2 years ago #150178

No problem that part is clear. My question is with regard to the voltage source for the oscillator. I would like to know where to connect the source voltage for the oscillator circuit I understand the output and the working of the circuit just need clarity on the input power side.

Reply
SwagatamAdmin
March 13, 2024 • 2 years ago #150181

The 12V DC will go to the power supply inputs of the oscillator circuit and the H-bridge driver IC. The power supply connections for the opamps will depend on which opamp you have selected. For example, for the IC LM324 the supply will be across pin11(-) and pin4(+)

For the power supply you can use a capacitive 12V power supply or a smps 12V adapter.

Reply
Verma Rahul
November 23, 2023 • 3 years ago #147312

it’s working in inverter 3 phase refrigerator compressor operate.???

Reply
SwagatamAdmin
November 23, 2023 • 3 years ago #147313

Since it is a square wave design it might not be suitable for compressors.

Reply
Blimkpitz
August 11, 2023 • 3 years ago #144652

Hi thanks for the post. What is the use of HV capacitors? What would happen if I omit them?

Reply
SwagatamAdmin
August 11, 2023 • 3 years ago #144657

The HV capacitors are for controlling the switching high voltage spikes and protect the MOSFETs.

Reply
Blimkpitz
August 19, 2023 • 3 years ago #144796

Thanks

Reply
Vijay Sonawane
July 13, 2023 • 3 years ago #144074

Hello Swagatam,
Wht is the output rating of the circuit. I want to use it for driving a 220 V, 60 w 3 phase brushless motor. May I know if the fuse or other safety device for protection is required.
Thanks.
Vijay Sonawane

Reply
SwagatamAdmin
July 14, 2023 • 3 years ago #144083

Hello Vijay,
The output power will depend on the specifications of the MOSFETs. The MOSFET rating can be selected in accordance with the power of the load. You can add a fuse in series with your output load.

Reply
MS Dhingra
July 11, 2023 • 3 years ago #144016

Well explained article.
With the availability of so many advanced ICs, can’t it be made around a single IC signal generator and control circuit and another single IC for MOSFET. In short every thing built around just two chips.

Reply
SwagatamAdmin
July 11, 2023 • 3 years ago #144019

Thank you very much. So far I haven’t come across any 3 phase driver IC having a built-in 3 phase generator. If you have any ideas please do let us know about it.

Reply
Richard Jombo
July 4, 2023 • 3 years ago #143900

Dear Swagatam
Instead of the 4047, can I use the 50 hz 555 oscillator to directly drive the lm324 thee phase generator?

Reply
SwagatamAdmin
July 4, 2023 • 3 years ago #143902

Hi Richard,
You can use 555 oscillator but the NPN/PNP transistors will be still required.

Reply
rrr
June 4, 2023 • 3 years ago #143184

Maybe it’s possible to make sine inverter using IRS20957 (used in audio amplifier, class D)

Reply
Sanika
April 18, 2023 • 3 years ago #141879

Hi Sir, I am constantly studying your projects, I like them. They are explained in a simple and easy way. I don’t have that much experience but I have learned a lot from reading your articles, thank you for that. I want to make VFD to drive 3 phsae motor from single phase 230 VAC for 5Hp three phase motor in our farm. So which of your projects should be referred to? I would be very grateful if you could help me with this. – Sanika

Reply
SwagatamAdmin
April 18, 2023 • 3 years ago #141885

Thank you Sanika, I am Glad you found my posts helpful.
However, presently i do not have a properly tested 3 phase VFD circuit with me, so it is not possible for me to solve your problem.
In near future, if I happen to get this circuit I will surely inform you about it.

Reply
Sanika
April 23, 2023 • 3 years ago #141982

Good Morning sir,
I studied below mentioned circuit.In that I have confusion about 10uf/1kv capacitor. Please it would be good if you could explain to me and what kind of it? Polarised or non-polarise?
Have a good day .
thank you Sir.
3 phase inverter with parts

Reply
SwagatamAdmin
April 23, 2023 • 3 years ago #141986

Hello Sanika,
I would recommend using a non-polar capacitor, which would work better than a polarized one.

Reply
Sanika
April 23, 2023 • 3 years ago #141990

Sorry Sir to distrub you again,
Please which capacitor ( 10uf/1kv product name just like 104/105) available in market? I searched a lot of but I confused to select.I want check all material availablity in market and after that I will be going to make it so please help for the same issue.
Awaiting for your positive response.
Thanking you Sir.

Reply
SwagatamAdmin
April 23, 2023 • 3 years ago #141993

No problem Sanika!
If you are having difficulty in getting a single 10uF/1kV capacitor, you can try 10nos of 1uF/1KV in parallel, or 5nos or 2uF/1KV in parallel.

Reply
Sanika
April 24, 2023 • 3 years ago #142000

R/Sir,
I have 10uf / 500v capacitor, so how can do? Please suggest me.

Reply
SwagatamAdmin
April 24, 2023 • 3 years ago #142004

OK, in that case you will need 4 of these capacitors. Make two series connections each having 2nos of 10uF/500V capacitors then connect these two series strings in parallel.

Reply
RAHERISOA Nilaina Onja Solange
April 2, 2023 • 3 years ago #141561

Est ce que ce circuit correspond pour le variateur de vitesse moteur asynchrone triphasé

Reply
SwagatamAdmin
April 3, 2023 • 3 years ago #141565

Any 3 phase motor should work with this inverter.

Reply
Shubham Patil
February 13, 2023 • 4 years ago #140185

Hey swagatam, I just wanted to ask whether the address mentioned on JustDial is still available or you it has been changed? We were actually planning to visit you.

Reply
SwagatamAdmin
February 13, 2023 • 4 years ago #140190

Hello Shubham,
I have moved to Mira Road now. If you have any circuit related questions you can feel free to ask me here, I will be most happy to help you.

Reply
Shubham Patil
February 13, 2023 • 4 years ago #140194

Ohkayy can you please share your contact no. on my email because we are eagerly planning to meet you.

Reply
SwagatamAdmin
February 13, 2023 • 4 years ago #140197

I am sorry Shubham, meeting personally may not be possible for me, I prefer discussing through comment conversation only….I hope you will not mind it.

Reply
Shubham Patil
February 13, 2023 • 4 years ago #140198

Sir we are almost in bhayandar… you are probably our last hopee… pls don’t let us down. We are hoping for a positive response from your end. Or pls send us simple 3 phase inverter circuit diagram Input -12V dc and output – 230V AC each phase and only lamp load max 60W load

Reply
SwagatamAdmin
February 13, 2023 • 4 years ago #140199

Hello Shubham,
There’s no simple circuit for a 3 phase inverter.
You will have to to build the one which is given in the above article, taken from the datasheet of the IC.
First you will have to try the following circuit and check with an oscilloscope whether it produces 12 V 3 phase signals or not:
oscillator
Once the above circuit is verified, then you can integrate the 3 phase signal to the input side of the following circuit:
3 phase inverter circuit

If you find the above concept difficult then you can try the following concept instead:
electronics-project-hub.com/three-phase-inverter-circuit-diagram/

Reply
kaif Shaikh
February 13, 2023 • 4 years ago #140193

sir can you please mail us the address my mail id is [email protected]

Reply
SwagatamAdmin
February 13, 2023 • 4 years ago #140196

I am sorry Kaif, meeting personally may not be possible because then I may have to meet with many other visitors also, which can be difficult for me.

Reply
kaif Shaikh
February 12, 2023 • 4 years ago #140179

can i visit your shop in mira bhayander and please share some contact details i am coming all the way from thane, i need a circuit diagram of 3 phase solar inverter (12 V input)(230 v output in each phase).

Reply
SwagatamAdmin
February 13, 2023 • 4 years ago #140187

The circuit diagram is already given in the above article. You can see the circuit diagram just below the heading “Using IC IR2103”
However the problem is that this project is recommended for those who are expert in electronic concepts…it is not recommended for newcomers.

Reply
Kaif Shaikh
February 12, 2023 • 4 years ago #140174

Sir, i have to make a 3 phase solar inverter and i am facing difficulties in that and since i am a final year student i have a deadline to get it completed by end of february can you please help me with making a circuit for 3 phase solar inverter

Reply
SwagatamAdmin
February 12, 2023 • 4 years ago #140176

Hello Kaif,
3 phase inverter is not an easy project to build. It will require a thorough knowledge of electronics for completing the project successfully.
I would recommend to first try the concept explained in the above article, under the heading “Using IC IR2103”.
If you are able to complete this circuit successfully, then you can replace the mosfet +600V supply with a supply from a solar panel DC.

Reply
zoomer
January 24, 2023 • 4 years ago #139415

Hi Swagatam
Many thanks for all the interesting stuff on your site as its very helpful for a learner like me. As per an earlier request, I need a circuit to produce 115v 3 phase 400Hz to power a military artificial horizon using a 12v dc supply. I plan to use the 4047 based oscillator circuit feeding the LM324 and IC4049 based 3 phase generator circuit. The HIN and LIM will then be fed into the IR2103 based full bridge driver stage.
What value of R1,P1 and C1 in the oscillator do I require for 400Hz?
What is a shutdown mode and do I need it?
Do I need to feed 115v dc to the Mosfet drain?
Would it be better to use a 24v dc supply and if so what changes to the circuit would be required?
Many thanks

Reply
SwagatamAdmin
January 25, 2023 • 4 years ago #139449

Thank you zoomer, I would recommend you to try the following circuit for the oscillator, since it looks easier and hassle free:
oscillator
But test it separately to see whether it generates the required 3 phase signal or not?
I am not sure about the part values for 400 Hz, you may have to set the values using a frequency meter.
MOSFET drain can handle any DC depending upon its drain/source voltage rating.
12V is the recommended voltage for the ICs.

Reply
zoomer
January 25, 2023 • 4 years ago #139461

Thank you for the reply. With regard to the alternative oscillator circuit. It does not have any power input and 3 outputs so how does it connect to the 3 phase generator circuit?

Reply
SwagatamAdmin
January 25, 2023 • 4 years ago #139463

The following 3 phase circuit already has 4049 gates at the HIN, LIN inputs which will do the required conversions. Power input must be connected to the respective supply pins of the op amp.
3 phase inverter circuit

Reply
zoomer
January 25, 2023 • 4 years ago #139464

Ok so I think I understand. This circuit replaces the need for the oscillator circuit and connects directly to the driver stage. How is the 400Hz frequency set?

Reply
SwagatamAdmin
January 25, 2023 • 4 years ago #139473

Yes that’s right. I think C1, and R1 can be adjusted appropriately to get the desired frequency at the output:
oscillator

Reply
john w
October 8, 2022 • 4 years ago #133844

the flyback buck/boost converter would usually have a snubber network across the transformer primary to absorb transients.

Reply
Joe Hovel
August 20, 2022 • 4 years ago #132510

Hi Swagatam.
Thank you very much for the detailed explanations of the 3-phase inverter designs shown here.
I was hoping to make enough sense out of this article to make an inverter for my specific need:
I need 115V 400Hz 3-phase with just some 200 – 400mA output. It would ideally have an input of 12VDC and be small. It is is to drive a vintage artificial horizon instrument out of a WW2 aircraft. It has 3 low power gyroscopes in it that require this voltage and frequency. It is for demonstration purposes, NOT for use in an aircraft. 🙂
Kind Regards,
Joe Hovel, Australia

Reply
SwagatamAdmin
August 20, 2022 • 4 years ago #132521

Thank you Joe,
It is possible to get 115V, 400 mA 3-phase AC from the shown designs. You can try the IC IR2103 based design which appears to be a good option. However for getting 115V you will need to supply 115 DC across the drains of the mosfets. If you are intending to get the 115V from 12V then you will have to first boost the 12V to 115V through a boost converter circuit and then feed it across the mosfet drains.

Reply
adetunji
August 15, 2022 • 4 years ago #132366

like it this idear l like learn form you but if are going teach me very well

Reply
Ore
August 11, 2022 • 4 years ago #132221

I want to achieve a 3 standard phase output(415v ) from 12v batteries. I understand how to go about this up until the mosfet drver where you fed in 330V dc into the mosfet .
How will i get my desired out voltage(not for motor control) using your mosfet driver configuration

Reply
SwagatamAdmin
August 11, 2022 • 4 years ago #132227

You will get the 3 phase voltages across the 3 wires that are connected to the motor. If you feed 330V Dc to the mosfet drains, then the output wires from the mosfets will produce 330V AC 3 phase square wave.

Reply
Souradeep Mitra
January 6, 2023 • 4 years ago #138646

Hi
there is a little difference in opinion. to obtain 220vac line to line you will need 311VDC bus & for 415V ac line to line you will need 650VDC bus.

Reply
SwagatamAdmin
January 6, 2023 • 4 years ago #138652

Hi, the output AC from the bridge is a square wave not a sine wave, so its value will be equal to the DC input, according to me.

Reply
Abhishek Rathore
August 11, 2022 • 4 years ago #132197

4049ic connect

Reply
Nico
May 9, 2022 • 4 years ago #120434

Hi Very interesting the 3 ph circuit .
I am thinking about driving a std 220v refrigeration compressor with this type of circuit .

Your thoughts on this application ?

Regards
Nico

Reply
SwagatamAdmin
May 9, 2022 • 4 years ago #120441

Hi, thank you and glad you liked the post. I think fridge compressor require sine wave AC, so unless the above 3 phase inverter is converted to sine wave it can be unsafe to use.

Reply
Bibek Bhandari
December 31, 2021 • 5 years ago #108813

i am confusing in pwm generator circuit where r1,p1,c1 what is the value of it
and 3 phase signal generator circuit where c1 =?
mosfet driver circuit what is the watt of 100ohm resister and which mosfet
and what is the value of ah battaery
can i use irf540 mosfet in this circuit and is it right one mosfet is n channel and another is p channel
plz help me this is my final year project

Reply
SwagatamAdmin
December 31, 2021 • 5 years ago #108825

The formula is
f = 1/4.4RC

R = P1 + R1 and these should be in ohms.
C will be in farads

100 ohm is 1/4 watt
battery Ah and voltage will depend on the required inverter power output.

All mosfets are N channel, and its rating will again depend on the desired inverter power output

Reply
Darpan Ghodasara
May 26, 2021 • 5 years ago #90556

Dear

I want complete one image file Simple Stable Regular Use Working Circuit Design for convert single phase 230v 50Hz Ac Supply to Three phase Phase to Phase Like R-Y, Y-B, B-R 415v AC 50Hz Supply With Load 1-AMP to 5AMP 3 Phase .

Thanks & Regards
Darpan Ghodasara
+919824549849

Reply
SwagatamAdmin
May 26, 2021 • 5 years ago #90563

Hi Darpan, I don’t have this circuit with me at the moment, if I happen to get it, will inform you about the same…

Reply
Hamdi
December 29, 2020 • 6 years ago #85701

Hi, thanks for your sharing. I think if we use ir2104 instead of ir2103 and 4049 will not be needed. Thank you in advance for your reply.

Reply
SwagatamAdmin
December 29, 2020 • 6 years ago #85704

Hi, yes for IR2104, the 3 phase inputs can be directly configured with the IN pinout of the IC

Reply
Collins MAMBWE
September 18, 2020 • 6 years ago #82386

Dear Sir,

My small 2kW genset has its inverter cooked. I have been able to convert its Delta winding low power 400V-AC 3-phase output to about 500V-DC. I need a simple steady inverter circuit to convert the 500VDC to about 230V-AC.

Would you have such a circuit?

Reply
Collins MAMBWE
September 18, 2020 • 6 years ago #82384

Dear Sir,

My BMW N52 engine coolant water pump motor has its drive circuit packed up. Its a 3-phase 12V-AC and I need simple circuit to convert 12V car battery input power to 12V-AC. What is the simplest circuit? I need to use the motor to pump water elsewhere

Reply
SwagatamAdmin
September 19, 2020 • 6 years ago #82400

Hi Collins, you can use any full bridge driver circuit using BJTs, or mosfets. Examples of full bridge diver can be seen in the following diagrams:

2 Simple Bidirectional Motor Controller Circuits Explored

Reply
Addae Michael
September 14, 2020 • 6 years ago #82255

thanks for the good work done sir.Please i want to control a 3-Phase motor with 72 volts dc.i want you to give me the componet list of the PWM using IC 4047 and also what is the number of the transister connected to ground. and if possible send me the full circuit connection of IC 4049 thanks

Reply
SwagatamAdmin
September 15, 2020 • 6 years ago #82282

Thanks Addae, you can use the IR2103 IC based design, it should be quite sufficient for driving any 3 phase motor.

Reply
Addae Michael
September 15, 2020 • 6 years ago #82288

Thanks I want you to give me the value of R1 and C1 of the PWM circuit using 4047

Reply
Shuvam das
February 3, 2020 • 7 years ago #75871

Hi
Can I use this circuit for normal 12 v dc to 3 phase ac Inverter

Reply
SwagatamAdmin
February 3, 2020 • 7 years ago #75877

You will have to first covert the 12V to 330V DC and then you can use it, or alternatively use a 3 phase 12V to 220V transformer with the MOSFETs.

Reply
Shuvam das
February 3, 2020 • 7 years ago #75869

Hi
Can you please explain that in the 3 phase drive circuit what is the mosfet you have used after IR2103 and what is that 330v dc

Reply
SwagatamAdmin
February 3, 2020 • 7 years ago #75875

Hi, You can use any MOSFET rated with VDs = 400 V and Current ID = 5 amps or as per the load specifications.
330V DC is the input voltage which will be converted to 220 V AC as the output.

Reply
Tommie Todd
January 9, 2020 • 7 years ago #74274

I truly appreciate this blog article.Much thanks again. Really Cool.

Reply
Kaleemulla
December 13, 2019 • 7 years ago #73035

Hi
I am trying to use generic Hoverboard motors on a wheel chair. Hoverboard main PCB uses its own IR sensor board as inputs. I would like to utilise a joystick for the motor operation. Can you suggest a simple method to achieve this?

Reply
SwagatamAdmin
December 13, 2019 • 7 years ago #73042

Sorry, I have no idea about joystick control…

Reply
mathieu
November 30, 2019 • 7 years ago #72603

Hi Swag,does a ir2103 can reproduce a sine wave ?
if i produce a sinewave with a pic16F can the ir2103 can transmit this sinewave for mosfetts drive?
thank you

Reply
SwagatamAdmin
November 30, 2019 • 7 years ago #72619

Hi Mathieu, if you can create a pair of complementing SPWM and feed them across HIN and LIN of the IC then it can be used for driving the MOSFeTs with a sinewave output

Reply
View Older Comments

Need Help? Please Leave a Comment! We value your input—Kindly keep it relevant to the above topic! Cancel reply

Your email address will not be published. Required fields are marked *

Primary Sidebar


Categories

  • Arduino Projects (95)
  • Audio and Amplifier Projects (134)
  • Automation Projects (18)
  • Automobile Electronics (104)
  • Battery Charger Circuits (90)
  • Datasheets and Components (109)
  • Electronics Theory (150)
  • Energy from Magnets and Earth (41)
  • Games and Sports Projects (11)
  • Grid and 3-Phase (20)
  • Health related Projects (27)
  • Home Electrical Circuits (13)
  • Indicator Circuits (16)
  • Inverter Circuits (100)
  • Lamps and Lights (163)
  • Meters and Testers (72)
  • Mini Projects (28)
  • Motor Controller (68)
  • Oscillator Circuits (30)
  • Pets and Pests (15)
  • Power Supply Circuits (91)
  • Remote Control Circuits (50)
  • Security and Alarm (65)
  • Sensors and Detectors (107)
  • SMPS and Converters (46)
  • Solar Controller Circuits (62)
  • Temperature Controllers (44)
  • Timer and Delay Relay (50)
  • Voltage Control and Protection (44)
  • Water Controller (37)
  • Wireless Circuits (31)


Circuit Simulator

circuit simulator image


Subscribe to get New Circuits in your Email


Other Links

  • Privacy Policy
  • Cookie Policy
  • Disclaimer
  • Copyright
  • Videos
  • Sitemap

People also Search

555 Circuits | 741 Circuits | LM324 Circuits | LM338 Circuits | 4017 Circuits | Ultrasonic Projects | SMPS Projects | Christmas Projects | MOSFETs | Radio Circuits | Laser Circuits | PIR Projects |


Recent Comments

  • Swagatam on Simple Delay Timer Circuits Explained
  • Swagatam on SG3525 Full Bridge Inverter Circuit
  • Swagatam on How to Replace a Transistor (BJT) with a MOSFET
  • Swagatam on Inverter Circuit with Feedback Control
  • Ngwabe David on SG3525 Full Bridge Inverter Circuit

Social Profiles

  • Twitter
  • YouTube
  • Instagram
  • Pinterest
  • My Facebook-Page
  • Stack Exchange
  • Linkedin

© 2026 · Swagatam Innovations