• Skip to main content
  • Skip to primary sidebar

Homemade Circuit Projects

Need circuit help? Post them in the comments! I've answered over 50,000!

Blog | Categories | About | Hire Me | Contact | Calculators-online
You are here: Home / Battery Charger Circuits / Simplest BJT CC, CV Battery Charger Circuit with Trickle Charging (Adjustable)

Simplest BJT CC, CV Battery Charger Circuit with Trickle Charging (Adjustable)

Last Updated on August 18, 2026 by Swagatam 2 Comments

Today I will explain to you how this simplest constant voltage and constant current battery charger circuit works. This circuit is very nice for charging battery safely without damaging it. It has two main jobs, one is limiting high current and second is stopping over voltage.

Table of Contents
  • Audio/Video Representation
  • Main Parts Used In Circuit
  • How Constant Voltage (CV) Working
  • How Constant Current (CC) Working
    • Trickle Charging And Full Charge Condition
    • Upgrading to High Current, CC, CV Battery Charger Version
    • Sources

Audio/Video Representation

Main Parts Used In Circuit
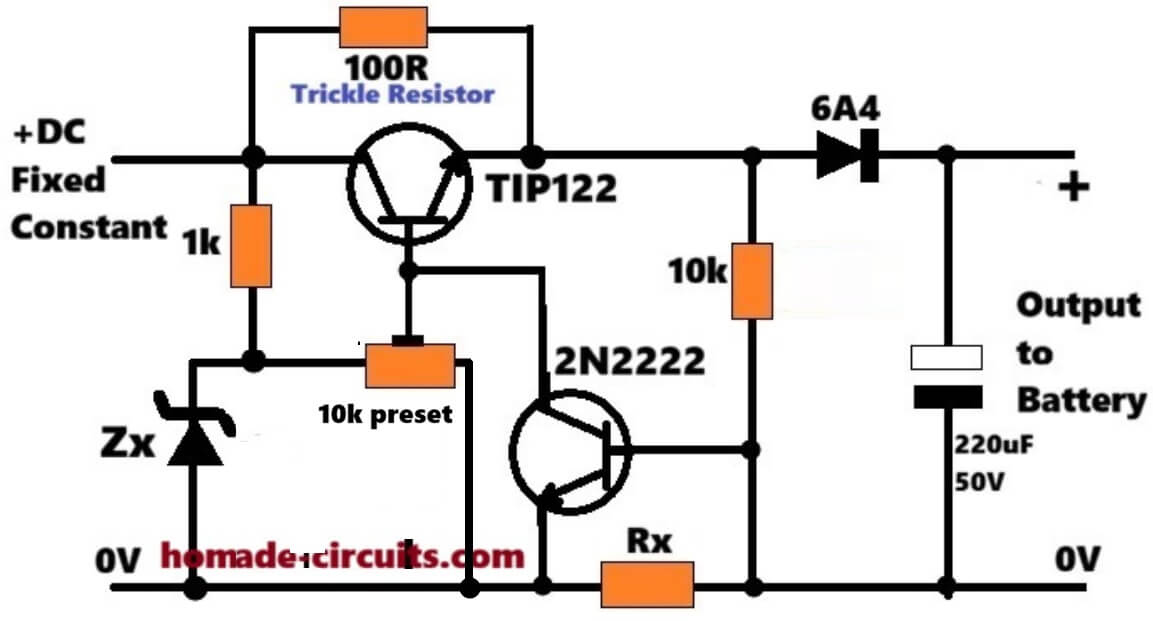
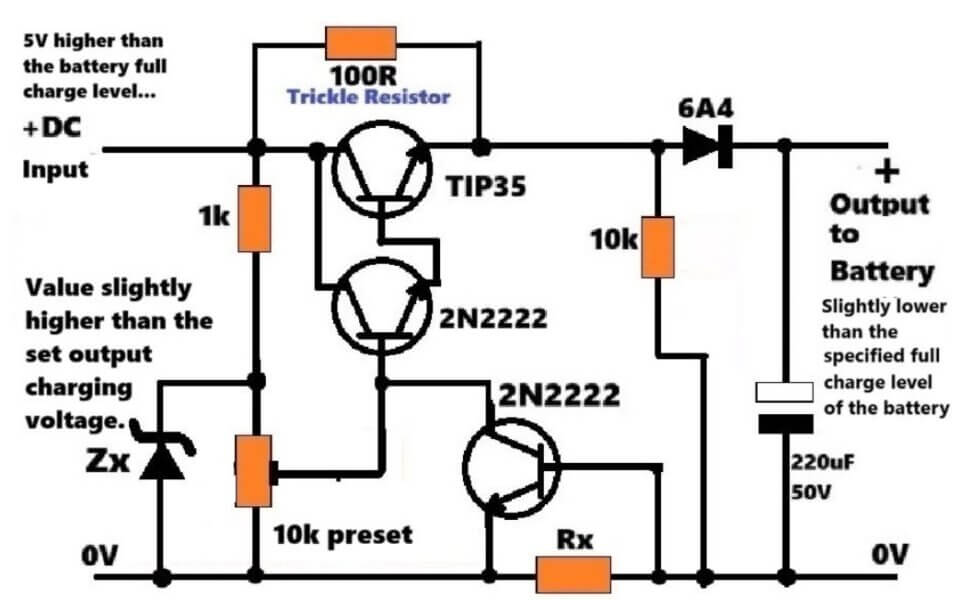
In this circuit we are using TIP122 NPN Darlington transistor as main pass element. For current sensing and limiting we are using 2N2222 transistor. For fixing maximum voltage we have Zener diode Zx and one 10k preset potentiometer.

Then we have Rx resistor for sensing current flow. There is one 100 ohm resistor given for trickle charging. One 6A4 diode is put at output side so battery current cannot flow backward into circuit when input supply is off.

Finally one 220 uF 50 volt capacitor is given for filtering.

How Constant Voltage (CV) Working

First current comes from positive DC input and goes into base of TIP122 through 1k resistor so transistor turns on.

Zener diode Zx creates fixed voltage reference point. With 10k preset potentiometer you can easily rotate and adjust exact output voltage like 13.8 volt or 14.4 volt according to your 12 volt battery requirement.

When output voltage reaches this set limit the base drive gets controlled so voltage will not increase further.

How Constant Current (CC) Working

All returning current from battery goes to ground through Rx resistor. Voltage drop happens across Rx resistor according to Ohm law. This voltage drop is directly connected to base and emitter of 2N2222 transistor.

When charging current becomes too high then voltage drop across Rx reaches around 0.65 volt. At this moment 2N2222 transistor turns on automatically. Once 2N2222 turns on it pulls down base of TIP122 transistor towards ground.

Because of this TIP122 gets less base current and limits total charging current.

Maximum current limit formula is simple Rx = 0.65 / Max current.

Trickle Charging And Full Charge Condition

When battery becomes fully charged its voltage rises up and charging current automatically reduces down. Because current becomes less the voltage across Rx drops below 0.65 volt so 2N2222 turns off completely.

Now circuit stays at set constant voltage. Even if TIP122 stops heavy conduction the 100 ohm trickle resistor keeps sending very small tiny current to battery so battery remains fully charged continuously without any overcharging problem.

Upgrading to High Current, CC, CV Battery Charger Version

The above explained simplest CC, CV battery charger with trickle charging can be upgraded to a high current version, up to 10 amps, simply by replacing the TIP122 with a Darlington pair, using TIP35 and 2N2222, as shown below...
Sources

  • sciencedirect.com
  • reddit.com
  • renesas.com

You'll also like:

  • 5 Best 6V 4Ah Automatic Battery Charger Circuits Using Relay and MOSFET
  • LIFePO4 compressedLiFePO4 Battery Charging/Discharging Specifications, Advantages Explained
  • simplestbatterychargercircuitOne Transistor Automatic Battery Charger Circuit
  • graphNi-Cd Low Battery Monitor Circuit using Lambda Diode

Filed Under: Battery Charger Circuits Tagged With: Battery, CC, Charger, CV, Simplest, Trickle

About Swagatam

I am an electronics engineer and doing practical hands-on work from more than 15 years now. Building real circuits, testing them and also making PCB layouts by myself. I really love doing all these things like inventing something new, designing electronics and also helping other people like hobby guys who want to make their own cool circuits at home.

And that is the main reason why I started this website homemade-circuits.com, to share different types of circuit ideas..

If you are having any kind of doubt or question related to circuits then just write down your question in the comment box below, I am like always checking, so I guarantee I will reply you for sure!


Previous Post: « Build this Simple Solar Egg Incubator Circuit
Next Post: The Bubble Current Machine: A way to harvest energy from gravity »

Reader Interactions

Questions & Answers

Total Posts: 2
Newest Oldest
john
August 14, 2026 • 2 weeks ago #211928

what sort of value of zenner diode is required.

Reply
SwagatamAdmin
August 14, 2026 • 2 weeks ago #211957

zener diode provides the maximum safe range for the output voltage.
For example for a 12V battery this zener diode could be selected such that the maximum output even without the preset resistor is around 14.3V. Once this is fixed, the preset can be used to fine tune this voltage further to 14V.

Reply

Need Help? Please Leave a Comment! We value your input—Kindly keep it relevant to the above topic! Cancel reply

Your email address will not be published. Required fields are marked *

Primary Sidebar


Categories

  • Arduino Projects (95)
  • Audio and Amplifier Projects (134)
  • Automation Projects (18)
  • Automobile Electronics (104)
  • Battery Charger Circuits (90)
  • Datasheets and Components (109)
  • Electronics Theory (150)
  • Energy from Magnets and Earth (41)
  • Games and Sports Projects (11)
  • Grid and 3-Phase (20)
  • Health related Projects (27)
  • Home Electrical Circuits (13)
  • Indicator Circuits (16)
  • Inverter Circuits (98)
  • Lamps and Lights (161)
  • Meters and Testers (72)
  • Mini Projects (28)
  • Motor Controller (68)
  • Oscillator Circuits (30)
  • Pets and Pests (15)
  • Power Supply Circuits (91)
  • Remote Control Circuits (50)
  • Security and Alarm (65)
  • Sensors and Detectors (107)
  • SMPS and Converters (46)
  • Solar Controller Circuits (62)
  • Temperature Controllers (44)
  • Timer and Delay Relay (50)
  • Voltage Control and Protection (44)
  • Water Controller (37)
  • Wireless Circuits (31)


Circuit Simulator

circuit simulator image


Subscribe to get New Circuits in your Email


Other Links

  • Privacy Policy
  • Cookie Policy
  • Disclaimer
  • Copyright
  • Videos
  • Sitemap

People also Search

555 Circuits | 741 Circuits | LM324 Circuits | LM338 Circuits | 4017 Circuits | Ultrasonic Projects | SMPS Projects | Christmas Projects | MOSFETs | Radio Circuits | Laser Circuits | PIR Projects |


Recent Comments

  • Swagatam on Simple Delay Timer Circuits Explained
  • Maddy on Simple Delay Timer Circuits Explained
  • Swagatam on HX710B Air Pressure Sensor Datasheet, How to Connect
  • Swagatam on Simplest One Transistor Regulated Power Supply Circuit
  • Luciano Orozco on HX710B Air Pressure Sensor Datasheet, How to Connect

Social Profiles

  • Twitter
  • YouTube
  • Instagram
  • Pinterest
  • My Facebook-Page
  • Stack Exchange
  • Linkedin

Calculators

  • ZVS Induction Heater + Tank Calculator Tool
  • Zener Diode Calculator
  • Wire Current and Thickness Calculator (Ampacity Calculator)
  • Voltage Divider Calculator
  • Transistor Base Resistor Calculator
  • Transistor Astable Multivibrator Calculator
  • TL431 Calculator
  • Solar Panel, Inverter, Battery Calculator
  • Ferrite Core Air Gap Calculator Tool
  • Parallel MOSFET Calculator Tool: How to Connect MOSFETs in Parallel Safely
  • LC Resonance Calculator for EV Battery Charger Circuits
  • LED String Series Resistor Calculator
  • Calculator to Design a High Power 3kW PFC (Power Factor Correction) Circuit
  • Passive Power Factor Correction (PFC) Calculator
  • LM567 IC Calculator Tool
  • SMPS Flyback Boost Converter Calculator
  • Shunt Resistor Calculator for Ammeters
  • SCR and Triac Gate Resistor Calculator
  • Battery Back up Time Calculator
  • Boost Converter Calculator (Non-Isolated)
  • Bootstrap Capacitor Calculator
  • Buck Converter Calculator
  • Buck-Boost Converter Calculator
  • Capacitance Reactance Calculator
  • DCM Flyback Transformer & Wire Gauge Wire Size Calculator Tool
  • Filter Capacitor Calculator
  • IC 4047 Calculator (Frequency and PWM)
  • IC 4060 Calculator
  • IC 555 Astable Calculator
  • IC 555 Monostable Calculator
  • IC SG3525, SG3524 Calculator
  • Inductance Calculator
  • Induction Heater Inductor and Resonant Frequency Calculator
  • Induction Heater Work Coil Calculator
  • Inverter LC Filter Calculator
  • LC Resonance Calculator
  • LED Current Calculator
  • LM317, LM338, LM396 Calculator
  • NAND/NOT Gate RC Values Calculator
  • NOT, NAND Gate Frequency Calculator
  • Notch Filter Calculator Tool
  • Ohm’s Law Calculator
  • Phase Angle Phase Shift Calculator
  • Power Factor (PF) Calculator
  • RC Filter Calculator
  • Reactance Calculator
  • Sine Table Calculator for SPWM Arduino Code
  • Small Signal Transistor(BJT) and Diode Quick Datasheet
  • SMPS Calculator for Toroidal Ferrite Transformers
  • SMPS Flyback Transformer Calculator – Design by Target Duty Cycle
  • TL431 Calculator

© 2026 · Swagatam Innovations