If you are wondering if there's an easy way to implement an H-bridge driver circuit without using the complex bootstrapping stage, the following idea will precisely solve your query.
In this article I have explained how to build an universal full-bridge or H-bridge MOSFET driver circuit, using P-channel and N-channel MOSFETs, which can be used for making high efficiency driver circuits for motors, inverters, and many different power converters.
The idea exclusively gets rid of the standard 4 N-channel H-bridge driver topology, which imperatively depends on the complex bootstrapping network.
Advantages and Disadvantages of Standard N-Channel Full Bridge Design
We know that full bridge MOSFET drivers are best achieved by incorporating N-channel MOSFETs for all the 4 devices in the system. The main advantage being the high degree of efficiency provided by these systems in terms of power transfer, and heat dissipation.
This is due to the fact that N-channel MOSFETs are specified with minimal RDSon resistance across their drain source terminals, ensuring minimum resistance to current, enabling smaller heat dissipation and smaller heatsinks on the devices.
However, implementing the above is not easy, since all the 4 channel devices cannot conduct and operate the central load without having a diode/capacitor bootstrapping network attached with the design.
Bootstrapping network requires some calculations, and tricky placement of the components to ensure that the systems works correctly. This appears to be the main disadvantage of a 4 channel MOSFET based H-bridge topology, that common users find difficult to configure and implement.
An Alternative Approach
An alternative approach to making an easy and universal H-bridge driver module that promises high efficiency and yet gets rid of the complex bootstrapping is by eliminating the two high side N-channel MOSFETs, and replacing them P-channel counterparts.
One may wonder, if it's so easy and effective then why is it not a standard recommended design? The answer is, although the approach looks simpler there are a few downsides which may cause lower efficiency in this type of full bridge configuration using P and N channel MOSFET combo.
Firstly, the P-channel MOSFETs usually higher RDSon resistance rating compared to N-channel MOSFETs, which may result in uneven heat dissipation on the devices and unpredictable output results. Second danger may be a shoot-through phenomenon, which can cause an instant damage to the devices.
That said, it is much easier to take care of the above two hurdles than designing a dicey bootstrapping circuit.
The two above issues can be eliminated by:
- Selecting P-channels MOSFETs with lowest RDSon specifications, which may be almost equal to the RDSon rating of the complementary N-channel devices. For example in our proposed design, you can find IRF4905 being used for the P-channel MOSFETs, which are rated with an impressively low RDSon resistance of 0.02 Ohms.
- Countering the shoot-through by adding appropriate buffer stages, and by using oscillator signal from a reliable digital source.
An Easy Universal H-Bridge MOSFET Driver
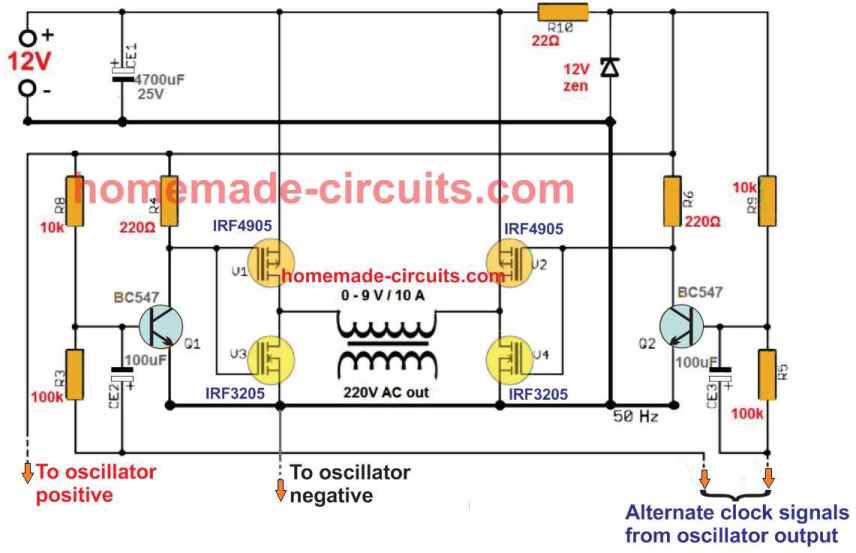
The following image shows the P-channel/N-channel based universal H-bridge MOSFET driver circuit, which seems to be designed to provide maximum efficiency with minimum risks.
How it Works
The working of the above H-bridge design is pretty much basic. The idea is best suited for inverter applications for efficiently converting a low power DC to mains level AC.
The 12V supply is acquired from any desired power source, such as from a battery or solar panel for an inverter application.
The supply is conditioned appropriately using the 4700 uF filter capacitor and through the 22 ohm current limiting resistor and a 12V zener for added stabilization.
The stabilized DC is used for powering the oscillator circuit, ensuring that its working is not affected by the switching transients from the inverter.
The alternate clock output from the oscillator are fed to the bases of the Q1, Q2 BJTs which are standard small signal BC547 transistor positioned as buffer/inverter stages for driving the main MOSFET stage with precision.
By default, the BC547 transistors are in the switched ON condition, through their respective base resistive divider potentials.
This means that the in the idle condition, without the oscillator signals, the P-channel MOSFETs are always switched ON, while the N-channel MOSFETs are always switched OFF. In this situation, the load at the center, which is a transformer primary winding gets no power and remains switched OFF.
When clock signals are fed to the indicated points, the negative signals from the clock pulses actually ground the base voltage of the BC547 transistors via the 100 uF capacitor.
This happens alternately, causing the N-channel MOSFET from one of the arms of the H-bridge to turn ON. Now, since the P-channel MOSFET on the other arm of the bridge is already switched ON, enables one P-channel MOSFET and one N-channel MOSFET across the diagonal sides to get switched ON simultaneously, causing the supply voltage to flow across these MOSFETs and the primary of the transformer in one direction.
For the second alternate clock signal, the same action repeats, but for the other diagonal arm of the bridge causing the supply to flow through the transformer primary in the other direction.
The switching pattern is exactly similar to any standard H-bridge, as depicted in the following figure:
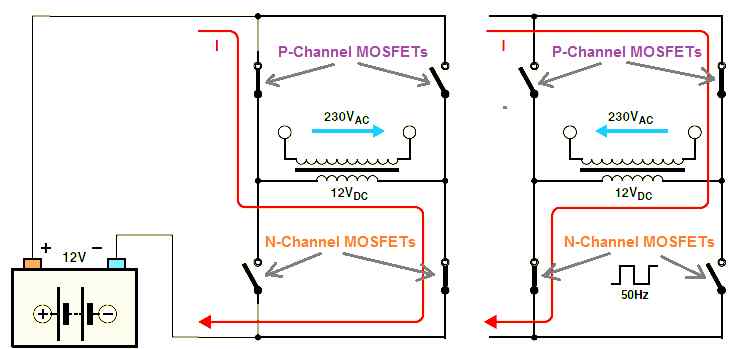
This flip-flop switching of the P and N channel MOSFETs across the left/right diagonal arms keep repeating in response to the alternate clock signal inputs from the oscillator stage.
As a result, the transformer primary is also switched in the same pattern causing a square wave AC 12V to flow across its primary, which is in correspondingly converted into 220 V or 120 V AC square wave across the secondary of the transformer.
The frequency is dependent on the frequency of the oscillator signal input which can be 50 Hz for 220 V output and 60 Hz for 120 V AC output,
Which Oscillator Circuit can be Used
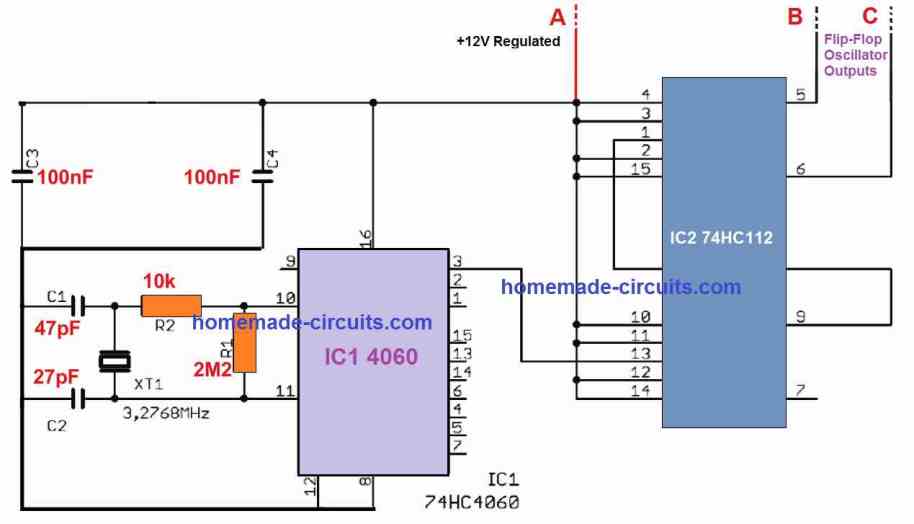
The oscillator signal can be from any digital IC based design, such as from the IC 4047, SG3525, TL494, IC 4017/555, IC 4013 etc.
Even transistorized astable circuit can be used effectively for the oscillator circuit.
The following oscillator circuit example can be ideally used with the above discussed full bridge module. The oscillator has a fixed at 50 Hz output, through a crystal transducer.


Questions & Answers
swagatam,
please I need circuit diagram of 3kva 12v h full bridge inverter that I will use at work shop
Nonison, you can try the following design. First build a smaller 100 watt version, later on you can upgrade it to 3kv, step wise
https://www.homemade-circuits.com/arduino-h-bridge-sine-wave-inverter-circuit/
hello Dr. Swagatam.
Thank you for your efforts and your answer.
This is the circuit you kindly prepared and sent to me. Now I want to add a variable current limiter from zero to 7 Amps to the circuit. The voltage should be constant at 80 Volts and it should support high power up to 5000 Watts. Please suggest a circuit.
https://ibb.co/kg6TrYhm
ibb.co/kg6TrYhm
I need a circuit for a soft start, so that the current reaches its maximum in 5 to 10 seconds. Please see if this can be done with this circuit, and please provide the values for the components. If it is not suitable, please suggest an appropriate circuit.
https://ibb.co/mCHFVfmn
ibb.co/mCHFVfmn
Hi Mazloumi, you can try the following concept, and see how it works:
https://www.homemade-circuits.com/ir2111-h-bridge-inverter-circuit-with-soft-start/
WE will add the current limit afterwards….
Dear Mr. Swagatam
This circuit has a problem with the IR2111.
The MOSFETs and drivers are burning out or failing.
I think the issue is with VB and VS.
VB must be 10 volts higher than VS. For example, if VS is 220 volts, then VB should be 230 volts.
Hello Mr Swagatam,I am a newbie to electronics and I know nothing about electronics.I want to know how to repair any kind of electronic,how to analyse circuits and how to build circuits,how can you be of help?.Are there any softcopies of textbooks or pdf’s that you can recommend to me that I can download too that would hasten my learning.Many thanks in advance sir.
Hi Tony,
The learning process can involve many months or years, where you may have to first learn the theoretical stuff, and then implement each concept practically, then check/compare and analyze the results.
First learn the functions of resistors, capacitors, inductors, and transistors. Then learn how to join these basic parts to build small working active circuit modules, and then learn how to troubleshoot them if something goes wrong.
You can start with this article:
https://www.homemade-circuits.com/basic-electronic-circuits-explained-beginners-guide-to-electronics/
You can feel free to comment under the above article…if you have any further doubts..
Dear Mazloumi,
The circuit is 100% correct and taken from the datasheet of the IC.
VB will be always higher than VS due to the presence of the bootstrapping network by the diode and the 10uF capacitor.
Please try a resistive load first for confirming the results, and also make sure to put snubbers across the drain/source of each MOSFETs.
For further questions on this topic please comment under the IR2111 article.
hello Dr.Swagatam
thank you if your reply.
How can I implement a soft-start and adjustable start without using Arduino?
Mazloumi, that may be possible only if the SPWM generation is implemented through a 555 IC circuit, then we can additionally introduce a slow ramping SPWM during power switch ON, to initiate the soft stat procedure.
Hello Dr. Swagatam.
, thank you for your feedback. The soft-start circuit I need is for thePWM in the H-Bridge to prevent inrush current during the initial moments of circuit startup. I think with the 555 IC,only the frequency can be managed (if I’m not mistaken)
Hi Mazloumi, 555 can be customized for SPWM with slow starting duty cycles, so yes 555 can be customized for a soft-start pwm.
Hello Dr.Swagatam.
Please suggest an adjustable soft-start circuit up to 10 seconds for an 80V DC,10A H-Bridge for PWM. Thank you for your attention.
Mazloumi, I can suggest a 555 based circuit?
Yes, please suggest a circuit with 555. Thank you.
Sure, you can try the following circuit:
https://www.homemade-circuits.com/wp-content/uploads/2025/09/soft-start-pwm-using-IC-555.jpg
Please make sure the low-side MOSFET gate resistor values are around 47 ohms….
I have IC 4047 in stock pls which 24v h-brigde circuit that can work with it or with ic555 and 4017.pls I want a tested circuit pls I will be grateful for quick reply
You can use any 12V flip-flop oscillator with the previously linked circuit. Make sure to connect 12V zener diodes across gate/source of the P-channel MOSFETs as suggested earlier.
I connected the circuitry bc547 to a 12v regulator 7812 and the source of the p Channel MOSFET direct to a 24v battery because the irf4905 drain/source voltage is 55v, and not surpose to heating up and burning my mosfet. Pls am confused by you saying I should add a 12v zener diode to the gate/source of all the 4 MOSFET because I used mine as yours with same mosfet number. Can you pls show me with diagram pls it is on my neck now I want to power the inverter with a 24v 200ah*2 batteries
Actually modifying the above concept for 24V is almost impossible, instead you can try the following concept:
https://www.homemade-circuits.com/wp-content/uploads/2021/02/4047-solar-transformerless-inverter-compressed.jpg
Just make sure to add a 12V zener diode across the gate/source of the upper MOOSFETs, meaning, the P-channel MOSFETs.
Cathodes will go to the sources and the anodes will go to the gates.
The +310V DC can be replaced with your +24V supply, and the 4047 oscillator can be replaced with any 12V oscillator.
Pls how can I connect this circuit to a 24v battery because when I do it will be burning my mosfet
You can use 24V supply for the MOSFET H-bridge stage by connecting 12V zener diodes across the gate/source terminals of all the 4 MOSFETs
Hello Mr. Swagatam, I would like you to see a circuit for me and give me your personal opinion, it is the circuit of a three-phase electric bicycle controller box, but I took out the single-phase diagram.This scheme would also help me to implement it as an inverter power stage, greetings
Hello Adrian, you can send to
homemadecircuits
@gmail.com
I will check it out and let you know,….
Hello sir. I would like to ask you for an assembly of a 48v to 12v DC/DC converter of 40 amps. thank you very much, and good luck
Ghoumrassi,
My name is Scott, I am trying to build an “H” bridge system for controlling an inverter motor. I am not an EE and have struggled for years trying different designs. This is a very important project and I sure could use your help. Please let me know if you are willing to help. I am sure this is a simple problem for someone skilled in this area. I respect your time and would be willing to compensate you. If you are willing then I can give you all the information on the system.
Thankyou,
Scott
Swagatam,
Thank you pointing me in the right direction. I will study it and ask question afterwards.
Scott
Swagatam,
Motor specs – “Y” configuration but can make it a Delta. I am open to a half bridge, but we seem to get a feedback that short out the mosfets on the switches or sometimes the power supply.
Thank you for your help.
Scott
Size and Poles
12” motor has 48 magnets, 36 poles, 3 – 12 pole motors with 4 to 3 ratio
7.5” motor has 24 magnets, 18 poles, 3 – 6 pole motors with 4 to 3 ratio
Wire size:
12” motor has: 0.0365” or 0.93mm Enameled Copper Wire – measured
7.5” motor has: 0.0335” or 0.85mm Enameled Copper Wire – measured
Inductance and Resistance:
12” motor has: 5.5 – 5.6 ohms and 16.76 – 16.79 mH
7.5” motor has: 4.7 – 4.8 ohms and 22.1 – 22.3 mH
Motor Spec – listed on housing
12” – 310VDC, 0.92HP, 2.8A, 1400 RPM 3F
7.5” – 310VDC, 0.87HP, 2.5A, 800 RPM 3F
Thank you Scott,
Did you try the basic 3 phase H-bridge circuit using IC IR2103, as given below?
https://www.homemade-circuits.com/wp-content/uploads/2022/08/3-phase-inverter-circuit.jpg
To ensure added protections to the MOSFETs, you can put external 1n5408 diodes across the drain/source of the MOSFETs.
Please let me know if you have any further doubts about the circuit.
Hello Scott,
I guess the question was referred to me.
I can definitely help you to build an H-bridge PWM system to control a motor.
Please let me know the specifications of the motor and/or other related details about the system.
Hello Ghoumrassi, you can try the second circuit from the following article:
https://www.homemade-circuits.com/5v-pwm-solar-battery-charger-circuit/
For 40 amp current you may have to replace Q2 with a 100 amp transistor, or add many transistors in parallel.
Swagatam,
We are using Hall Sensors to trigger the firing sequence, which work fine. We have both 3 pin and 4 pin hall sensors to work with. I’m not sure what is the best way to trigger the circuit. Can you please suggest hall sensors, encoder not sure what would work the best? The problem we seem to also find is as the rpm increases the timing of the firing circuit needs to change as well.
Thank you,
Scott
Swagatam,
Thank you for your quick replies. I really appreciate you helping.
We have speed sensors to detect the position of the magnet above the three separate circuit poles. We want to use an “H-bridge” configuration for driving this motor, which normally would be 12 total mosfets, 4 for each circuit. This configuration takes advantage of all 3 circuits. Can you help configure this design or some configuration that uses all 3 circuit as I outlined above. Please show me how to configure this.
In addition, we need a circuit for each speed sensor to vary the timing of the pulse to the each of the 3 legs of the circuit, by using the actual speed of the motor for optimum performance.
Thank you,
Scott
Swagatam,
Yes, this is a 3 phase motor. I’m very thankful for your help. I’m in the process of designing my own H-bridge and your help in sorting things out about the difficulty in what I am attempting is actually reassuring too here.
This is a challenging problem and I need to do a little more work on my end so I can phrase my questions about the circuit better and clearer.
Thank you again for your support,
Scott
No problem Scott,
All the best to you.
Thank you Scott,
Are your motors 3 phase or single phase? If they are 3 phase then 4 MOSFET H-bridge cannot be used.
I am a little confused.
Moreover, designing a circuit for each speed sensor to vary the timing of the pulse to the each of the 3 legs of the circuit can be difficult, I have no idea how to do it.
Hi Scott,
I can configure Hall effect sensors at the inputs of the 4049 IC NOT gates, however as far as the working sequence or the firing adjustments are concerned, I am not quite sure about them.
If you say, i can attach hall effect sensors at the inputs of the NOT gates in my previous circuit.
Let me know what you think about it.
Hi Swagatam
I am trying to use mosfets to power 120 v to a generator (homemade). It is fired every 1/4 of a turn on the shaft with sensor (hall) and would like to know if you have a circuit for that.
I was using carbon brushes but would like to eliminate because of sparks, wear and excessive ozone generation.
Any thoughts?
Thanks!
Hi Steve,
did you try the configuration shown below? However for this configuration to work the voltage from the hall effect must be above 9V
I want to drive DC motor with H-bridge using just ,N-channel MOSFETs ,speed,and direction .
Using N channel only will be a complex design, using P channel and N channel will easy…or you can refer to the following article for more info:
Simplest Full Bridge Inverter Circuit
Hello sir. I would like to calculate an inverter, to supply an air conditioner which consumes 22A,
4.8kw. thank you for all your publications and your work. my greetings thank you again.
Thank you Cherfu, for a 4.8kW load you will need a 6 to 7kW inverter design. The transformer and battery voltage of the inverter would be around 48V, 150 amps and 1500 Ah
Hello sir and many thanks
My pleasure!