In this post we will comprehensively discuss how to build a 500 watt inverter circuit with an integrated automatic battery charger stage.
Further in the article we will also learn how to upgrade the system for higher loads and how to enhance ot into a pure sine wave version.
This 500 watt power inverter will convert a 12 V DC or 24 V DC from a lead acid battery to 220 V or 120 V AC, which can be used for powering all types of loads, right from CFL lights, LED bulbs, fans, heaters, motors, pumps, mixers, computer, and so on.
Basic Design
An inverter can be designed in many different ways, simply by replacing the oscillator stage with another type of oscillator stage, as per user preference.
The oscillator stage is basically an astable multivibrator which could be using ICs or transistors.
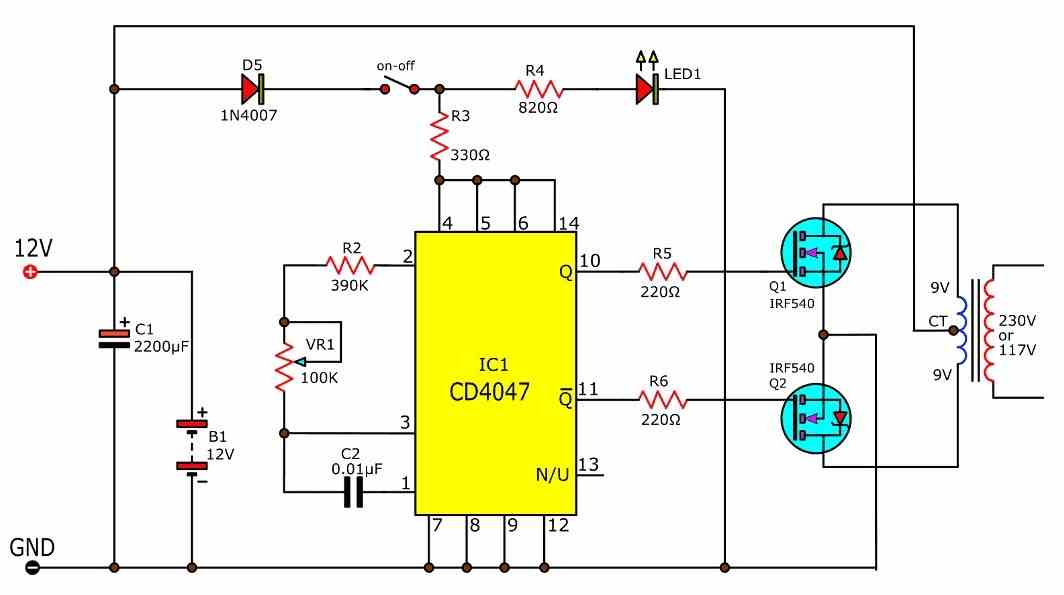
Although an astable based oscillator can be designed in various ways, we will use the IC 4047 option here since it is a versatile, accurate and a specialized astable chip designed specifically for applications like inverers.
Using IC 4047
Making any inverter using the IC 4047 is probably the most recommended option due to high accuracy and readability of the IC. The device is a versatile oscillator IC which provides a dual push pull or flip flop output across its pin10 and pin11, and also a single square wave output at pin13.
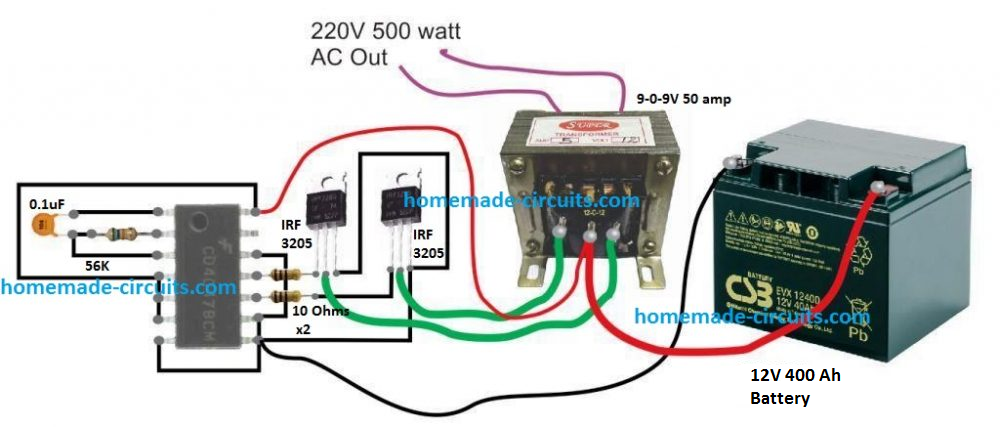
A basic 500 watt inverter with a square wave output can be as simple as above to build. However, to upgrade it with a battery charger we may have to employ a charger transformer rated appropriately as per the battery specifications.
Before learning the charger configuration let's first get acquainted with the battery specification required for this project.
From one of our previous post we know that the more appropriate charging and discharging rate of a lead acid battery should be at 0.1C rate or at a supply current that's 10 time less than the battery Ah rating. This implies that to get a minimum of 7 hours back up at 500 watt load, the battery Ah could be calculated in the following manner
Operational current required for a 500 watt load from a 12V battery will be 500 / 12 = 41 Amps approximately
This 41 amps needs to last for 7 hours, implies that the battery Ah must be = 41 x 7 = 287 Ah. However, in real life this will will need to be at least 350 Ah.
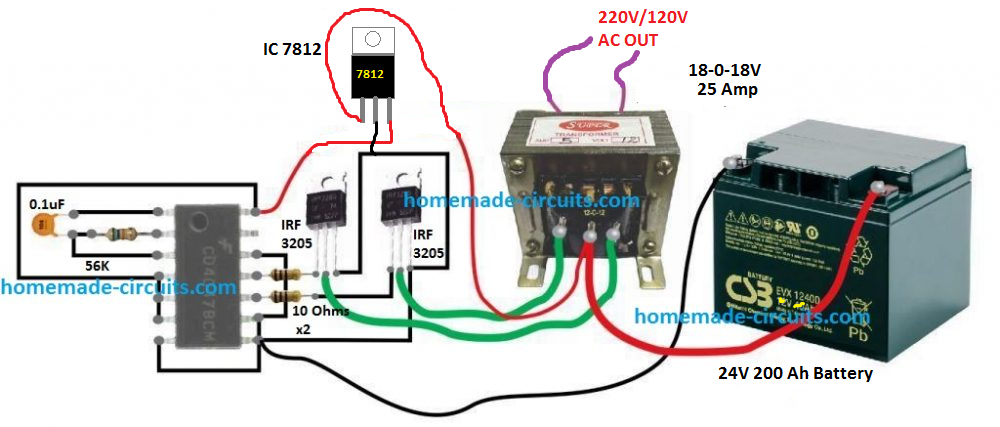
For a 24 V battery this may come down to 50% less at 200 Ah. This is exactly why a higher operational voltage is always advised as the wattage rating of the inverter gets on the higher side.
Using 24 V Battery
In order to keep the battery and the transformer size smaller and cables thinner, you may want to use a 24 V battery for operainf the proposed 500 watt design.
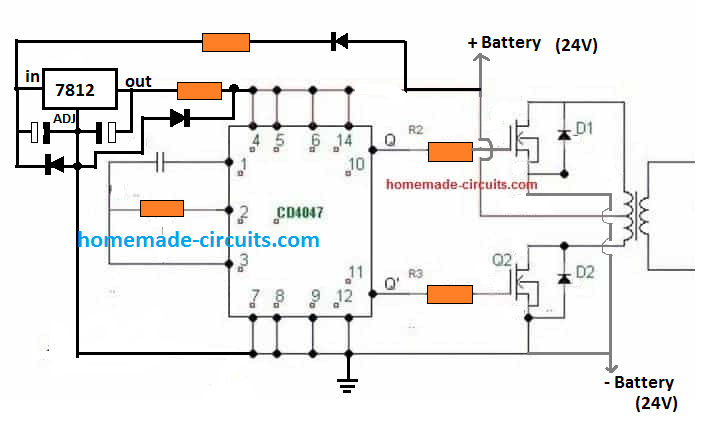
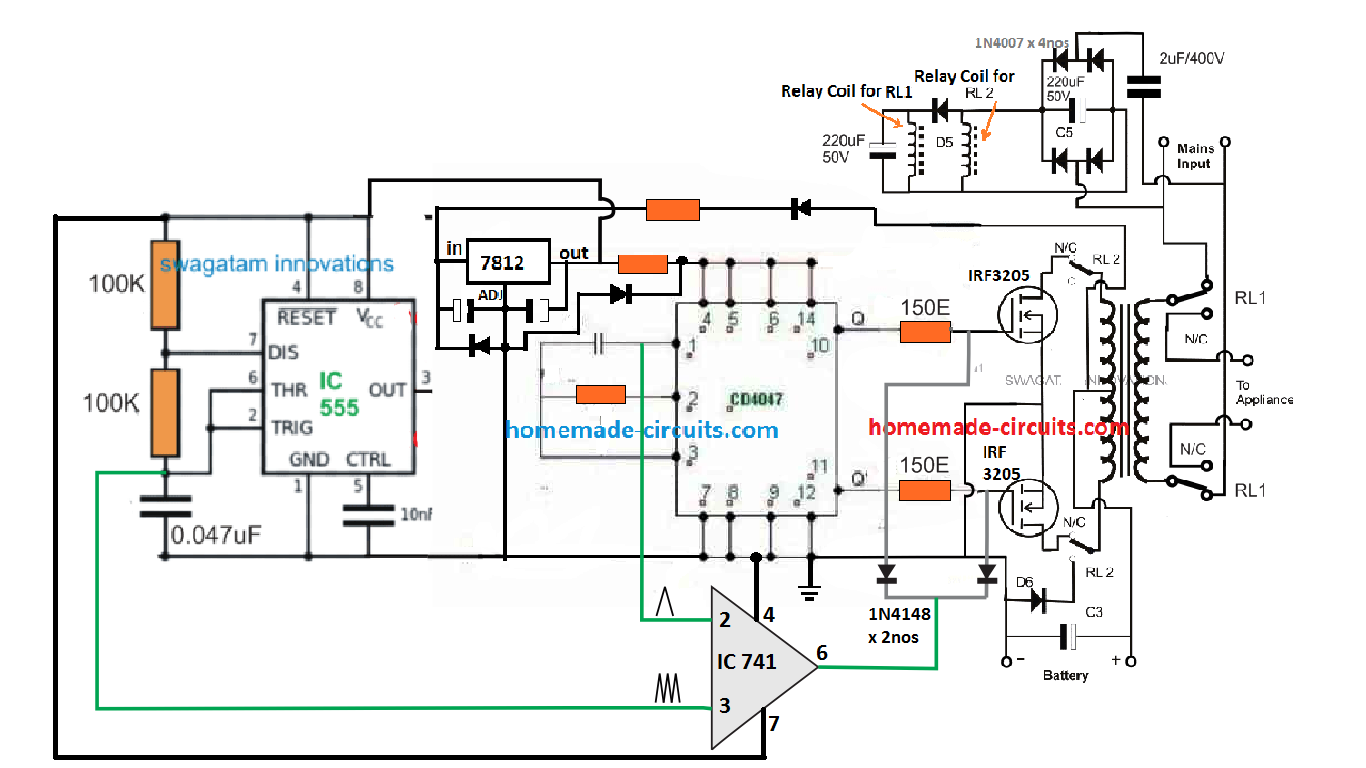
The basic design would remain as is, except a 7812 IC added to the IC 4047 circuit, as shown below:
Schematic Diagram
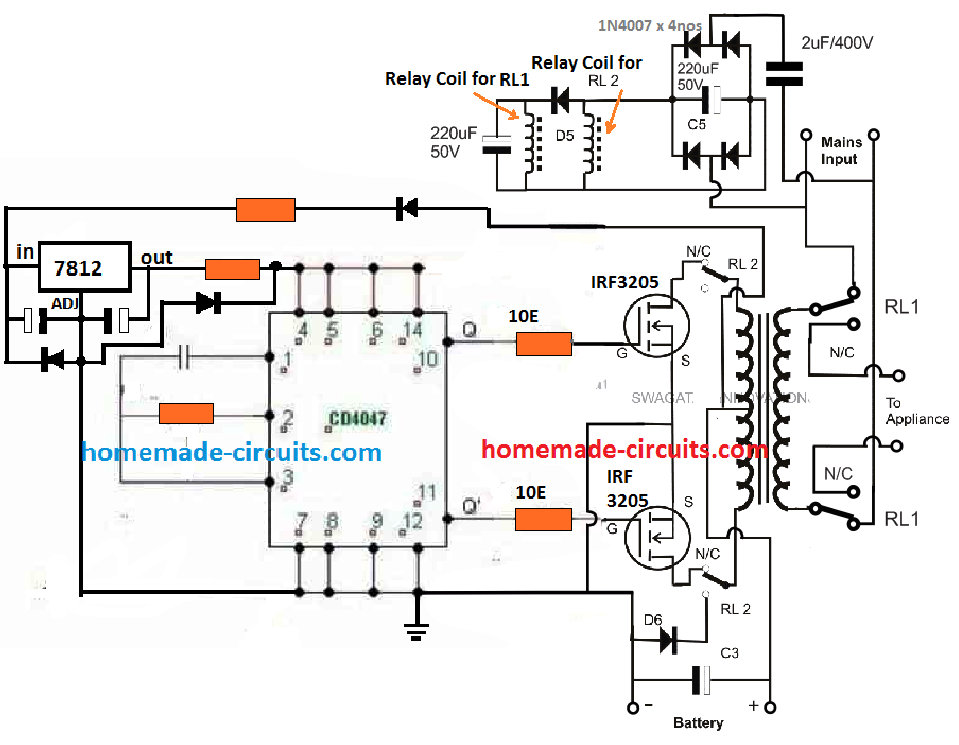
Battery Charger
To keep the design simple yet effective, I have avoided the use an automatic cut off for the battery charger here, and have also ensured a single common transformer is used for the inverter and the charger operations.
The complete circuit diagram for the proposed 500 watt inverter with battery charger can be seen below:
The same concept has been already elaborately discussed in one of the other related posts, which you can refer to for additional information.
Basically, the inverter uses the same transformer for charging the battery and for converting the battery power to 220 V AC output. The operation is implemented through a relay changeover network, that alternately changes the transformer winding to charging mode and inverter mode.
How it Works
When grid mains AC is not available, the relay contacts are positioned at their respective N/C points (normally closed). This connects the drains of the MOSFETs with the transformer primary, and the appliances or the load connect with the secondary of the transformer.
The unit gets into inverter mode and begins generating the required 220V AC or 120 V AC from the battery.
The relay coils are powered from a simple crude transformerless (capacitive) power supply circuit using a 2uF / 400V dropping capacitor.
The supply is not required to be stabilized or well regulated because the load is in the form of the relay coils which are quite heavy duty and will easily withstand the switch ON surge from the 2uF capacitor.
The coil for RL1 relay which controls the mains AC side of the transformer can be seen connected before a blocking diode, while the coil of RL2 which controls the MOSFET side is positioned after the diode and in parallel to a large capacitor.
This is intentionally done to create a small delay effect for RL2, or to ensure RL1 switches ON and OFF prior to RL2. This is for safety concerns, and to ensure that the MOSFETs are never subjected to the reverse charging supply whenever the relay moves from inverter mode to charging mode.
Safety Suggestions
As we know, in any inverter circuit the transformer works like an heavy inductive load. When such a heavy inductive load is switched with a frequency, it's bound to generate a massive amount current spikes which may be potentially dangerous for the sensitive electronics and the involved ICs.
To ensure proper safety to the electronic stage, it may be important to modify the 7812 section in the following manner:
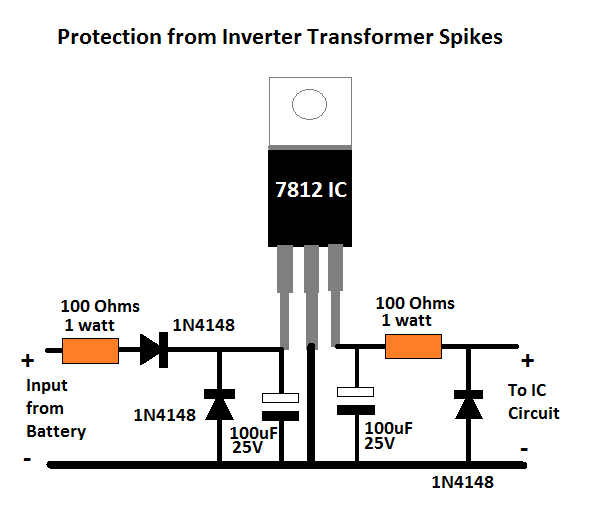
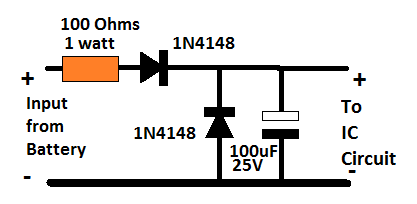
For a 12V application, you can reduce the above spike protection circuit to the following version:
Battery, MOSFET and Transformer Determine the Wattage
We have discussed this many times through different posts that it is the transformer, the battery, and the MOSFET ratings that actually decide how much power an inverter can produce.
We have already talked about the battery calculations in the previous paragraphs, now let's see how the transformer can be calculated for complementing the required power output.
It is actually very simple. Since the voltage is supposed to be 24 V, and power 500 watts, dividing 500 with 24 gives 20.83 amps. Meaning the transformer amp rating must be above 21 amps, preferably up to 25 amps.
However, since we are using the same transformer for both charging and inverter modes, we have to select the voltage in such a way that it suits both the operations optimally.
A 20-0-20 V for the primary side appears to be a good compromise, in fact it is the ideally suited rating for the overall working of the inverter across both the modes.
Since, only one half winding is used for charging the battery, the 20 V RMS rating of the transformer can be used for getting a 20 x 1.41 = 28.2 V peak Dc across the battery with the help of the associated filter capacitor connected across the battery terminals. This voltage will charge the battery at good rate and at the correct speed.
In the inverter mode, when the battery is at around 26 V, will allow the inverter output to be at 24/26 = 220 / Out
Out = 238 V
This looks a healthy output while th battery is optimally charged, and even when the battery drops to 23 V, the output can be expected to sustain a healthy 210V
Calculating MOSFET: MOSFETs basically work like switches that must not burn while switching rated amount of current, and also must not heat up due to increased resistance to switching currents.
To satisfy the above aspects, we have to make sure that the current handling capacity or the ID spec of the MOSFET is well over 25 amps for our 500 watt inverter. Also to prevent high dissipation and inefficient switching the MOSFET's RDSon spec must be as low as possible.
The device shown in the diagram is IRF3205, which has an ID of 110 amp and RDSon of 8 milliohms (0.008 Ohms), which actually looks quite impressive and perfectly suitable for this inverter project.
Parts List
To make the above 500 watt inverter with battery charger, you will need the following bill of materials:
- IC 4047 = 1
- Resistors
- 56K = 1
- 10 ohms = 2
- Capacitor 0.1uF = 1
- Capacitor 4700uF / 50 V = 1 (across the battery terminals)
- MOSFETs IRF3205 = 2
- Diode 20 amp = 1
- Heatsink for the MOSFETs = Large Finned Type
- Blocking Diode Across MOSFETs Drain/Source = 1N5402 (Please connect them across drain/source of each MOSFET for added protection against reverse EMF from the transformer primary. Cathode will go to the drain pin.
- Relay DPDT 40 amp = 2 nos
Upgrading to Modified Sinewave Inverter
The square wave version discussed above can be effectively converted into a modified sinewave 500 watt inverter circuit with much improved output waveform.
For this we use the age old IC 555 and IC 741 combination for manufacturing the intended sine waveform.
The complete circuit with battery charger is given below:
The idea is the same which has been applied in a few of the other sinewave inverter designs in this website. It is to chop the gate of the power MOSFETs with calculated SPWM so that a replicated high current SPWM is oscillated across the push pull winding of the transformer primary.
The IC 741 is used as a comparator which compares two triangle waves across its two inputs. The slow base triangle wave is acquired from the IC 4047 Ct pin, while the fast triangle wave is derived from an external IC 555 astable stage. The result is a calculated SPWM at pin6 of the IC 741. This SPWM is chopped at the gates of the power MOSFETs which is switching by the transformer at the same SPWM frequency.
This results in the secondary side with a pure sinewave output (after some filtration).
Full Bridge Design
The full bridge version for the above concept ca be built using the below given configuration:
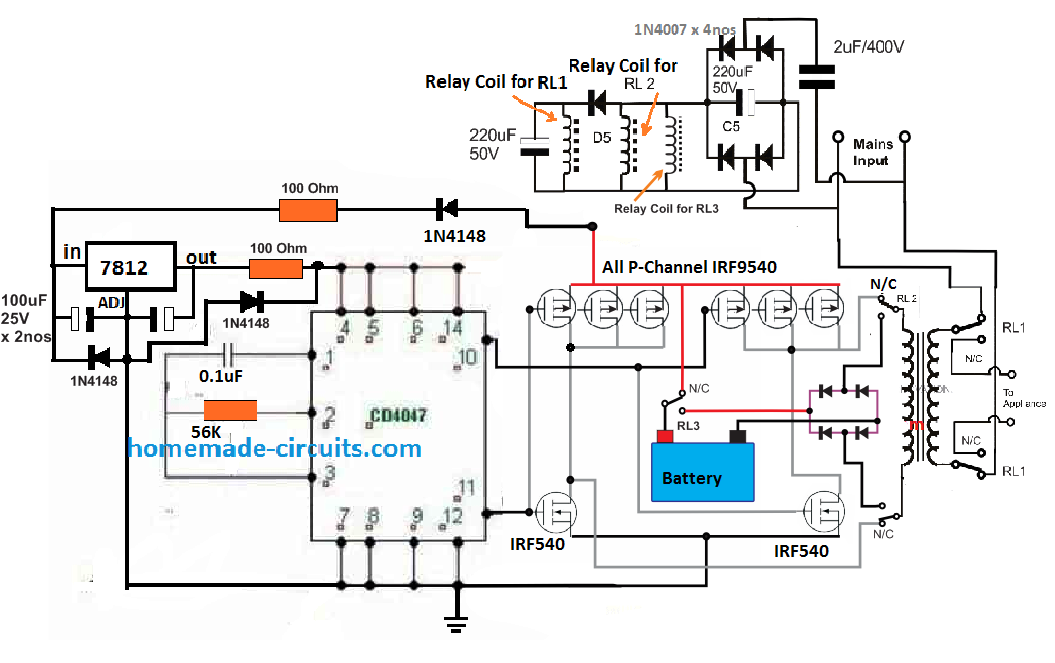
For sake simplicity, an automatic battery cut off is not included, so it is recommend to switched OFF the supply as soon as the battery voltage reaches the full charge level. Or alternatively you may add an appropriately filament bulb in series with the charging positive line of the battery, to ensure a safe charging for the battery.
If you have questions or doubts regarding the above concept, the comment box below is all yours.


Questions & Answers
hi, Swagatam, an an electronics technician in Kenya. I need a circuit diagram of an audio amplifier, 100 Watts, using 2SA 1302 transistors. I have plenty of these units.
Hi Johnstone, I do not have any 100 watt circuit using the mentioned transistors. Instead you can try other configurations, as given below:
https://www.homemade-circuits.com/?s=100+watt+amplifier
Hello sir, I build another 24v inverter using a round transformer 500w rated 20v-0-20v. I hv two 200ah batteries in series. The circuit I built is using 14 MOSFETs meaning 7 each side. The challenge am seeing is that it drains the battery faster without load than when with the load. This is contrary to the first inverter I built using two 100ah in series when I was using 10 MOSFETs 5pcs each side. I now have 200ah batteries and that round transformer(500w) so what could be the problem? Do i increase it to 22-0-22 or I decrease the number of MOSFETs to 10 or what can be adjusted sir?🙏🙏
Hello Morris,
Please connect an ammeter in series with the battery positive and monitor the current consumption with load and without load.
It will help you to assess the real problem…actually without a schematic of the circuit it can be difficult for me to judge the fault.
Now between 20-0-20 and 22-0-22 which one of the two can draw more power from the batteries assuming the two transformers are of the same wattage? Or what is the difference there?
Thanks.
20-0-20V will draw more current than 22-0-22V transformer, simply because the 20V winding has less resistance than the 22V transformer.
hi Swagatam, can help me out with circuit diagram of 500-700watts pure sine HIGH-BRIDGE inverter using SG3525N with battery charging and overload protection. Am a vivid follower of u from Ghana.Thank u
Thank you Idris,
Let me figure it out, if it’s is not already discussed in this blog, I will surely design it for you…
Ok thanks. So 22-0-22 stands the best for inverter and will at least last with the battery compared to 20-0-20??? Secondly, can u refer me to a simple and efficient inverter circuit or oscillator using 4047 or sg3525. I bought two 200ah batteries. We have power failure every time here sir.
Thanks.
It will depend on your battery voltage, the transformer primary voltage must be always slightly lower than the battery voltage, provided the inverter is not a PWM inverter.
You can try this simple 4047 inverter circuit:
Make sure add a 12V zener diode across the IC supply terminals.
Hello my lecturer, happy new year there👋 I have upgraded my backup system from 24v to 48v inverter. Now I have two, one homemade and the other inverter 48v (modified sinewave) from Norway. if you have ever come across this inverter which one do you think is the best best to use. please advise .
Hi Morris, sorry, never heard or tried this inverter from Norway, so it is difficult for me to give my opinions on this…
Ok sir. Do u have a diagram too using sg 3525 with a standby indicator and whn it’s switched on the indicator goes off?( Silent oscillator) please refer 🙏🙏
Thanks.
Hello Morris,
sorry, i am not sure how to implement a standby LED indicator for the SG3525, i will investigate it and if I find it will surely let you know….
Hello, please I need the circuit diagram with the components value written besides each of the components because am confused with the diagram
Which circuit are you referring to?
Thanks sir. But do u have a design of oscillator using sg3525…the perfect one and very silent whn inverter is on? If u hv have that inverter circuit pliz refer.
Thanks
Hi Morris,
You can find the best possible designs in the datasheet of the IC, you can also find good designs in the following article. The IC is nor responsible for the noise, the transformer is responsible…it will generate noise if it is not wound correctly or not clamped tightly with the cabinet.
https://www.homemade-circuits.com/sg3525-pure-sinewave-inverter-circuit/
This type of inverter, can it’s supply voltage be directly from a solar panel?
Yes, any DC to AC inverter can be used with a solar panel.
Hello my teacher, I have a circuit like this of yours 👆above. Now can I use 10 ohms resistors connecting gates of the Mosfets instead of 100 ohms and work perfectly? Or what would be the effect? Can it affect efficiency of the inverter or it’s just ok?
Thanks.
Hello Morris,
The resistor is just to safeguard the MOSFET from abrupt voltage spikes, and is actually optional, since the MOSFETs are mostly not impacted by such spikes across the gates.
Also, these gate resistors must be dimensioned according to the operating frequency of the MOSFEs.
The resistor value must be reduced as the frequency increases.
So, basically, using 10 ohms will be fine in your case. Alternatively, you can also use 100 ohms and connect reverse diodes across the resistors to make the situation 100% safe and efficient.
why are same atx transformers have 13pin and same 8-9 pins ,so whats they out put voltage
Swagatam, interesting circuit. This renewed my interest in Solar Power systems. A couple of questions if you have a moment.
1). Is there any benefit to GPS locking the frequency of the inverter? This plays into question 2.
2). In a solar home situation, where you have more devices, exceeding 500 watts, would it be better to upsize the components for greater power, or go with multiple 500 watt units for various rooms of a house; hence the reason of GPS lock for stability and aid with devices needing +/- 1 hz precision?
3). Finally, what are people doing when they have systems as large as 20,000 watts for a whole home?
Thanks for the article. I have have a new winter project.
Thank you Frederick,
I do not have sufficient information regarding GPS frequency locking in inverters, so I cannot suggest much on this. However, as far the inverter frequency is concerned, if we use a voltage regulator for the main oscillator IC, the frequency will remain constant always without fail.
2) I think it is better to use separate inverters to maintain higher efficiency.
3) For 20,000 watt requremenet, as mentioned above people can either have a single large inverter or divide into many smaller inverters.
Please help me sir I have connected the circuit but the voltage at the output is very low 0.65v. I do not know why. I want to design an inverter of 500watt or 100watt
Okon, please check the frequencies at pin10 and pin12 and pin13 of the IC 4047. They should be around 50 Hz, 50 Hz and 100 Hz. If you are not getting these frequencies then your IC is faulty or not configured correctly.
I will trying this plz help me sir
Try an easier and smaller diagram first
Reference to my previous comment. I want to use the ups with solar panels.
It is OK, the solar panels must be appropriately rated, according to the UPS power.
Hello @ Swagatam. I have this 12v blue gate ups (BG653 elite pro) that I want to use as a normal inverter. Do I need to change or add something to it? It uses four CS150N03 transistors.
If I want to increase the power output, what can I do to achieve that? Thanks
Hello @Breno1, UPS can work like an inverter, so you can use that inverter for your application. If you want to increase the output power, you will have appropriately increase the transformer power rating and the ratings of the MOSFET or the transistors.
Sir is that above circuit with spwm generator a 50hz inverter?? Secondly is it suitable for 70 crt television and 60watt standing fan
John, you will have to adjust the frequency to 50 Hz through the given preset. Yes it can be used for a CRT TV and a table fan.
Sir but you already used 100k and 0.047uf capacitor for getting the 50hz while then should I use preset for getting 50hz
Yes, you can adjust one of these two components (or both) with a frequency meter to get a 50 Hz output.
The shown value may not be exactly accurate, so please confirm with a frequency meter.
I don’t have multi meter for adjusting frequency. Can I use the above value
Without a frequency meter you cannot confirm the frequency so you will need a frequency meter.