• Skip to main content
  • Skip to primary sidebar

Homemade Circuit Projects

Need circuit help? Post them in the comments! I've answered over 50,000!

Blog | Categories | About | Hire Me | Contact | Calculators-online
You are here: Home / SMPS and Converters / 220V SMPS Cell Phone Charger Circuit

220V SMPS Cell Phone Charger Circuit

Last Updated on June 10, 2026 by Swagatam 221 Comments

In this post I have explained how to make a simple, cheap yet extremely reliable smps based 220V/120V mains operated cell phone charger circuit.

Table of Contents
  • Why TNYxxx Tiny Switch is Used
  • Audio/Video Representation
    • How the SMPS Circuit Works
    • How to wind the ferrite transformer
    • Transformer Winding Calculations

Why TNYxxx Tiny Switch is Used

The TNY series of tiny switch ICs provide us with an option of making perhaps the smallest possible smps circuits with high reliability. The tiny switch series includes the following ICs: TNY267P, TNY263, TNY264, TNY265, TNY266, TNY267, TNY268, TNY280.

The above ICs have an integrated in-built mosfet switching control circuit, protection against over current and thermal overshoot, along with rugged voltage and current specifications.

The IC comes in a DIP8 package that's exactly how a 555 is enclosed. The maximum tolerable voltage limit of the TNY series ICs is a massive 700V, a margin that's way beyond our normal household AC specs. The operating frequency is at about 132kHz.

The IC is specifically designed and built for implementing compact and reliable 120/220V mains operated SMPS flyback converters.

Although the application of the proposed simplest SMPS design could be huge, it could be best used as a mains operated 5V cell phone charger circuit.

The proposed cell phone charger design using the IC TY 267 can be visualized in the below shown diagram.

Audio/Video Representation

How the SMPS Circuit Works

The circuit can be understood as follows:

The mains input which could be anywhere between 100 and 280V is half wave rectified and filtered through shown 1N4007 diode and 10uF/400V input rectifier stage.

The 10 ohm/1watt resistor is included to provide some sort of restriction against the surge current inrush during power switch ONs and also forms like a fuse in case of a catastrophic situation.
The switching voltage is acquired via the BA159 diode at pin5 of the IC.

The IC instantly locks into the specified 132kHz switching frequency when switched ON across the input winding of the switching ferrite transformer.

The 180V zener diode safeguards the IC from peak switching voltages.

The above switching generates the calculated stepped down low voltage across the output winding of the transformer.

The BA159 diode at the output rectifies the 132kz pulsed DC while the 220uF capacitor filters the high frequency ripples to produce a clean DC.

The optocoupler acts like a feedback link between the output and the IC in order to ensure that the output never exceeds a certain predetermined voltage level.

This feedback limit is decided by the adjoining 4.7V zener diode, which ensures that the output stays well within the 5 V range just suitable for charging any attached cell phone.
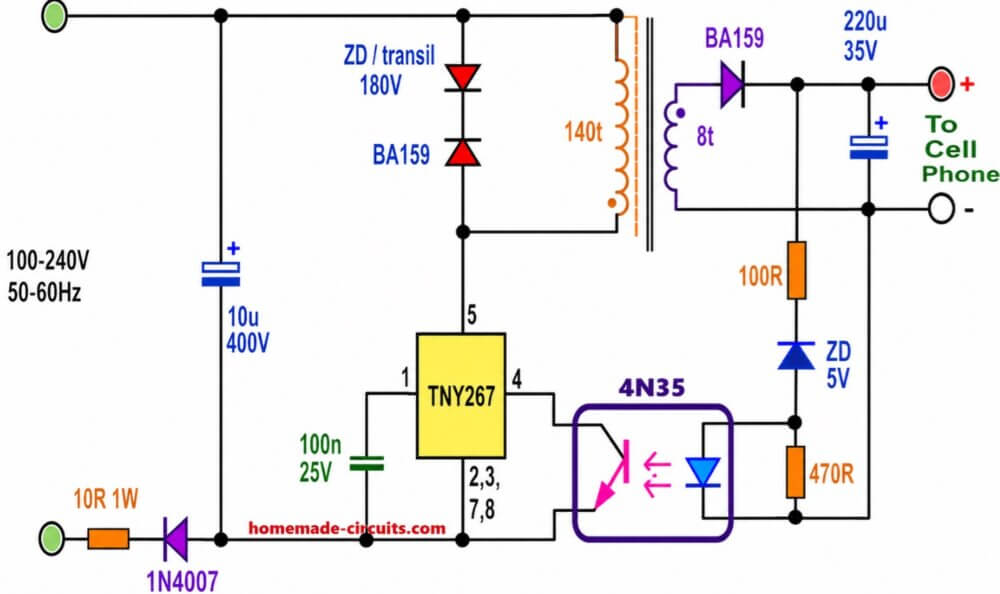
220V AC to 5V DC SMPS mobile charger circuit for all smartphones

How to wind the ferrite transformer

The shown ferrite transformer along with the IC forms the heart of the circuit, however due to its simple configuration winding this transformer is much easier compared to other mains operated cell phone charger circuit topologies.

The input primary winding consists of around 140 turns of 36 SWG, while the output secondary winding is made up of 8 turns of 27SWG super enameled copper wire turns.

The core used can be a small E19 type ferrite core with bobbin having a central core area section measuring 4.5 by 4.5mm.

The primary is wound first. After winding it, it must be covered with a layer of insulation before winding the 8 number of secondary turns on top of the primary layer.

A copper or aluminum tape layer should be preferably included in between the primary and the secondary winding and a wire connected with this tape with the "cold" end of the primary winding (see the trafo in the figure), this provides guaranteed isolation between the winding as well as guards against interference issues.

Transformer Winding Calculations

We can use the following standard formula for calculating the transformer primary and secondary turns:

B = Vin * Dmax / (Np * Ae * f)

Assuming the core is EE19, then Ae can be taken as 30 mm2 and Bmax = 0.25 Tesla...

Substituting in the above equation gives:

0.25 = 310 * 0.45 / (Np * 30 * 10⁻⁶ * 132000)

Np = 140 turns

Secondary Turn formula is:

Vout = (Ns/Np) * Vreflected

Assuming reflected voltage as 80V, then

5 = (Ns/140) * 80

Ns = 8 turns
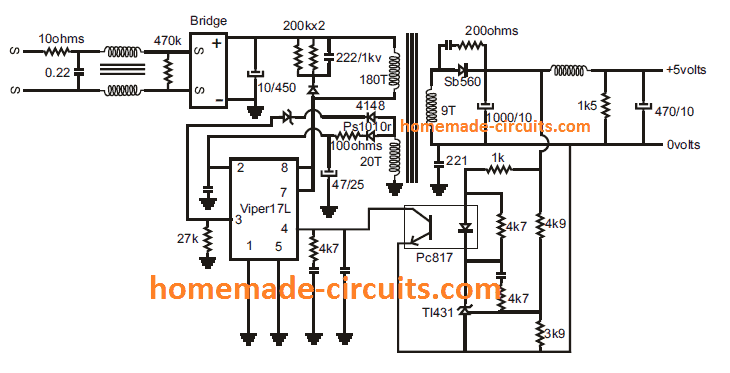
220V Mobile Charger Circuit diagram using Viper22E IC

DATASHEET

You'll also like:

  • center tapped transformerHow to Calculate Ferrite Core Transformers
  • solar battery charger using 7805 switching regulatorHigh Efficiency Solar Charger Circuits using Switching Regulators
  • ferrite1 2Ferrite Core Material Selection Guide for SMPS
  • boostHow to Build a Boost Converter Circuit: Explained with Calculations

Filed Under: SMPS and Converters Tagged With: 220V, Cell, Charger, Phone, SMPS

About Swagatam

I am an electronics engineer and doing practical hands-on work from more than 15 years now. Building real circuits, testing them and also making PCB layouts by myself. I really love doing all these things like inventing something new, designing electronics and also helping other people like hobby guys who want to make their own cool circuits at home.

And that is the main reason why I started this website homemade-circuits.com, to share different types of circuit ideas..

If you are having any kind of doubt or question related to circuits then just write down your question in the comment box below, I am like always checking, so I guarantee I will reply you for sure!


Previous Post: « Making a Flynn Motor
Next Post: SMPS 50 watt LED Street Light Driver Circuit »

Reader Interactions

Questions & Answers

Total Posts: 221
Newest Oldest
Vijayarajan
October 22, 2025 • 10 months ago #188770

I NEED 25W MOBILE CHARGER CIRCUIT

Reply
MURUGAVEL S
August 18, 2024 • 2 years ago #158262

Hallo friend can I parallel two 7805 ic to overcome heating in making 5v cell phone charger from 12v battery. If not what is the way to overcome heat.
thank you
S.MURUGAVEL

Reply
SwagatamAdmin
August 18, 2024 • 2 years ago #158267

Hello MURUGAVEL, you can put two 7805 ICs in parallel to enable current sharing and reduce heat, just make sure to attach them together, close to each other, over a single common heatsink.
To further reduce the heat, you can use 9V battery instead of 12V.
Alternatively, you can try one of these designs:
https://www.homemade-circuits.com/ic-7805-switching-power-supply-circuit/

Reply
Syed Pasha
December 25, 2023 • 3 years ago #148184

Hello Swagatam Sir.
Myself Pasha from Hyderabad. I want to make 5v, 20amps SMPS circuit for controlling Pixel led lights, and wants to use core as Ferrite ring because it’s easily available, please help me. My cellphone and WhatsApp number 9247772219.
Thanks

Reply
SwagatamAdmin
December 25, 2023 • 3 years ago #148185

Hello Pasha,
20 amp is too high, at the moment i do not have an SMPS circuit rated at 20 amps. If I find one soon, I will surely let you know.

Reply
Jitendra kumar das
March 27, 2023 • 3 years ago #141403

A negative photoresit coating devloped on pcb and after transfering the circuit layout, how to remove unwanted photoresits

Reply
SwagatamAdmin
March 27, 2023 • 3 years ago #141407

Clean it with acetone or thinner, and then apply a coat of varnish on the PCB tracks.

Reply
Lucas
March 6, 2022 • 4 years ago #114990

Dear swagatam sir
I have tested this circuit by replacing the zener with a TL431 with very good results.
The tny290 is the most powerful IC in the entire TNY family.
I am wondering if it is possible to replace the tny267 with a tny290.
Or if you have any easy circuit with the mentioned integrated.
I greet you cordially

Reply
SwagatamAdmin
March 7, 2022 • 4 years ago #115056

Dear Lucas, Yes you can replace TNY267 with TNY290. Yu can refer to the following circuit which I got from the datasheet of the IC:

TNY290 tiny switch SMPS circuit

Reply
Shyamkant Vasekar
August 20, 2021 • 5 years ago #95102

Thanks for providing all details with so much effort. I hope by reading this article it may be possible for me. Previously, I am thinking about using a readymade mobile battery charger for my project. but now out of curiosity, I will try to build it up. Surely there may be problems while making the transformer but definitely, I will give it a try.

Reply
SwagatamAdmin
August 20, 2021 • 5 years ago #95110

I am glad you liked it! I hope you will be able to succeed with this project!

Reply
marcos
April 6, 2021 • 5 years ago #88290

hola una consulta para obtener los 12 que deveria modificar
seria aumentar al doblr las vueltas del secundario ,el zener a 12v ?

desde muchas gracias

Reply
SwagatamAdmin
April 7, 2021 • 5 years ago #88304

yes for 12V you have to double the number of secondary turns, but this will also cause the output current to drop to 500 mA

Reply
Satyajit Roy
November 25, 2020 • 6 years ago #84816

Most important part of “How to wind the ferrite transformer” is the gap which you haven’t mentioned. The heart of this flyback transformer is it’s gap and unless you give it properly, it will just refuse to work. That’s where all the energy gets stored during the switch on period. People will just build the circuit and try to find why isn’t it working as intended.

Reply
SwagatamAdmin
November 25, 2020 • 6 years ago #84820

SMPS circuits are not for newcomers, so it is assumed that the reader will know the basics of winding an SMPS transformer.

Reply
Satyajit Roy
November 25, 2020 • 6 years ago #84821

The gap has to be accurate or else it would be meaningless. Providing turns is not enough unless gap is placed perfectly. That too has few rules. For EE cores, you could use it on the center area only (TDK or some manufacturers supply this predefined gap on request) and for newbies, this gap could spread all across the three legs. Using gap on the center leg has good EMI shielding. An expert will not build this schematic and will follow design rules, so I am guessing only newbies will see this schematic and dream to build one for experiments. Unless they know why GAP is being used they can’t even predict what is missing, rest aside the accuracy of this gap. Just a thought so I shared. When I started, it took years to perfectly align this gap for best results. GAP is an integral part of any flyback transformer design and no one has the brain to predict it. It comes from computation of transformer design. IDK if you just answered it for the sake of answering on a post.

Reply
SwagatamAdmin
November 25, 2020 • 6 years ago #84822

SMPS is not for newbies, it is for people who know the basics of building SMPS transformers.

For your knowledge, Inductors and flyback transformer cores usually require an air-gap to prevent core saturation due to high current flow in the windings

While building an SMPS transformer it is not just the gap but many other critical factors needs to be followed, all cannot be explained in an SMPS circuit.

If you are a newbie and having difficulty in understanding the above design you can go and first learn the following chapters and then try any of the SMPs deigns otherwise you will end up burning your home wiring:

Leakage flux consideration

How to Calculate Ferrite Core Transformers

Reply
Romano Novalski
August 26, 2020 • 6 years ago #81709

Hi Swagatan
Is there any commercial model of this transformer that can fit in this application?
I don’t have the skill nor the time to build this transformer, so i’m searching for any that i can buy. If you can provide a model with part. number i’ll be really glad.

Thank you in advance for your attention. Keep up the excellent job

Reply
SwagatamAdmin
August 26, 2020 • 6 years ago #81717

Hi Romano, No, a ready made transformer may not be available for this project, you will have to make it yourself.
Alternatively you could probably buy a complete assembled piece from amazon.

You can Google “Power Supply 230V AC to 5V DC Circuit Board SMPS”

Reply
Romano Novalski
August 26, 2020 • 6 years ago #81726

Ok, thank you

Reply
Ch shahzaib
February 15, 2020 • 7 years ago #76627

Hi sir ,
Sir i have made above mentioned circuit with same specifications but i am facing a problem of loading effect, without load it gives 6.7 v and with load it gives 3.8 v .
Can you tell me any solution?
Quick reply would be appreciated

Reply
SwagatamAdmin
February 15, 2020 • 7 years ago #76628

Hi Ch, what load did you connect? The IC TNY can supply less than 1 amp, so make sure the load is not pulling over 1 amp?

Reply
Ch shahzaib
February 15, 2020 • 7 years ago #76632

Sir i connected a usb port then i attempted to charger a nokia phone which normally charges bu 500mA charger
I guess its loading effect but how can i reduce it

Reply
SwagatamAdmin
February 16, 2020 • 7 years ago #76657

Ch, you will have to find how much current the load is consuming, if it is higher than 1 amp then the drop will happen. Alternatively, you can try rewinding the secondary using bifilar copper wire, meaning use 4 strands of 0.2mm copper wire and wind them together, this will increase the current absorbing capacity of the output winding.

Reply
sedigh hosein
September 5, 2019 • 7 years ago #69950

dear sir i have a question about trafo whether air gap may be nececery inside centrarl leg
and what is the reason air gap in ferrit trafo or how to core take saturation
whether you have blog in this case
excuse me concern your hassle

Reply
SwagatamAdmin
September 6, 2019 • 7 years ago #69963

Hi Sedigh, yes the gap must be introduced otherwise the magnetization will increase to an extent where the cores will saturate and become unstable and short!

I have an article which explains how to design an SMPS transformer:

https://www.homemade-circuits.com/how-to-design-and-calculate-ferrite-core-transformers-for-inverters/

Reply
sedighhosein
September 9, 2019 • 7 years ago #70051

Dear sir a new i connect an load in output and an glow bulb in output after one fast recovery diode and in order an capacitor after diode for get ripple but again beyond last a few time and blinking glow lamp again chip go on blowing off what is your opinion on this case
do you have any suggest for me
whether being below number winding primary is it reason that cause this problem
tanks in advance
best regard sedigh

Reply
SwagatamAdmin
September 9, 2019 • 7 years ago #70053

Hi Sedigh,
As far as I know all ferrite transformers are built with a paper gap on the outer edges of the E cores, otherwise it can lead to over saturation and short circuit. The above circuits are tested by the original author, so it will work if done correctly. Make sure the winding has the correct number of turns and the 180 zener is correctly configured.

Reply
sedighhosein
September 9, 2019 • 7 years ago #70055

Dear sir i salvaged the ferrit trafo from an cfl board as i winding wound as same you told of coures air gab exsiting on central leg EE trrafo
What is it your opinion on EE trrafo my own
i appricate from quick reply
best regards

Reply
SwagatamAdmin
September 10, 2019 • 7 years ago #70062

Dear Sedigh,
the gap must be put using cello-tape or paper on the outer legs of the E core, not the center leg. Please do this and check the response!

Reply
Charan S
September 5, 2019 • 7 years ago #69931

Hi bro, TNY266 & 268 are available at the nearby shop, will this circuit work with those chips with same transformer parameters as above?

Reply
SwagatamAdmin
September 5, 2019 • 7 years ago #69944

Hi charan, you can refer to the datasheet of the IC to get the exact circuit diagram, for your assurance.

Reply
Charan S
September 6, 2019 • 7 years ago #69970

I referred the datasheet, they have given combined data sheet for TNY263 to 268 all operating at 132khz switching, only power ratings were different. So i hope i can proceed with this circuit.
In the example circuit they have shown a safety cap between primary and secondary like in most of smps circuit. Can you tell me what is the specific function of it ?

Reply
SwagatamAdmin
September 6, 2019 • 7 years ago #69975

Hi Charan, according to the datasheet, the importance of the capacitor is to reduce electrical interference and increase stability of the design:

“The placement of the Y-capacitor should be directly from the primary bulk capacitor positive rail to the common/return terminal on the secondary side. Such placement will maximize the EMI benefit of the Y-capacitor and avoid problems in common-mode surge testing.”

Reply
Charan S
September 6, 2019 • 7 years ago #69976

As always thanks for your quick reply. Am in core electrical field so making circuits is just my hobby & am referring this page since SSLC. I’ve limited knowledge about the cap theory u mentioned above so i will proceed with the above circuit and let you know. Thanks….

Reply
SwagatamAdmin
September 6, 2019 • 7 years ago #69984

No problems, wish you all the best. Just make sure to wind the transformer accurately as given in the article or datasheet.

Reply
venu
August 17, 2019 • 7 years ago #69379

how much is the max output current

Reply
SwagatamAdmin
August 17, 2019 • 7 years ago #69387

1 amp

Reply
Ngô Hữu Nam
April 28, 2019 • 7 years ago #66707

Sir
Thanks for the post
I need as small as possible board, so I want to use horizontal type EE10, output 5v – 400 – 450ma, sir, is it possible? and how wire a transformer? I found in aliexpress, there is a cheap one that has informations below, can I use it?
EE10-Q8type Horizontal
Electrical parameters:
1,N1 [1-2] 0.11/170T,N2 [8-5] 0.30/13T,N3 [3-4] 0.11/13T,
2,N1/N2/N3No crossing;1,8,3or2,5,4Foot is homonymous
3,Inductance is:Lp=(1-2)=4.0mH/±10%,(10KHz,1V,25℃)
4,EE10 PC40Magnetic core
5,EE10horizontal4+4skeleton, 1,2,3,4;5,NC ,NC,8,(among6、7Feet are empty feet.)

Thanks sir

Reply
Harshal
June 26, 2019 • 7 years ago #67948

What is the rated power of 180V zener diode?

Reply
Satyajit Roy
November 25, 2020 • 6 years ago #84817

It’s not zener, that TVS diode. Something like SMBJ180CA will work.

Reply
SwagatamAdmin
November 25, 2020 • 6 years ago #84819

It is a TVS, but an equivalent 1 watt zener should also work,

Reply
SwagatamAdmin
June 27, 2019 • 7 years ago #67950

1 watt

Reply
Harshal
June 27, 2019 • 7 years ago #67963

Can you please tell the exact part number of zener?
Can i replace this with the 120v zener with some extra components?

Reply
Harshal
July 4, 2019 • 7 years ago #68196

No sir, with load….What should i check to solve the problem….?

Reply
SwagatamAdmin
July 4, 2019 • 7 years ago #68197

Then the problem could be with the diode, because at 80mA the diode should not become hot…change it with a 1N5408 diode, or use two 1N4007 in parallel, but make sure both are tightly joined with their bodies touching each other.

Reply
SwagatamAdmin
June 27, 2019 • 7 years ago #67964

As per the schematic it has to be around 180 V. You can add two 90V zeners in series or 120 + 60V in series.

Reply
Harshal
July 4, 2019 • 7 years ago #68190

But my BA159 is getting very heated thats why i checked the diode current and voltage…..

Reply
SwagatamAdmin
July 4, 2019 • 7 years ago #68194

Is it getting hot with load or without a load? if it’s without load then disconnect the opto coupler feeedback and check again

Reply
Harshal
July 4, 2019 • 7 years ago #68184

Sir i connect a relay with the supply and i check that 80mA is passing through BA159 and voltage across it -6.3V…..So is it a issue….?Anything wrong here…?

Reply
SwagatamAdmin
July 4, 2019 • 7 years ago #68186

Hi Harshal, if you want to check voltage and current, then check it in series with the relay coil and across the relay coil….not the diode.

Reply
Harshal
July 3, 2019 • 7 years ago #68152

Sir is there any other platform where i can contact you and share my power supply problem with the help of photos and videos…?
I really need this to work….
Thank you sir….

Reply
SwagatamAdmin
July 4, 2019 • 7 years ago #68167

Hello Harshal, you can explain me the problem here, I’ll try to solve if possible, pictures alone may not help to understand the issue you are facing.

By the way you can also check the datasheet of the IC and see it the data helps to get some clue about the issue.

https://www.mouser.in/datasheet/2/328/tny263_268-1512708.pdf

Reply
Harshal
July 2, 2019 • 7 years ago #68106

5v to 20v…..input current consumption is 10mA…is it good..?

Reply
SwagatamAdmin
July 2, 2019 • 7 years ago #68107

yes, just make sure your SMPS output is below 15 V

Reply
Harshal
July 1, 2019 • 7 years ago #68085

Sir i want to power up a ic…Should i connect ic with some series resistor at output side or connect it directly across output pins…..?

Reply
SwagatamAdmin
July 2, 2019 • 7 years ago #68094

Harshal, what is the IC Vcc rating? if it’s higher than the SMPS output then you can use it without any resistor, or regulator.

Reply
Harshal
July 1, 2019 • 7 years ago #68078

I used one120V and 2 30V….It worked… But now BA159 at output side is getting very heated and thus output is fluctuating…I checked voltage across diode is constant around 6.3V….What could be the reason sir….?

Reply
SwagatamAdmin
July 1, 2019 • 7 years ago #68081

Hi Harshal, Is it heating up with load or without load? if it’s without load try reducing the number of turns from 8 turn to 4 turns and check the response

Reply
SwagatamAdmin
April 29, 2019 • 7 years ago #66711

Hi Ngô Hữu Nam, the transformer specifications must be exactly as specified in the above article, any other data can produce unpredictable results, so I won’t recommend a different readymade transformer.

Reply
Ngô Hữu Nam
April 29, 2019 • 7 years ago #66722

Thanks sir

Reply
Ehtisham
April 11, 2019 • 7 years ago #66448

Hey, i implemented the circuit and used a ferrite core transformer form a mobile charger with six outputs, primary, secondary and auxiliary, i didnt used the auxiliary winding first and only used primary and secondary. The fuse resistor 10 ohm 1watt produces a big spark and gets open.
Then i shorted the primary winding with auxiliary and same resistor goes off, i wanted to ask wether the fault is in transformer or i am doing some mistake in the circuit.
Thanks

Reply
SwagatamAdmin
April 11, 2019 • 7 years ago #66449

Hi, The transformer data should be exactly as mentioned in the article, if you try any other unknown data, it will burn and may cause catastrophic results… The ferrite core should be E19 type, and the transformer must have around 150 turns on the primary side.

Reply
Ehtisham
April 11, 2019 • 7 years ago #66451

Thanks Very much Swagatam!

Reply
SwagatamAdmin
April 11, 2019 • 7 years ago #66453

Glad to help!????

Reply
Lakshan
March 29, 2019 • 7 years ago #66172

Hi Swagatam,
Hope you are doing good!
It’s Lakshan again.

Could you please advise with the inductance value of the above mentioned transformer as my transformer maker is asking for that.

Also, I could not find a 180v zenor diode.
Appreciate if you could provide an alternative part or a part number if there’s any.

Thanks & regards

Reply
SwagatamAdmin
March 29, 2019 • 7 years ago #66175

Hi Lakshan, sorry I do not have the inductance values.

If you want to avoid the zener, you can try the Fig.14 from the datasheet of the IC, as shown in the following pdf

http://www.mouser.com/ds/2/328/tny263_268-8433.pdf

Reply
Lakshan
March 29, 2019 • 7 years ago #66176

Noted with thanks Swagatam!

I will look in to that.

Best regards

Reply
SwagatamAdmin
March 29, 2019 • 7 years ago #66177

OK, great!!

Reply
Nitesh
January 30, 2018 • 9 years ago #58106

Respected Sir
kindly inform me change for work this circuit with 5v@2A. I am looking for 2A ( standby ) & peak current 2.25A .
what woulb be change in ferrite transformer & other component ?

Reply
SwagatamAdmin
January 30, 2018 • 9 years ago #58113

Nitesh, try reducing the number of turn to 5 turn for the secondary, and use two 27 SWG wires in parallel while winding the turns…

Reply
Muhammad Ovais
December 22, 2017 • 9 years ago #56930

Hello sir! The charger pic at the start of the article shows a pin-based mobile charger. Can I use this same circuit diagram to design a usb based charger for phones?

Reply
SwagatamAdmin
December 22, 2017 • 9 years ago #56931

Hello Muhammad, the USB output can be directly used for charging a cellphone, I could not get what you are intending to build, please clarify…

Reply
Muhammad Ovais
December 22, 2017 • 9 years ago #56947

Got it. Thanks! I just want to build a mobile charger with USB output.
One thing more: What’s the voltage across the primary winding of the transformer?

Reply
SwagatamAdmin
December 23, 2017 • 9 years ago #56958

It is 220 switched voltage, obtained from the AC mains and switched by the IC mosfet

Reply
Muhammad Ovais
December 24, 2017 • 9 years ago #56987

Sir, I searched the whole market and couldn’t find the mentioned optocoupler SFH6106-1 and any ferrite core.
Can I use Orient 817C (mentioned as a universal optocoupler by the shopkeeper) instead of SFH6106, and use a core that I dismounted from my samsung charger (model name: ETA U90EWE) in the above circuit?
PS: I am making a through hole pcb mobile charger circuit for a semester project.
Please help 🙂

Reply
SwagatamAdmin
December 24, 2017 • 9 years ago #56994

Muhammad, You can try any other similar opto couplers also, most of them should work.

Reply
Muhammad Ovais
December 22, 2017 • 9 years ago #56948

If we are working with 220V, 50 Hz input AC supply*

Reply
Zacson Skaria
December 11, 2017 • 9 years ago #56615

What is the maximum current output this circuit can provide ?

Reply
SwagatamAdmin
December 11, 2017 • 9 years ago #56626

1 amp

Reply
ABBA
November 27, 2017 • 9 years ago #56141

hi Swagatam, my question is why is it all the commercially used chargers use high frequency switching transformer, tnyxx series , opto-coupler, when there are regulators that can perform importance functions in one. like the LM2575 can take unregulated voltage of up to 60v and gives out 5V 0.5A. what if we use transformerless power supply topology with the regulator can we achieve the same result with efficiency like the above circuit. the only limitation i can see is the isolation from mains. thanks in advance.

Reply
SwagatamAdmin
November 28, 2017 • 9 years ago #56162

Hi ABBA, SMPS circuit is required to step down the high mains voltage to a lower level, therefore even to get 60V input for the regulator you will require an 220V to 60V SMPS converter. The high frequency is required because SMPS use ferrite transformer, and ferrite trafos require high frequency for implementing magnetic induction across the winding correctly.
capacitive power supplies cannot be designed to provide high current like SMPS safely, and also these are not isolated from dangerous mains current, that’s why capacitive power supplies are not recommended for AC to DC power supply circuits

Reply
Sheraz Ahmad
November 2, 2017 • 9 years ago #55498

dear sir i want to modify this circuit replacing the 180V tran zener with capacitor and resistor what value should i use for C and R, also want to change the output voltage and current Vo = 12V , 2A what guage for primary and secondery can be use to obtain this output?

Reply
sheraz
November 9, 2017 • 9 years ago #55701

sir i made the smps circuit like the one you have presented in this artical exactly like that, also i have checked all filter capacitors and the bypass capacitor of TNY277, i have wind the transformer for 12v but and using TNY277 instead of TNY267, all connection with TNY277 are correct but voltage is not regulating but fluctuate sometime b/w 5v to 35v and then continously b/w 9v to 40v & 41v. i dont know where is the problem with in the circuit, i also try 7812 regulator to regulate the voltage but output is still not regulating?

Reply
sheraz
November 9, 2017 • 9 years ago #55727

sir! the output has regulated upto 13v to 14v but when i connect 12v led strip it continously on and off, indicating that the output fluctuate b/w max and min. how this problem can be corrected so that output may not fall to min. i also try 1k 2w resistor but output is not correcting.

Reply
Sheraz
November 10, 2017 • 9 years ago #55748

thanks you sir!

Reply
Sheraz
November 10, 2017 • 9 years ago #55778

thanks sir for helping me. the problem in the circuit was actually due to bad winding of the transformer. i have replace the transformer and now it is working well. thanks

Reply
SwagatamAdmin
November 10, 2017 • 9 years ago #55779

that’s great Sheraz, I am glad it is working now!

Reply
SwagatamAdmin
November 10, 2017 • 9 years ago #55739

Sheraz, the IC will start switching ON OFF when it senses a short circuit or an overload or absence of load at the output….this can also happen due to badly built transformer.

make sure you have built the transformer correctly, or get it checked from a professional winder…because making ferrite core transformer needs special care, knowledge and good winding machine

Reply
SwagatamAdmin
November 9, 2017 • 9 years ago #55705

Sheraz, connect a 1K 2 watt resistor dummy load across the output winding and check if that corrects the issue or not, it seems your circuit is going in the burst mode due to abnormal output voltage, this is usually corrected by putting some load at the output or through a dummy load resistance of 1K

Reply
SwagatamAdmin
November 2, 2017 • 9 years ago #55501

Dear Sheraz, you can take the help of the following SMPS deign, and copy the values indicated in this diagram

https://www.homemade-circuits.com/12v-5-amp-transformerless-battery/

2 Amp won’t be possible from the above design because the TNY switch is rated to produce a maximum of 1 Amp

Reply
Psalmol
July 13, 2017 • 9 years ago #51668

Mr swagatam thanks very much for your efforts.
Please sir how can I increase the output current from a power supply maybe charger.
Thanks in advance.

Reply
SwagatamAdmin
July 13, 2017 • 9 years ago #51676

Thanks Psalmol, current cannot be increased for the above design, you can try the following concept instead for higher current

https://www.homemade-circuits.com/2017/06/12v-2-amp-smps-circuit.html

Reply
Adrees mohmand
May 19, 2017 • 9 years ago #50618

really impressive

Reply
SwagatamAdmin
May 22, 2017 • 9 years ago #50674

Hi Adrees, I have one related article posted in this website, you can check it out and see if it helps

https://www.homemade-circuits.com/2015/07/turns-and-voltage-ratios-total-voltage.html

Reply
Adrees mohmand
May 21, 2017 • 9 years ago #50652

Thanks Sir.
as i mention above that i take out etd core transformer for fused homage ups board. i don't know about it's parameter. now i am thinking to design my own etd core transformer for desired values. i.e Vin 12vdc vout 320vdc power rating 600w. and then invert high dc back to 220v AC using sine pulse width modulation.
Sir have you write blog of winding etd core tranformer. if! please send me link i want to learn how to select the wire guage for required power rating.

Reply
SwagatamAdmin
May 19, 2017 • 9 years ago #50624

Thanks Adrees, did you calculate the coil parameters before implementing it practically.

The mosfet will definitely burn if the coil fails to resonate with the applied frequency…or if the mosfet rating is not matching the load current.

you can take the help of the following and see if that helps.

https://www.homemade-circuits.com/2015/10/calculating-inductor-value-in-smps.html

Reply
Adrees mohmand
May 19, 2017 • 9 years ago #50617

Sir i am designing 12v dc to 320vdc using smps topology. i have an old etd core tranformer taking for homage ups cicuit. i give pulses to mosfet using sg33525 ic but when i connect the gate pulse my mosfet burn out. pls give me some suggestion why the mosfet burn out. is the tranformer rating is high.. or tranformer is short. i am using irf1010 mosfet

Reply
Unknown
December 23, 2016 • 10 years ago #47517

Sir can you suggest any 5volt & 2 to 2.5Amp SMPS circuit..

Reply
View Older Comments

Need Help? Please Leave a Comment! We value your input—Kindly keep it relevant to the above topic! Cancel reply

Your email address will not be published. Required fields are marked *

Primary Sidebar


Categories

  • Arduino Projects (95)
  • Audio and Amplifier Projects (134)
  • Automation Projects (18)
  • Automobile Electronics (104)
  • Battery Charger Circuits (90)
  • Datasheets and Components (109)
  • Electronics Theory (150)
  • Energy from Magnets and Earth (41)
  • Games and Sports Projects (11)
  • Grid and 3-Phase (20)
  • Health related Projects (27)
  • Home Electrical Circuits (13)
  • Indicator Circuits (16)
  • Inverter Circuits (100)
  • Lamps and Lights (163)
  • Meters and Testers (72)
  • Mini Projects (28)
  • Motor Controller (68)
  • Oscillator Circuits (30)
  • Pets and Pests (15)
  • Power Supply Circuits (91)
  • Remote Control Circuits (50)
  • Security and Alarm (65)
  • Sensors and Detectors (107)
  • SMPS and Converters (46)
  • Solar Controller Circuits (62)
  • Temperature Controllers (44)
  • Timer and Delay Relay (50)
  • Voltage Control and Protection (44)
  • Water Controller (37)
  • Wireless Circuits (31)


Circuit Simulator

circuit simulator image


Subscribe to get New Circuits in your Email


Other Links

  • Privacy Policy
  • Cookie Policy
  • Disclaimer
  • Copyright
  • Videos
  • Sitemap

People also Search

555 Circuits | 741 Circuits | LM324 Circuits | LM338 Circuits | 4017 Circuits | Ultrasonic Projects | SMPS Projects | Christmas Projects | MOSFETs | Radio Circuits | Laser Circuits | PIR Projects |


Recent Comments

  • Swagatam on Simple Delay Timer Circuits Explained
  • Swagatam on SG3525 Full Bridge Inverter Circuit
  • Swagatam on How to Replace a Transistor (BJT) with a MOSFET
  • Swagatam on Inverter Circuit with Feedback Control
  • Ngwabe David on SG3525 Full Bridge Inverter Circuit

Social Profiles

  • Twitter
  • YouTube
  • Instagram
  • Pinterest
  • My Facebook-Page
  • Stack Exchange
  • Linkedin

© 2026 · Swagatam Innovations