In this post I have explained a simple, accurate, high torque treadmill motor speed controller circuit which may be effectively installed in similar units for acquiring PWM controlled variable speed feature. The idea was requested by Mr. Samuel.
Technical Specifications
I've a treadmill whose power failed completely...it had been imported from china and it's like they can't help after negotiating with them..guarantee is only meant in their x-try.
So, am asking, how would you assist me in designing a power supply that will control speed and change of direction of the treadmill movement as well. I'm and forever will be glad for your work.
Looking into the specs of the unit, the switching relays are specified with 10A ratings. I also had a view of the motor and it was written 180Volts on it.
This is the information i got sir. They also had a cautionary notice that the T.Mill shouldn't be run beyond 2hrs continuously. I hope I've given the best for the best.Thanks sir. Stay blessed now and forever! best moments!
Using a Single IC 555 Astable Multivibrator in PWM Mode
Audio/Video Representation
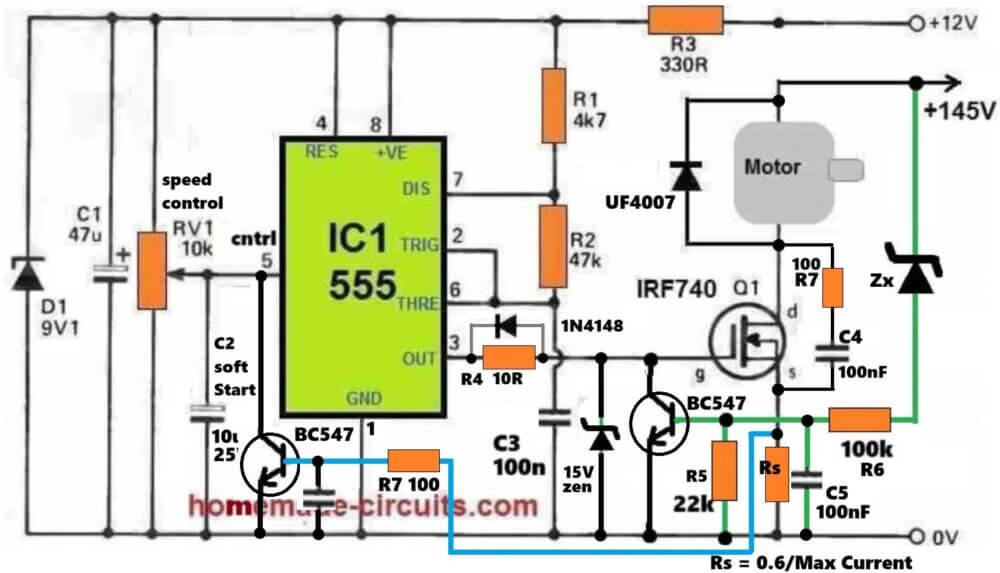
This is a PWM based speed controller circuit for a high voltage DC treadmill motor. The main controller is the 555 timer, which generates the PWM signal and drives the IRF740 power MOSFET. The motor is supplied from a separate +145V DC supply, while the 555 control circuit works from the +12V supply.
12V control supply
The +12V supply first passes through R3 330 ohm. D1 9.1V zener is used to limit the supply voltage for the 555 circuit and C1 47uF provides filtering.
So the 555 gets roughly 9V supply and the high voltage 145V motor supply is kept separate from the low voltage control section.
555 PWM generator
The 555 together with R1 4.7K, R2 47K and C3 100nF forms the PWM oscillator.
The output is taken from pin 3 of the 555 and is given to the gate of IRF740 through R4 10 ohm.
RV1 10K is used as the speed control. Its wiper is connected to pin 5 of the 555. When RV1 is rotated, the voltage at pin 5 changes and this changes the PWM duty cycle.
When the PWM duty cycle is increased, the IRF740 remains ON for longer time and more average power is given to the motor. So the motor speed increases.
When the duty cycle is reduced, the motor receives less average power and the speed comes down.
With R1 4.7K, R2 47K and C3 100nF, the basic operating frequency is around 2.7kHz. The actual frequency can change somewhat because pin 5 is also being used for controlling the PWM.
Soft start
C2 10uF is used for the soft-start function.
When the circuit is switched ON, C2 is initially discharged. Since C2 is connected to pin 5 of the 555, the control voltage changes gradually as C2 charges.
Because of this, the PWM does not suddenly jump to a high level. The motor power increases gradually and the motor starts more smoothly.
This is useful in a treadmill because the motor can take a very high current during starting, especially when the belt is already loaded.
MOSFET gate drive
The PWM output from pin 3 of the 555 reaches the IRF740 gate through R4 10 ohm.
R4 limits the instantaneous gate current and also helps to reduce gate ringing.
The 1N4148 provides a faster path in one direction, allowing the MOSFET gate to charge or discharge faster.
The 15V zener connected between the gate and source of IRF740 protects the MOSFET gate from excessive VGS voltage and switching spikes.
Motor switching
The IRF740 is used as a low-side power switch.
The motor is connected between +145V and the drain of IRF740. Therefore, when the MOSFET turns ON, current flows from +145V through the motor and then through IRF740 to ground.
When the MOSFET turns OFF, the motor current cannot suddenly stop because the motor is an inductive load. The UF4007 then provides the freewheeling path for this motor current.
The UF4007 is a fast recovery diode and is more suitable for this PWM application than the normal 1N4007.
But its actual current and voltage ratings still have to be suitable for the motor. A treadmill motor can draw very high current during starting and heavy loading.
RC snubber
R7 100 ohm and C4 100nF are connected across the IRF740 switching section and form an RC snubber.
When IRF740 switches OFF, the inductance of the motor wiring and other parasitic inductances can produce a fast voltage spike and ringing at the MOSFET drain.
R7 and C4 absorb and damp these high frequency spikes.
So this RC snubber helps to reduce switching stress on the IRF740 and makes the switching waveform cleaner.
Current limiting
The current limiting section works in a different way from the voltage protection section.
Rs is the current sensing resistor and it is connected in the source path of IRF740.
When motor current flows through Rs, a voltage develops across this resistor. The value of Rs can be approximately selected using:
Rs = 0.6 / Maximum Current
For example, if the required maximum motor current is 10A:
Rs = 0.6 / 10
Rs = 0.06 ohm.
The voltage developed across Rs is applied through R7 100 ohm to the base of the LEFT BC547. When the motor current becomes high enough to produce around 0.6V across Rs, the LEFT BC547 starts conducting.
Now the important part is that this BC547 does not directly pull the IRF740 gate to ground.
Its collector is connected to pin 5 of the 555. Therefore, when the current becomes excessive, the BC547 pulls pin 5 of the 555 towards ground. This changes the 555 control voltage and reduces the PWM duty cycle.
The IRF740 then gets less ON time and the motor current is reduced.
This is especially useful during motor starting and when the treadmill is heavily loaded. R5 22K and C5 100nF are used around the sensing section to keep the sensing point stable and filter unwanted switching spikes.
Voltage protection
The voltage protection works separately from the current limiting circuit.
Zx, R6 100K, R5 and C5 are connected to the RIGHT BC547 which monitors the high voltage condition.
Zx is connected to the +145V rail. When the monitored voltage becomes high enough, Zx starts conducting and current flows through R6 into the base of the RIGHT BC547.
When this BC547 turns ON, its collector pulls the IRF740 gate directly towards ground.
Therefore the IRF740 is switched OFF. So the voltage protection action is....This is different from the current limiting action.
The current feedback controls pin 5 of the 555 and reduces the PWM, while the voltage feedback directly pulls the MOSFET gate to ground. The exact voltage protection level depends on the actual value of Zx, so the cutoff voltage cannot be calculated from the diagram unless the Zx value is known.
C5 and R5 in voltage sensing
C5 100nF provides filtering at the base of the RIGHT BC547. This helps prevent short switching spikes from unnecessarily turning the transistor ON. R5 22K keeps the BC547 base pulled towards ground when there is not enough sensing voltage. So this section gives a more stable voltage protection operation.
Complete working
- In simple way, RV1 controls the speed by changing the 555 control voltage.
- The 555 generates the PWM and this PWM drives the IRF740.
- The IRF740 switches the 145V DC supply to the motor and the PWM duty cycle controls the average power given to the motor.
- C2 provides soft start during startup.
- UF4007 provides the freewheeling path for the motor current when the MOSFET switches OFF.
- R7 and C4 form the RC snubber and reduce voltage spikes across the MOSFET.
- The 15V zener protects the IRF740 gate.
- Rs senses the motor current and the LEFT BC547 provides current feedback to pin 5 of the 555. When current becomes too high, it pulls pin 5 down and reduces the PWM.
- Zx and the RIGHT BC547 provide voltage protection. When the sensed voltage becomes too high, the RIGHT BC547 directly pulls the IRF740 gate to ground and switches the MOSFET OFF.
Using Two IC 555
Here's a simple PWM based motor speed controller circuit which can be used for controlling a treadmill speed right from zero to maximum.
The circuit also provides an instant bidirectional stop and reversal of the motor rotation by a single flick of a given switch.
Another interesting feature of this circuit is its capability of sustaining and balancing optimal torque even at lower speeds ensuring a continuous working of the motor without stalling it during extreme low speeds.
The circuit of the proposed treadmill motor speed controller may be understood with the help of the following points:
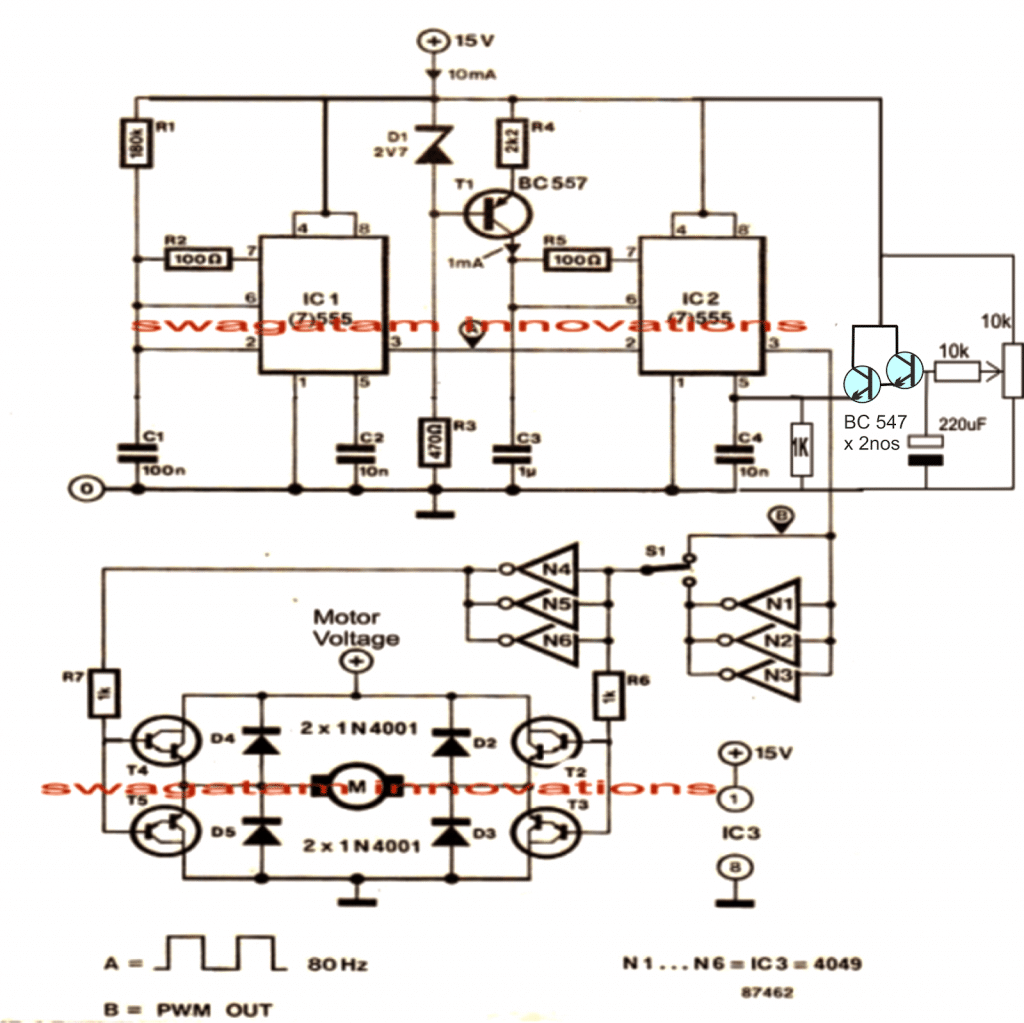
Here the two 555 ICs are configured as PWM generator/optimizer for acquiring the required speed control of the connected motor.
Circuit Operation
IC1 works as a frequency generator and is rigged at around 80Hz, any other value would also do and is not anyway critical.
The above frequency from pin#3 of IC1 is fed to pin#2 of IC2 which is wired as a standard monostable. IC2 responds and starts oscillating at this frequency, forcing equivalent triangle wave frequency at its pin2/6.
The above triangle waves is instantly compared by the set potential at pin#5 of IC2 creating an equivalent level of chopped PWM at its pin#3
The preset or a pot positioned at pin#5 of IC2 forms a potential divider network for a selectable fixing of any voltage from zero to maximum supply voltage at pin5 of IC2. This level is directly translated through optimized PWMs at pin#3 of the same IC as explained above.
The PWMs are fed across two sets of NOT gates via an SPDT toggle switch.
The NOT gates which act as inverters provide the feature of instant toggling of the motors rotational direction by a mere flick of the SPDT switch.
The resultant PWMs from the selected NOT gates finally reach the transistorized bridge network that holds the motor between them for implementing all the specified features discussed above.
These transistors should be rated as per the motor specifications, and the voltage across this bridge should also be as per the motor requirements.
Video Clip:
Simplified Design
If you do not wish to have the reverse forward facility, then you can much simplify the above design by eliminating the lower section of the circuit entirely, as shown below:
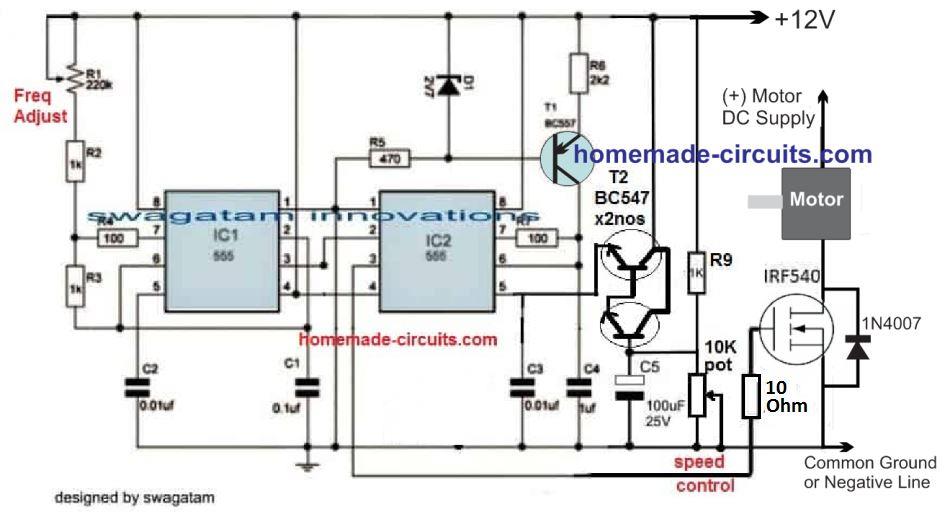
The 10K pot can be used for the speed control, while the 220uF determines the soft start feature. Increasing the 220uF value increases the soft start effect and vice versa.
Controlling Through an External Power Supply
The above design could be also modified for enabling motor speed control through an external variable power supply, as shown below.
Pin#5 can be seen driven from an external 0 to 10V variable power supply, for example from a LM317 based power supply
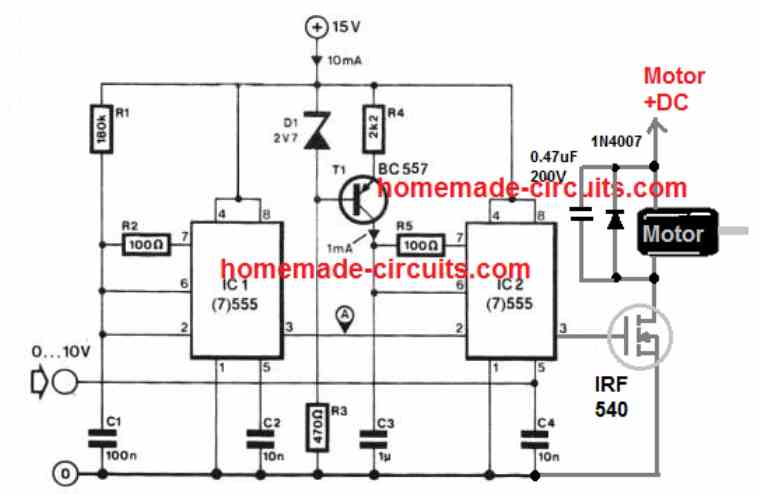
If you do not wish to use an external power supply, the above treadmill speed controller design could be simplified even further, by adding a 1k pot at pin#5 of IC2, as demonstrated below:
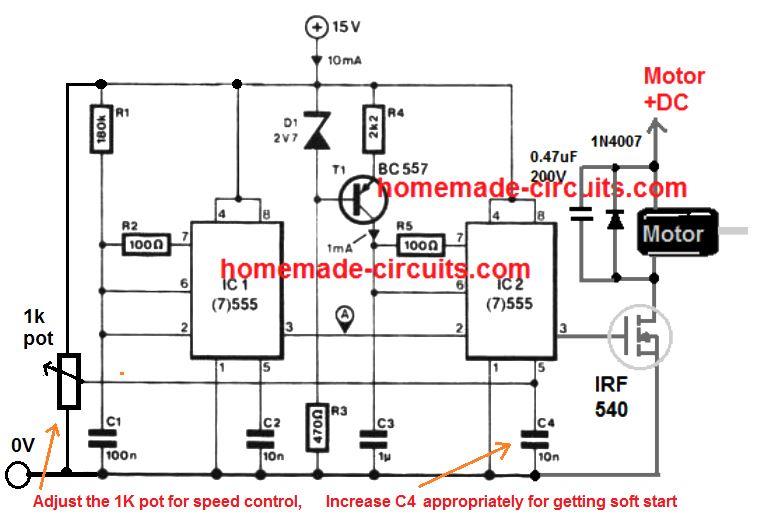
The 1k pot will allow you to adjust the treadmill speed from 10% to 90%, and the C4 value could be experimented to add a nice soft start to the treadmill motor during the switch ON.
Construction Guide
Power Supply Section
15V DC Supply:
Ensure that the input power source delivers a stable 15V DC, because it is critical for the 555 timers and the IRF540 MOSFET operation.
Use a well-filtered power source to avoid the noise interference.
Zener Diode (D1 - 2.7V):
Provides a fixed reference voltage for the base of T1 (BC557 transistor) which gives stable operation.
PWM Generator (IC1 - 555 Timer)
The first 555 timer (IC1) is configured as an astable multivibrator, to generate a pulse-width modulated (PWM) signal.
Pin Connections:
Pin 1 (GND): Connect to the ground.
Pin 8 (Vcc): Connect to +15V supply.
Pin 4 (Reset): Connect to +15V to enable the IC.
Pin 5 (Control Voltage): Add a 10nF capacitor (C2) to ground to stabilize the PWM signal.
Pin 3 (Output): Outputs the PWM signal to the base of T1 (BC557 transistor) via R4.
Frequency Control:
Use R1 R2, and C1 to set the frequency of the PWM signal.
Formula for frequency:
f = 1.44 / [(R1 + 2R2) * C1]Where:
R1 = 180kΩ
R2 = 100kΩ
C1 = 100nF
PWM Adjustment (1kΩ Potentiometer):
The 1kΩ potentiometer varies the duty cycle of the PWM signal allowing the speed control of the treadmill motor.
Soft Start and Motor Driver (IC2 - 555 Timer)
The second 555 timer (IC2), is configured as a monostable multivibrator to implement the soft start feature.
Pin Connections:
Pin 1 (GND): Connect to the ground.
Pin 8 (Vcc): Connect to +15V supply.
Pin 4 (Reset): Connect to +15V to enable the IC.
Pin 5 (Control Voltage): Add a 10nF capacitor (C3) to ground.
Pin 3 (Output): Drives the gate of the IRF540 MOSFET.
Soft Start Capacitor (C4 - 10nF):
This capacitor determines, the ramp-up time for the soft start feature.
Larger values of the C4 increases the soft start time.
Adjust C4 using the formula:
t = 1.1 * R6 * C4Where:
R6 = 10kΩ
C4 = Soft start capacitor
Motor Connection:
The motor is connected to the drain of the IRF540 MOSFET with the source connected to the ground.
D5 (1N4007): Protects the MOSFET from back the EMF generated by the motor.
Working Principle
PWM Speed Control:
The duty cycle of the PWM signal generated by IC1 provides the average voltage applied to the motor.
Adjusting the 1kΩ pot, changes the PWM duty cycle effectively, controlling the motor speed.
Soft Start:
When the circuit is powered ON, the IC2 gradually increases the gate voltage of the MOSFET due to the charging of the C4.
This ensures that motor starts smoothly without jerks.
Overvoltage Protection:
The 2.7V zener diode (D1) ensure the PWM output voltage doesnt exceed safe levels for the transistor T1.
Relevant Calculations
Frequency of PWM Signal (IC1):
f = 1.44 / [(R1 + 2R2) * C1]For the given values:
R1 = 180kΩ
R2 = 100kΩ
C1 = 100nF
Substituting:
f = 1.44 / [(180k + 2 * 100k) * 0.1µF]
f ≈ 34.3 Hz
Soft Start Time (IC2):
t = 1.1 * R6 * C4For the given values:
R6 = 10kΩ
C4 = 10nF
Substituting:
t = 1.1 * 10k * 10n
t = 0.11 msIf a larger value for the C4 is chosen (e.g 1µF):
t = 1.1 * 10k * 1µF
t = 11 msAssembly Tips
Use a Heat Sink for the IRF540:
The MOSFET can heat up under heavy motor loads so Attach an appropriate heat sink.
PCB Design:
Keep the ground connections of the IC1, IC2 and the motor driver separate to avoid noise.
Testing:
Test the PWM output with the multimeter or oscilloscope before connecting the motor.
Safety Precautions:
Ensure proper insulation for all tthe high-current connections to prevent short circuit.
Using A Dimmer Phase Chopper Circuit
As rightly suggested by one of the dedicated readers of this blog, Mr. Ivan, a 180 V treadmill motor can be simply controlled through mains phase chopping concept, normally incorporated in all commercial dimmer switches for regulating home fan speed.
Shown below is a modified dimmer switch circuit design which can be effectively used for regulating a 180 V treadmill motor from zero to max:
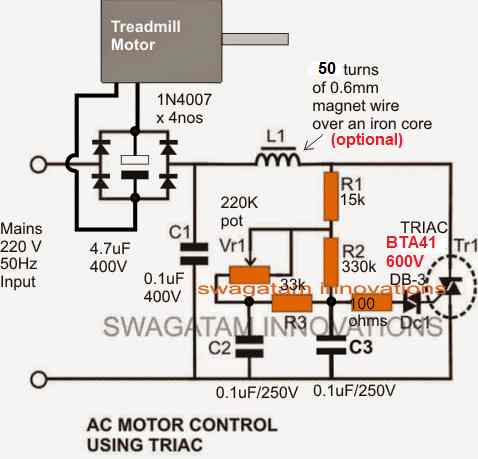
Please make sure to use a non-polar capacitor for the one shown between the bridge rectifier.
Use the following type, 10 in parallel
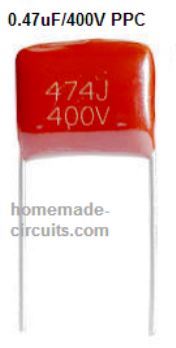
10nos of 0.47/400V in parallel will make 47uF/400V non polar capacitor which may work like a decent filter capacitor for the motor.


Questions & Answers
Hello,
thanks for this circuite. I have questions about it :
is the IRF540 strong enough ? its rated for only 100V as I see on datasheets.
why aren’t any isolation ? On treadmills, there are very high currents and high tensions as M. Samuel said
Thanks
Regards
Hey, thanks for your useful suggestions. You are correct, I will try to design the same using an SSR, soon.
Thank you for such a great article . How can i add a comparator circuit where with a variable resistor i cad fixed my voltage at 50 , 60 ,80 or what i want . when i input External 10 volt it will output my desired set voltage or if i input 5 volt it will output half of set voltage .
it will great if you reply my comment . thanks in advanced .
Thank you Ali, I think you can try the following simple circuit instead which will give all the required features necessary for adjusting the treadmill motor parameters. The zener diode can be changed to get the required 50 , 60 ,80 V motor control or any other desired value.

Thank you for your everts. can i use IGBT transistor instead of IRF740 ?, my DC motor up to180v 4A and they used G40N60 so i want to use it for more safety
Regards
You are welcome, yes you can use IGBT for handling higher power loads….

I have improved the above design with additional protections along with a current, overload protection.
Saya seorang teknisi alat olahraga treadmill,sering memperbaiki modul pcb controlernya cuma saya selalu kesulitan untuk mendapatkan skema dari modulcontroler yang saya perbaiki,manakala ada modul yang sulit diperbaiki karna keterbatasan kemampuan membaca rangkaian tanpa skema
I have a proteus mtm-5600 treadmill which is now showing a e1 error and the belt does not move. The output voltage on the power board reads around 72 vdc whereas the motor needs 190 vdc. i have a picture of the board at:

What can i test with a multimeter? i am an electronics noob but can use a multimeter and know some basics. I just want to make sure the repair guy is actually doing a decent job and not damaging the board.
Sorry, I have never used that board so it is practically impossible for me to know the exact test points.
my email: [email protected]
my customers treadmill shoots to high speed upon start, I have checked the swapped the speed sensor but the [problems remains, please advise me which speed control component should i change in the circuit board,
Thank you and I will be grateful.
Collins Stuart
I understand the problem, however since I do not have any information regarding your details of the treadmill circuit board, it can difficult for me to judge the issue and suggest a solution.
Dear Swagatam,
This is Collins again:
My Motor is 200v and the motor control board is an Altatech alt-6890 mcb I have replaced all the 3 mosfet but motor still starts in high speed.
Hi Collins,
I do not have sufficient information regarding Altatech alt-6890 mcb, so it is difficult for me to solve your query.
very good your post, I have a 90V treadmill motor, but I’m having trouble with a power supply, could you help me????
Thanks, and glad you liked the post. I think you will need a 220V to 90 V transformer for the power supply
Thanks for the useful post and info. I dont really need to use the motor at low speeds so I intend to use the SCR based circuit (thanks for such a nice, concise diagram!). However, I just have a question which may be rendered moot. I understand how SCRs work but the thing I am concerned with is this:
A motor rated at, let’s say 240V DC (though it seems 180 is more common), when fed with rectified DC will be seeing +/- 340V from a 240V AC supply due to the difference between peak/RMS values. Am I missing something or is this likely to burn the motor out as it runs on 40% more voltage than it is rated for?
Thanks for your interesting question.
Yes you are right, that is why the motor is supposed to be a 310V or 340V DC motor if the input AC is 220V or 240V. For 110V AC inputs the motor is supposed to be rated at 155 V. Alternatively you can use a 240V to 150V transformer and then rectify the transformer output for the getting the matching DC for the motor
Thanks for your quick reply. I had been watching the videos and reading the web sites about this thinking people were asking for trouble just rectifying DC without taking into account peak vs RMS. I’m glad to hear someone with your skills agrees. Now I just need to work around the problem. Thanks again.
You are welcome!
I’m posting this again because after pressing the “Post Comment” button, I didn’t get an awaiting moderation message.

I have an update, I hope you got my last message, If not I will recap.
My damaged controller had a MUR3060PT ultrafast diode with following circuit across the motor.
102K 1kV Ceramic Disc Capacitor and 470K resistor.
I bought a mosfet 23N50 500V 23A (My motor rating 180V 14A). I used this Mosfet and connected the above circuit across the motor. Treadmill is running with belt tightened. The problem I have now is with pot at minimum position the treadmill is running at RUNNING speed, I need to slow it down further to JOGGING speed and WALKING speed. I cant even get on it safely with this speed. When pot at minimum the voltage is 140V DC across load. How can i reduce it further?
Do I need an appropriate powersupply to reduce the input voltage to 180V? Can I use the one in following https://www.homemade-circuits.com/0-300v-variable-voltage-current/
Can it withstand the current rating of my motor (if not which component needs to be replaced?)
Please suggest a transformerless power supply that can be used for 180v DC motor.
Thank you
Have a great day
The diodes and the capacitor are provided only to suppress back emf from the motor.
Yes you can use the 300V MOSFET circuit, however the mosfet can get too hot at lower speeds. Therefore only a PWM based design is recommended.
How can I reduce the minimum voltage to the motor? With Pot at minimum, motor is running fast. How can i reduce the speed even further? Right now with pot at minimum position, motor is at 50% speed, How can i adjust the speed from 0 to 100%?
You will need a Pwm circuit with a pot, or a mosfet circuit with a pot for reducing the speed.
I tried the First Circit (Simplified version), I tested it with a 12v motor using a 12 volt smps, which worked fine. Then I used a bridge rectifier D35SB80 (1000v 35A) and connected a 60W bulb, which also worked. Then I connected 10 capacitor 0.47uf in parallel to the DC output of the rectifier and feed that to the treadmill. Treadmill ran at very high speed so I turned it off. The Mosfet IRFP240 (200v 20A) was short after this. Is this because I used a 200v Mosfet? DoI have to use a 400v or higher? (My motor specs is 180v 14A). I used a 200v one because you said in the previous post to choose the mosfet as per the motor specs. The bridge rectifier output is 240v DC and when using the 10 non polar capacitors in parallel raises the voltage further to 300+.
Also when using the pot, the voltage varies too qickly, which pot should I use to fine tune the voltage even further?
Thank you
Have a nice day
Glad you could build the circuit successfully! Matching the mosfet with the load specs means the mosfet rating must be considerably higher than the load, voltage rating should be 25% higher and the current rating 50% higher. Yes a 400V mosfet would be required for a 300V output, which can be actually fatal for a 180 V motor. So the supply input itself is incompatible with your motor. The mosfet can also burn due to reverse spike from the motor, so make sure to add the diode/capacitor snubber across the motor, and repeat the same across the mosfet drain/source.
You can try two 10k pots in series and use both of them to fine tune the motor output
Hello, I have an old treadmill which i bought back in 2015. It wasn’t used for a year and now it stopped working. The control board is faulty. The motor is working fine (180v dc motor). I would like to know if i can use the treadmill again with the First Circuit (Simplified version, I dont need reverse direction control). Can the First Circuit handle the load when running on the belt?
Thank you
Have a nice day
The simplified can be used for your purpose, provided the mosfet voltage and current rating the appropriately selected as per the motor specs.
Hello Mr. Swagatam,
I purchased two different dimmer switches you are speaking of to control a 3HP, 110VDC, 21A Treadmill motor. Both of those dimmer switches were defective. It said you could use 120 or 220VAC supply.
When I had them hooked up, I used a high amperage full bridge rectifier along with high power capacitor. Nonetheless the potentiometer had no effect on the AC output side or the recitified end. At the output AC before the rectifier it read 125VAC and on the DC end it read 175VDC no matter where the potentiometer was adjusted at. I got tired of it all and send them back. And the motor wouldn’t respond at all. The fact is I was reading 175VDC at all times so the potentiometer wasn’t controlling supply voltage if that is the game and the motor wasn’t doing anything. That is that. The first dimmer did respond but it was terrible and the adjustment wasn’t at all from 0 to the maximum whatsoever.
know the motor is good because I run it with a Treadmill motor controller just fine. Only that I use that controller with another motor.
So I like to just build your second circuit above, one without the reverse circuit.
What I don’t understand is the following.
1. I don’t see where the supply AC line is in the circuit and at what voltage it has to be 120 or 220 VAC? The DC output is clear.
2. I don’t know what that frequency adjuster is (R1) or how to adjust it and its value and what it looks like which seems to be external to IC1 555 timer.
3. I see 5 capacitors in total and none has 220uF value. I don’t know where the 220uF capacitor is that you are speaking of below the circuit in your commentary. You mention it is used for soft start.
4. I understand that the circuit still needs a 1K resistor paralell to that C3 capacitor.
5. I assume this is a pwm control that uses a potentiometer to control the speed of the motor which controls the voltage supply to it.
6. I want to make sure I have this right. There is one zener diode 2V7 ( D1) and one regular diode IN4007 in the circuit.
7. Will this cicruit be good enough for my motor. 110VDC, 20 A. I am certain I will never need that much power from the motor. Most likely if anything around 8 amps at best. Just for hobby usage. I won’t be running it on some Treadmill. I will use it to install a metal cutting blade, sanding, grinding, things of that nature. It won’t be pulling any 100 lb weights.
Thanks in advance for clarifying the above points. Appreciate everything you do.
Hello Mr. Ali,
I forgot to mention in the article that for a tread mill the light dimmer triac will need to be changed to a powerful one such as the BTA41/800, otherwise the normal triac can get damaged instantly. But you must always test any circuit using an incandescent lamp first just to confirm that the circuit is actually working or not?
1) The IC 555 and mosfet based schematic are for treadmills with DC motors. But you can convert them to work with AC loads by adding a bridge rectifier with the load, as shown in the following example:
2) You can adjust the frequency to 100 Hz, by checking the frequency at pin#3 of IC1
3) The 220uF is mistakenly written for 100uF at the base of the BC547
4) That’s right.
5) The potentiometer controls the PWM which in turns causes the motor speed to vary as per the pulse widths.
6) That’s correct!
7) If Your MOSFET is appropriately rated then there shouldn’t be any problems operating your treadmill.
I would recommend adding a snubber network parallel to the motor as well to safeguard the circuit from accidental voltage spikes.
Sorry more questions.
I noticed the diagram in the link you sent me is more different looking in its details than what is in the main post here.
There are 5 capacitors in the main post’s diagram and the link you sent there are 4 capacitors.
And there is more other things involved. But the other stuff is no problem.
I just want to make it is all I need and the only thing I don’t know what it is that square box (7812) that is hooked up to rectifier IN7007. Is that a transistor or some kind of variable resistor and is that where one adjusts the frequency or the frequency is adjusted by some other device in the circuit?
I would advise you not to attempt this circuit unless you have learned all the basics of electronics otherwise there’s a 100% chance you will fail with this project. The linked circuit is little different but the function is the same, to control the load with PWM.
Thank you so much for being clear in your effort to cover each point.
On the first one, I believe you meant that, the schematic is for DC supply source and by adding a bridge rectifier to an AC power supply, one can use AC supply as power source.
And the schematic you included I noticed another element, a transformer.
It appears that the circuit itself require lower voltage so a transformer is needed.
I want to make sure that I have it right. The transformer is a step down to 12VAC.
Is this correct? ( I have many transformers converting 120VAC to 12VAC)
And could I use 120VAC as power supply with this circuit as these circuits seem to show 220VAC across the board?
Thank you so much.
All electronic circuits will require a small DC to run, so this circuit will also require a 12 V Dc to operate. Yes a bridge rectifier needs to be added with the load so that the MOSFET is able to work with DC while the load works with AC.
I think you are very new to electronics. Yes a transformer is a device which steps down high AC to low AC which is then converted to DC through a bridge for supplying an electronic circuit.
Your transformer primary must be rated at 120V to handle 120V AC input.
I think you must first get well versed with all the basics of electronic and only then attempt the above complex designs.
Hi Mr Swagatam
I’m working on a project to use a treadmill motor to drive a lathe. I’ve purchased a Motor Speed Controller Board to drive the motor and it needs an external PWM signal to vary the speed of the motor. There is a 12 pin connector socket on the board, through which the external PWM signal is connected (normally via the console). I’ve managed to find a drawing of the 12 pin connector and it identifies each pin as follows
Pin #1 +11V
Pin #2 ELV Up/Dn
Pin #3 ELV Dn/Up
Pin #4 +11V
Pin #5 Relay ENB
Pin #6 Command PWM
Pin #7 Gnd
Pin #8 Gnd
Pin #9 Speed Signal
Pin #10 ELV +5V
Pin #11 ELV In
Pin #12 ELV Gnd
I’m hoping you can help me decipher what these Pin identifiers are so that I could connect the motor speed control board to one of your PWM circuits.
Regards
Jim
Hi Jim,
I am not very sure about the terms mentioned on the pin connector?
ELV probably means Extra Low Voltage.
Relay ENB means Relay ENABLE
Command PWM could be the input for the external PWM control
Speed Signal could indicate an input for a DC level, or it could be an output to measure speed.
Hi Mr Swagatam, thanks for your reply. I think I may have to try and find out which manufacturer made the treadmill that the board came from. As a matter of interest, could you tell me what connections are necessary between a PWM controller and a motor speed control board of this type.
You are welcome Jim, A motor speed controller board as the name suggest must include a PWM generator in the board itself and must not depend on external signals. So I am not sure what kind of controller may require external signals for the control. If the broad is built only with power mosfets or transistors then an external pwm can be justified but then the board cannot be specified as motor controller board.
asslam o alaikum
i am in confusion, i am trying to make tredmil motor control circuit, which consist 1 dc motor, variable copper quile like automatic voltage stablizer, and rectifier. through variable copper quile input for example 60v after this input i given to rectifier then came to know in output 100volts. this circuit increase volts . what is matter plz guide me. thanks zameer hussain
Hello, An AVR or an autotransformer will have a range from a higher stepped-up voltage to a lower stepped-down voltage, so you AVR is giving the correct results. Check the tapping of the AVR and connect you motor with a tapping whose maximum voltage is not in the stepped-up range
It has been so many years but I still find it very interesting. My back ground in electronics is not near what yours is especially in semi conductors. My education was in the time of tubes and stopped in the infancy of semi conductors. I’m the kind of guy that wants to trouble shoot a problem and then change what ever component is bad rather than take out the entire circuit, throw it away and put in a new one. This was a little off topic but what I am needing to build is a controller that operates on 120v and operates a 90v DC motor where the field and armature are both wound. Can one of your circuits be modified for this purpose? Thank you for your help. I do have a controller but I can not find a schematic for it. There are no obvious bad components and I could and probably should check all of the components to see if I can find the bad culprit. But then again, your control sounds very interesting. Thanks again for any advice or help.
Thank you for your query, and explanation!
Yes you can use the second last circuit for powering your 90V Dc motor
Hello friend, all right, one more question about the dimmer, I’m having trouble connecting the potentiometer to control the speed. I installed the potentiometer, but the speed is not changing, can I get out of this doubt? I mean the last dimmer scheme for 180v
Hello Elias, For the dimmer, you have to build everything exactly as shown, and first test with a 100 watt lamp, if the lamp works fine then you can try it with a motor.
More information on the dimmer controller can be found in the following article:
Light Dimmer and Ceiling fan Regulator Circuit
when the problem of the triac I managed to solve, I was commenting an error, I was using a 4 ampere triac, but I had not paid attention before, doing the tests I realized that the triac was low amperage. solved that part.
OK, glad it is solved now!!
hello friend, I made the circuit according to the Scheme you sent me, the 1.2 hp 90v engine keeps burning the triac, I think the engine is shorted. I tested the scheme on the treadmill with a 1.4hp 90v motor it worked, the treadmill is working even more smoothly, I used a resistor and a capacitor in series. I leave my thanks here.
No problem friend, I hope you are able to solve the issue fast, and report back here.
thank you very much friend. could you send me a schematic for me to do this montage? I would like to thank you in advance.
hello friend, I did this dimmer project, but I still couldn’t understand the part of the Vr1 potentiometer, I put the potentiometer but it has no effect, how can you get me out of this doubt? I thank you already friend.
VR1 is the speed control pot, and rotating it should enable the speed control from 0 to maximum. If it is not working then your circuit is not working or maybe something is wrong in it.
Try reducing the C2, C3 to 0.047uF/250V, and use a pot rated at 220k, and see the results, if still it doesn’t then your triac is blown for sure or there maybe some other connection fault.
You can add the snubber across the triac pins, as indicated in the following schematic:
thank you so much friend for the return! so if i put a diode in parallel on the motor output would it work?
You are welcome Friend, no not a diode, rather a capacitor/resistor in series. You can try a 100 Ohm and 0.33uF/400V capacitor series network across the MT1/MT2 pns of the triac.
Hello Friend! the project was filet on my treadmill using the 1.4 hp 90v engine, the torque is excellent. now on another 1.2hp engine also 90v I tried to use the same project but it’s not working I used a coil with 21 awg wire with 200 volts is burning the triac transistor. my thanks friend, I really like your projects.
Thanks friend, I guess you are referring to the last circuit…most probably your triac might have burned, due to back emf from the motor….you may have
to use external snubber also, even if the triac has internal snubber. The coil has nothing to do with this issue actually.
Good night, I live in Brazil I am a hobbyist and I am looking for a PWM circuit for a 90V DC motor. and 1 Hp, I think this circuit will do, does your circuit have to have 2 supplies? 15v for the circuit and 90v for the motor (in my case)? should I connect the 90v directly to the motor where “Motor + Dc” and “0v” are? Thanks.
Yes the circuit requires two DC supplies, one from the the motor other for the circuit.
You can extract the 15V from the 90 V itself through a suitable SMPS buck converter
hello friend, I set up the project and it is already working. I made the coil with 200 turns, but it is getting very hot in a short time. What do you advise me to do? I tested with 100 laps, but it didn’t go very well in the test, 200 laps was already much better in the test, but there is only this detail to solve, I thank you for the strength and patience.
Glad to know it is working for you, I guess you are talking about the last circuit. Please try using thick wires for the coil L1, may be a 1 mm or 1.5 mm enameled copper wire should work nicely, since the motor is a high current motor.
Mr. Swagatam,
I am attempting to build the Treadmill speed control circuit, the second simplified one. Do you have a more clear picture of the circuit? Its a bit blurred and hard to read. I’m wanting to control a 2.5 HP 22 AMP 130VDC PM motor.
Also in the comments its stated to use PPC or metalized type and non polar capacitors. I have not been able to find info as to this type, are they called something different.
Do you have a parts list to go by on this diagram?, that would help a lot too.
I know enough about electronics to safely let out the smoke.
Mr Swagatam,
I see no change in the Simplified Design. Just as blurry.
Can you send me directly a very clear diagram.
I can’t see what the transistor number is or what the resistor is above it, barley make out some of the capacitors.
I’m a CAD drafter and would love to redraw some of you circuits for you that need a good clear diagram.
Yes those are clear but wrong circuit. Its the second circuit in that group. The one after the reversible speed control. I just want to build a one direction speed control.
I also see in both those examples a resistor marked “2k2”. Is that suppose to mean a 2k resistor? The second “2” to me is confusing.
I’ve got a background in electrical controls, so electronics is a bit of a learning curve for me.
The new designs are the simplified versions, they are not wrong!! The following circuit is the simplified version of the second one and will do exactly same like the second one:
2k2 is 2.2k
Mr. Clint, Are you seeing the following figures? They are larger and much clearer now:
Mr.Clint,
I have updated the post with new simplified diagrams and clearer diagrams, Please check them out!
Part numbers are given in the diagram itself.
All the resistors are 1/4watt 5%
Al the capacitors are PPC type non polar 100V, except the one parallel to the motor which is rated at 200V
I did it the way you told me about the capacitors, it was excellent. I now have a new question … about the coil; what is the ferrite size? for me to do the correct calculation. thank you very much friend.
Glad to know it is solved! The L1 and the complementary C1 are not critical, they are introduced to cancel out the high frequency RF disturbance generated due to the rapid chopping of the phase by the triac!
The coil will need to be experimented with some trial and error. Initially try any ferrite core that will accommodate 100 turns closely wound 21 SWG super enameled copper wire. C1 can be 0.1uF 400V.
Now keep an MW radio nearby and check the reduction of RF by increasing the number of turns on L1. Keep increasing until you find minimum disturbance on the radio.
I’m sorry friend !, I think I couldn’t express myself very well. I replaced the 4.7uf 400v electrolytic capacitor with 10uf and also replaced the 0.1uf400v capacitor with the 22uf non-polarized capacitor and performed the assembly in parallel, overheating still continues. I appreciate your patience in helping me.
No problem friend, I have understood it! The capacitor between the bridge rectifier, can be 4.7uF/400V or 10uF/400V but it should be strictly a non-polar PPC type, just as the other capacitors are.
The 0.1uF/400V does not need to be changed at all, which can cause other problems.
So all the capacitors in the diagram must be non-polar, and the values shown in the diagram must be exactly as it is!
hello friend, I did everything you recommended, replacing the 4.7uf400v capacitor for 10uf 400v is overheating, I put the 22uf capacitor, the heating is very little but if you continue with the 22uf capacitor and the motor will run for another 1 hour or less it can burst. do you suggest me with this situation? I configured the project as shown in the image and I have the omponetes as the project asks.
OK got it, so did you also use a non-polar capacitor as advised by me? Electrolytic cap might not work and may heat up quickly…
Good day. My degree is in Physics, NOT electrical engineering. I have a couple mc2100 board versions and a recent freebee mc1650LS Both need PWM to control motor speed since neither has potentiometer connectors. The 1650 has a 4 pin connector from the upper control board and the other boards have: an RJ45 8 pin, or the 7-8 straight pin. I have seen one mod where a PWM was connected to the 7-8 straight pin connector utilizing just 4 of these pins. While encouraging, none of these searches details, or explains how to connect the PWM generator to any of these boards. I am tempted to just use the SCR + rectifier examples – – but I would really like to utilize the treadmill controller boards. I am just a little lost/overwhelmed… Bill
Hello, I could not find a proper datasheet for the IC MC1650, so I am unable to figure out the pinout details of the IC.
Thans for trying – I ordered a PWM generator off ebay (china) so I don’t expect to see it until May. I looks like it has 4 wire connectors, would you have an idea how to connect this to a mc2100 board? Thanks again.
The MC1200 is actually an SMPS circuit for powering the treadmill motor. It requires an external varying PWM input to enable the corresponding speed variations on the treadmill motor.
You will find a connector near the end opposite to the transformer end of the board. This connector will have four wires, two black common wires which will connect with the negative of the PWM circuit, one red wire that will connect with the positive line of the PWM circuit, and a blue wire that will connect with the PWM signal output of your PWM circuit.
There’s another quick way of achieving the speed control on MC-1200 without using an external PWM. It is by replacing the small yellow colored voltage control preset existing on the MC-1200 board with an identically rated potentiometer.
Hello friend! about the dimmer is working perfectly I mounted it the way you explained to me. I have a new question, I need to set up a project to control a battery-powered 36v 700watt electric bike motor. Do you have a project like this or could you help me with this project? God bless you always my friend.
Hello Elias, glad the dimmer is working correctly now. For a e-bike control circuit you can probably try the following design
Simple E-Bike Circuit [Electric Bike]
yes friend, it is the capacitor that controls the motor. can I replace with a 22uf 450v?
No, the capacitor does not change the speed, the speed is changed by the pot VR1. The capacitor only filters the ripples.
yes 22uF will do, but it should be non-polar to ensure that it does not heat up
I am looking to use this pwm circuit on a conveyor, the engine will work with 1.4hp. 90v. 10A.
I made the circuit and tested it. the 4.7uf 400v capacitor is overheating in the 1.2 hp.90v engine. 10A 4000RPM. Should I change the configuration of this scheme? what did you suggest to me friend?
Is it controlling the engine speed? If yes then you can replace the 4.7uF electrolytic capacitor with 5 or 10 nos of 1uF/400V in parallel, these must be PPC or metalized type and non polar, like the brown one in the following image:
Hi, I am hoping to build your 2nd circuit. My motor is rated at 230 Volt DC 9.5 Amp. Will the following Mosfet be suitable?
IXFQ60N50P
Channel Type N
Maximum Continuous Drain Current 60 A
Maximum Drain Source Voltage 500 V
Package Type TO-3P
Mounting Type Through Hole
Pin Count 3
Maximum Drain Source Resistance 100 mΩ
Channel Mode Enhancement
Maximum Gate Threshold Voltage 5V
Maximum Power Dissipation 1.04 kW
Transistor Configuration Single
Maximum Gate Source Voltage -30 V, +30 V
Thank You
John
Hi, yes it should work with the specified circuit design, but first confirm the circuit operation using a 220V bulb, if it dims and brightens with the PWMs then the circuit is working and confirmed.