• Skip to main content
  • Skip to primary sidebar

Homemade Circuit Projects

Need circuit help? Post them in the comments! I've answered over 50,000!

Blog | Categories | About | Contact | Calculators-online
You are here: Home / Datasheets and Components / High Voltage, High Current Transistor TIP150/TIP151/TIP152 Datasheet

DIY Circuits | Learn Basics | Arduino Coding


High Voltage, High Current Transistor TIP150/TIP151/TIP152 Datasheet

Last Updated on January 1, 2020 by Swagatam 11 Comments

The TIP150, TIP151, TIP152 series are high voltage, high current Darlington transistors which can be used for applications involving voltages at mains 120V or 220V levels. The datasheet and other related details can be read in the following article.

The typical applications of this transistor could be for high voltage motor control, automotive ignition, inverter converter switching, SMPS and in many other similar areas.

Main Specifications

The main datasheet, specifications and features are as follows:

Collector to Emitter Continuous Voltage:
VCEO(sustained) = 300V minimum for (TIP150)
VCEO(sustained) = 350V minimum for (TIP151)
VCEO(sustained) = 400V minimum for (TIP152)
Collector−Emitter Saturation Voltage: VCE(sat) = 2V maximum at I current of 5A

The maximum current for the above voltages is 7 amps (continuous) and 10 amps for instantaneous peaks.

The base/emitter saturation voltage for TIP150, 151, 152 is 1.5V at 100mA for a typical 2 amp collector load, while it could be around 250mA at 2.3V for a 5amp collector load.
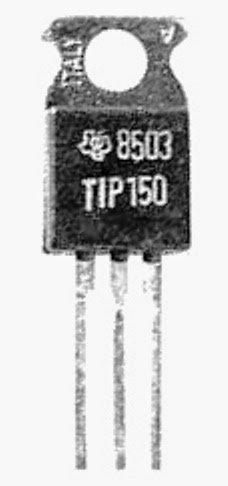
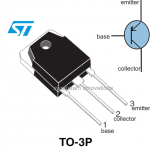
Pinout Details

In the shown image above the pinouts of the transistor can be identified as follows:

The center lead is the collector, it's connected with the metal tab of the device therefore the back steel tab also becomes the collector.
The right side lead is the emitter.
The left side lead is the base of the transistor.

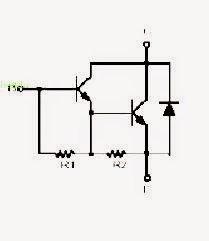
Internal schematic of the transistor TIP150/TIP151/TIP152

The above figure shows the internal Darlington structure of the transistor. A typical paired transistors could be seen here which forms the Darlington configuration.

This configuration helps to provide the device with extremely high gain and sensitivity even at the specified high power inputs.

You'll also like:

  • irfp2907datasheetHigh Current 209A, 75V MOSFET IRFP2907 Datasheet
  • BC547 symbol and pinoutBC547 Transistor Datasheet [45V, 100mA NPN Transistor]
  • 723px NE555 Bloc Diagram.svgIC 555 Pin Description and Working [with Formulas]
  • positive feedback hysteresisComparator Datasheet Parameters

Filed Under: Datasheets and Components Tagged With: Current, High, TIP150, TIP151, Transistor, Voltage

About Swagatam

I am an electronics engineer and doing practical hands-on work from more than 15 years now. Building real circuits, testing them and also making PCB layouts by myself. I really love doing all these things like inventing something new, designing electronics and also helping other people like hobby guys who want to make their own cool circuits at home.

And that is the main reason why I started this website homemade-circuits.com, to share different types of circuit ideas..

If you are having any kind of doubt or question related to circuits then just write down your question in the comment box below, I am like always checking, so I guarantee I will reply you for sure!

Previous Post: « Fading an LED ON/OFF – Arduino Basics
Next Post: Tilt Sensor Switch Circuit »

Reader Interactions

Comments

Engr Bolaji says:
December 24, 2022 at 8:15 pm

How?, Can you provide me with accurate circuit diagram and specifications.

Reply
Swagatam says:
December 24, 2022 at 8:23 pm

You can try the circuits explained in the following article:

https://www.homemade-circuits.com/simple-high-voltage-generator-circuit/

Reply
Engr Bolaji says:
November 27, 2022 at 4:04 pm

How do i connect the TIP152 for an amplifier to amplify 7.2volt,2amps DC to 400 volt?

Reply
Swagatam says:
November 27, 2022 at 5:27 pm

You will need a boost converter circuit for that…a transistor alone cannot be used for boosting a voltage level.

Reply
Jideofor Igwe says:
December 12, 2013 at 7:34 pm

The inductor is about 330uH. The battery is 3.7v 1200mah. I used the concept of the 1.5v to 12v converter i found in your site here. The two transistors are BC548-558(complementary). But i want to use 4×1.5v in parallel.

Reply
Swagatam says:
December 13, 2013 at 5:35 am

the 330uH coil should be rated at 1 amp, meaning the wires guage should be at least 0.8mm and the transistors should also be rated equally, 2N2222/2N2907 could work.

Alternatively you can try the following design if the previous circuit does not give appropriate results:

https://www.homemade-circuits.com/2012/10/1-watt-led-driver-using-joule-thief.html

Reply
Jideofor Igwe says:
December 12, 2013 at 11:22 am

Ok. The joule thief cellphone charger i produced was discharging instead of charging the phone. Please what could be the problem. And if i use L7805 with it, the current output will drop to 10mA. My phone needs atleast 800ma to charge. Please help

Reply
Swagatam says:
December 12, 2013 at 2:57 pm

provide me with all the details about the circuit, only then i would be able to suggest correctly.

provide the coil details and the battery details

Reply
Jideofor Igwe says:
December 10, 2013 at 2:37 pm

Please sir, i have a 650VA UPS that is powered with a 12v, 7AH rechargeable battery. Is it possible to charge 50 cellphones at once with this UPS? If not, how many cellphones can it charge at once?

Reply
Swagatam says:
December 10, 2013 at 3:58 pm

….oops sorry 0.2 x 50 = 10amps, now it looks impossible…

Reply
Swagatam says:
December 10, 2013 at 3:57 pm

50 cell phones would consume 0.2 x 50 = 5amps of current while charging, your battery would get discharged within half an hour so it's not feasible in my opinion.

Reply

Need Help? Please Leave a Comment! We value your input—Kindly keep it relevant to the above topic! Cancel reply

Your email address will not be published. Required fields are marked *

Primary Sidebar

circuit simulator image


Subscribe to get New Circuits in your Email


Categories

  • Arduino Projects (93)
  • Audio and Amplifier Projects (133)
  • Automation Projects (17)
  • Automobile Electronics (101)
  • Battery Charger Circuits (85)
  • Datasheets and Components (109)
  • Electronics Theory (149)
  • Energy from Magnets (27)
  • Games and Sports Projects (11)
  • Grid and 3-Phase (20)
  • Health related Projects (27)
  • Home Electrical Circuits (13)
  • Indicator Circuits (16)
  • Inverter Circuits (95)
  • Lamps and Lights (159)
  • Meters and Testers (71)
  • Mini Projects (28)
  • Motor Controller (68)
  • Oscillator Circuits (28)
  • Pets and Pests (15)
  • Power Supply Circuits (91)
  • Remote Control Circuits (50)
  • Renewable Energy (12)
  • Security and Alarm (64)
  • Sensors and Detectors (106)
  • SMPS and Converters (34)
  • Solar Controller Circuits (60)
  • Temperature Controllers (43)
  • Timer and Delay Relay (49)
  • Voltage Control and Protection (42)
  • Water Controller (36)
  • Wireless Circuits (30)


Other Links

  • Privacy Policy
  • Cookie Policy
  • Disclaimer
  • Copyright
  • Videos
  • Sitemap


People also Search

555 Circuits | 741 Circuits | LM324 Circuits | LM338 Circuits | 4017 Circuits | Ultrasonic Projects | SMPS Projects | Christmas Projects | MOSFETs | Radio Circuits | Laser Circuits | PIR Projects |

Social Profiles

  • Twitter
  • YouTube
  • Instagram
  • Pinterest
  • My Facebook-Page
  • Stack Exchange
  • Linkedin


Recent Comments

  • Swagatam on 9 Simple Solar Battery Charger Circuits
  • Gagana on 9 Simple Solar Battery Charger Circuits
  • Swagatam on Arduino 2-Step Programmable Timer Circuit
  • Swagatam on Simple Buck-Boost Converter Circuits Explained
  • Swagatam on IC IR2111 H-Bridge MOSFET, IGBT Driver IC: Full Datasheet, Circuit Diagram

© 2026 · Swagatam Innovations