• Skip to main content
  • Skip to primary sidebar

Homemade Circuit Projects

Need circuit help? Post them in the comments! I've answered over 50,000!

Blog | Categories | About | Hire Me | Contact | Calculators-online
You are here: Home / Automobile Electronics / Sequential Bar Graph Turn Light Indicator Circuit for Car

Sequential Bar Graph Turn Light Indicator Circuit for Car

Last Updated on June 1, 2026 by Swagatam 167 Comments

The article illustrates a simple yet innovative, fancy car turn signal light circuit which produces a rising bar graph sequence effect when switched ON.

Table of Contents
  • Technical Specifications
    • Audio/Video Representation
    • The Design
    • Circuit Diagram
      • Adding a Delay Timer
      • Modifying Further

The circuit idea was requested by Mr. +Bruce Lowry. I have explained more.

Technical Specifications

I am after a circuit design similar to the LED Bar Graph circuit that is found on this site/blog.

What I want to develop is a front turn signal sequential flasher that illuminates and holds the lights from top to bottom and then cycles them again and again until the turn signal is turned off.

I need to drive exactly 12 Amber LED's that drop 1.8 volts per LED. The LED's are laid out from top to bottom as such.

  • 1 (number of LED's)
  • 1(number of LED's)
  • 1(number of LED's)
  • 2(number of LED's)
  • 3(number of LED's)
  • 4(number of LED's)

I would like to illuminate the first one at the top and hold and then move on to the second one down and so forth until all 6 rows which consist of 12 total LED's are illuminated and then start the sequence over.

Variable resistors should be included so that the clock frequency can be altered. This will allow me speed up or slow down the illumination and hold of the LED's.

Plus if there is a variance in the driver side circuit and the passenger side I could use the adjustability to "syncronize" the working rates of both sides. (turning on the hazard flashers to observe both sides being enabled and sequencing would be a good way to visually check this)

In the connector to the front turn signals I am working with three connections.

Top pin is 12 volts constant when running lights are turned on (oh, just a thought- It would be nice to use the entire string of LED's as running lights as well) Middle Pin is zero volts (GROUND) and lower pin is 0-12 volts when the turn signal is activated.

I need a working circuit that will handle automotive voltages that are not always 12 volts in practice , but can range up to 14 or so volts in actual real world use.

A complete circuit diagram would be helpful. Including resistor values for driving the different multiples of LED's and if each LED would have its own resistor or just run them in series with one resistor.

Audio/Video Representation

The Design

The above circuit can be built using two different types of circuit configurations. One which uses the IC 4017, and the other through the IC 74LS164. Here we'll discuss the one which uses the IC 4017.

As shown in the first circuit diagram, the entire design is wired around the IC 4017.

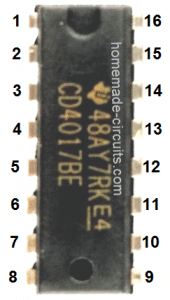
We know that the IC 4017 which is a johnsons divide by 10 decade counter/divider chip produces sequencing high logic pulses on its outputs in response to  clocks applied on its pin#14.

In response to each high pulse on pin#14, a high logic shifts from one output to the next in the following pin-out order: 3-2-4-7-10-1-5-6-9-11.

Thus all the 10 outputs become high sequentially until the last pin#11 becomes high after which the sequence returns to pin#3 so that the cycle can repeat yet again.

The cycle keeps repeating as long as the clock pulses are sustained at its pin#14.

However the sequencing pattern does not keep the outputs illuminated while shifting. The outputs become high and then become low again as the sequence shifts from one pin out to the other.

It means at any instant only one output is high during the sequencing process.

If we connect 10 LEDs at the above 10 outputs of the IC 4017, it would provide an impression of a single LED chasing effect, however since for the present car turn signal application we want a bar graph kind of appearance we would want the LEDs to stay and hold their illumination as the sequence proceeds from the start to the finish pin-outs.

To implement this "hold" feature we need to introduce a latching feature with the given outputs.

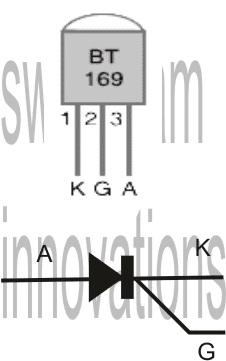
This can be simply done with the use of SCRs, because as per the characteristics SCRs latch their MT1, MT2 leads if the supply is a DC. Therefore it perfectly suits our application.

By connecting SCRs at the first 6 outputs of the IC we can simply implement the bar graph kind of feature such that the LeDs hold and stay illuminated until the complete is completed.

Pin#1 provides the last sequencing output after which the IC should shut down all the LEDs and begin the procedure all over again.

For actuating the above action, the transistor T1 stage in introduced at the next pin#5, which instantly inhibits the supply voltage to the SCrs so that all of them  shutdown.

Pin#6 is tied to the reset pin#15 of the IC which makes sure the sequence gets back to pin#3 as soon as the LEDs shut OFF,  enabling the next cycle to commence.

Circuit Diagram
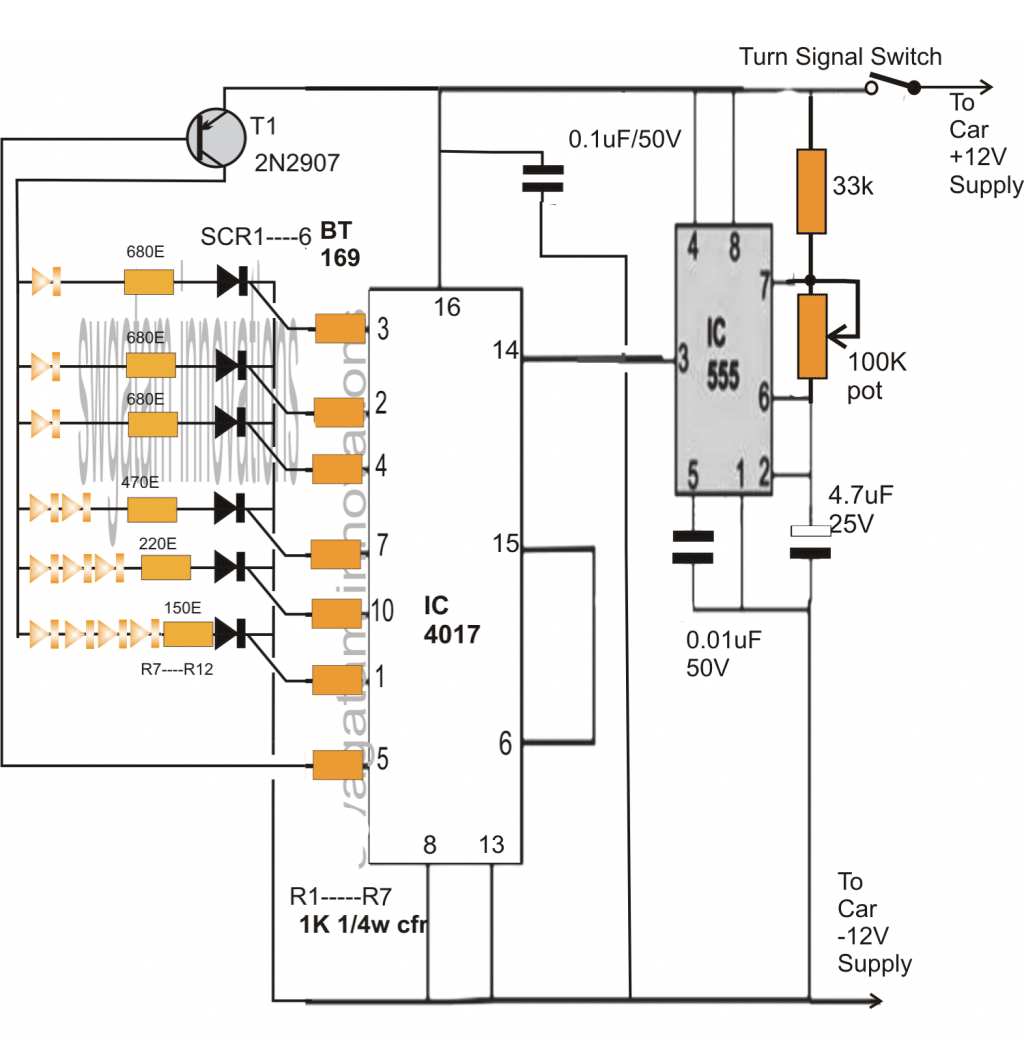
As rightly expressed by Mr. Bruce, the above circuit will not function properly under a fluctuating DC which would be normally available across the existing turn signal light outputs due to switching of the flasher relay.

Adding a Delay Timer

However the above circuit can be simply modified by adding a small time delay circuit, which would hold the current and keep the circuit functioning switched ON by supplying the required amount of power during the absence of supply from the flasher relay.
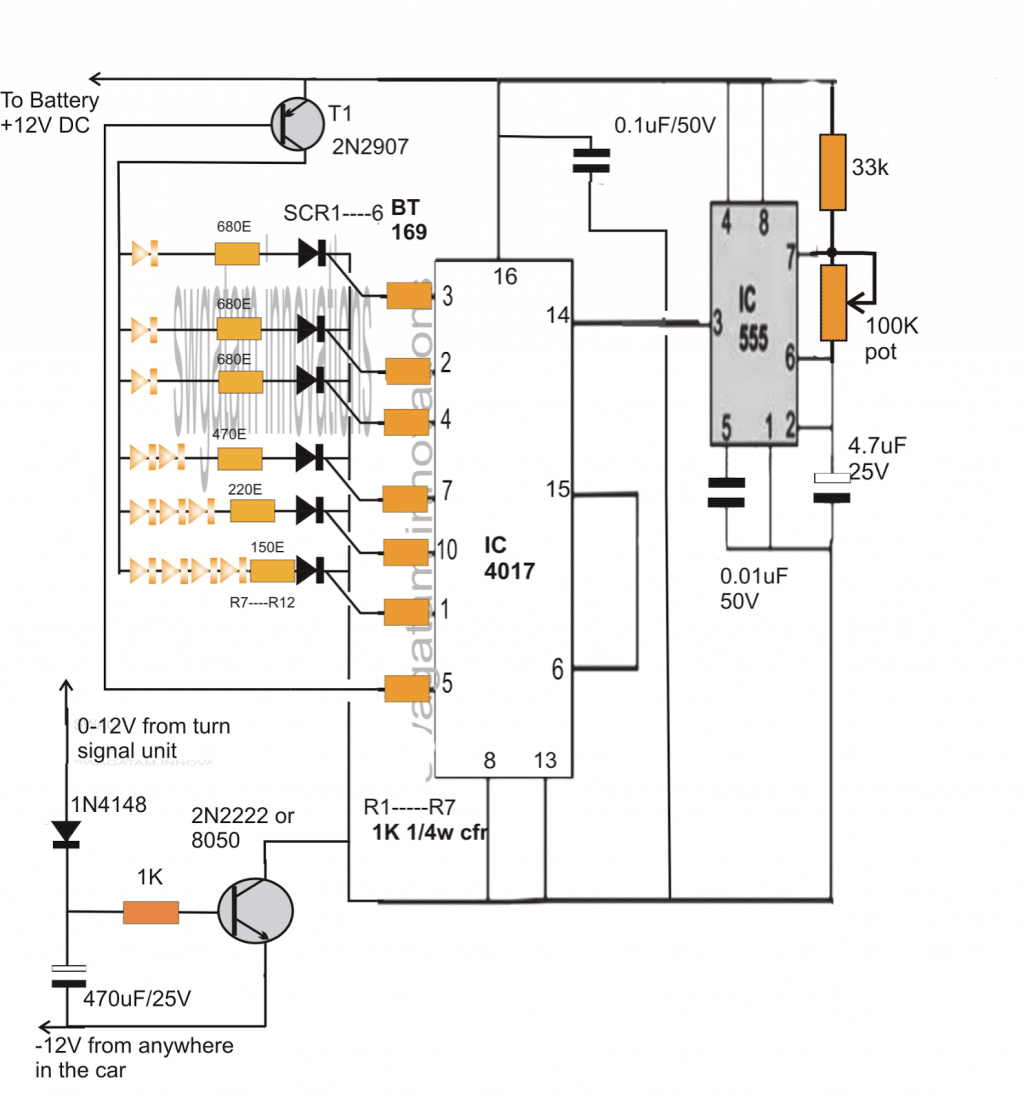
The above sequential car turn signal light circuit was successfully built and tested by Mr.Bruce Lowry.

The wonderful results can be witnessed in the following video. Please refer to the comments to learn regarding the whole process.

With an adjustable rate of flash added, the circuit now looks much enhanced. Courtesy: Mr.Bruce Lowry.

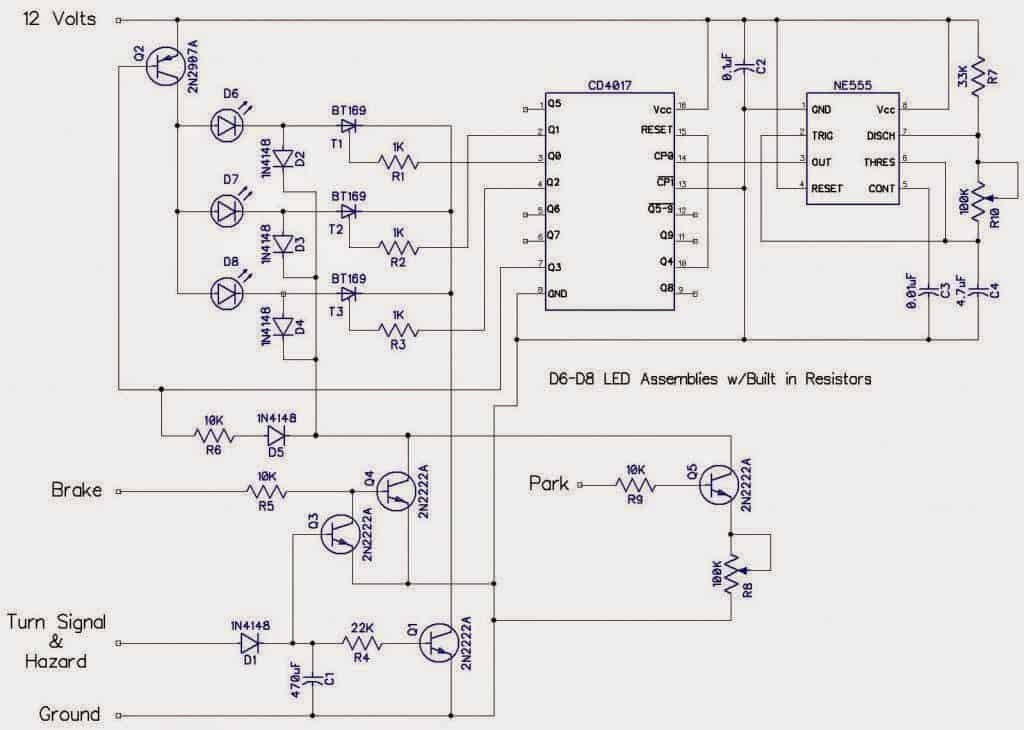
The above design was further modified by Mr. Jason in order to implement additional specific actions such as making the LEDs stay solid when the brakes are applied, but also making sure that the LEDs stayed in the flashing/running mode in case both: the turn signal and the brakes were switched ON together or simultaneously.

Modifying Further

The modified design which is attached below has an additional feature wherein the LEDs could also be used as park lights thereby making the above circuit a 3 in 1 unit:

Here's the complete design drawn by Mr. Jason for your viewing pleasure:
You'll also like:

  • multispark cdi circuitMulti-spark CDI Circuit
  • 110Vcompactledtubelightcircuit110V Compact LED Tubelight Circuit
  • 0.6v to 6v converter circuit0.6V to 6V/12V Boost Converter Circuit Diagram
  • Simple Car Burglar Alarm Circuit

Filed Under: Automobile Electronics, Lamps and Lights Tagged With: Graph, Indicator, Light, Sequential, Turn

About Swagatam

I am an electronics engineer and doing practical hands-on work from more than 15 years now. Building real circuits, testing them and also making PCB layouts by myself. I really love doing all these things like inventing something new, designing electronics and also helping other people like hobby guys who want to make their own cool circuits at home.

And that is the main reason why I started this website homemade-circuits.com, to share different types of circuit ideas..

If you are having any kind of doubt or question related to circuits then just write down your question in the comment box below, I am like always checking, so I guarantee I will reply you for sure!


Previous Post: « 3 Interesting DRL (Day Time Running Light) Circuits for Your Car
Next Post: 4 Simple Li-Ion Battery Charger Circuits – Using LM317, NE555, LM324 »

Reader Interactions

Questions & Answers

Total Posts: 167
Newest Oldest
Shishir
August 12, 2024 • 2 years ago #157846

Hello Swagatam,

Looks you are doing great job for the community.
Can you help me with a circuit diagram for Motorcycle Indicators Flowing Turn White/Red/Amber. like this Link : https://www.ebay.com/itm/266706573438
I would like to use this to create circuit board and use it.

Thanks

Reply
SwagatamAdmin
August 13, 2024 • 2 years ago #157889

Thank you Shishir,
Can you please tell me how the LEDs are supposed to illuminate? Once I know this I can try to figure out the design…

Reply
Shishir
August 13, 2024 • 2 years ago #157890

Hello Swagatam,

Thank you for your reply.
Here is what I am looking for
1. Two front indicator should glow white and amber with flowing pattern.
2. When turning on indicator the white DRL should turn off and amber should glow in flowing mode.
3. Once turned off DRL should glow and amber should turn off.
4. Same with back turn signal with re and amber.

Here is the youtube link
youtu.be/BYvmQ7QrZfc

Thank you

Reply
SwagatamAdmin
August 13, 2024 • 2 years ago #157908

Thank you Shishir,
The LED running pattern appears to be having more than two sequences which looks difficult to implement using a discrete circuit, so it may not be possible for me to design this multiple-pattern LED illumination.

However, the 4 points that you have mentioned above is possible, assuming the “flowing pattern” is just a simple running LED light pattern, which can either be a “dot” mode or “bar” mode.

Let me know your thoughts on this.

Reply
RANDY
December 20, 2022 • 4 years ago #137660

I like tis circuit. I would like to be able to connect to a 4 wire hitch like the LED Bar strips. Brake and turn signal are combined. There is no constant 12v supply. I haven’t found a schematic that explains how to make the sequential turn and brake work separately.

Regards,

Randy

Reply
SwagatamAdmin
December 20, 2022 • 4 years ago #137707

I will have to see how the 4 wire LED is designed to work, only then I would be able to suggest.
If there’s no constant supply from a 12V battery then the above circuits won’t work.

Reply
Zapp123
October 17, 2021 • 5 years ago #101715

Hi Swagatam and thank you for the circuit you have shared.

I Must say, mine works mostly well, although the one issue i have, when connecting the indicator line to 12v (re Diagram 1) all of my leds light up, except for the first one in the sequence. But if i hold the indicator wire to 12 input, when it finishes the first run through sequence, it will begin the 2nd one and light up all the leds including the first one this time. I am unsure what could be causing this behavior.

The first led in the sequence is connected through the collector on pin 3 on the 4017 ic (marked as output 0)

Any idea why it would skip the first led during the initial sequence when 12 is applied, but then light all led on the 2nd sequence?

Thanks

Reply
SwagatamAdmin
October 18, 2021 • 5 years ago #101759

Thank you Zap123, it could be probably due to some kind of spike or instability which might causing the erratic behavior.

You can try putting a 100uF capacitor across supply pins of both the ICs, and additionally connect the IC 555 pin3 with the 4017 pin14 through a series 100k resistor, and connect a 0.22uF capacitor between pin14 and ground.

Reply
zapp123
November 11, 2021 • 5 years ago #104481

I see what you are trying to say. I am yet to give this a go, i just wanted to clarify, i am putting separate 100uf caps for pin 16 on the 4017, and then 2 separate caps for pin 4 and pin 8 on the 555, only pin 8 on the 555?

Assuming, I only need to put the cap on pins 16 and 8, would I be able to get away with having 1 200uf cap for both pins 16 and pin 4, or will this not work correctly. Trying to think of the most efficient way for when I design my rev 2 board.

Thanks 🙂

Reply
SwagatamAdmin
November 11, 2021 • 5 years ago #104488

Just one 100uF capacitor each across the supply terminals of the two ICs will be enough. Let’s hope this helps to solve the issue!

Reply
Zapp123
December 7, 2021 • 5 years ago #106499

Hi Swagatam

This seems to have corrected the activity in some cases, although now that it will start from the first LED on initial power supply, it seems as though, when power is disconnected and reconnected in the space of less than 3 to 5 seconds, the circuit will hold charge somwhere, and then resume the sequence from where the power was disconnected. (when resuming the sequence, it will not light the previous led’s until the next run through the sequence) The best way i can explain it would be to show below how it will run through the sequence

(x) Resembles Light on
(o) Resembles Light off

-o-o-o-o-o-o-o-o-o-o-
-x-o-o-o-o-o-o-o-o-o-
-x-x-o-o-o-o-o-o-o-o-
-x-x-x-o-o-o-o-o-o-o-
-x-x-x-x-o-o-o-o-o-o-
——–Power Cut Less than 3 Seconds——–
-o-o-o-o-x-o-o-o-o-o-
-o-o-o-o-x-x-o-o-o-o-
-o-o-o-o-x-x-x-o-o-o-
-o-o-o-o-x-x-x-x-o-o-
-o-o-o-o-x-x-x-x-x-o-
-o-o-o-o-x-x-x-x-x-x-
-o-o-o-o-o-o-o-o-o-o-
-x-o-o-o-o-o-o-o-o-o-
-x-x-o-o-o-o-o-o-o-o-
-x-x-x-o-o-o-o-o-o-o-
-x-x-x-x-o-o-o-o-o-o-

I feel like the current might be held in the 0.1uf capacitor that connects the positive to the neg rail. do you think adding a diode on the positive side would prevent backcharge? I will try this and report back. please let me know if you have any other suggestions

Reply
SwagatamAdmin
December 7, 2021 • 5 years ago #106509

Hi Zapp, that looks very strange, because 4017 do not have “memory.”
You can do one thing….connect the pin#15 to ground through a 10k resistor, and then connect any small value capacitor between positive rail and pin#15..this will reset the IC each time power is switched off and allow the sequence to begin from pin#3

Reply
Zapp123
January 18, 2022 • 5 years ago #110026

Hi Swagatam

Sorry for taking so long to get back to you. It has taken me some time to free myself to test this fix.

With this being said, after adding the 10k resistor between Gnd and reset, and the 0.1uf cap between vcc and reset. This has tightened up timing in regards to how long I have to wait before restarting the sequence when power is disconnected. As before I’d have to wait between 3 to 5 sec, I now only have to wait 1 sec before it will start the sequence again from the beginning.

I am Baffled as we are supplying voltage to the reset pin as soon as the circuit sees power. So I do not understand why it is still acting this way

Would you happen to have any other ideas? Thanks in advance

Reply
SwagatamAdmin
January 18, 2022 • 5 years ago #110030

No Problem Zapp!
However a 1 second delay with a 0.1uF/10K as the reset network looks strange. Because the 0.1uF should charge within milliseconds and enable the sequencing quickly for the IC. You can reducing the 10K to 1K and check the response again. Nevertheless, it seems there may be something else not right either with the circuit or the IC itself. Will need to be investigated by replacing the IC with a new one perhaps.

Reply
vamsi Krishna
July 5, 2020 • 6 years ago #80138

Hi swagatam,
I tried the circuit which you suggested. it’z working good in sequential. but here i need a small modification.
if when ever I applied the brake, leds lights up sequentially and stay all lights should ON till I release brake.
but here, when powered to the circuit, sequential effect continues.
can you please help me what changes should I do here.
Thanks in advance…:)

Reply
SwagatamAdmin
July 6, 2020 • 6 years ago #80143

Hi Vamsi, the LEDs will latch and remain ON if the transistor is disabled during power switch ON. So when the brakes are applied it must switch ON the positive supply to the circuit and also simultaneously should apply the positive to the base of T1. This will disable the T1 and allow you to get the required results.

Reply
SwagatamAdmin
July 6, 2020 • 6 years ago #80144

sorry, please correct my previous comment, T1 must be permanently enabled to ensure the LEDs stay switched ON after one chasing sequence. For this use a BC547, connect its collector to T1 base via a 1 k resistor, emitter to ground, and base to brake positive via a 10k resistor. The brake switch must also supply the positive supply to the circuit when it is pressed.

Reply
Amit Kumar
April 7, 2020 • 6 years ago #77742

Very good sir….Liked ur project very much. But I want to make on 1w led with 10 channel and with del white light on….When we turn on engine ..DRL of white color is on and when we turn on indicator white is off and sequential turn signal is flashing…..This is one of my dream projects with 1w or 3w LEDs… Please guide if possible

Reply
Amit Kumar
April 7, 2020 • 6 years ago #77759

Sirji so humble of you. But I am little novice to electronics. If u can make a video on your YouTube channel on this with drl and sequential turn signals that would be a help to …many headlamp and tail lamp modifiers like me

Reply
SwagatamAdmin
April 8, 2020 • 6 years ago #77766

Thank you Amit, however making a detailed construction video will not be possible at this moment, in future I may surely consider it.

Reply
Amit Kumar
April 9, 2020 • 6 years ago #77789

Ok sir, can u just please modify that diagram to the newer one

Reply
SwagatamAdmin
April 9, 2020 • 6 years ago #77793

Please make the circuit which is shown in the second design, once you build it successfully then i’ll explain how to do the next modification.

Reply
SwagatamAdmin
April 7, 2020 • 6 years ago #77751

Glad you liked it.

Please see the second circuit and do the following additions.
Connect a TIP122 transistor in the following manner:
Base to 12V via ignition switch. Connect the base also to the collector of 2N2222 in the second diagram.
Connect the emitter of TIP122 to the ground line.
Connect the DRL between collector of TIP122 and battery positive line

Reply
billis
February 11, 2020 • 7 years ago #76348

hi my friend… i make this circuit in a board and i put small led with mcr100-8 thyristor. with small led wprk perfect.. but i have 3 watt led im my car with led drivers.. so when i put 12 volt the sequence start but not bright all and in the end only two led turn on.. the sequence work like have tranzistor.. what can i do… please help me..

Reply
SwagatamAdmin
February 11, 2020 • 7 years ago #76362

Hi, which SCR did you use? Please use C106 SCR, and replace the transistor with TIP127

calculate the resistor using this formula:
R = (12 – LED FWD V) / LED Current

Reply
René
August 19, 2021 • 5 years ago #94917

Hello Swagatam, i built the project according to the first diagram and would like to connect 3 watt leds , i replaced the Scr’s for the C106 and T1 for the Tip 127. Unfortunately it won’t work when connecting 1 led it works fine but after that it works wrong and some leds are only blinking. Can you maybe help me? Greetings René

Reply
SwagatamAdmin
August 19, 2021 • 5 years ago #94949

Hello Rene, which resistor did you connect in series with each LED?

Reply
René
August 19, 2021 • 5 years ago #94973

hello Swagatam, I am using a led driver to drive the leds.

Reply
René
August 20, 2021 • 5 years ago #95094

Hi Swagatam, yes that is correct. I still had these laying around, I have now ordered 15ohm. Greetings René

Reply
SwagatamAdmin
August 20, 2021 • 5 years ago #95105

No problem Rene, I hope it works for you perfectly!

Reply
René
August 20, 2021 • 5 years ago #95023

Hi Swagatam, I did a test with 20ohm resistors and now it works indeed. Thank you for your help. Greetings René

Reply
SwagatamAdmin
August 20, 2021 • 5 years ago #95055

That is great Rene, I am glad you could solve it, however a 20 ohm is too high for a 3 watt LED at 12 V, and it will cause the LED to glow with a relatively low illumination.

Reply
Ray Lancaster
March 8, 2022 • 4 years ago #115198

Mr. Swagatam:
I have been involved in electronics since 1965 and take I interest in unique circuits such as the sequential led driver by you and Mr. Jason. I completely understand 99% of the circuit however I am baffled by R6 and D5 as to their function? Another question is how the counter can start at #1 when the 555 timer is running open loop and driving the counter continuously even though no leads light until the turn signal is applied. Seems like the led sequence would start wherever the counter happens to be. Thanks for your sanity check if you get time.

Reply
Ray Lancaster
March 8, 2022 • 4 years ago #115242

Many thanks for your quick response! My project not only involves a 10 lamp circuit but also includes building the lamp fixtures as well. My truck does not have existing fixtures so that is an additional project by itself. Again many thanks I will share my results.

Reply
SwagatamAdmin
March 8, 2022 • 4 years ago #115263

No problem, I wish you all the best!

Reply
SwagatamAdmin
March 8, 2022 • 4 years ago #115219

Thank you Mr. Ray, you are right, the R6, D5 don’t make sense, however I think they are mistakenly shown in the wrong area. D5 is actually not required but R6 is required and it should be in series with the collector of Q4. R6 value should not be more than 1K
To answer your second question, I don’t think it is important for the 4017 output to reach #1 each time the turn signal is switched ON simply because the sequencing is supposed quite fast….,therefore it can start from anywhere in sequence and keep cycling across the 3 outputs

Reply
SwagatamAdmin
August 19, 2021 • 5 years ago #94990

OK, however I would recommend using individual LEDs and a calculated series resistor with each LED. An LED with driver across each SCR might not be a good idea. Also for 3 watt LEd on each channel, a TIP127 might not work. You might have to use a TIP147 with a large heatsink.

Reply
Dejan
August 27, 2019 • 7 years ago #69687

Can someone share PCB look for this circuit?

Reply
Ruben Valiente
May 9, 2019 • 7 years ago #66935

Hi! Thanks for this project !
Can make this work with about 70 leds?
With other 4017?
Can help me…plz….

Reply
SwagatamAdmin
May 10, 2019 • 7 years ago #66944

Hi, I have not yet investigated how to cascade many 4017 together, if its possible I may research on this and publish it here.

Reply
Ruben Valiente
May 11, 2019 • 7 years ago #66961

THanks!

Reply
jeremy
March 1, 2019 • 7 years ago #65688

just want to confirm.

If I use the first circuit which is minus the constant 12v supply.

Will the circuit work with all LED’s turning on in sequence plus remaining on during the sequence until the 555 triggers a reset or the car signal wire = 0v?

I want the LED’s to do ONE sequence during the car signal “on” period.

Each time the circuit gets 12v from the car signal 12v wire it will do one sequence then stop when the car indicator wire has 0v.

Reply
SwagatamAdmin
March 1, 2019 • 7 years ago #65689

Yes it will work in the mentioned manner! You can see the response in the first video.

Reply
Jeremy
March 1, 2019 • 7 years ago #65691

So the SCR uses the momentary output from the 4017 to close its gate and leave the LED on?

Reply
SwagatamAdmin
March 1, 2019 • 7 years ago #65692

That’s right, SCRs and triacs have the property of latching with DC supplies.

Reply
Jeremy
March 1, 2019 • 7 years ago #65694

Sure. Just checking that the SCR remains latched after the momentary signal from the output of the 4017 is no longer present.

Reply
SwagatamAdmin
March 1, 2019 • 7 years ago #65698

yes, a momentary trigger is enough to latch the SCRs

Reply
Faith
March 17, 2018 • 8 years ago #59152

great work! put together, i have built it without much stress and it working fine i even went as far making all to come up at once by incorporating 1n4148 thanks for the knowledge share.

but i have one question, is there a way of making a sequential light using 4017 such that when it get to the last output instead of going to start from the beginning it will now start from the very last to the beginning and vice versa

Reply
Ted Burrell
November 21, 2019 • 7 years ago #72299

You would need to substitute a 4013 flip-flop with a 4510 up/ down counter, whose counting sequence is switched by the logic state of the 4013’s Q output ( pin 1 or 13) connected to the 4510’s direction pin 10. The 4013’s D input ( pin 5 or 9) is connected to pin 7 of the 4510 to manually reset the 4013’s Q output ( pin 1 or 13) feeding the IC counter’s pin 10 to reverse the counting sequence. I don’t have a circuit penned out for this suggestion to be made clearer than I can explain it.

Reply
SwagatamAdmin
March 18, 2018 • 8 years ago #59161

Glad it’s working for you. The reverse effect may not be possible with a 4017 for the above implementation, but using LEDs it may be possible with 5 outputs only, as shown here

https://www.homemade-circuits.com/200-led-reverse-forward-light-chaser/

Reply
FR Custom Creations
May 4, 2016 • 10 years ago #40700

hey ahain Mr Swagatam… did you delete some of our last conversation here? i am trying to refresh my memory with with something u told me but i cant find the whole conversation 😛 i am sorry for that… i will try to remember…

Reply
SwagatamAdmin
May 4, 2016 • 10 years ago #40704

Hey FR, all comments posted between April 5 and April 15 are lost in the other platform where I had moved my blog during this period of time, but I had to return back here due to some complexities I could not handle….

so I am sorry those comments are gone now.

please try to remember it and put it back here, I'll answer it appropriately 😉

Reply
FR Custom Creations
April 1, 2016 • 10 years ago #40183

Well Mr Swagatam… its working :D…. but i need your help with something else now :P….
how i can stop the sequential cyrcle?… (What im trying to say is: if the turn signal from the car stay for 1 second on, its a litle dificult with the potentiometer to find the exact point to start from led 1 and finish to led 10, before start again the cyrcle…) so i need to make the sequential to make 1 cyrcle only and then stop… and then start again after the turn signal cut…. i dont know if u can understand what i am trying to say, i am trying my best with my english 😛

best regards

Reply
SwagatamAdmin
April 2, 2016 • 10 years ago #40203

FR, you can probably do it with the following changes :>)

1)connect pin15 to ground through a 1M resistor, and also connect a 0.1uF capacitor from pin15 to the positive line

2) and furthermore connect pin15 with pin13 and to base of T1 via a 10K resistor
I hope you understood the procedure :-#

Reply
SwagatamAdmin
April 2, 2016 • 10 years ago #40204

make sure to remove pin13 connection from ground first…..

Reply
Andrei
August 5, 2019 • 7 years ago #69020

Hi Mr. Swagatam
I have completed the project with all 10 outputs and it works but I didn’t checked yet on the signal from the car.
I tried to simulate a signal like it was from the car, in the first diagram, but the sequence is not starting from the beginning all the time, sometimes it starts from 5-6-9.
Adding the delay timer from second diagram, the intensity of the led goes down and 3 outputs from all work like a chaser( the led comes on, and off when the next sequence is on).
I saw this this conversation with FR and I want to ask you if the modifications above work for my project with 9 led lit?
And please can you give me a email address to send you the design to double check, might be something wrong and I can’t see it.
Thank you very much

Reply
SwagatamAdmin
August 6, 2019 • 7 years ago #69026

Hi Andrei,

For 9 outputs you can repeat the SCR/LED configurations across the 9 outputs of the IC, in the following pinout order:

3, 2, 4, 7, 10, 1, 5, 6, 9

Connect the last pin11 with T1 base through a 1K resistor.

The pin15 will now connect with the ground. But to ensure that the IC always starts from the beginning, connect the pin15 to ground line through a 10K resistor, and also connect a 1uF/25V capacitor between pin15 and the positive line.

In the delay timer circuit you can increase the base resistor value of 2N2222 to 10K and see whether it helps or not.

I am sorry, the checking and verifying will have to be done by you, because a mistake can happen by me also while checking and that can create more confusions. I hope you will understand.

Reply
andrei
August 14, 2019 • 7 years ago #69281

hi
thank you very much for your help, i followed your instruction and everything works fine with 9 outputs and stays put when the last led is lit.
now i have other questions
1. how can i do the led to lit faster? for example all 9 led are lit in 1.2 sec, i want to lit in 0.40 sec due to my project
2. what modification i have to make to use just 5 outputs? i have used the first design and taking in account
1> that at 6 outputs, 3-2-4-7-10-1, next pin 5 it goes to T1 trough a resistor and next pin 6 goes to 15 witch is the reset pin, and
2> the information shared above for the 9 outputs
=i have created the design with 5 outputs in the following way: 3-2-4-7-10 as the original design, pin 1 to T1 trough the 1k resistor, pin 5 to pin 15 and i did the connections to stay lit after the last sequence, and when i tested the circuit, just first sequence 3 is lights on and the rest off.
Thank you very much for your help

Reply
SwagatamAdmin
August 14, 2019 • 7 years ago #69285

Hi, that’s great, congrats to you on that!

to make it faster you just have to vary the 555 IC 100K pot, or simply reduce the 4.7uF capacitor to 2.2uF or lower.

Your procedure for the 5 output is correct, and the LEDs must sequence upto pin10.

Something may not be correct in the connections, which will need to be checked carefully. you can manually touch an LED across each of the 5 output pins to ground through a 1K…this will help you know whether the relevant pins are producing the required high or not

Reply
FR Custom Creations
April 1, 2016 • 10 years ago #40175

😀 Thank you i will try it.

Reply
FR Custom Creations
March 31, 2016 • 10 years ago #40161

first off all thank you for your answer… please help me more… i did that but it didnt work… in this diagram the last connection (without led) in 4017 is number 5 connection.
i need to use 5-6-9-11 (with leds) and then the 15 without bridge to 6 for reset?

thank you for everything
best regards

Reply
SwagatamAdmin
April 1, 2016 • 10 years ago #40173

thanks FR, just forgot to tell you that if you are using all the 10 outputs of the IC 4017, in that case pin#15 should be grounded, that is connected with the negative supply line.

Reply
FR Custom Creations
March 29, 2016 • 10 years ago #40108

Hello all… the diagram realy works poperly… i have a question… can i add more led rows? now we have 6 here but i need 10… is that posible? best regards

Reply
SwagatamAdmin
March 30, 2016 • 10 years ago #40127

you can use all the 10 outputs of the IC 4017 and repeat the SCR stages across its output pins to acquire the require 10 LED sequence…

Reply
Andrei Comca
July 25, 2019 • 7 years ago #68741

Hi Mr. Swagatam
Can you send me please the scheme for 10 outputs because I don’t understand exactly how to do the modifications?
I’m new in this hobby and I really want to do this for my car.
Kind regards
Andrei

Reply
SwagatamAdmin
July 25, 2019 • 7 years ago #68755

Hi Andrei,

it’s actually very easy, just modify the circuit in the following manner.
Disconnect pin#15 from pin#6 and the connect pin#15 to ground line, or the negative line.

Now connect the SCR/LED network to all the 10 outputs in the following pinout order: 3-2-4-7-10-1-5-6-9-11

Also, remember to disconnect the T1 base resistor from pin#5 and connect the resistor end with pin#11.

Reply
Andrei Comca
July 25, 2019 • 7 years ago #68767

Thank you for your quick response.
I understand now how it should lock but I have an other question. Pin#12 is always unconnected? To understand better, what is his role?

Reply
SwagatamAdmin
July 25, 2019 • 7 years ago #68768

You are welcome, pin#12 is not used in single 4017 IC circuits, it’s used when many 4017 are cascaded together to carry forward the clock frequency from 4017 to the next 4017 sequentially.

Reply
Jun Miranda
June 11, 2015 • 11 years ago #31456

Hi Swagatam,

This project is awesome! after reading all the blogs, I decided to build one and it work as it should. My only question is can you modify the circuit instead of shutting OFF all LEDs in one time after they all got illuminated, is to turn them OFF sequentially (one at the time) starting from the first row, second row, third row and so on.. until the last row, then Reset and cycle back again
Thank you,
Jun Miranda

Reply
Jun Miranda
June 11, 2015 • 11 years ago #31476

Thanks Swagatam

Reply
SwagatamAdmin
June 11, 2015 • 11 years ago #31466

Thanks Jun,

the above circuit can be modified as per your requirement but it could become quite lengthy and complex, rather you can try the following circuit which has the specified function in-built and can be simply tggled through an externally switch:

https://www.homemade-circuits.com/2014/08/knight-rider-led-scanner-circuit.html

you can eliminate the second 74LS164 IC if you are satisfied with only 7 number of LED sequences, however if you are interested to keep all the 15 LED outputs you can carry on with the one that's shown in the figure

Reply
kaleb
April 20, 2015 • 11 years ago #30206

With the diagram you provided above. Can I use the same circuit fro both turn signals? I just want to verify. I was thinking the easiest way for me to use both turn signals I would splice into both the left and right turn signals and wire them into the circuit some how.
This is an example of what I would like to do. imageshack.com/a/img540/1305/lVtzx9.jpg

Where there is 3 LEDs I could do 2 instead.
If you think of anything that would be better please let me now.

Reply
SwagatamAdmin
April 21, 2015 • 11 years ago #30216

you can share the 4017 and 555 configuration for both the left and the right LEDs, but the SCR, LED and the T1 section will need to be repeated for the two channels.

For the T1, their positives (emitters) will need to be isolated from the IC positive rail, and the respective emitters will need to be connected with the L/R turn signal switch positives.

The IC positive could be either permanently connected with the battery positive or with the turn signal positive through two diodes, the diode cathodes to be joined and connected with the IC positive while the anodes connected separately with the L/R turn positives.

Reply
armysaxman
December 16, 2014 • 12 years ago #27652

I'm so glad I found this! I'm currently building a similar system for my'68 T-bird (which actually has sequential turn signals as original equipment). Through the help of a local electronics club, I designed a circuit to be driven by an Arduino. Everything was coming together until I got to the code. I just can't figure it out. I'm thinking that your circuit (as rendered by Mr. Jason) would be better since it is not software dependent.
So, a few questions:
1. I have the park lights on a separate circuit. Can I just omit that portion of your diagram?
2. Can I use the circuit for one side of the vehicle and a duplicate for the other side and tie both sides together at the Hazard switch. My original design has 4 "inputs" – Brake, Left Turn, Right Turn and Hazard.
3. The sequential signals are for the rear of the vehicle. The front only has one bulb that is wired to turn on with the middle bulb of the rear indicators. Can I tie the front indicator in with the middle LED (pin 2 on the CD4017)?
Thank you for you time!

Reply
SwagatamAdmin
December 21, 2014 • 12 years ago #27718

You can send it to my email ID, [email protected],
There's another better and easier way of doing it, by making a separate IC555 section, and then use its output for toggling the front single lamps.

You will find many such IC 555 circuits online….just type "IC 555 flasher circuit" and you'll probably get many options for it.

If you have problems, let me know I'll help you out

Reply
armysaxman
December 20, 2014 • 12 years ago #27708

Ok. I've developed a proposed circuit based on Jason's diagram using Eagle CAD. I've tried to share it through Google Share, but it's not working with my MacBook (seems to be a universal problem). Is there another way I can share my schematic for your scrutiny?

Reply
SwagatamAdmin
December 19, 2014 • 12 years ago #27696

I think you will need to include a selector switch kind of thing, one that would allow you to select whether the circuit is required to work for the front lamp application or the rear ones.

It may be implemented by connecting the positives of the lamp that connects with the SCR through a switch such that toggling the switch selects either the front or the rear lamp for the operations, but never together.

Reply
armysaxman
December 18, 2014 • 12 years ago #27685

Thanks Swagatam for the quick reply and for pointing out the problem I overlooked. I’m thinking I can use an NPN power switch IC between the pin and the front lamp that would be turned on by the turn signal switch. Or, perhaps a standard relay. Thoughts?

Reply
SwagatamAdmin
December 17, 2014 • 12 years ago #27657

Here are the answers:
1) Yes you can omit the park light section in Jason's diagram for your specific need.

2)yes two identical can be built and used independentaly or simultaneous;ly for the two sides of the vehicle.

3) Yes it's possible, however suppose If you connect the front lamp with pin2 of the circuit from the rear, switching ON the rear would also switch ON the front and switching on the front would in turn switch ON the rear lamps….how would you be able to control the front and the rear lamps independently meant for different indications using the same circuit??

Reply
AESHID Indonesia
October 31, 2014 • 12 years ago #26870

I always get fail to make this diagram with project board, can you post details of parts, because Im newbie with this

Reply
SwagatamAdmin
November 1, 2014 • 12 years ago #26882

all the part numbers are given in the diagram itself, you can note it down separately….the resistors are all 1/4 watt 5%, capacitors are 50V rated.

Reply
SwagatamAdmin
August 27, 2014 • 12 years ago #25296

I am unable to understand exactly what you are trying to implement,please clarify it properly…

Reply
SwagatamAdmin
August 27, 2014 • 12 years ago #25295

sorry I did not understand the problem, are you saying without the Scrs the LEDs are illuminating one at time across the outputs in the form of a dot sequence??

then it's correct the IC 4017 is designed to work that way, and SCrs are specifically positioned to latch up and sustain the illumination and elimiante the above situation

Reply
SwagatamAdmin
July 31, 2014 • 12 years ago #24719

600mA is the maximum current eating.

if you are using SCrs, then probably only 9 outputs would work, the last pin11 of the IC 4017 will need to be used for activating the 2N2907 as given in the first diagram.

Reply
SwagatamAdmin
July 31, 2014 • 12 years ago #24718

yes will do….with all the 10 outputs being used you will need to connect pin15 of 4017 to ground

Reply
SwagatamAdmin
July 30, 2014 • 12 years ago #24678

OK….please make it 250 ohms if the voltage is 2.5V (for 3 in series)

Reply
SwagatamAdmin
July 30, 2014 • 12 years ago #24677

I specified 150 ohms correctly with reference to the same link earlier.

Please do not put external links.

Reply
SwagatamAdmin
July 30, 2014 • 12 years ago #24676

….

Reply
Jason S.
July 26, 2014 • 12 years ago #24587

Okay, I had a chance to work on it, but have not tested it on the breadboard yet. If this works, one 4017 and 555 timer chip can be used for both left and right turn signal.

If you need a larger file for better viewing, just let me know and I can email it to you.

Here is the schematic.

i30.photobucket.com/albums/c345/_Falcon/SequentialLEDs10.jpg

I hope you can understand what it is doing. The LED's I will be using have 3 wires out. One is ground, one is Brake/Turn, and one is Park. When just 12 volts is hooked up to the assemblies, It seems that there are different resistors to control the brightness (a fixed amount) for the brake/turn, and for the Park. Which is a nice factory option from the LED assemblies themselves. If I just use one wire (the brake/turn), and a potentiometer to adjust the brightness for the Park, I am thinking I would need a 19W potentiometer, and those are expensive. Each LED assembly draws 246mA at 12.8 volts. If all 6 lights were on, that's 246mA * 12.8 volts = 18.89W of power. So, wiring them separately and using a common ground to switch them on and off, would eliminate the need for a potentiometer, since the resistors are built into the lights themselves.

I am using a NOR gate to turn off the Park LED's when the brake or turn signals are applied.

I am not sure on the resistor values. I've changed the Vcc for the 4017 and 555 to run off of the LM7805 voltage regulator. By doing that, should I also run the other inputs/outputs of those chips off of the LM7805 as well? If I do, I am not sure of the Capacitor and Resistor values needed then.

I'd like to switch all power to 5volts for less power consumption. Except for the LED supply voltage of course. that needs to stay the 12-14 volts coming straight from the wiring of the Truck.

I took your suggestion and added the transistor and the resistor to rapid discharge the 470uF capacitors so the LED's do not continue to sequence for 15 seconds AFTER the turn signals have been turned off. As per your request, I have connected them to the last sequencing output of the 4017. It makes sense, and as you said, should work for turning off the LED's from sequencing.

If I can get this to work, I plan on building a circuit to allow up to the 8 sequencing LED's (available outputs for the 4017 since two are used to reset the 4017 and the SCR's). I will do it using either dip switches or more simply, solder bridges. I will also make it so that solder bridges will be before and after a resistor of each LED, if a resistor is needed for standard LED's to be wired up. I need to do this for my car, and my new lights will have 5 rows of LED's I will need to sequence instead of the 3 that my nephews truck has. So I'll need to design the circuit to work for both. Fun Stuff!

Let me know what you think, and thanks for all your help! 🙂

Jason

Reply
SwagatamAdmin
July 26, 2014 • 12 years ago #24600

Thanks Jason, that looks great, I think all's pretty neatly done and this one should click.

As for the 7805 connection with the IC supply pins, yes everything relevant to the positive supply will need to be connected with the 7805 IC's 5V rail, so the IC stages entirely get connected with the 5V from the 7805 and the ground of the circuit. No changes would be required as far as part values are concerned.

I think this design deserves special attention and I would want to post it as a new article, cannot let it get wasted at the corner of this page, I'll do it soon:)

And we all wait to see how it performs practically in your car.

If you have troubles on the way, do let me know, we'll fix them together
cheers:)

Reply
Jason S.
July 21, 2014 • 12 years ago #24415

not sure i understand. What good is it putting the base to pin 1 or 5. Doesn't the 4017 reset after it hits Q4 (pin 10 which is connected to pin 15, reset). That would mean there would be no output of the 4017 from anything higher then Q4 to trigger the base of the BC547.

If I move Q4 to Q5 and connect to RESET, then put the base of the BC547 to Q4, then there would be a signal, but wouldn't the delay be too much for the sequencing of lights?

I understand what the BC547 is doing, it is to rapid discharge the 470uF cap.

Oh, I think I understand. You are looking at the original design using 6 LED's into the 4017, where my design only has 3.

So the base of the BC547 would connect to the last sequence before the RESET of the 4017.

I will try that.

FYI, I need to update the schematic for you. I see some mistakes in the one that is posted above that I sent you.

Jason

Reply
SwagatamAdmin
July 21, 2014 • 12 years ago #24435

Oh, by mistake I referred my diagram while suggesting the solution, it should be Q2 as per your diagram.

yes you got it right…each time the sequence ends and reaches Q2 it makes sure the 470uF gets discharged and "checks" in the meantime if the flasher is switched OFF or continues with its switching for the next sequence to begin.

sure, an updated diagram would be helpful

Reply
Jason S.
July 15, 2014 • 12 years ago #24260

Swagatam,

I don't exactly understand what the pnp transistor does in the circuit. Could you explain it?

And I'm still having trouble with the circuit. Seems, the pulses from the trucks turn signals aren't exactly in perfect sequence, which is making it impossible to get the correct capacitor/resistor combination to tune the 555 so it puts out a steady voltage using that Missing Pulse Detector design.

I am currently exploring a less complicated design for that using a 12 volt relay.

Jason

Reply
SwagatamAdmin
July 15, 2014 • 12 years ago #24270

The PNP transistor is for breaking the latch of the SCRs each time the cycle reaches the end of the sequence (pin5).

Jason, here's a simple a solution you would want to try:

Take a BC547, connect its collector to the 470uF (+) terminal VIA A 1K RESISTOR.

Emitter to the usual ground point.

The base will go to pin1 or pin5 of the IC 4017.

I hope you would get the logical point behind this modification, and this would most likely solve the issue effectively.

Reply
Jason S.
July 10, 2014 • 12 years ago #24153

Thanks Swagatam.

I found a circuit that may work using an additional 555 timer. It's a Missing Pulse Detector. If the pulse is delayed or interrupted for more then two ticks, it will put the output to low on the output of the 2nd 555, otherwise, if the pulse is even, it will keep the output of the 2nd 555 to high. This could be used to turn off the base of Q1. Also, with that circuit, I think I can eliminate the Diode, Resistor, and the 470uF cap.

I will need to test this. But in simulation, it seem to work. The switching time from High to Low seems to be about 57ms. Which is pretty darn fast, less than 1/10 of a second. I will test this tomorrow night, if it works, I will post an updated circuit schematic for others to use.

Jason

Reply
SwagatamAdmin
July 10, 2014 • 12 years ago #24159

Thanks Jason, that appears to be a great idea, I am sure it would work practically too and also help to eliminate the undesired fading effect of the LEDs

Reply
Jason S.
July 9, 2014 • 12 years ago #24135

Hi Swagatam,

I found a fix for the Parking Lamp staying on while the lights are flashing from turn signals or hazards. That problem has been solved.

I am however stumped on the problem with the LED's still flashing (and slowly dimming to nothing) when the turn signals are turned off. This is also affecting the brake lights/park lights from turning on right away, as they are waiting for the capacitor to totally discharge before turning off the transistor to allow the current to flow through the other transistors operated by the brake and park switches.

I've tried to fix this in the simulation, but is not working. because the flashers are 'flashing' via the factory relay, i can't just install a transistor to shut off when the turn signals are turned off. When I do, the transistor just turns on and off with the flasher relay. I can't change that in the truck. Even at the switch itself on the steering column, it is still flashing there. That, plus, If I deactivate the relay, then the fronts do not flash on the truck.

Is there a way to rapidly discharge the capacitor so that the transistor turns off allowing the brake and park to operate as they should without delay when flashers are turned off?

Jason

Reply
SwagatamAdmin
July 10, 2014 • 12 years ago #24141

oops! the above improvement won't help, because it would interfere the flashing effect when brakes are applied while the turn signals are on.

The simplest way would be to add a preset across the base/emitter of Q1 and adjust it such that the OFF delay stays just ahead of the flashing arte from the flasher, I cannot see any other quick modification feasible other than this

Reply
SwagatamAdmin
July 10, 2014 • 12 years ago #24140

Hi Jason, It seems you are working too hard on this circuit, and I appreciate your efforts. So far you everything right.

In order to discharge the 470uF cap quickly, you can try the following modification.

Take a BC547 transistor, connect its collector via a 1k resistor to the (+) of 470uF and the emitter to ground, and now simply integrate its base to the brake switch via a 10k resistor.

I hope this will solve the problem since its during braking the flashing needs to stop instantly, otherwise normally if the flashing persists for a few seconds more it won't create or lead to any hazardous situation.

Reply
Jason S.
July 9, 2014 • 12 years ago #24124

I think I just found a fix for problem 2 with the parking lamp dimming the LED's as they flash. If I connect the collector of Q3 to the base of Q5, as I did for the Base of Q4, that should turn off the parking lamp when the flashers are on. Am I correct to think this? I will have to try it.

Now to think of a way to turn off the lights when the flashers are turned off, instead of them continuing to flash. But that capacitor is messing things up, I understand it needs to be there, so that it tricks the circuit into thinking it's a continuous power source of 12volts, instead of flashing on and off with the flashing relay of the truck.

Jason

Reply
View Older Comments

Need Help? Please Leave a Comment! We value your input—Kindly keep it relevant to the above topic! Cancel reply

Your email address will not be published. Required fields are marked *

Primary Sidebar


Categories

  • Arduino Projects (95)
  • Audio and Amplifier Projects (134)
  • Automation Projects (18)
  • Automobile Electronics (104)
  • Battery Charger Circuits (90)
  • Datasheets and Components (109)
  • Electronics Theory (150)
  • Energy from Magnets and Earth (41)
  • Games and Sports Projects (11)
  • Grid and 3-Phase (20)
  • Health related Projects (27)
  • Home Electrical Circuits (13)
  • Indicator Circuits (16)
  • Inverter Circuits (100)
  • Lamps and Lights (163)
  • Meters and Testers (72)
  • Mini Projects (28)
  • Motor Controller (68)
  • Oscillator Circuits (30)
  • Pets and Pests (15)
  • Power Supply Circuits (91)
  • Remote Control Circuits (50)
  • Security and Alarm (65)
  • Sensors and Detectors (107)
  • SMPS and Converters (46)
  • Solar Controller Circuits (62)
  • Temperature Controllers (44)
  • Timer and Delay Relay (50)
  • Voltage Control and Protection (44)
  • Water Controller (37)
  • Wireless Circuits (31)


Circuit Simulator

circuit simulator image


Subscribe to get New Circuits in your Email


Other Links

  • Privacy Policy
  • Cookie Policy
  • Disclaimer
  • Copyright
  • Videos
  • Sitemap

People also Search

555 Circuits | 741 Circuits | LM324 Circuits | LM338 Circuits | 4017 Circuits | Ultrasonic Projects | SMPS Projects | Christmas Projects | MOSFETs | Radio Circuits | Laser Circuits | PIR Projects |


Recent Comments

  • Swagatam on 50 Watt Sine Wave UPS Circuit
  • Alireza.Moghaddam on 50 Watt Sine Wave UPS Circuit
  • Swagatam on Simple Walkie Talkie Circuit
  • Swagatam on ISD1820 Voice Recording IC Datasheet, Circuit Diagram
  • Jeremy on ISD1820 Voice Recording IC Datasheet, Circuit Diagram

Social Profiles

  • Twitter
  • YouTube
  • Instagram
  • Pinterest
  • My Facebook-Page
  • Stack Exchange
  • Linkedin

© 2026 · Swagatam Innovations