• Skip to main content
  • Skip to primary sidebar

Homemade Circuit Projects

Need circuit help? Post them in the comments! I've answered over 50,000!

Blog | Categories | About | Hire Me | Contact | Calculators-online
You are here: Home / Battery Charger Circuits / Super Capacitor Charger Theory and Working

Super Capacitor Charger Theory and Working

Last Updated on May 17, 2026 by Swagatam 241 Comments

In this post I have explained a super capacitor charger circuit for charging super capacitors which converts a 12V car battery voltage to an elevated 16V for charging a bank of super capacitors. The idea was requested by Miariver.

Table of Contents
  • Super Capacitor for Peak Power Compensation 
  • The Design
    • PWM Control
  • Another Useful Boost Converter Circuit for Charging Super Capacitor Banks from a 12 V Car Battery

Super Capacitor for Peak Power Compensation 

First thanks for keep publishing this blog is very helpful, I have a question and I don't know if this is the right section!!! sorry for any inconvenient.

I am working from my car, running: a laser copier/printer, a die sublimation photo printer, a note book, 2 cellphones, and plus plus.

My inverter is (1500w 12dc-Battery in to 120ac out) a very good one.

after 4 hours of working the battery is getting too low, so the inverter starting to run on protection mode and beeping like crazy. So I decided to run a 6-pack of super capacitor in parallel with the battery to support the (peak moments) the problem is the super capacitor bank need to be charged to 16.2dc volts (6 times 2.7 volts each capacitor)

So do you have any idea how to get 16.2 volts from the 12 volts battery in order to keep the capacitors charged in order to hold the peak load when would be needed.

any idea, advise or circuit, would be highly appreciated.
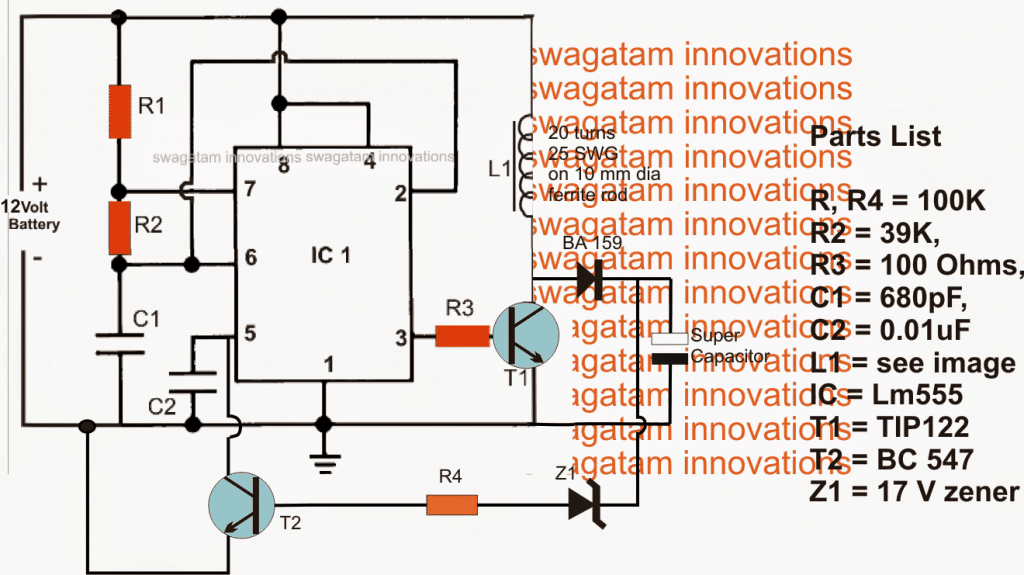
supercapacitor charger circuit using IC 555 boost converter

The Design

The proposed super capacitor charger circuit for charging super capacitor banks may be witnessed in the above figure.

The entire circuit can be seen wired around the ubiquitous IC 555, configured as a high frequency astable.

High frequency is required in order to drive a compact ferrite coil which becomes responsible for producing the required boosted voltage.

The relatively low current output from the IC is amplified using T1 which switches the connected ferrite inductor at the rate of the fed astable frequency.

The above action induces a calculated boosted voltage across the coil which is appropriately rectified using the attached BA159 fast recovery diode.

The resultant voltage at the cathode of the diode is fed to the associated super capacitors for the intended charging of the devices.

A feedback loop can be seen from the output to the base of T2 which ensures a perfectly stabilized voltage for the super capacitors....in case the voltage tends to rise above the predetermined fixed value, Z1 gets forward biased and switches ON T2 which in turn grounds pin5 of the IC choking the pulse width of the pin3 frequency.

This procedure quickly reduces the output to the safe limits and the cycle keeps switching ensuring that the voltage always stays within the set thresholds.

PWM Control

In the above design, R2 can be replaced with a 100k pot for achieving a PWM output across the load, although it may be not applicable for charging super capacitors, rather for some different relevant application .

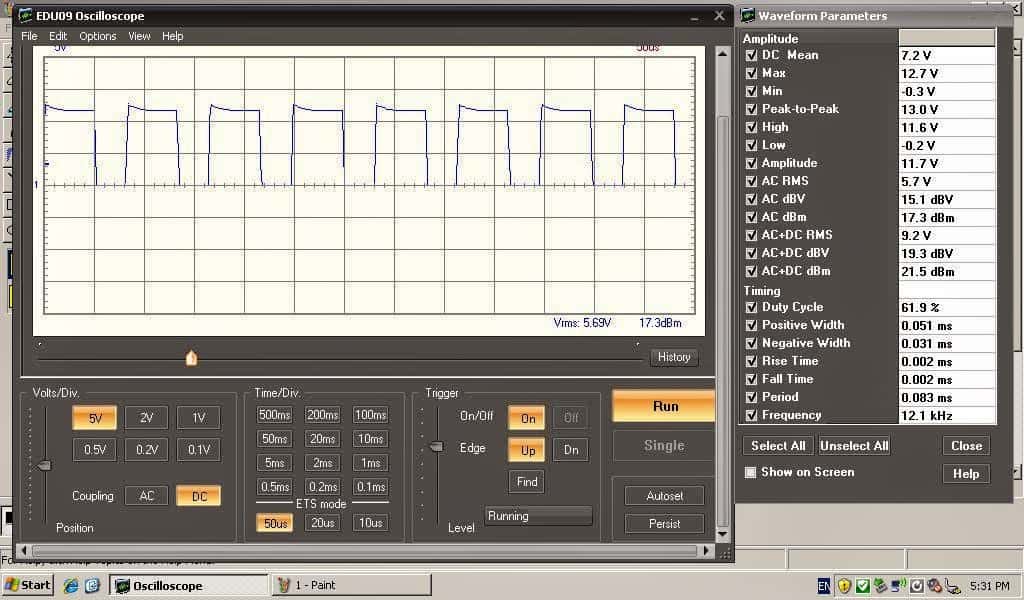
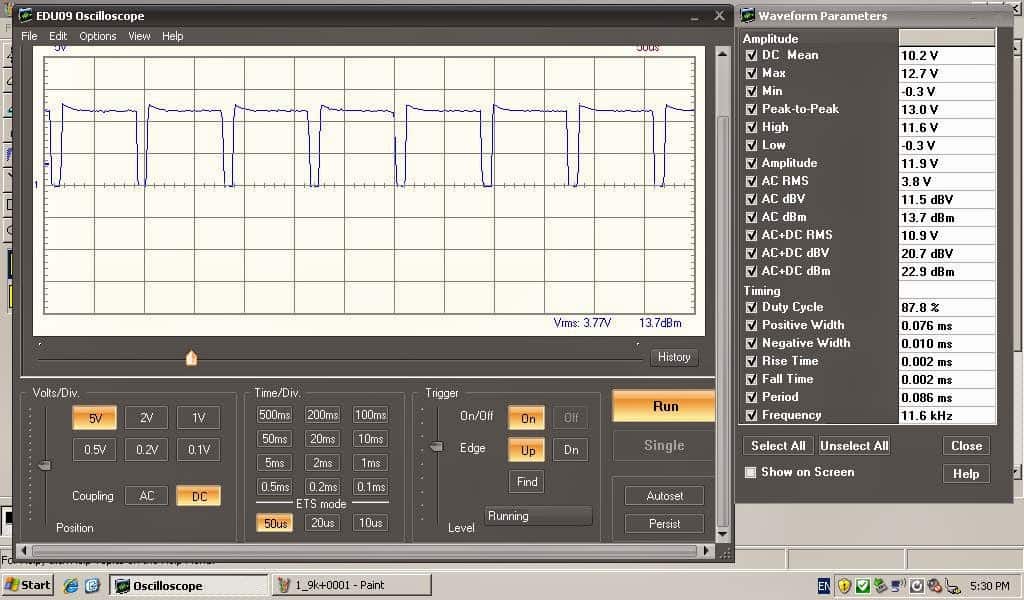
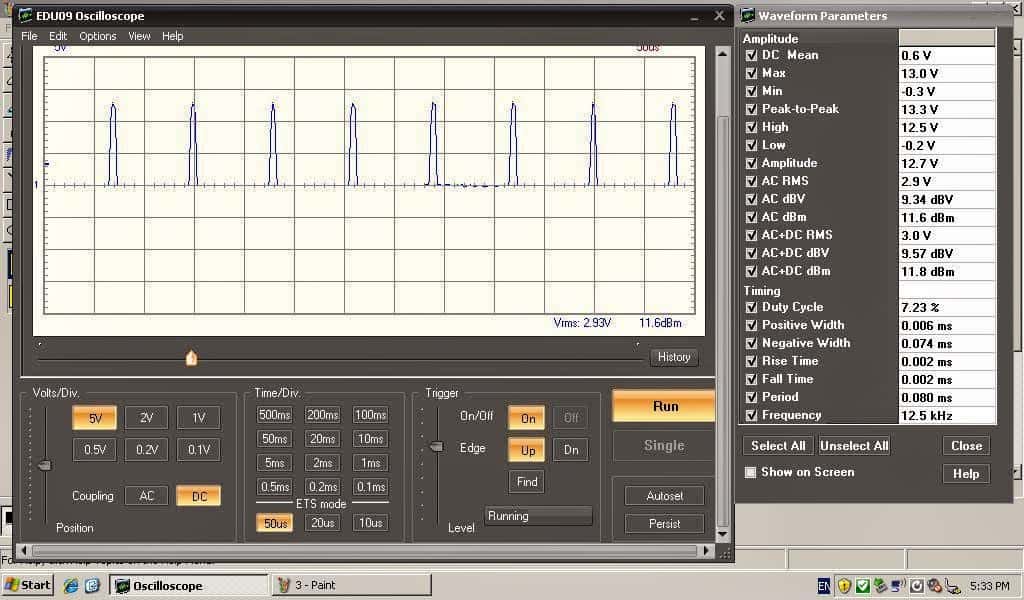
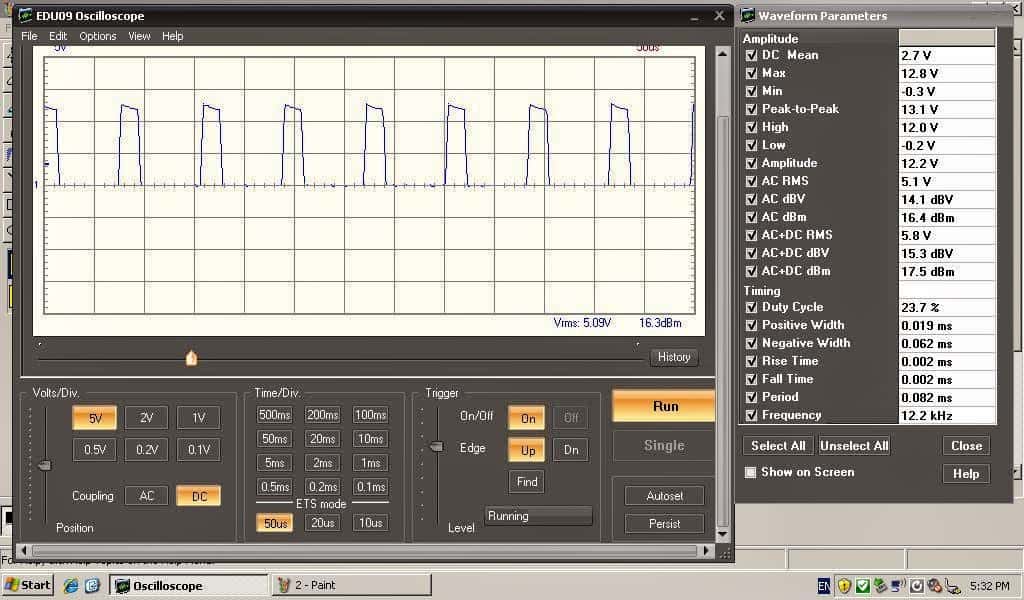
The above super capacitor charger circuit was tested and implemented by Miss Claudia who is an avid follower of this blog and a vehement electronic hobbyist, the verified results for the same may be witnessed with the following images, tested by Miss Claudia:
Another Useful Boost Converter Circuit for Charging Super Capacitor Banks from a 12 V Car Battery

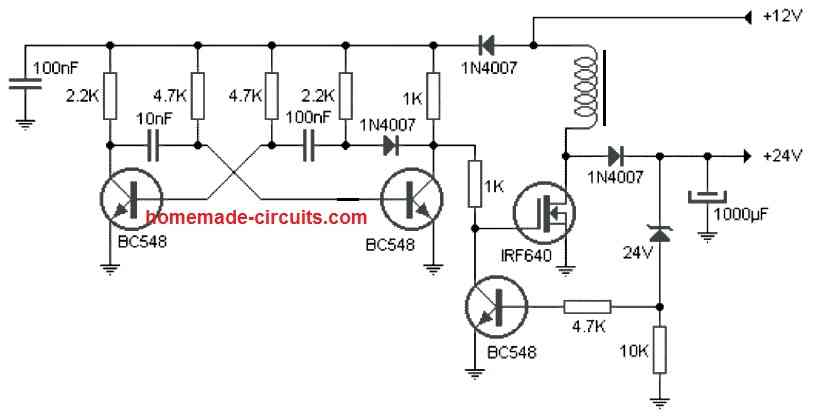
Here's a voltage booster circuit which can be used for charging a super capacitor banks from a car lead acid battery.

The boost circuit has an oscillator stage using a BC548 transistor astable.

This transistor astable oscillator generates a high frequency output which drives a MOSFET based boost converter stage.

The circuit also has a feedback circuit stage using the 24 V zener diode which controls the output voltage level by switching the gate of the MOSFET appropriately.

This zener value can be adjusted for getting a customized boosted output voltage for the super capacitors
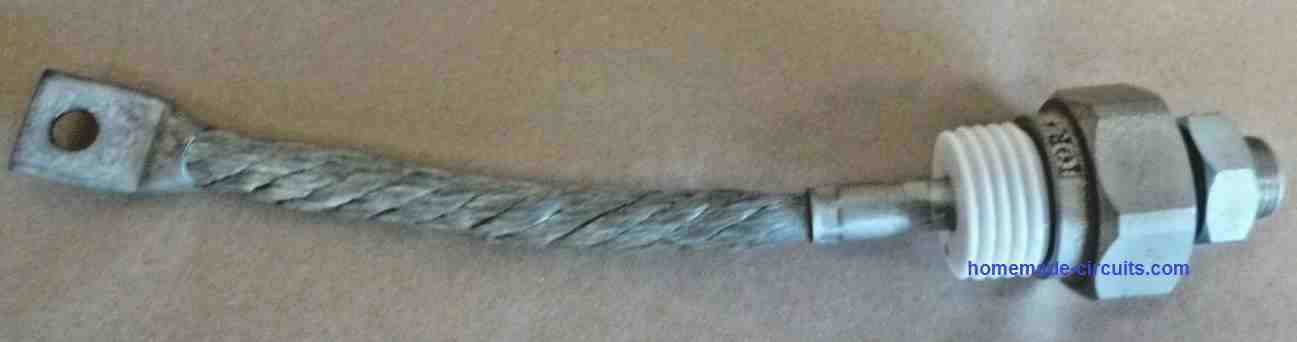
The inductor can be built by winding 30 turns of 1 mm super enameled copper wire over a 1 cm thick ferrite rod or a ferrite ring.
You'll also like:

  • offshore 2Camper, Motorhome Battery Charger Circuit
  • triac battery charger circuit 750x445Triac Battery Charger Circuit
  • dynamobatterychargercircuitBicycle Dynamo Battery Charger Circuit
  • lipo2BscanLipo Battery Balance Charger for Charging of Series Connected Lipo Cells

Filed Under: Battery Charger Circuits Tagged With: Capacitor, Charger, Super, Theory, Working

About Swagatam

I am an electronics engineer and doing practical hands-on work from more than 15 years now. Building real circuits, testing them and also making PCB layouts by myself. I really love doing all these things like inventing something new, designing electronics and also helping other people like hobby guys who want to make their own cool circuits at home.

And that is the main reason why I started this website homemade-circuits.com, to share different types of circuit ideas..

If you are having any kind of doubt or question related to circuits then just write down your question in the comment box below, I am like always checking, so I guarantee I will reply you for sure!


Previous Post: « Self Optimizing Solar Battery Charger Circuit
Next Post: Transcutaneous Nerve Stimulator Circuit »

Reader Interactions

Questions & Answers

Total Posts: 241
Newest Oldest
hand 8727
June 28, 2023 • 3 years ago #143753

so where i s the flux capacitor ? at and if you know any thing about the the e bike battery chargeing circuit .what keeps me from chargeing it up

Reply
Adi
November 6, 2022 • 4 years ago #134438

I made a capacitive charger for desulfation car battery capacitor and bridge and I would like to know if 15.7v is normal for a battery or is it too much

Reply
SwagatamAdmin
November 6, 2022 • 4 years ago #134453

15.7V can be tried on a 12V battery for desulfating it.

Reply
Thykkoottathil Job
May 13, 2021 • 5 years ago #89295

Dear Mr. Swagatam,
What is the current output of the circuit? how long it will take a to charge an 83 F capacitor bank from zero to 15V?
kind regards,
Job.

Reply
SwagatamAdmin
May 14, 2021 • 5 years ago #89370

Dear Thykkoottathil Job

sorry I do not have the necessary calculations for the results, it will need to be checked through a practical experimentation

Reply
James Skews
February 28, 2021 • 5 years ago #87413

If you have a super cap, they say you can’t charge and discharge at the same time. Can you rotate the charge discharge cycle, so that the capacitor will charge then discharge.
Jim

Reply
SwagatamAdmin
February 28, 2021 • 5 years ago #87421

It can be switched through a relay timer, for example the following circuit can be employed with its connected contacts appropriately wired with the super capacitor, load and the charging source.

Switching Two Alternate Loads ON/OFF with IC 555

Reply
hilman
November 11, 2017 • 9 years ago #55800

Dear brother…
I had wasted my time for two days just looking for BUZ10 at many electronic shop on my town… To make your circuit of driving 2x 100watt led with a couple ic 555. I am finding there are many kind of mosfet here, ex IRF540, and etc, but i can’t to change the part that you are posted without your guide…
But now… I found something interest to read more of your article like this one, more simple, and looklikes easy to build, so i read this article for 3 hours.
My question is…
Which one is better between this circuit and https://www.homemade-circuits.com/underwater-led-boost-converter-with/ this circuit…?

I only need to drive 100w led 33volt from 12volt battery. Built in protection circuit, dimming 100k preset and also safety switch

Many thanks for your time…

Reply
SwagatamAdmin
November 11, 2017 • 9 years ago #55802

sorry, the above IC555 Is a better and easier one since it uses a PWM, so I am changing my suggestion and referring you back to the above design:

you can also simply use a TiP35 BJT for T1, and remove the coil, the diode, the zener diode and the capacitor, and replace the coil with your LED.

and configure the BC547, just as shown in the first diagram from this article:

https://www.homemade-circuits.com/calculating-inductor-value-in-smps/

and yes instead of BC547 use 2N2222

Reply
SwagatamAdmin
November 11, 2017 • 9 years ago #55801

Don’t waste anymore time bro, I would suggest you make the first design from this article:

https://www.homemade-circuits.com/designing-customized-battery-charger_13/

But make sure the input DC does not increase over 38V, that would be bad for the LM338 ICs.

also make sure to replace the 5K pot with a 22K pot
R1 = 1.25/LED current

Reply
hilman
November 12, 2017 • 9 years ago #55806

Thank you very much brother….
I worker hard here as community consultant development, so i only have weekend time for keeping my hobby making useful circuit at home.
I keep insist on trying your circuit as long as i can do. So you don’t think that i will leave from your site :)… I will try step by step and will post it with lucky 🙂

After this project, i will need your advise to built subwoofer controller with volume and frequency control from single supply source.
I have already make it from TL 084, LM5812, LM324, LM741, 062, but no ones better works at single supply.. I feel dizzzy make 2.1 ch satelite huft 🙁

Reply
SwagatamAdmin
November 12, 2017 • 9 years ago #55810

You are welcome bro! I am sure you will not leave, nobody has done so far 😉

However I am not so good with audio circuits, so I am not very sure whether I will be able to guide with regards to a subwoofer design but I may be able to show you some good related links within this site.

Reply
hilman
November 12, 2017 • 9 years ago #55821

Yeah… I feel sure that power supply is heart of electronic, so this site should be the first step for building everything project circuit.:)

By the way i’m not a technician, but i keep learning….

Reply
SwagatamAdmin
November 12, 2017 • 9 years ago #55822

that’s great hilman, keep up the good work!

Reply
Nikhil Gujar
July 27, 2016 • 10 years ago #42998

Hi, I am going to design buck converter and requirement is as follows
Input voltage: 72 V
Output voltage: 54 V
Output current: 15 A
Switching frequency: 10 kHz

I tried to design inductor and capacitor values but did not get good achievement. you may please help to design the same.

Reply
SwagatamAdmin
July 27, 2016 • 10 years ago #43013

Hi, I have posted a few easy to understand posts regarding how to design and calculate buck converters, please use the search box on top to find those, I am sure once you read those posts it will become extremely easy for you to get the best optimization for your application

Reply
Claudia ft Privacy
May 17, 2016 • 10 years ago #40993

Back for a moment, i had no time yet to try this solution because i am in the middle of a documentary shoot. But a friend of mine is fighting also with a LED driver. He bought a LED driver that should do between the 28 and 48 Volt….BUT….there is no pot or switch to find on it to adjust the voltage to 33V. Do you know something how this kind of drivers works?
https://drive.google.com/file/d/0B8P7WWCVO6Nwb0JtSktqMlAxZ3M/view?usp=sharing

For me it is a miracle.

Reply
SwagatamAdmin
May 21, 2016 • 10 years ago #41105

you are welcome 🙂

Reply
Claudia ft Privacy
May 20, 2016 • 10 years ago #41093

I must thank you very much, his LED's works now with the resistors:-D

Reply
SwagatamAdmin
May 19, 2016 • 10 years ago #41058

may be it's due to the driver's overload feature getting triggered.

remove the transistor buffer circuit which I suggested, and connect the LED directly with the driver through a resistor

resistor value can be calculated as follows:

R = (U – fwd.LED)/I.

R = resistance value required in series

U = driver o/p voltage without LED connected

Fwd.LED = 33V

I = 3amp

Reply
Claudia ft Privacy
May 19, 2016 • 10 years ago #41050

He thanks you for your answer, but he says that the LED is blinking, is that correct? It doesn't give continuous light. Can that be solved with a big capacitor?

Reply
SwagatamAdmin
May 18, 2016 • 10 years ago #41014

no problem dear:)

Reply
Claudia ft Privacy
May 18, 2016 • 10 years ago #41013

Sorry i was in a hurry …blush

Reply
Claudia ft Privacy
May 18, 2016 • 10 years ago #41012

PS: Does the resistor stay's the same?

Reply
Claudia ft Privacy
May 18, 2016 • 10 years ago #41010

Thank you mr. Swagatam, i will pass the information throe.

Reply
SwagatamAdmin
May 18, 2016 • 10 years ago #41004

It's an SMPS circuit, like the following one:

https://www.homemade-circuits.com/2014/03/12v-5-amp-transformerless-battery.html

for dropping the volatge to 33V, you can try using a emitter follower circuit using a TIP142 transistor as shown in this example circuit, but make sure to use a 33V zener diode instead of the shown 9V, and 1K 2 watt for the resistor, use a large heatsink on the transistor

https://www.homemade-circuits.com/2012/08/simplest-dc-cell-phone-charger-circuit.html

Reply
Claudia ft Privacy
May 10, 2016 • 10 years ago #40815

This link shows the circuit diagram how it is now.
https://drive.google.com/file/d/0B8P7WWCVO6NwdDkzY0RTLS1mNW8/view?usp=sharing

I think there need a diode between each of them, but the one's i have tried don't do the job. I have tried the SB560 and the P600G and both don't stop the influencing from the inductors to each other.

Reply
SwagatamAdmin
May 12, 2016 • 10 years ago #40869

I cannot guarantee whether my "buffer" solution will solve the issue, but you can try it.

first disconnect the center leads of the pots from A1, A2, A3.

take BC547 transistors 3 of them, connect their bases with the center leads of the pots, connect the emitters with A1, A2, A3…and the collectors with the +5V…see if this works

Reply
Claudia ft Privacy
May 12, 2016 • 10 years ago #40868

This is how it is connected to the Ardiuno Uno, it are 4k7 pot's

https://drive.google.com/file/d/0B8P7WWCVO6NwRlU0RzZ2R1BObGM/view?usp=sharing

Reply
SwagatamAdmin
May 12, 2016 • 10 years ago #40858

although I am not entirely sure how things are configured, you can try using emitter followers BJTs as buffers with the pots….if you could show me how the pots are wired I'll tell you how to configure the buffers with them…
if ground is a part of the pot connection then it cannot be removed.

Reply
Claudia ft Privacy
May 11, 2016 • 10 years ago #40847

I found the problem 🙂

The problem is that i had replaced the circuit for a Arduino Uno, and the pot's are in that system connected with each other by +5V and the gnd. With as result that the pot meters are influencing each other. So it is not the booster part but the pwm part. I just don't know how to separate the pot's from each other. Do you have any suggestions? Removing the gnd connection is that an option?

Reply
SwagatamAdmin
May 11, 2016 • 10 years ago #40841

Hi Miss Claudia! How are you?

If it's cross interference that's causing the issue, it possibly could be controlled using separate inductors in series with the positives of each of the circuits and the battery positive

this inductor could be an air cored type, which will need to be experimented for the turns, probably 50 turns/ 1 inch diameter could do the job

Reply
Claudia ft Privacy
May 11, 2016 • 10 years ago #40833

Good morning mr. Swagatam,

I have tried it with 1K ohm and they keep influencing each other.

Reply
SwagatamAdmin
May 10, 2016 • 10 years ago #40816

the connections are OK, but 3 amp for each LED would mean 9 amps from the battery so the battery needs to be at least 100AH rated otherwise the voltage might see a significant drop when all the LEDs are connected together

diode might not be required….try low wattage LEDs or connect a 1K resistor with each LED just to see the response, if it solves the issue then the battery AH rating could be the culprit

Reply
Claudia ft Privacy
May 10, 2016 • 10 years ago #40819

So i replace then the 5x 1 ohm resistors for 1 x 1k resistor? is a 0.25W 1k resistor good or must i have 3 or 5w resistor for that?

Reply
SwagatamAdmin
May 10, 2016 • 10 years ago #40824

use a higher watt resistor because 1/4 w could burn…this is to decrease the LED current drastically and check whether the issue is with the current consumption or the frequency interference.

Reply
SwagatamAdmin
May 10, 2016 • 10 years ago #40817

you can also try increasing the filter capacitor value attached with the coil

Reply
Claudia ft Privacy
May 10, 2016 • 10 years ago #40821

Ok, i have made the capacitor from 1000uF now 2000uF and the result was the same that they keep influencing each other.

Reply
Claudia ft Privacy
May 9, 2016 • 10 years ago #40809

I made 3 boost converters, like in the circuit above here, just the LED is parallel with the capacitor (in your circuit called super capacitor) from 1000uF.

The 3 boost converters i connected parallel together on a battery. So each boost converter got 1 LED from 100W.

Reply
Claudia ft Privacy
May 8, 2016 • 10 years ago #40785

Hello mr. Swagatam, how are you doing?

With me all goes great. But i have a question about this circuit. I am using now 3 of these circuits next to each other with one battery, on it self it works but i noticed that when i change the power from one LED, the others are changing to while i don't want that. It looks to me that the coil inductance from all 3 coils are driving power to each other. How can i change this? I have tried to separate the circuits with p600g diodes, but those diodes get fast very hot. Do you have any suggestions how to solve this?

Reply
SwagatamAdmin
May 9, 2016 • 10 years ago #40794

Hi Claudia, welcome back.

how did you connect the three circuits and their coils with the LED? sorry I couldn't figure out the idea??

is there a single LED or three separate LeDs?

Reply
Claudia ft Privacy
November 9, 2015 • 11 years ago #35733

I will try tonight to make a other coil with 4 nos of 0.8, i think that when the wire is to thin from the coil, it will change its behavior and the DPDT and capacitor gets hot?

Reply
SwagatamAdmin
December 10, 2015 • 11 years ago #36611

OK great! thanks for updating, I am sure this will help the readers a lot.

Reply
Claudia ft Privacy
December 9, 2015 • 11 years ago #36601

I just want to add, that i have changed the diode for a Schottky 60V 5amp diode. With that and the EE core for the coil and a wire AWG from 15 and 6 turns, i tested the 100Watt LED for 4 hours and nothing got hot. The rectifier diode i replaced because it became hot in the first minute even it was a 400V 50Amp diode, but that can come because i worked now with a higher frequency.

Reply
SwagatamAdmin
December 6, 2015 • 11 years ago #36481

Hmmm…that sounds interesting 🙂

wish you the same…keep up the good work

Reply
Claudia ft Privacy
December 6, 2015 • 11 years ago #36476

I told you we Romanian woman don't give up where we put our teeth in 🙂

Happy holiday's and a wonderful Christmas!

Reply
SwagatamAdmin
December 5, 2015 • 11 years ago #36463

I can't believe it 😀 but if it's true then I am the happiest man right now…and I congratulate you for your relentless effort, patience and and intense passion for electronics.

being a newcomer this achievement is indeed huge!

It's me who should actually thank you,,,,well done, and all the best.

Reply
Claudia ft Privacy
December 5, 2015 • 11 years ago #36462

ok, i got it done finally!

R2 must be always bigger then R1. So i used r1 a 1Kohm, and for r2 a 2kohm in serie with a 10k pot. Then the freq. is around the 60kHz and it works great. To protect the pwm i have put a 7812 regulator in front of the pwm power.

Thank you very much for your patience, i am happy now that i have learned this part 🙂

Reply
SwagatamAdmin
December 2, 2015 • 11 years ago #36381

PWM stands for pulse width modulation, so it is supposed to be the optimized ON time and OFF time adjustment of the pulses at pin3….20kHz is the frequency not PWM.

Calculating all the parameters can be time consuming which at the moment will be difficult for me….

you can do one thing, Google "555 boost flyback converter circuit" and build one of these circuits that you find online, it could help with some alternative idea….

Reply
Claudia ft Privacy
December 1, 2015 • 11 years ago #36371

Ok, if i have calculated it right, then the coil must be 123uH with a PWM from 20kHz freq.
And the shottky diode should have a forward current from 2.8Amp with a power dissipation from 100.8V. Can that be correct? So with the coil that i have from 41uH i need a frequency from 60kHz.

Reply
Claudia ft Privacy
December 1, 2015 • 11 years ago #36370

😀 you see, i am learning it….well thanks to a patient tutor.

Reply
SwagatamAdmin
December 1, 2015 • 11 years ago #36355

PWM is definitely crucial because it sets the duty cycle correctly for the converter…so it must be considered too.

Reply
SwagatamAdmin
December 1, 2015 • 11 years ago #36354

I think, it's the inductance and the wire thickness that needs to be considered basically, the size and shape of the inductor does not matter much.

You can refer to the following article, page 6, which provides a clear formula for determining the ripple current or the average current in a boost current.

http://www.ti.com/lit/an/slva372c/slva372c.pdf

the formula will allow you to calculate all the parameters correctly.

As for the E cores, as I mentioned the dimension does not matter, use the one which is able to accommodate the required number of turns at the specified wire thickness.

Reply
Claudia ft Privacy
November 30, 2015 • 11 years ago #36351

Well, there are a lot of sizes for EE core 😐
From ETD29 till ETD 70. It is sold by two pieces, must i put the two peaces against each other? For the ETD39 there is also a plastic housing with connectors. What size do i need you think?

Reply
Claudia ft Privacy
November 30, 2015 • 11 years ago #36348

A ferrite rod is difficult to get here, but a EE core i can get here. Must i then wind the wire around the middle pale from it?

And what if i raise the frequency, can it then still get saturating? Wouldn't that lower the voltage to then? In my logic i think that when there is a higher frequency, then the inductor got less time to load, and gets faster unloaded? Because some of those boosters i see on ebay works with 180Khz with such small coils. Like on this one:
http://www.ebay.com/itm/DC-4-5-32V-to-5-42V-High-Power-Wide-Voltage-Regulator-Booster-Converter-Module-/371242188430

I just don't see the pwm there.

Reply
SwagatamAdmin
November 30, 2015 • 11 years ago #36329

yes definitely that could be the problem in your case too…try using an EE core based inductor or simply use a ferrite ROD which the earlier MW radios used to incorporate for their antenna coils

Reply
Claudia ft Privacy
November 29, 2015 • 11 years ago #36310

Back…. i am not the only one with this problem i see. One of the explanations i found was:"Your toroidal coil doesn't have enough inductance for this application, and it's saturating. This limits the amount of energy it can store, and it also causes the current through the MOSFET to be way too large."

I don't know what it means, but can that be the case for me to that the coil have not enough inductance?

I got it from this site: https://electronics.stackexchange.com/questions/110843/why-my-boost-converter-is-not-working

Reply
SwagatamAdmin
November 25, 2015 • 11 years ago #36234

OK, but it would be difficult for me to make it for you due to my busy schedule….you'll have to keep trying until you succeed, or may be purchase a similar unit from any online store, I'm sure somebody would be selling this online.

Reply
Claudia ft Privacy
November 25, 2015 • 11 years ago #36218

Well i must admit, when i was a little girl i wanted to be a boy but we can't change nature….well it is possible but it is not the same i think. But well, in the television world you can't really be a woman and dress up elegant when you work behind the camera, but it is my passion and i know what i want and that is a lot of LED light that i can influence from behind the camera while i watch my monitor.

I know my creations are strange, i will now make a pcb for it and make it as the one you made in the other article were the frequency can be modified. If this doesn't work ether, then you must let me know what it will cost me when i send the project to you. Because i really want to make better recordings then any one else.

Reply
SwagatamAdmin
November 24, 2015 • 11 years ago #36182

I'll fix it for you…but still I do not know if you are pretending to be a woman, and may be actually are a boy…the circuit should not have problems even with a high current…because the circuit has no relation to high current only the mosfet is….

Reply
Claudia ft Privacy
November 23, 2015 • 11 years ago #36167

hahahaha yea i know, it became a long episode 😀

I will try now to make a pcb for it, maybe the parts were to close to each other.

No, not forever lol. If i really can't manage it, then i send you the components with a sweet smile if you want to fix it for me 😉

I think my problem is that the frequencies from the PWM and the coil are not matching and then the mosfet conducts to long so it generates a high amp. The efficiency is then maybe 10% while it should be around the 90-94%. In principal it works, it is just a matter of fine tuning i think. But i agree, i have some miracle results. Maybe high current circuits are not the best way to start electronics with. But i am thank full for your patience with me.

Reply
SwagatamAdmin
November 22, 2015 • 11 years ago #36133

sure…we all hope and pray you succeed soon with this project…or you can also just continue commenting here forever:-) and I keep advising you forever…

Reply
SwagatamAdmin
November 22, 2015 • 11 years ago #36127

I am not asking, I trying to make you understand your silly experimental results :-D…well the whole episode has already gotten too funny by now…because you are still pursuing this circuit and God knows when you'll actually succeed..:-D

Reply
Claudia ft Privacy
November 22, 2015 • 11 years ago #36121

I must start all over again, my pcb became a chaos. The problem is that i must fabric something myself because the stores here are idiots. They sell 36V LED's and 12V sources. So no matter what you buy, nothing fits with each other. In the past i had those small booster circuit buyed with the LED's in China, but those burns out in no time. So some how those LED's are a problem to deal with.

Reply
Claudia ft Privacy
November 21, 2015 • 11 years ago #36107

Now it gets funny when you are going to ask me the questions 😀

Reply
SwagatamAdmin
November 21, 2015 • 11 years ago #36106

…the BC547 current limiter does not have any relation with the IC so how can it affect the IC performance??

Reply
SwagatamAdmin
November 21, 2015 • 11 years ago #36105

the BC547 current limiter does not any relation with the IC so how it can it affect the IC performance??

Reply
SwagatamAdmin
November 21, 2015 • 11 years ago #36101

yes that will do…:-)

Reply
Claudia ft Privacy
November 21, 2015 • 11 years ago #36094

It does not work, it stabilizes the voltage at 11.41 volts no matter what i do with the pwm.

Reply
Claudia ft Privacy
November 21, 2015 • 11 years ago #36088

GREAT :-), then i will create 0.6 ohm resistor….three resistors from 1.8ohm parrallel would do the job.

Reply
SwagatamAdmin
November 21, 2015 • 11 years ago #36077

yes the BC547 transistor and the 0.6 ohm is designed to solve the over current issue

the 0.6ohm is with reference to the base potential of the BC547, so the circuit will cut off at 0.6/0.6 = 1 amp…so the max current cannot exceed 1 amp

In the above calculation the other 0.6 is the BC547 base trigger limit.

therefore the formula is R = 0.6/current

this formula will tell you what resistor you might want to include for the current limit

Reply
Claudia ft Privacy
November 20, 2015 • 11 years ago #36072

Well, i connected a 10ohm 5w resistor in series between the – from the battery and the input terminal to see what happened. The boost was of course smaller, just around 18V but the DPDT didn't got hot when nothing was connected to the output terminals. So i think that when the mosfet conducts that the amp becomes up to 30 Amps. The resistor became of course warm during this test. With a adapter from 12V 3Amp the adapter gets warm very fast. In the other circuit from https://www.homemade-circuits.com/2015/10/calculating-inductor-value-in-smps.html i saw that you have used a 0.6 ohm resistor behind the mosfet, and a bc547 and behind the BA159 diode a 1K resistor. Do you think i can solve my problem when i put that to in my circuit? But 0.6 Ohm would create 55 Amp with 33V? The PWM is not the problem that one works good.

Reply
Claudia ft Privacy
November 20, 2015 • 11 years ago #36053

Ok, i will try to find such one. A resistor between the minus from the battery and the input terminal wouldn't do the job? I was looking back to the other circuit where we started with.

Reply
SwagatamAdmin
November 19, 2015 • 11 years ago #36000

You can try a 12V, 2 amp transformer power supply, it will not allow the current to increase to extreme levels.

Reply
Claudia ft Privacy
November 17, 2015 • 11 years ago #35970

I have a 12V 8Ah accu for it to test with.

hahhahaa i am a Romanian woman, we don't give up when we put our teeth in something 😀

Reply
SwagatamAdmin
November 16, 2015 • 11 years ago #35934

what's your input power supply amp spec….you can simply use a 2 amp or a 3amp power supply at the input to prevent excessive current from getting in….

you are definitely not a woman, because it's quite unlikely that a woman may have so much interest in a strictly technical thing such as electronics 🙂

Reply
Claudia ft Privacy
November 16, 2015 • 11 years ago #35918

Cant i use a 220V 400Watt light bulp dimmer and limit it to 33 Volt with resistors and put a diode between? Or do i get then a blinking effect on my video recordings?

Reply
Claudia ft Privacy
November 16, 2015 • 11 years ago #35917

Well, i made the coil with 4 wires, and get minimal 31V, but with the two 22ohm 5W resistors in series on the output terminals, the dpdt gets warm and brake the circuit, also the resistors gets warm and the high frequencies sounds stays to. So i think the pwm and coil and mosfet are not the problem, but some how it creates very high amps after the coil. 31V with 44 ohm should be 0.7 Amps. I don't see what component i used that can not handle that. Everything i used is for above the 10 amps. So the only explanation i can find is that when the mosfet is conducting to ground, the ohm value is close to 1 ohm and it generates 31 Amps, the dpdt can't handle that amount of amps. Can't i bring that kind of amps down with a 10ohm 5w resistor between the dpdt and the drain from the mosfet? then the amps would be 3.1Amps when the mosfet closes and when the LED in series with a 10ohm resistor is 24ohm then the resistance on the LED site is still higher then when the mosfet conducts…..in my woman logic 🙂

Reply
SwagatamAdmin
November 10, 2015 • 11 years ago #35748

OK sure!!

Reply
Claudia ft Privacy
November 9, 2015 • 11 years ago #35729

euw, wait you wrote that in your explanation from your other article i see now.

Reply
Claudia ft Privacy
November 9, 2015 • 11 years ago #35727

As i see it, in general it is the same circuit, a pwm with a boost circuit with a coil and mosfet. The only thing that is different is the 1K resistor over the output and the 2200uF capisitator. The PWM i built works on it self good, but the boost part is a other story, that is where it goes wrong for some reason that is unknown by me, because the mosfet is for 500V 50Amp or something, the coil is 0.8mm magnetic wire, the DPDT should do 75V and a few amps, and the diode should be big enough to, the capacitor is 1000uF 63V….but maybe that one gets hot when there is used 40V 1 Amp? btw…..is 0.8mm wire for the coil enough or should i wind it with double wire, i have seen that on some boosters to?

Reply
SwagatamAdmin
November 10, 2015 • 11 years ago #35747

it includes the important current limiting feature which makes sure nothing burns and it also allows you to test the frequency and the PWMs together in one circuit, so it's equipped with many test and protection features…..nothing can go wrong if you test with this circuit and is better suited to the newcomers.

Reply
Claudia ft Privacy
November 7, 2015 • 11 years ago #35681

I am back mr. Majumdar 😀 well, if i got the pot in the lowest position with 44ohm 5W resistor over the terminals, then i got 19V but i hear a very high frequence that goes higher when i turn the pot up. When i go up with my pot, then at 38V the DPDT becomes hot and also the + pin from the capacitor becomes hot. The PWM just does 6.8Khz now. I have not connected the bc547 now. With 44 ohm over the out terminals the amp is not more then 0.9A. So i can forget my 100W 2.5Amp LED to connect on it. Any suggestions?

Reply
SwagatamAdmin
November 8, 2015 • 11 years ago #35692

It can be difficult for me to judge your circuit, I think you can use the first circuit from this article:

https://www.homemade-circuits.com/2015/10/calculating-inductor-value-in-smps.html

Reply
Claudia ft Privacy
September 28, 2015 • 11 years ago #34394

You are not going to believe this 😀

I blew up the giant diode :-))))))
https://drive.google.com/file/d/0B8P7WWCVO6NweWV4R3M1UzJlTXc/view?usp=sharing

First it worked good, nothing wrong, i set first at 32.9V then i connected the LED with a 22 ohm resistor in series, the dpdt jumped after 10 seconds at 29.7 Volts i didn't reached the top from 32.9V. So i disconnected the LED and waited till the dpdt was recovered. And i connected it again without the LED, and the diode exploded.

Reply
SwagatamAdmin
October 13, 2015 • 11 years ago #34761

It' always better to use lower frequency and higher number of turns, which becomes more manageable, anyway, you can go ahead with the existing set up, just make sure the capacitor is rated at 100V

Reply
Claudia ft Privacy
October 12, 2015 • 11 years ago #34746

Ok, i have just 5 turns left on the coil and i don't come lower then 79V. So i am afraid when i connect the capacitor again, that it will blow up even it lowers the voltage.

Reply
Claudia ft Privacy
October 12, 2015 • 11 years ago #34744

Yes, i won't give up. I am going to try that. It will work some day 😀

Reply
SwagatamAdmin
October 12, 2015 • 11 years ago #34722

OK nice…

higher frequency will allow you to use lower number of turns for achieving the same required boost, so it's not bad….now let's see how you progress from here:-D

Reply
Claudia ft Privacy
October 11, 2015 • 11 years ago #34716

Ok, the problem was the preset from 10k. Now i removed it, i had at once a boost to 88.7V with the pot in the lowest position. But i noticed that on the center terminal from the mosfet the freq is 65kHz and at the output terminal the freq was 125kHz, I am sure you never reached that with a mosfet 😀

Reply
SwagatamAdmin
October 11, 2015 • 11 years ago #34701

yes that's possible, simply use a 0-24V/3amp transformer, rectify the output using bridge diodes and a filter cap…the output will be roughly around 33V….just what we need…for extra safety you add a calculated series resistor for limiting current to the LED…:) the resistor value can be changed for changing the illumination.

Reply
Claudia ft Privacy
October 10, 2015 • 11 years ago #34693

I agree with you about that. I have removed the capacitor and replaced the diode but the voltage stays stable at 11.7V. The pwm works normal so i guess that the mosfet is not functioning anymore. Because no matter how i move the pot, the voltage stays at 11.7v. Now i am wondered how the mosfet could be blown up because that one does 500V at 50Amp and got a big radiator and it went wrong at 29V. Is it simpler to make a 100W LED driver that can be variable from 220V so that i don't have to boost?

Reply
SwagatamAdmin
September 30, 2015 • 11 years ago #34453

…hmm but electronics always works and responds with strong reasons so nothing can eb strange here…
do one thing just remove all that's connected at the cathode side of the diode…and check again with a new diode…because something across the cathode of the diode is possibly causing a short circuit.

Reply
Claudia ft Privacy
September 29, 2015 • 11 years ago #34426

hahahhaaa and thank you again lol

I have no idea ether, there is no logic in to find. I mean i have used giant mosfet, giant diode, giant cooler the resistance is not less then 36 ohm, so there cant come a huge current. And yet that diode connectors went hot like hell and the second time it explodes. 36 ohms on 29 volts that is less than 1 amp. With a 400v 6Amp diode???

Reply
SwagatamAdmin
September 29, 2015 • 11 years ago #34407

I certainly believe this because it's being done by you 🙂

but I do not have any explanation or remedy for all these because I have no idea what exactly you are doing and what's causing such bizarre things to happen 😀

Reply
Claudia ft Privacy
September 27, 2015 • 11 years ago #34365

Question,do you have a project some where to connect two gas detectors together?

The problem is this: we have on two places a gas using device, a central heater and a stove. Near every gas using device we must have a gas detector by law. But what i would like is when one of the gas detectors gives alarm, then the other one must give alarm to, because my mom is a bit deaf so she dont hear the alarm from the other side of the house. So i want to connect these detectors with each other. Is that possible with two bc547 transistors or something?

Reply
SwagatamAdmin
September 28, 2015 • 11 years ago #34376

how do you want to interconnect the both…with wires or without wire (remotely)

Reply
View Older Comments

Need Help? Please Leave a Comment! We value your input—Kindly keep it relevant to the above topic! Cancel reply

Your email address will not be published. Required fields are marked *

Primary Sidebar


Categories

  • Arduino Projects (95)
  • Audio and Amplifier Projects (134)
  • Automation Projects (18)
  • Automobile Electronics (104)
  • Battery Charger Circuits (90)
  • Datasheets and Components (109)
  • Electronics Theory (150)
  • Energy from Magnets and Earth (41)
  • Games and Sports Projects (11)
  • Grid and 3-Phase (20)
  • Health related Projects (27)
  • Home Electrical Circuits (13)
  • Indicator Circuits (16)
  • Inverter Circuits (100)
  • Lamps and Lights (163)
  • Meters and Testers (72)
  • Mini Projects (28)
  • Motor Controller (68)
  • Oscillator Circuits (30)
  • Pets and Pests (15)
  • Power Supply Circuits (91)
  • Remote Control Circuits (50)
  • Security and Alarm (65)
  • Sensors and Detectors (107)
  • SMPS and Converters (46)
  • Solar Controller Circuits (62)
  • Temperature Controllers (44)
  • Timer and Delay Relay (50)
  • Voltage Control and Protection (44)
  • Water Controller (37)
  • Wireless Circuits (31)


Circuit Simulator

circuit simulator image


Subscribe to get New Circuits in your Email


Other Links

  • Privacy Policy
  • Cookie Policy
  • Disclaimer
  • Copyright
  • Videos
  • Sitemap

People also Search

555 Circuits | 741 Circuits | LM324 Circuits | LM338 Circuits | 4017 Circuits | Ultrasonic Projects | SMPS Projects | Christmas Projects | MOSFETs | Radio Circuits | Laser Circuits | PIR Projects |


Recent Comments

  • Swagatam on PIR Controlled Solar Garden Light Circuit
  • Swagatam on PIR Controlled Solar Garden Light Circuit
  • Swagatam on The Perfect FM Radio Circuit using TDA7000 IC
  • Swagatam on Voltage Regulator Circuits and Projects
  • Martin on The Perfect FM Radio Circuit using TDA7000 IC

Social Profiles

  • Twitter
  • YouTube
  • Instagram
  • Pinterest
  • My Facebook-Page
  • Stack Exchange
  • Linkedin

© 2026 · Swagatam Innovations