In this post I have explained how to make a simple, cheap yet extremely reliable smps based 220V/120V mains operated cell phone charger circuit.
Why TNYxxx Tiny Switch is Used
The TNY series of tiny switch ICs provide us with an option of making perhaps the smallest possible smps circuits with high reliability. The tiny switch series includes the following ICs: TNY267P, TNY263, TNY264, TNY265, TNY266, TNY267, TNY268, TNY280.
The above ICs have an integrated in-built mosfet switching control circuit, protection against over current and thermal overshoot, along with rugged voltage and current specifications.
The IC comes in a DIP8 package that's exactly how a 555 is enclosed. The maximum tolerable voltage limit of the TNY series ICs is a massive 700V, a margin that's way beyond our normal household AC specs. The operating frequency is at about 132kHz.
The IC is specifically designed and built for implementing compact and reliable 120/220V mains operated SMPS flyback converters.
Although the application of the proposed simplest SMPS design could be huge, it could be best used as a mains operated 5V cell phone charger circuit.
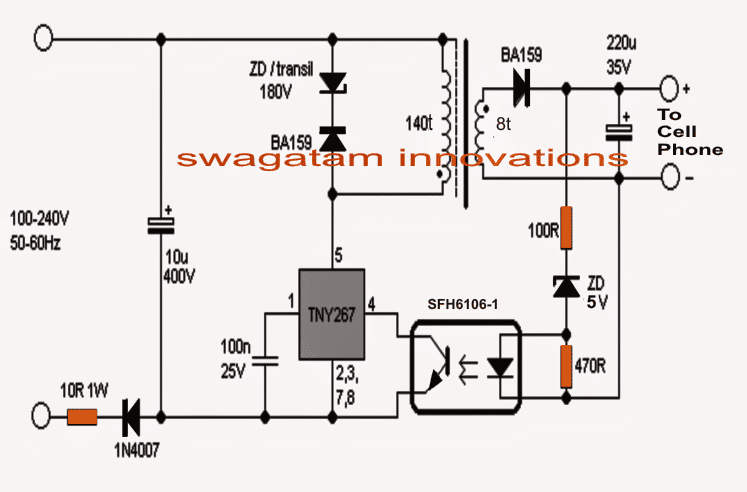
The proposed cell phone charger design using the IC TY 267 can be visualized in the below shown diagram.
How the SMPS Circuit Works
The circuit can be understood as follows:
The mains input which could be anywhere between 100 and 280V is half wave rectified and filtered through shown 1N4007 diode and 10uF/400V input rectifier stage.
The 10 ohm/1watt resistor is included to provide some sort of restriction against the surge current inrush during power switch ONs and also forms like a fuse in case of a catastrophic situation.
The switching voltage is acquired via the BA159 diode at pin5 of the IC.
The IC instantly locks into the specified 132kHz switching frequency when switched ON across the input winding of the switching ferrite transformer.
The 180V zener diode safeguards the IC from peak switching voltages.
The above switching generates the calculated stepped down low voltage across the output winding of the transformer.
The BA159 diode at the output rectifies the 132kz pulsed DC while the 220uF capacitor filters the high frequency ripples to produce a clean DC.
The optocoupler acts like a feedback link between the output and the IC in order to ensure that the output never exceeds a certain predetermined voltage level.
This feedback limit is decided by the adjoining 4.7V zener diode, which ensures that the output stays well within the 5 V range just suitable for charging any attached cell phone.
How to wind the ferrite transformer
The shown ferrite transformer along with the IC forms the heart of the circuit, however due to its simple configuration winding this transformer is much easier compared to other mains operated cell phone charger circuit topologies.
The input primary winding consists of around 140 turns of 36 SWG, while the output secondary winding is made up of 8 turns of 27SWG super enameled copper wire turns.
The core used can be a small E19 type ferrite core with bobbin having a central core area section measuring 4.5 by 4.5mm.
The primary is wound first. After winding it, it must be covered with a layer of insulation before winding the 8 number of secondary turns on top of the primary layer.
A copper or aluminum tape layer should be preferably included in between the primary and the secondary winding and a wire connected with this tape with the "cold" end of the primary winding (see the trafo in the figure), this provides guaranteed isolation between the winding as well as guards against interference issues.
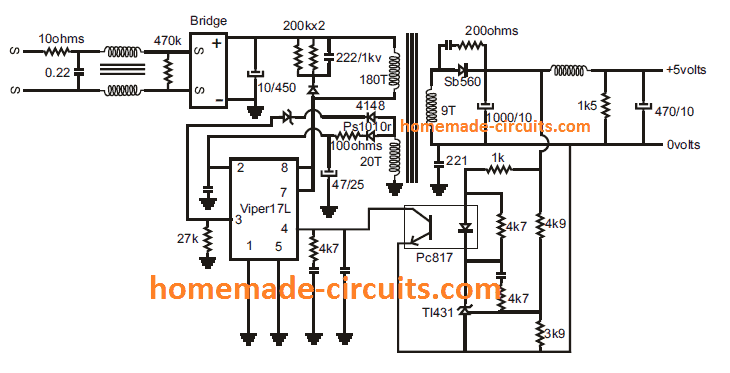
220V Mobile Charger Circuit using Viper22E IC
Comments
I NEED 25W MOBILE CHARGER CIRCUIT
Hallo friend can I parallel two 7805 ic to overcome heating in making 5v cell phone charger from 12v battery. If not what is the way to overcome heat.
thank you
S.MURUGAVEL
Hello MURUGAVEL, you can put two 7805 ICs in parallel to enable current sharing and reduce heat, just make sure to attach them together, close to each other, over a single common heatsink.
To further reduce the heat, you can use 9V battery instead of 12V.
Alternatively, you can try one of these designs:
https://www.homemade-circuits.com/ic-7805-switching-power-supply-circuit/
Hello Swagatam Sir.
Myself Pasha from Hyderabad. I want to make 5v, 20amps SMPS circuit for controlling Pixel led lights, and wants to use core as Ferrite ring because it’s easily available, please help me. My cellphone and WhatsApp number 9247772219.
Thanks
Hello Pasha,
20 amp is too high, at the moment i do not have an SMPS circuit rated at 20 amps. If I find one soon, I will surely let you know.
A negative photoresit coating devloped on pcb and after transfering the circuit layout, how to remove unwanted photoresits
Clean it with acetone or thinner, and then apply a coat of varnish on the PCB tracks.
Dear swagatam sir
I have tested this circuit by replacing the zener with a TL431 with very good results.
The tny290 is the most powerful IC in the entire TNY family.
I am wondering if it is possible to replace the tny267 with a tny290.
Or if you have any easy circuit with the mentioned integrated.
I greet you cordially
Dear Lucas, Yes you can replace TNY267 with TNY290. Yu can refer to the following circuit which I got from the datasheet of the IC:
Thanks for providing all details with so much effort. I hope by reading this article it may be possible for me. Previously, I am thinking about using a readymade mobile battery charger for my project. but now out of curiosity, I will try to build it up. Surely there may be problems while making the transformer but definitely, I will give it a try.
I am glad you liked it! I hope you will be able to succeed with this project!
hola una consulta para obtener los 12 que deveria modificar
seria aumentar al doblr las vueltas del secundario ,el zener a 12v ?
desde muchas gracias
yes for 12V you have to double the number of secondary turns, but this will also cause the output current to drop to 500 mA
Most important part of “How to wind the ferrite transformer” is the gap which you haven’t mentioned. The heart of this flyback transformer is it’s gap and unless you give it properly, it will just refuse to work. That’s where all the energy gets stored during the switch on period. People will just build the circuit and try to find why isn’t it working as intended.
SMPS circuits are not for newcomers, so it is assumed that the reader will know the basics of winding an SMPS transformer.
The gap has to be accurate or else it would be meaningless. Providing turns is not enough unless gap is placed perfectly. That too has few rules. For EE cores, you could use it on the center area only (TDK or some manufacturers supply this predefined gap on request) and for newbies, this gap could spread all across the three legs. Using gap on the center leg has good EMI shielding. An expert will not build this schematic and will follow design rules, so I am guessing only newbies will see this schematic and dream to build one for experiments. Unless they know why GAP is being used they can’t even predict what is missing, rest aside the accuracy of this gap. Just a thought so I shared. When I started, it took years to perfectly align this gap for best results. GAP is an integral part of any flyback transformer design and no one has the brain to predict it. It comes from computation of transformer design. IDK if you just answered it for the sake of answering on a post.
SMPS is not for newbies, it is for people who know the basics of building SMPS transformers.
For your knowledge, Inductors and flyback transformer cores usually require an air-gap to prevent core saturation due to high current flow in the windings
While building an SMPS transformer it is not just the gap but many other critical factors needs to be followed, all cannot be explained in an SMPS circuit.
If you are a newbie and having difficulty in understanding the above design you can go and first learn the following chapters and then try any of the SMPs deigns otherwise you will end up burning your home wiring:
Leakage flux consideration
How to Calculate Ferrite Core Transformers
Hi Swagatan
Is there any commercial model of this transformer that can fit in this application?
I don’t have the skill nor the time to build this transformer, so i’m searching for any that i can buy. If you can provide a model with part. number i’ll be really glad.
Thank you in advance for your attention. Keep up the excellent job
Hi Romano, No, a ready made transformer may not be available for this project, you will have to make it yourself.
Alternatively you could probably buy a complete assembled piece from amazon.
You can Google “Power Supply 230V AC to 5V DC Circuit Board SMPS”
Ok, thank you
Hi sir ,
Sir i have made above mentioned circuit with same specifications but i am facing a problem of loading effect, without load it gives 6.7 v and with load it gives 3.8 v .
Can you tell me any solution?
Quick reply would be appreciated
Hi Ch, what load did you connect? The IC TNY can supply less than 1 amp, so make sure the load is not pulling over 1 amp?
Sir i connected a usb port then i attempted to charger a nokia phone which normally charges bu 500mA charger
I guess its loading effect but how can i reduce it
Ch, you will have to find how much current the load is consuming, if it is higher than 1 amp then the drop will happen. Alternatively, you can try rewinding the secondary using bifilar copper wire, meaning use 4 strands of 0.2mm copper wire and wind them together, this will increase the current absorbing capacity of the output winding.
dear sir i have a question about trafo whether air gap may be nececery inside centrarl leg
and what is the reason air gap in ferrit trafo or how to core take saturation
whether you have blog in this case
excuse me concern your hassle
Hi Sedigh, yes the gap must be introduced otherwise the magnetization will increase to an extent where the cores will saturate and become unstable and short!
I have an article which explains how to design an SMPS transformer:
https://www.homemade-circuits.com/how-to-design-and-calculate-ferrite-core-transformers-for-inverters/
Dear sir a new i connect an load in output and an glow bulb in output after one fast recovery diode and in order an capacitor after diode for get ripple but again beyond last a few time and blinking glow lamp again chip go on blowing off what is your opinion on this case
do you have any suggest for me
whether being below number winding primary is it reason that cause this problem
tanks in advance
best regard sedigh
Hi Sedigh,
As far as I know all ferrite transformers are built with a paper gap on the outer edges of the E cores, otherwise it can lead to over saturation and short circuit. The above circuits are tested by the original author, so it will work if done correctly. Make sure the winding has the correct number of turns and the 180 zener is correctly configured.
Dear sir i salvaged the ferrit trafo from an cfl board as i winding wound as same you told of coures air gab exsiting on central leg EE trrafo
What is it your opinion on EE trrafo my own
i appricate from quick reply
best regards
Dear Sedigh,
the gap must be put using cello-tape or paper on the outer legs of the E core, not the center leg. Please do this and check the response!
Hi bro, TNY266 & 268 are available at the nearby shop, will this circuit work with those chips with same transformer parameters as above?
Hi charan, you can refer to the datasheet of the IC to get the exact circuit diagram, for your assurance.
I referred the datasheet, they have given combined data sheet for TNY263 to 268 all operating at 132khz switching, only power ratings were different. So i hope i can proceed with this circuit.
In the example circuit they have shown a safety cap between primary and secondary like in most of smps circuit. Can you tell me what is the specific function of it ?
Hi Charan, according to the datasheet, the importance of the capacitor is to reduce electrical interference and increase stability of the design:
“The placement of the Y-capacitor should be directly from the primary bulk capacitor positive rail to the common/return terminal on the secondary side. Such placement will maximize the EMI benefit of the Y-capacitor and avoid problems in common-mode surge testing.”
As always thanks for your quick reply. Am in core electrical field so making circuits is just my hobby & am referring this page since SSLC. I’ve limited knowledge about the cap theory u mentioned above so i will proceed with the above circuit and let you know. Thanks….
No problems, wish you all the best. Just make sure to wind the transformer accurately as given in the article or datasheet.
how much is the max output current
1 amp
It is a TVS, but an equivalent 1 watt zener should also work,
It’s not zener, that TVS diode. Something like SMBJ180CA will work.
Then the problem could be with the diode, because at 80mA the diode should not become hot…change it with a 1N5408 diode, or use two 1N4007 in parallel, but make sure both are tightly joined with their bodies touching each other.
No sir, with load….What should i check to solve the problem….?
Is it getting hot with load or without a load? if it’s without load then disconnect the opto coupler feeedback and check again
But my BA159 is getting very heated thats why i checked the diode current and voltage…..
Sir i connect a relay with the supply and i check that 80mA is passing through BA159 and voltage across it -6.3V…..So is it a issue….?Anything wrong here…?
Sir is there any other platform where i can contact you and share my power supply problem with the help of photos and videos…?
I really need this to work….
Thank you sir….
5v to 20v…..input current consumption is 10mA…is it good..?
Hi Harshal, if you want to check voltage and current, then check it in series with the relay coil and across the relay coil….not the diode.
Hello Harshal, you can explain me the problem here, I’ll try to solve if possible, pictures alone may not help to understand the issue you are facing.
By the way you can also check the datasheet of the IC and see it the data helps to get some clue about the issue.
https://www.mouser.in/datasheet/2/328/tny263_268-1512708.pdf
yes, just make sure your SMPS output is below 15 V