In this article we are going to build a smart automatic ON/OFF switch using Arduino, which can turn on or off gadgets automatically by sensing the presence of human nearby through the concept of ultrasonic.
We are going to use ultrasonic module and Arduino to sense the presence of human which activates the gadgets such as table lamp or table fan.
We sometimes forget to turn off the lights or fan while leaving home, at the middle of a trip; we’ll realize that we forgot to turn off “something”. This is enough to ruin our joyful trip. But some don’t even realize it; the energy gets wasted until we return to home.
In this project we are concentrating on gadgets which we use frequently such as table lamps/ table fan and other gadgets, where we sit and move frequently. Leaving these gadgets on for long period may lead to potential energy and money loss.
The Design:
The heart and brain of this smart automatic ON/OFF switch using Arduino is an ultrasonic module, and arduino respectively. The ultrasonic module senses the presence of human, but the ultrasonic module can’t differentiate between a human and an obstacle such as chair in front of the table. Therefore in order to enable this feature we are going to set a threshold distance between the sensor and human.
The distance between the sensor and an object will reduce when new obstacle comes in between them such a human. If Arduino detects the distance between two object the set level goes below the threshold value and this triggers the relay.
When the person moves out of the threshold range it turns off the relay.
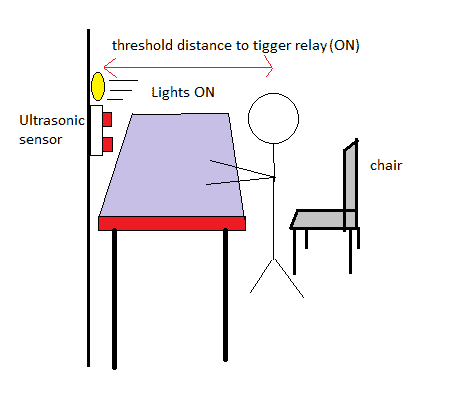
The above diagram illustrates the triggering of the relay in the presence of human, since Arduino detected the distance below the threshold value.
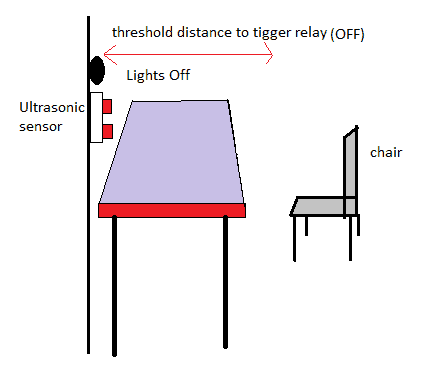
The above diagram illustrates that relay is held switched off in the absence of human, since the arduino continues to detect the distance above threshold value.
The program is written in such a way that it measures the distance between the sensor and obstacle in real time.
The users need to input the threshold value in centimeter before uploading to arduino.
How it Works
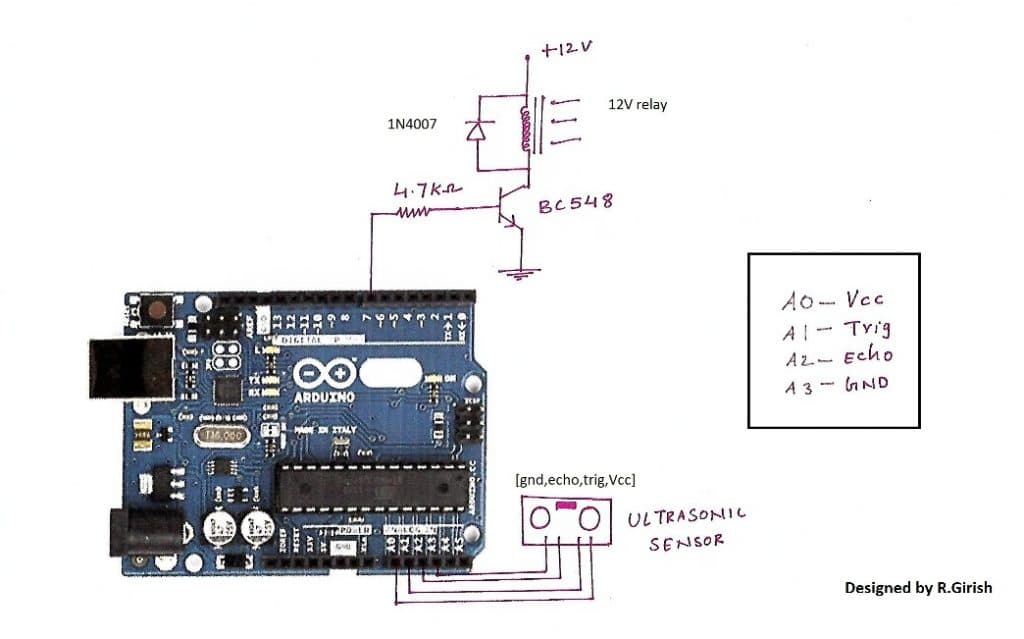
The ultrasonic sensor can be directly inserted on analog pins from A0 to A3, sensors facing outward, this may reduce wire congestion while prototyping the circuit.
NOTE: #PIN 7 is the output to relay
//--------------------Program developed by R.Girish-------------------//

const int trigger = A1;

const int echo = A2;

int vcc = A0;

int gnd = A3;

int OP = 7;

long Time;

float distanceCM;

float distance = 15;  // set threshold distance in cm

float resultCM;

void setup()

{

pinMode(OP,OUTPUT);

pinMode(trigger,OUTPUT);

pinMode(echo,INPUT);

pinMode(vcc,OUTPUT);

pinMode(gnd,OUTPUT);

}

void loop()

{

digitalWrite(vcc,HIGH);

digitalWrite(gnd,LOW);

digitalWrite(trigger,LOW);

delay(1);

digitalWrite(trigger,HIGH);

delayMicroseconds(10);

digitalWrite(trigger,LOW);

Time=pulseIn(echo,HIGH);

distanceCM=Time*0.034;

resultCM=distanceCM/2;

if(resultCM<=distance)

{

digitalWrite(OP,HIGH);

delay(4000);

}

if(resultCM>=distance)

{

digitalWrite(OP,LOW);

}

delay(10);

}

//-----------------Program developed by R.Girish-------------------//
NOTE:
In the program replace the value 15 with your distance between the sensor and table’s edge + 7 to 10cm.
float distance = 15; // set threshold distance in cm
For example: if the distance between sensor and table is 100cm, add 7 to 10 cm more and place the value. The values are in centimeter. It may take up to 4 seconds to turn off the relay after the person moved away from the sensor’s range.


Questions & Answers
Thanks for your good works, I am a keen follower. Please can you help me with an arduino cylcle ON/OFF timer code? The timer should be on for 10 minutes and then off for 8 hours then on for 10 minutes, off for 8 hours repeating like that. An LED display may be ok but not necessary
Thank you.
Thank you, appreciate your thoughts, you can trey the following design and check if it solves your requirement:
https://www.homemade-circuits.com/arduino-2-step-programmable-timer-circuit/
where i can buy this
Hi Mr. Swag,
I am a beginner in Arduino and I level up from LEDs to Sensors. I built and tested your project it’s proven working and useful for my home. I tried different distances and delay time but it works accordingly.
I want to do more on what you started and if you can help to incorporate the serial print so that the distance value and assigned trigger distance to be visible from the Arduino Serial Monitor?
I am from the Philippines.
Thanks a lot.
Hi Mr. Leo, I am sorry my Arduino knowledge is not good so will be difficult for me to help you in this regard.
THANK YOU! you provide solution to my Ultrasonic on/off requirement!
You are welcome! Glad it helped you!
hi,your project was good and useful to us
we are providing inplant training in cheenai for all engineering department students
Thank you, Glad it helped you!
can i use more than one sensor, if so how do i modify the code.
do you know the maximum operating distance
sorry I am not sure about the procedures…
Hi Yashas,
There is no error in the program, I double checked.
If possible try to share link to your screenshot.
Regards
distanceCM was not declared in this scope error is coming what to do