In this article I have explained how to wire tiny 12 volt flashlight bulbs into decorative string light for decorating houses during festivals like Diwali and Christmas.
What are String Lights
As the name suggests a string light is a wired lamp system in which many lamps such as bulbs or LEDs are joined together in series to form string or chain like arrangement.
The series connections are specifically done to divide the supply voltage uniformly across the lamps and to ensure that this voltage value is within the specifications of the lamps.
Diwali and Christmas string lights are also popularly known as TORAN in India.
The articles describes in a very simple to understand language, the basic concept and also the entire wiring details of these TORAN lights or the string lights.
In this article I have explained how tiny 12 volts flashlight bulbs can be strung up together by pieces of electrical wires by soldering them serially.
In one of my earlier articles I discussed and shared with you the moments and the celebration atmosphere of various Indian festive occasions.
We also talked regarding the outrageous light shows generally accompanied with typical Indian festivals.
In the article I have explained how to build a traditional illuminated STAR using bamboo canes and some colorful gelatin paper.
We also discussed about the very popular TORAN lights which are most extensively used during these festivals and I’m sure you all very share the making procedure of these TORAN lights here, which are also commonly known as string lights throughout the world.
In this article we are going to discuss a very simple configuration of making AC mains operated string lights using ordinary small incandescent torch bulbs.
Though the wiring may appear pretty straightforward, it too definitely involves some bit of calculations.
Before we study the complete connection details of the various designs covered here, grasping the basic concept would be handy.
A Simple Flashlight Wiring
A flashlight is the most simple and common form of electrical wiring that one can refer to.
As shown in the diagram, the configuration includes a couple of cells, a small incandescent bulb, a switch and the relevant connections which together constitutes the flashlight circuit.
The only important few things to be taken into account in the above wiring are the compatibility of the involved units among each other.
The two cells which are joined in series contribute a potential difference of 3 volts, making it obvious for the bulb to be also rated at around this level, so the bulb is found to be of 3 volts.
The current of the battery, which is another prime factor is also considered, given in some AH (Ampere Hour), is also matched with the bulb so that the illumination lasts for quite some time with optimum results.
Now suppose a larger flashlight with four of these cells, 1.5 volts each, together producing a potential difference of 6 volts.
For this we would require a 6 volt bulb as the above 3 volt bulb would get burnt off within seconds and wouldn’t last the potential which is double its maximum rating.
However supposing you wanted to use 3 volts bulb with the above 6 volts, then as per the calculations, you would require two of them in series to match 6 volts across them without any danger.
Thus, basically it’s just about adding up the light bulbs in series such that it matches or becomes close to the applied voltage across the connected load or the light bulbs.
It must be noted that, with incandescent bulbs or any resistive load, the type of current does not make any difference.
Therefore, whether it’s an AC or DC, the results or rather the calculations remain exactly the same.
Making a String Light TORAN Using 12 Volt Torch Bulbs
For making the suggested string lights with 230 volts AC mains, we employ the same theory as explained above.
In order to keep things clean and avoid too much of wiring mess, we choose light bulbs rated at 12 volts, instead of 3 volts.
Selecting 3 volt light bulbs would mean, 230 ∕3 = 77 numbers, which is huge and would require a hell lot of connections to be done.
To avoid the clutter we rather use 12 volt devices, since dividing 230 by 12 gives around 20 numbers of light bulbs, which is a pretty manageable quantity as far as knitting them together is concerned.
Parts Required
- Wire – 14/36, 10 meters or as per the required length.
- Soldering Iron – 25 watt, 230 volts,
- Solder wire – 60/40, 18 SWG,
- Solder Paste also called flux.
- Light Bulbs – 12 volts, 100 mA torch bulbs or similar.
- Two pin plug – 1No.
Construction Procedure:
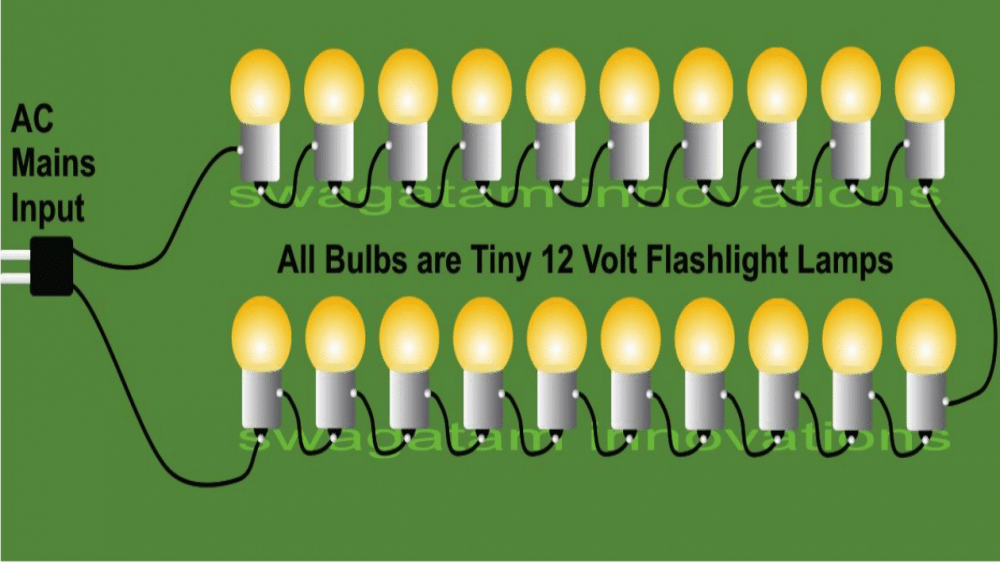
As shown in the above string light circuit diagram, we can see that the bulbs are simply connected in series, end to end in sequence, until two wire terminate from the “string” which are connected to the supply mains outlet.
Usually the metal cylindrical body of the bulb forms one of the terminals, while the bottom soldered point forms the second electrical termination of it.
These two points are the only places where the wires need to be soldered.
For proper soldering results, the portions must be perfectly cleaned using sand paper, however the use of solder paste itself is enough to make the soldering without the need of much cleaning.
Initially, the wire pieces must be cut and stripped as per the desired length, then the wire ends can be dipped in solder paste so that it may be soldered on the shown areas by touching the wire end and the soldering iron hot tip filled with molten solder simultaneously.
The point will sizzle; hold the wire in place until the solder solidifies, holding the wire end firmly in place.
Finish the assembly procedure with the above steps to finally complete the light string or the toran.
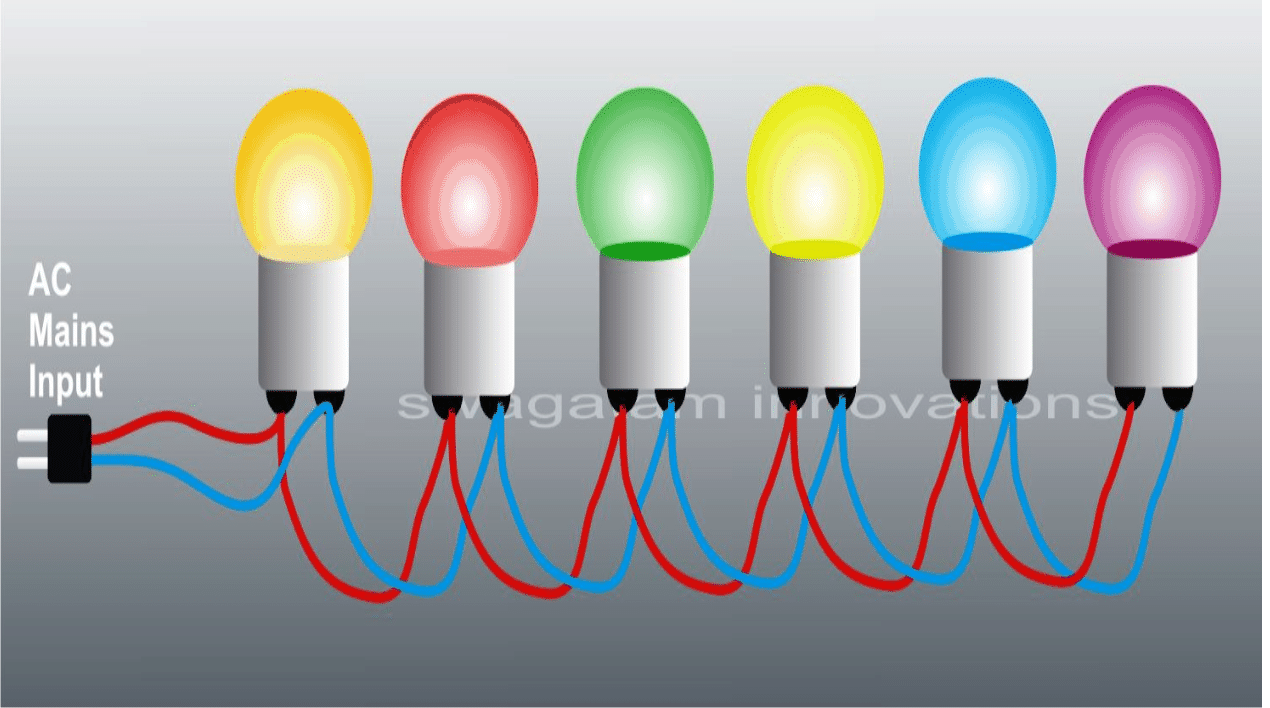
The toran can also be made by using a few colored bulbs rated at the Mains AC level.
In this case it simply needs to connect the bulbs in parallel and not in series. Use holders for better convenience. If bulb holders are used, the need of soldering is simply eliminated.
WARNING - SINCE THE STRING LIGHT OPERATES AT AC MAINS POTENTIAL, ALL EXPOSED AREAS OF THE BULBS MUST BE APPROPRIATELY SHIELDED OR COVERED WITH INSULATING PLASTIC CAPS OR SIMILAR ENCLOSURES, NOT FOLLOWING THIS CAN RESULT IN SEVERE ELECTRIC SHOCK OR EVEN DEATH TO ANYONE TOUCHING IT IN POWERED POSITION.


Discussion & Solutions
Hello!
My question is for an infinite number of serial lighting, how do I ensure strings to give uniform brightness without getting dimmer with increased number of bulbs? i.e., we understood that 3V rated LEDs can be connected in series with about 80 to AC mains of 240V. But my house requires many more such strings. Also, if one of the LED in the string gets damaged or open, will the entire string will stop glowing? If no, how & why? (I don’t know electrical fundamentals…)
Hi,
You will have to use calculated resistors in series with each LED string and then connect all the strings in parallel to ensure uniform brightness on them. I have presented a detailed explanation regarding how to make LED strings, you can read them under the following posts:
https://www.homemade-circuits.com/200-600-led-project-on-mains-220v/
https://www.homemade-circuits.com/how-to-calculate-and-connect-leds-in/
If one of the LEDs become open internally then the entire string will shut off, but this can happen very rarely.
Hello sir,
I have some leds which has 3 wire connectors, There are red, green and white.
Which type of leds they are? how to connect with power? they are AC or DC?
Hello Ani, the center pin is the ground or the common cathode and must be connected to negative of a DC supply, while the other two pins are the positives for the respective red and green LED anodes, and must be connected to the positive of the DC source via 1K resistors. Supply can be anything between 5V and 12V DC
In the above example of 230V /12v bulbs=19 bulbs can i use more than 20bulbs of 12v or is it maximum 20bulbs of 12v??? Also trying a electric experiment for the first time so any way to avoid a blast if something goes wrong :p :p
If you multiply 12 x 20 gives = 240V so it is OK to use 20 or more bulbs, but the glow will proportionately diminish if the supply is less than 240V AC
I would like to make serial lights using DC led bulbs, so i request you to suggest me how to make this serial lights.
search for 4017 LEd chaser light circuit
Hello swagatam, I recreated your project but as I power the led it gives out a flickering, strobe light. Would you know how to fix this? Thanks.
which circuit idea or suggestion are you referring to??
Hi! Swagatam hw r u brother? I'm preparing to start a LED jhalar business and I'm looking for some advice and technical support from u.
Looking forward for your kind response.
Hi Vikas, please provide detailed specifications of your requirement, I'll try to help.
HELLO I WANT TO MAKE 20 NOS LED STRING OF 3V LED BULB BUT IN PARALLEL CIRCUIT.SO THAT I CAN IDENTIFY THE BULB WHICH IS GONE OFF EASILY. MY QUESTION IS HOW TO COMPLETE THE CIRCUIT? WHETHER I NEED TO USE A DIODE AND IF SO WHAT IS THE STEP DOWN PROCESS? PLZ GIVE ME DETAILS GUIDELINE AS IAM MAKING FOR THE FIRST TIME. THE BULBS WILL BE OF DIFFERENT COLOURS. THANKU!
Thanks for your suggestion to make serial lights , but I want to know how to make serial lights from DC led bulbs
you can use the following circuit
https://www.homemade-circuits.com/2011/12/cheap-yet-useful-transformerless-power.html
Hello,
I am interested in making 20 bulbs strip lights.. the bulbs would be about 3V each. My question is:
How do I connect them?
Can i plug these directly into the power supply.
PS: I want to make the stips like they put on some marriage functions.. Always on and yellow in color. You help would be highly appreciated. Thanks!
Omesh, circuit should exactly as shown in the first diagram….the wattage of the bulb is not important, you can use any wattage of your choice, but the voltage must satisfy the formula which is explained in the article and also in my previous comment.
Thanks Swagatam for your reply. What would be the circuit diagram? What is wattage of the bulb that are normally put up? 12V would be very bright, yes?
Thanks!
yes you can plug-in directly to 230V mains once the above instructions are followed
if your bulbs are 3V then you would require 230/3 = 76 to 80 number of bulbs in one series.
for 20 in series the bulbs should be at least 12V rated.
Solution i found is: take 3V bulbs each then divide the input voltage with that of each bulb(say 3) ..Hence we got the no. Of bulbs we can connect in series…
for Ex if my Input voltage is 240V AC Mains, n i have 3V bulbs,then i must need more than 80 Bulbs.
Now My LED String lights are Ready, now i want different patterns of lights, different frequencies of blinking..I need that schematic which can take 240V AC 50Hz input n outputs same amount to my attached string afterwards!!!
but from where will yo get 110V??
anyway you can try the FIRST circuit from the following article for the flashing effect
https://www.homemade-circuits.com/2013/07/simple-triac-timer-circuit.html
make sure to remove D2.
pin#3 can be used for flashing one string light
you can repeat the pin#3 configuration at pin#2 for flashing the other string
Ok i can connect them in parallel…making two different Lines,So Voltage to each of my String got 110 V..Now with 110V each two string containing 40 Bulbs each.. Give some schematics that can blink them(Both Rows) at different patterns/frequencies.
the 220/3 formula is already mentioned in the the above article…..
but if you connect all in a single series then different patterns cannot be implemented across the bulbs since they are all connected together in one line…
How many maximum no. of bulb I can connect in one diwali light how to connect more no. Of diwali light In Switch board
you can refer to the first diagram, you can make many such strings as per requirement and arrange it for the decoration.
How we make a big size diwali light and connect in a building and how many bulb connect in one diwali light
May I purchase 2 set of light
Hello Buddy..i am tired of searching chaser circuit with varied sequences like that in Diwali/Christmas lights..if you can please help me out. I need some schematics to first practice the stimulation in proteus or so.
Hello Deepak, by "varied frequency" did you mean variable speed adjust feature, or random speed generation….??
thanks!
hey i want to make a 100 multicolour LED chaser circuit running of the 220-240v AC mains.Please help?
you can try the following circuit, the power supply can be through a 12V smps ac/dc adapter.
https://www.homemade-circuits.com/2012/10/200-led-reverse-forward-light-chaser.html