• Skip to main content
  • Skip to primary sidebar

Homemade Circuit Projects

Need circuit help? Post them in the comments! I've answered over 50,000!

Blog | Categories | About | Contact | Calculators-online
You are here: Home / Automobile Electronics / Lamp Outage Detector Circuit for Car Turn Signal

Lamp Outage Detector Circuit for Car Turn Signal

Last Updated on January 8, 2024 by Swagatam 2 Comments

The O.E.M. turn signal flashing units installed in automobiles have two  basic functions i.e. Flasher and Lamp outage detection.

Table of Contents
  • Circuit Operation
  • NORMAL OPERATION:
  • OPERATION WITH A DEFECTIVE LAMP:
  • Circuit Diagram

These flashers  are usually built with an 8-pin IC like U2044B, U6432B etc. which are  specifically made for automotive flashers.

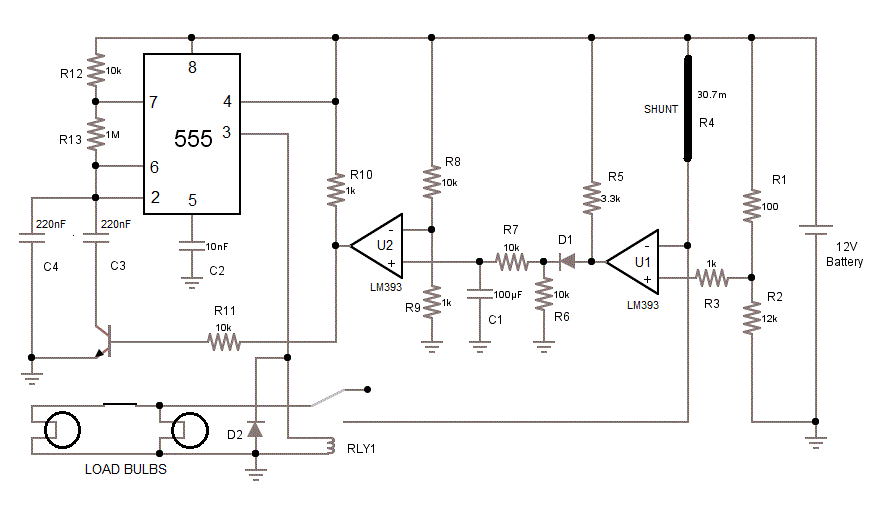
Designed and Written By Abu-Hafss

Circuit Operation

These flashers normally oscillate at about 1.4Hz. When a lamp goes bad,  the oscillation is doubled.

The flasher’s faster clicking sound and the  dashboard indicator’s faster flashing attracts the driver’s attention  that one of the bulbs has gone out.

Here, I have explained a flasher circuit which performs similarly but uses a  555 IC and two comparators.

The circuit consists of two parts – the flashing unit and the lamp  outage detection module. The flashing unit is built around 555 timer  configured as an astable multivibrator.

The resistors R12/R13 and  capacitors C3/C4 sets the required frequency. Note that C3 is connected  in parallel to C4 thru an NPN transistor, acting as a switch.

When there  is positive voltage at the base of the transistor, it conducts and  connects C3 to ground. C3 & C4 in parallel makes the capacitance value  double i.e. 220nF + 220nF = 440nF. This capacitance value together with  R12 and R13 result in frequency of about 1.4Hz.

In the Lamp outage detection module, a shunt resistor (a thick wire)  with a calculated minor resistance (30mΩ) is the key to detect the lamp  outage.

The voltage to lamps is fed thru this shunt. Hence, the shunt is  connected in series to the network of the bulbs which are connected in  parallel.

The inverting input (-input) of the comparator U1 is also  connected to the shunt. The non-inverting input (+input) is connected to  a potential divider providing a reference voltage of 11.90V.

NORMAL OPERATION:

-input = Square wave between 11.89V – 12.0V
+input = 11.9V (reference voltage)

The comparator U1 compares the two voltages and the output is a square  wave between 0-12V. This output is rectified thru diode D1 and filtered thru capacitor C1.

Now, we have a triangular wave form which is fed into  another comparator U2.

+input = Triangular wave between 7V – 8V  -input = 1V (reference voltage)

The comparator U2 compares them; the output is constant 12V which goes  to the base of the NPN transistor.

This switches on the NPN and hence C3  is connected to ground. In result, the 555 timer oscillates at about  1.4Hz.

The output of 555 is connected to relay RLY1 which relays 12V  direct from the battery (thru shunt) to the lamps.

OPERATION WITH A DEFECTIVE LAMP:

When a bulb is defective, there is an increase in the resistance of the  bulb network hence the voltage drop across the shunt is changed. So, in  this case we would have:

-input = Sq. wave between 11.95V – 12V

+input = 11.90V (reference voltage)

The comparator U1 compares them and the output is almost zero volts.  After the diode and the filter network, we finally have a few millivolts  at the +input of U2 which is compared with the reference voltage, 1V.

This results in low output of U2 which ultimately switches off the NPN  and hence C3 is disconnected from the ground.

Now, the timing network of 555 has only C4 to work with, therefore the frequency of the oscillation is doubled. This causes the remaining bulbs to flash at doubled rate.

Circuit Diagram

Flasherwithmalfunctionindicator

You'll also like:

  • 1.  3 Interesting DRL (Day Time Running Light) Circuits for Your Car
  • 2.  Car Reverse Parking Sensor Circuit with Alarm
  • 3.  Cellphone RF Triggered Car Amplifier Auto-Mute Circuit
  • 4.  Car Tank Water Sensor Circuit
  • 5.  GSM Car Ignition and Central Lock Circuit Using Arduino
  • 6.  Cellphone Controlled Car Starter Circuit

About Swagatam

I am an electronics engineer with over 15 years of hands-on experience. I am passionate about inventing, designing electronic circuits and PCBs, and helping hobbyists bring their projects to life. That is why I founded homemade-circuits.com, a website where I share innovative circuit ideas and tutorials. Have a circuit related question? Leave a comment.... I guarantee a reply!

Previous Post: « TSOP1738 Infrared Sensor IC Datasheet, Pinout, Working
Next Post: Induction Heater Circuit Using IGBT (Tested) »

Reader Interactions

Comments

  1. Jordan says

    September 15, 2022 at 12:59 am

    I put LED tail lights on my truck. Doing so required me to swap out the wiring harness for each light. After the install, I noticed the bulb outage detection wired were not connected to anything, as in the factory harness coming from the BCM has 5 wires and the one I purchased to make my new tail light wires work has 4.

    The bulb outage detection wire has a reading of 11.9V and I’ m getting hyperflash on both sides. How can I wire the bulb outage detection wire (or what can I connect it to) to trick it into thinking there isn’t a bulb out?

    Thanks!!

    Reply
    • Swagatam says

      September 15, 2022 at 9:35 am

      The outage detection wires probably requires a load to satisfy the detection circuit. You might have to connect an actual light bulb between the detection wire and ground to satisfy the load conditions. A resistor might not work since it might get too hot.

      Reply

Need Help? Please Leave a Comment! We value your input—Kindly keep it relevant to the above topic! Cancel reply

Your email address will not be published. Required fields are marked *

Primary Sidebar

Subscribe to New Circuit Ideas

Categories

  • Arduino Projects (87)
  • Audio and Amplifier Projects (132)
  • Automation Projects (17)
  • Automobile Electronics (101)
  • Battery Charger Circuits (83)
  • Datasheets and Components (104)
  • Electronics Theory (143)
  • Free Energy (37)
  • Games and Sports Projects (11)
  • Grid and 3-Phase (19)
  • Health related Projects (25)
  • Home Electrical Circuits (12)
  • Indicator Circuits (14)
  • Inverter Circuits (87)
  • Lamps and Lights (142)
  • Meters and Testers (69)
  • Mini Projects (46)
  • Motor Controller (64)
  • Oscillator Circuits (27)
  • Pets and Pests (15)
  • Power Supply Circuits (108)
  • Remote Control Circuits (50)
  • Security and Alarm (64)
  • Sensors and Detectors (101)
  • Solar Controller Circuits (59)
  • Temperature Controllers (42)
  • Timer and Delay Relay (49)
  • Transmitter Circuits (29)
  • Voltage Control and Protection (37)
  • Water Controller (36)

Calculators

  • Battery Back up Time Calculator
  • Capacitance Reactance Calculator
  • IC 555 Astable Calculator
  • IC 555 Monostable Calculator
  • Inductance Calculator
  • LC Resonance Calculator
  • LM317, LM338, LM396 Calculator
  • Ohm’s Law Calculator
  • Phase Angle Phase Shift Calculator
  • Power Factor (PF) Calculator
  • Reactance Calculator
  • Transistor Astable Calculator
  • Transistor base Resistor Calculator
  • Voltage Divider Calculator
  • Wire Current Calculator
  • Zener Diode Calculator
  • Filter Capacitor Calculator
  • Buck Converter Calculator
  • Boost Converter Calculator
  • Solar Panel, Inverter, Battery Calculator
  • Wire Current Calculator
  • SMPS Transformer Calculator
  • IC SG3525, SG3524 Calculator
  • Inverter LC Filter Calculator

People Also Search

555 Circuits | 741 Circuits | LM324 Circuits | LM338 Circuits | 4017 Circuits | Ultrasonic Projects | SMPS Projects | Christmas Projects | MOSFETs | Radio Circuits | Laser Circuits | PIR Projects |

Recent Comments

  • Swagatam on EGS002 Datasheet, Circuit Diagram Explained
  • Swagatam on How to Make IC LM339 Circuits
  • Swagatam on How to Make Dog Barking Preventer Circuit using High Frequency Deterrence
  • Swagatam on How to Buy and Use RF Remote Control Modules – Control Any Electrical Gadget Remotely
  • Swagatam on How to Generate PWM Using IC 555 (2 Methods Explored)

Company

  • Privacy Policy
  • Cookie Policy
  • About Me
  • Contact
  • Disclaimer
  • Copyright
  • Videos
  • Sitemap

Social Profiles

  • Twitter
  • YouTube
  • Instagram
  • Pinterest
  • My Facebook-Page
  • Quora
  • Stack Exchange
  • Linkedin
  • © 2025 · Swagatam Innovations