• Skip to main content
  • Skip to primary sidebar

Homemade Circuit Projects

Need circuit help? Post them in the comments! I've answered over 50,000!

Blog | Categories | About | Contact | Calculators-online
You are here: Home / Motor Controller / Climate Dependent Automatic Fan Speed Controller Circuit

Climate Dependent Automatic Fan Speed Controller Circuit

Last Updated on January 2, 2024 by Swagatam 32 Comments

The following circuit of a temperature or climate controlled automatic fan speed regulator circuit was requested by one of the  followers of this blog Mr.Anil Kumar. I have explained more about the proposed design.

Table of Contents
  • The Design
  • Circuit Diagram

The Design

As can be seen in the given diagram, a very simple concept has been implemented in the proposed design of a climate controlled or temperature controlled fan regulator circuit.

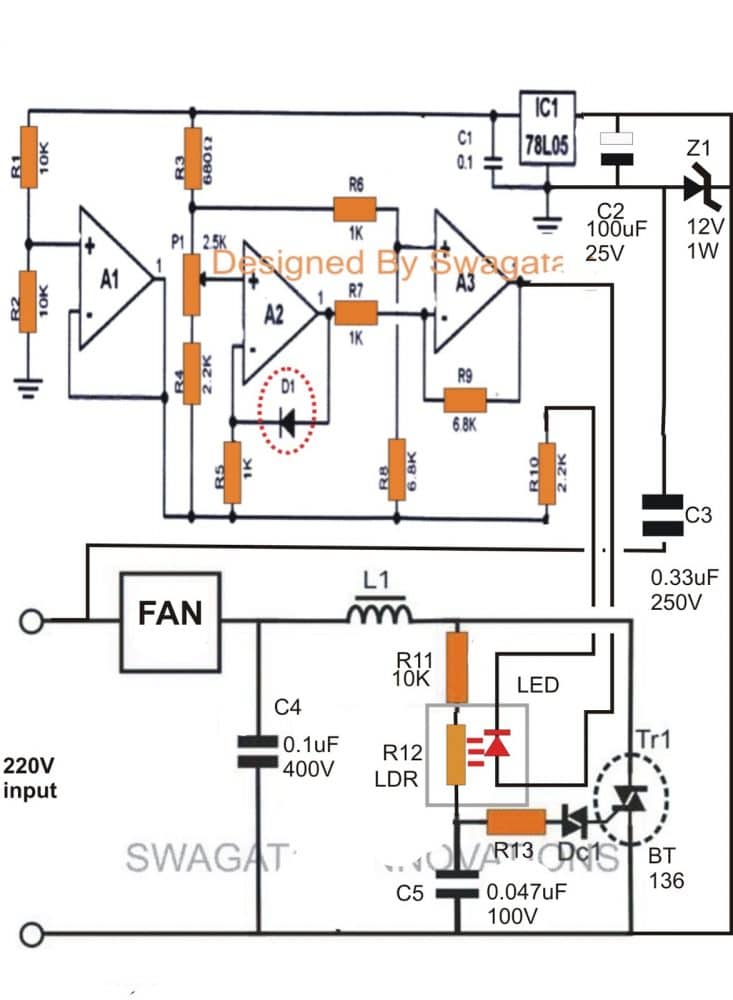
A1, A2, and A3 are the 3 opamps from the IC LM324 which are configured as voltage comparators and amplifier.

The diode D1 which is a common "garden diode" has a very interesting "drawback", it changes its forward voltage drop by 2mV in response to every degree rise in the ambient temperature or the temperature surrounding it.

The above drawback of the device becomes our benefit here, because the feature here is exploited for sensing the ambient temperature of the premise.

The varying voltage across D1, in response to the varying surrounding temperature is effectively amplified at the output of A3.

The above amplified response is fed over an LED/LDR opto coupler, where the LED becomes the output load of A3.

Therefore the brightness of the LED varies proportionately in response to the temperature variations, it becomes brighter with increasing temperature and vice versa.

The above illumination falls over the built in LDR of the opto, which in turn varies its resistance according to the above information from D1.

Since the LDR is fixed as the gate control resistor of the dimmer circuit consisting of R11, C5, R13, DC1 and the TR1, the voltage across TR1 starts regulating the mains AC in accordance with the fed LED/LDR response.

When the LED is bright (at higher temperatures), the LDR resistance lowers. allowing the triac to pass more current.

This increases the speed of the fan, and when the LED/LDR response decreases (at lower temperatures), the speed of the fan also decreases.

A compact power supply consisting of C3, C2, Z1 supplies the required filtered DC to the IC LM324 temperature sensor configuration for the intended operations.

Idealy P1 should be adjusted such that the LED just begins glowing at about 24 degree Celsius, initiating the rotation of the fan at the minimum level.

D1 must be kept exposed well outside the enclosure so that it is able to sense the fan breeze directly.

Circuit Diagram

climate controlled fan speed regulator circuit

WARNING - THE CIRCUIT IS NOT ISOLATED FROM MAINS AC...... BE VERY MUCH CAUTIONED WHILE BUILDING AND TESTING THIS CIRCUIT.

You'll also like:

  • 1.  Stepper Motor Driver Circuit using IC 555
  • 2.  3 Phase Brushless (BLDC) Motor Driver Circuit
  • 3.  Greenhouse Motorized Water Diverter and Humidity Controller Circuit
  • 4.  Refrigerator Motor Soft Start Circuit
  • 5.  High Current Motor Control Circuit using Arduino
  • 6.  Constant Torque Motor Speed Controller Circuit

About Swagatam

I am an electronics engineer with over 15 years of hands-on experience. I am passionate about inventing, designing electronic circuits and PCBs, and helping hobbyists bring their projects to life. That is why I founded homemade-circuits.com, a website where I share innovative circuit ideas and tutorials. Have a circuit related question? Leave a comment.... I guarantee a reply!

Previous Post: « IRF540N MOSFET Pinout, Datasheet, Application Explained
Next Post: 300 Watts PWM Controlled Pure Sine Wave Inverter Circuit »

Reader Interactions

Comments

  1. Thieu says

    June 30, 2024 at 6:26 pm

    Cảm ơn ngài, LDR tôi có nhiều, tôi sẽ làm theo ngài.

    Reply
    • Swagatam says

      June 30, 2024 at 7:27 pm

      Thank you Thieu, no problem!!

      Reply
  2. Thieu says

    June 30, 2024 at 11:42 am

    Hello sir, may I ask what specific LDR/LED component you are using (name or code number)?

    Reply
    • Swagatam says

      June 30, 2024 at 12:47 pm

      Hello Thieu, you can make an LED/LDR opto at home, using the following concept:
      " rel="ugc">comment image
      Just make sure to enclose the LED/LDR assembly inside a light proof tube, tightly.

      Reply
  3. Kesava Raj says

    December 28, 2016 at 5:12 pm

    Hai sir,,
    I need ac fan step by step regulator circuit..up to 4 levels sir

    Reply
    • Swagatam says

      December 29, 2016 at 4:37 am

      if possible i'll try to post it soon

      Reply
  4. gojo shthak says

    November 21, 2016 at 9:30 pm

    sir i have 3 terminal ic78L05 (outout gnd and input) how to implement it in this circuit ?

    Reply
    • Swagatam says

      November 22, 2016 at 6:10 am

      C1 side is out…..C2 side is in

      Reply
    • gojo shthak says

      November 22, 2016 at 7:05 am

      Sir will this circuit work i am making it.any headsup for me before making it ?

      Reply
    • Swagatam says

      November 22, 2016 at 10:42 am

      Gojo, this circuit will work if it's built if perfect understanding and care… and also by checking the stages step-wise before integrating together

      Reply
    • Swagatam says

      November 22, 2016 at 10:46 am

      first build the opamp stage, check it with a DC power supply, and make sure the LED changes its illumination when subjected to temperatures from 20 to 40 degrees C, proportionately

      after that build the dimmer stage, confirm the dimming effect using a pot instead of the LDR…and then replace the pot with the LDR concealed with the oamp LED

      all these will require a lot of optimization and understanding of the concept.

      newcomers should not try this circuit

      Reply
  5. O.J. Herbert says

    April 18, 2016 at 6:57 am

    Can I use a transistor based optocopler too I got PC817 and I realised it was a transistor based isolator. I looked in the near by store and failed to find that particular one. Or maybe you could help me with the code..

    I'm in the final process of building it on PCB board

    Reply
    • Swagatam says

      April 18, 2016 at 9:10 am

      NO, LED/transistor opto will not work here, only an LED/LDR hand-made opto will work, because the resistance of the dimmer circuit needs to vary in response to the LED brightness levels for the required fan speed control

      Reply
  6. O.J. Herbert says

    April 16, 2016 at 1:48 pm

    But its possible to use a DC input circuit isolated from AC through an opto copler and Triac?
    Could you help show me the circuit.
    Well, i also needed a pin-out number of the 324 IC used. Cos im not so good in it.

    Reply
    • Swagatam says

      April 17, 2016 at 12:24 pm

      yes you can replace the capacitive power supply with a DC adapter power supply, …..the circuit already employs an LED/LDR based opto so it is isolated from mains.

      if you are not good with the basics then I would advise you to first learn all the basics and only then try this complex circuit

      Reply
  7. O.J. Herbert says

    April 16, 2016 at 11:34 am

    Well thanks for helping us upcoming ambitious sudents.
    Mine has the same principle( control of the speed fan using a DC power source with a Thermistor.
    Could you please help me with that

    Reply
    • Swagatam says

      April 16, 2016 at 12:38 pm

      thermistors are not sensitive enough to sense minute changes in ambient temperature, so I don't think it can be used for the mentioned application….the proposed 1N4148 as the sensor in the above article is a better approach.

      Reply
  8. Javid Ahamed says

    September 6, 2015 at 8:58 am

    how change the setting for low temperature and high speed fan operation

    Reply
  9. Saeed Abu says

    May 23, 2015 at 1:12 pm

    Dear is this circuit is tested?

    Reply
    • Swagatam says

      May 25, 2015 at 2:50 am

      the two module were tested separately for different applications but not together, however it's recommended for experts only, newcomers will fail for sure

      Reply
  10. NITESH CHOURASIA says

    January 28, 2015 at 4:47 am

    Sir, do we need to give vcc and ground to the ic??

    Reply
    • Swagatam says

      January 28, 2015 at 12:45 pm

      Nitesh, the Vcc/ground will go to the 78L05 output supply….pin4 to (+) and pin11 to (-) of 78L05 outputs respectively

      Reply
  11. NITESH CHOURASIA says

    January 28, 2015 at 4:46 am

    Hi sir, do we need to provide vcc and ground , to the ic LM324??

    Reply
  12. Marri RAJESH says

    July 31, 2014 at 3:43 am

    hai sir we are going to do this temp controlled ceiling fan as our mini project can u help us

    Reply
    • Swagatam says

      July 31, 2014 at 7:43 am

      Hi Rajesh, if you do everything exactly as given in the above article it will surely work…

      if you have questions you can put them here.

      Reply
    • Marri RAJESH says

      August 5, 2014 at 7:31 am

      sir please give me a view about p1

      Reply
    • Swagatam says

      August 6, 2014 at 4:22 am

      It's given in the article explantion

      Reply
    • Jyotshna Josh says

      August 9, 2014 at 7:13 am

      Can you tell me the principle involved in the room temperature control fan…. in a simple way?

      Reply
    • Swagatam says

      August 9, 2014 at 4:28 pm

      D1 senses the ambient temp changes which is amplified by the opamps, then fed to the dimmer circuit which converts it into corresponding varying fan speeds

      Reply
  13. Swagatam says

    April 4, 2014 at 8:13 am

    try this:

    4.bp.blogspot.com/-G-E1CvLaU4U/UOfhAH6C0ZI/AAAAAAAACas/nsaEsevlY6k/s1600/reverse+forward+dc+motor+speed+controller+circuit.jpg

    use BC557 and not BC547 as wrongly shown in the diagram.

    Reply
  14. Amlan says

    April 3, 2014 at 7:34 pm

    can u help me how to rotate adjust fan forward and reverse direction??? i need it very urgent.

    Reply
  15. Swagatam says

    November 9, 2013 at 4:29 am

    D1 = 1N4148
    DC1 = diac DB-3
    R13 = 47 ohms

    L1 is not required, replace it with a link

    Reply

Need Help? Please Leave a Comment! We value your input—Kindly keep it relevant to the above topic! Cancel reply

Your email address will not be published. Required fields are marked *

Primary Sidebar

Subscribe to New Circuit Ideas

Categories

  • Arduino Projects (87)
  • Audio and Amplifier Projects (132)
  • Automation Projects (17)
  • Automobile Electronics (101)
  • Battery Charger Circuits (83)
  • Datasheets and Components (104)
  • Electronics Theory (143)
  • Free Energy (37)
  • Games and Sports Projects (11)
  • Grid and 3-Phase (19)
  • Health related Projects (25)
  • Home Electrical Circuits (12)
  • Indicator Circuits (14)
  • Inverter Circuits (87)
  • Lamps and Lights (142)
  • Meters and Testers (69)
  • Mini Projects (46)
  • Motor Controller (64)
  • Oscillator Circuits (27)
  • Pets and Pests (15)
  • Power Supply Circuits (108)
  • Remote Control Circuits (50)
  • Security and Alarm (64)
  • Sensors and Detectors (101)
  • Solar Controller Circuits (59)
  • Temperature Controllers (42)
  • Timer and Delay Relay (49)
  • Transmitter Circuits (29)
  • Voltage Control and Protection (37)
  • Water Controller (36)

Calculators

  • Battery Back up Time Calculator
  • Capacitance Reactance Calculator
  • IC 555 Astable Calculator
  • IC 555 Monostable Calculator
  • Inductance Calculator
  • LC Resonance Calculator
  • LM317, LM338, LM396 Calculator
  • Ohm’s Law Calculator
  • Phase Angle Phase Shift Calculator
  • Power Factor (PF) Calculator
  • Reactance Calculator
  • Transistor Astable Calculator
  • Transistor base Resistor Calculator
  • Voltage Divider Calculator
  • Wire Current Calculator
  • Zener Diode Calculator
  • Filter Capacitor Calculator
  • Buck Converter Calculator
  • Boost Converter Calculator
  • Solar Panel, Inverter, Battery Calculator
  • Wire Current Calculator
  • SMPS Transformer Calculator
  • IC SG3525, SG3524 Calculator
  • Inverter LC Filter Calculator

People Also Search

555 Circuits | 741 Circuits | LM324 Circuits | LM338 Circuits | 4017 Circuits | Ultrasonic Projects | SMPS Projects | Christmas Projects | MOSFETs | Radio Circuits | Laser Circuits | PIR Projects |

Recent Comments

  • Swagatam on EGS002 Datasheet, Circuit Diagram Explained
  • Swagatam on How to Make IC LM339 Circuits
  • Swagatam on How to Make Dog Barking Preventer Circuit using High Frequency Deterrence
  • Swagatam on How to Buy and Use RF Remote Control Modules – Control Any Electrical Gadget Remotely
  • Swagatam on How to Generate PWM Using IC 555 (2 Methods Explored)

Company

  • Privacy Policy
  • Cookie Policy
  • About Me
  • Contact
  • Disclaimer
  • Copyright
  • Videos
  • Sitemap

Social Profiles

  • Twitter
  • YouTube
  • Instagram
  • Pinterest
  • My Facebook-Page
  • Quora
  • Stack Exchange
  • Linkedin
  • © 2025 · Swagatam Innovations