• Skip to main content
  • Skip to primary sidebar

Homemade Circuit Projects

Need circuit help? Post them in the comments! I've answered over 50,000!

Blog | Categories | About | Contact | Calculators-online
You are here: Home / Security and Alarm / Security Alarm Circuit using RCWL-0516 Microwave Radar Sensor

DIY Circuits | Learn Basics | Arduino Coding


Security Alarm Circuit using RCWL-0516 Microwave Radar Sensor

Last Updated on August 22, 2024 by Swagatam 9 Comments

This security alarm circuit using RCWL-0516 microwave radar motion sensor will detect any moving thing in the restricted area and turn ON an alarm sound.

The RCWL-0516 is basically an advanced motion sensor using microwave radar signals.

I have already discussed the working of RCWL-0516 elaborately, which you can read for more details.

Circuit Description

The following figure shows the full circuit diagram of the proposed security alarm circuit using RCWL-0516 microwave radar motion sensor.

Referring to the above figure, the working of the circuit can be learned from the following points:

The circuit operation is actually very straightforward, thanks to the outstanding RCWL-0516 motion sensor module.

As we know that the RCWL-0516 module will detect anything that moves within its detection range and in response produce a positive voltage at its OUT pin.

Therefore as soon as a potential intruder or burglar tries to trespass the restricted zone, it is quickly detected by the RCWL-0516 module.

This causes the RCWL-0516 "OUT" pin to generate a positive voltage which is sent to the base of the TIP122 transistor via the 4.7k resistor and the LED.

The LED lights up, and the TIP122 switches ON turning ON the alarm device.

The alarm starts sounding indicating a possible intrusion in the protected zone.

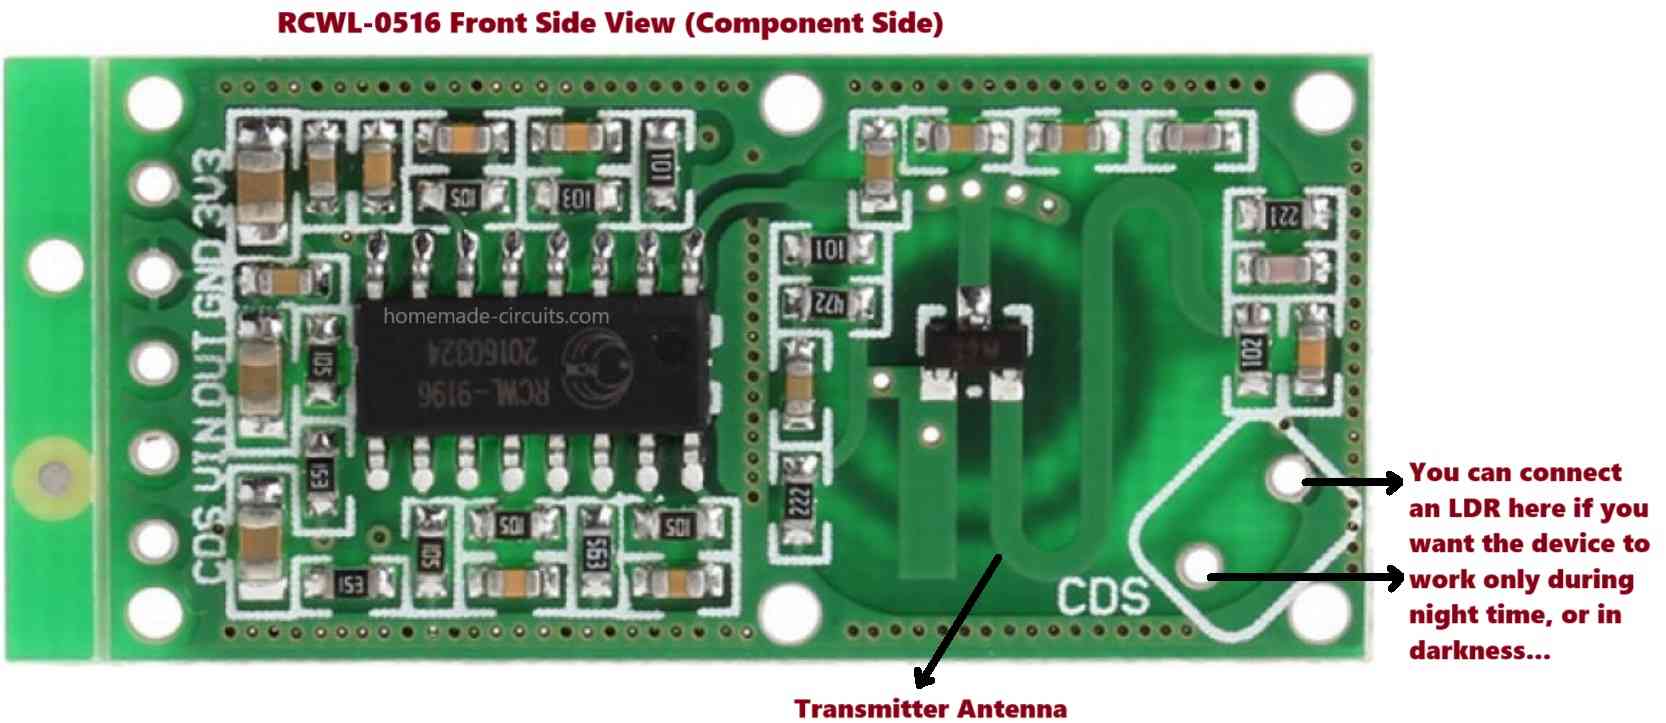
If you want the circuit to be functional only during nighttime or in darkness, you can add an LDR on the back side of the RCWL-0516 module.

Whenever an intruder is detected, the RCWL-0516 module keeps the siren activated as long as the intruder movement is detectable in the area. It shuts down the siren after a delay of 2 seconds once the moving object is terminated from the detection zone.

Parts List

  • Resistors are 1/4 watt 5% CFR
  • 4.7k = 1
  • 10 ohm = 1
  • Semiconductors
  • Transistor TIP122 = 1
  • RED LED 3.3 V, 5mm, 20mA = 1
  • Diode 1N4007 = 1
  • 12V Siren Module = 1
  • RCWL-0516 module = 1
  • 12V 1 amp Power supply SMPS = 1

You'll also like:

  • blockdiagramSMS Based Laser Security Circuit
  • ACFieldDetectorAnti Spy RF Detector Circuit – Wireless Bug Detector
  • 12V solenoid lockSimplest Combination Lock Circuit Explained
  • simple2Bdelay2BON2BcircuitLaser Activated GSM Call Alert Security Circuit

Filed Under: Security and Alarm Tagged With: 0516, Alarm, Microwave, Radar, RCWL, Security

About Swagatam

I am an electronics engineer and doing practical hands-on work from more than 15 years now. Building real circuits, testing them and also making PCB layouts by myself. I really love doing all these things like inventing something new, designing electronics and also helping other people like hobby guys who want to make their own cool circuits at home.

And that is the main reason why I started this website homemade-circuits.com, to share different types of circuit ideas..

If you are having any kind of doubt or question related to circuits then just write down your question in the comment box below, I am like always checking, so I guarantee I will reply you for sure!

Previous Post: « Insect Light Trap Circuit for Protecting Crops
Next Post: Flashlight Activated Burglar Alarm Circuit »

Reader Interactions

Comments

Udit says:
August 21, 2024 at 4:25 pm

Please give the calculations of 4.7 k and 10k resistances. What is the use of 10 k resistor in the circuit.

Reply
Swagatam says:
August 21, 2024 at 4:50 pm

Both the resistor values are not critical, the 4.7k value must be such which allows minimum glow on the LED. It can be calculated using the formula:
R = (5 – 3.3) / 0.02
The 10k pull-down resistor is also not critical, its value must be such that it allows at least 1.5 volts at the base of the TIP122

Reply
Udit says:
August 21, 2024 at 8:01 pm

The output of rcwl 0516 is 3.3 volt and not 5volt so R will be 3.3 -1.8,because forward voltage of red led is 1.8 volt not as mentioned you. Please clarify. Also tell us the base current and collector current of tip 122.

Reply
Swagatam says:
August 22, 2024 at 8:56 am

Thanks for the correction, I mistakenly assumed the output to be 5V.
I have corrected the diagram according to 3.3V output.
The LED must be 3.3V 20mA type.
No resistor is required for the LED, although you can use a 10 ohm series resistor for better safety.
For calculating base resistor for TIP122 you can use the following formula:
R = (3.3 – 1.2) * hFE / Siren current

Reply
Ghulam Mohio Din says:
December 11, 2025 at 8:35 am

hello sir، hope all is going well، sir what is the alternate of tip 122?

Reply
Ghulam Mohio Din says:
December 11, 2025 at 2:09 pm

ok sir, i will try and update you….
thanks

Reply
Swagatam says:
December 11, 2025 at 2:06 pm

Thanks Ghulam, I am good!
There’s no direct replacement for the TIP122 transistor, but you can easily replicate it using a TIP131 and 2N2222 in a Darligton configuration..
Darlington configuration image

Reply
Udit says:
March 17, 2025 at 9:23 pm

if 10 ohms is used, base current will increase. for proper base current 1k resistor should be used with 5 volt output from rcwl 0516.

Reply
Swagatam says:
March 18, 2025 at 7:57 am

The logic high from the OUT pin is 3.3V, so 10 ohms is fine for the LED, considering the LED fwd V is also rated at 3.3V.
You can use the formula for calculating the resistor value.
1k can be also used if the LED is high bright type.

Reply

Need Help? Please Leave a Comment! We value your input—Kindly keep it relevant to the above topic! Cancel reply

Your email address will not be published. Required fields are marked *

Primary Sidebar

circuit simulator image


Subscribe to get New Circuits in your Email


Categories

  • Arduino Projects (93)
  • Audio and Amplifier Projects (133)
  • Automation Projects (17)
  • Automobile Electronics (101)
  • Battery Charger Circuits (85)
  • Datasheets and Components (109)
  • Electronics Theory (149)
  • Energy from Magnets (27)
  • Games and Sports Projects (11)
  • Grid and 3-Phase (20)
  • Health related Projects (27)
  • Home Electrical Circuits (13)
  • Indicator Circuits (16)
  • Inverter Circuits (95)
  • Lamps and Lights (159)
  • Meters and Testers (71)
  • Mini Projects (28)
  • Motor Controller (68)
  • Oscillator Circuits (28)
  • Pets and Pests (15)
  • Power Supply Circuits (91)
  • Remote Control Circuits (50)
  • Renewable Energy (12)
  • Security and Alarm (64)
  • Sensors and Detectors (106)
  • SMPS and Converters (34)
  • Solar Controller Circuits (60)
  • Temperature Controllers (43)
  • Timer and Delay Relay (49)
  • Voltage Control and Protection (42)
  • Water Controller (36)
  • Wireless Circuits (30)


Other Links

  • Privacy Policy
  • Cookie Policy
  • Disclaimer
  • Copyright
  • Videos
  • Sitemap


People also Search

555 Circuits | 741 Circuits | LM324 Circuits | LM338 Circuits | 4017 Circuits | Ultrasonic Projects | SMPS Projects | Christmas Projects | MOSFETs | Radio Circuits | Laser Circuits | PIR Projects |

Social Profiles

  • Twitter
  • YouTube
  • Instagram
  • Pinterest
  • My Facebook-Page
  • Stack Exchange
  • Linkedin


Recent Comments

  • Swagatam on IC IR2111 H-Bridge MOSFET, IGBT Driver IC: Full Datasheet, Circuit Diagram
  • arj on IC IR2111 H-Bridge MOSFET, IGBT Driver IC: Full Datasheet, Circuit Diagram
  • Swagatam on IC IR2111 H-Bridge MOSFET, IGBT Driver IC: Full Datasheet, Circuit Diagram
  • Arj on IC IR2111 H-Bridge MOSFET, IGBT Driver IC: Full Datasheet, Circuit Diagram
  • Swagatam on How to Recharge Dead Batteries

© 2026 · Swagatam Innovations