In this post I will show how to construct a password based mains ON/OFF switch circuit, which can turn ON and OFF the AC mains supply, only when correct password is entered. This prevents the danger of electrocution of the technician who might be currently working with the high voltage lines and equipment.
Password Protection for Utility Mains Lines is Crucial
The biggest nightmare for any electrician or technician is an accidental activation of AC lines by someone, which might kill or cause fatal damage to the body organs in a blink of an eye.
This password protected mains ON/OFF switch circuit prevents such unfortunate incident and allows the technician to turn ON the AC mains supply safely by entering correct password and not just by flipping a lever.
This project presents the facility to change password which is stored in the EEPROM of Arduino’s microcontroller.
Human body or even animal body has its own electrical system, which helps to send information from one part of the body to another part. The information is send as electrical signals which have measurable amplitude and frequency. It also helps to contract and relax the muscles, for example our heart.
Fun Fact: Heart has a multivibrator like signal generator called “SA node” or “Sinoatrial”; which controls the heart rate. If Sinoatrial fails we have to apply external electrical signal to heart using pacemaker.
Any surge to existing electrical signals of our body will make lose control over our own body parts. That’s why people feel getting stuck and paralyzed when they come in contact with an open electrical LIVE wire.
Our body have reasonable resistance and also good amount of electrical conductance. We know that any element with resistance generate heat when electric current is passed.
This applies to human body too; the heat damages the organs and may cause blood to boil. Soon or later the person may die if he/she got electrocuted long enough.
That’s enough medical electronics for now. Let’s move on to technical details.
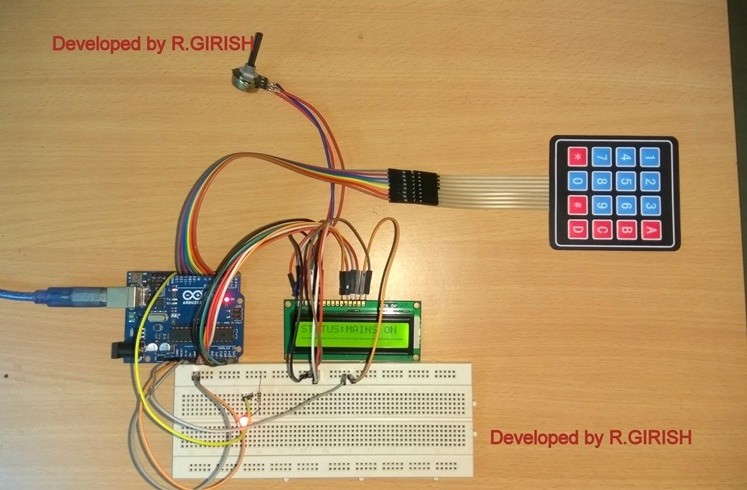
The project consists of LCD display, a 4 x 3 alphanumeric keypad, a status LED and relay.
Schematic for Arduino and LCD connection:
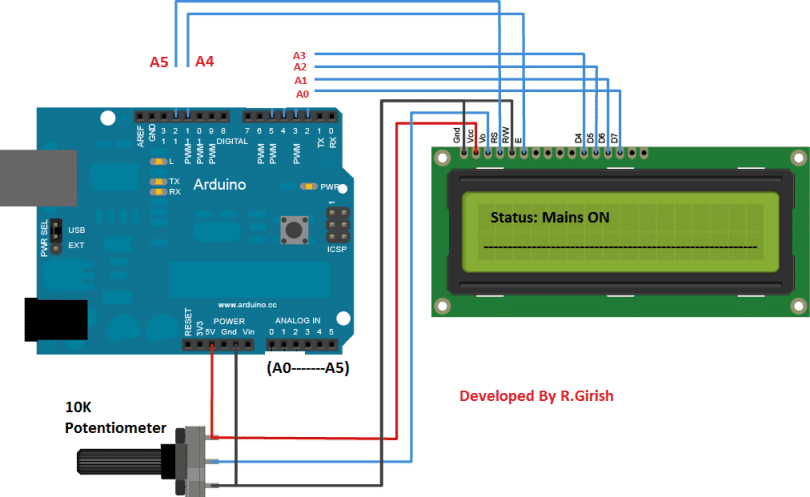
The display is connected to analog pins of the arduino from A0 to A5. The display is unusually connected to analog pins (which functions same as connected to digital pins) so that keypad can be connected to digital pins (from 2 to 9).
Adjust display contrast using the 10 K ohm potentiometer.
Keypad connection:
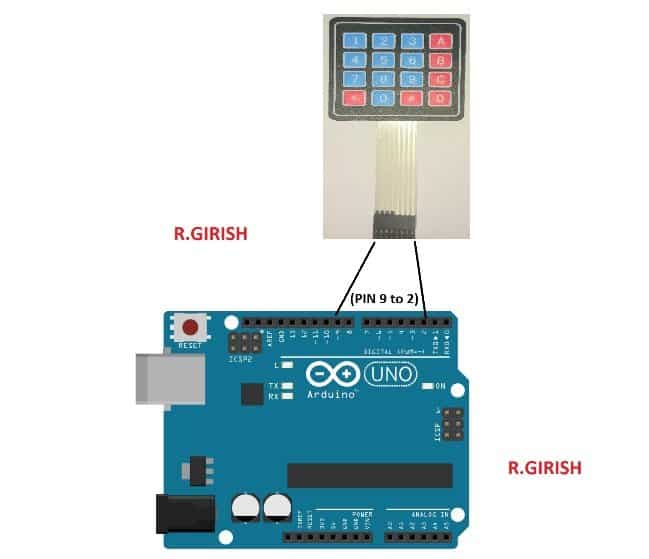
The keypad has 8 cables which should be connected to Arduino, from pin #2 to pin #9. The left most wire of keypad must go to pin #9 and connect the succeeding right to next wire of keypad to pin# 8, 7 ,6, 5, 4, 3, 2, the last or the right most wire of keypad must go to pin #2.
Rest of the electrical connections:

You need to download and add the keypad library from the following link: github.com/Chris--A/Keypad before compiling the code.
EEPROM of Arduino microcontroller would have some random values stored initially. We have to reset to zero, so that our main program don’t get confused. To rest EEPROM values to zero upload the below program first and then upload the main program second.
Program Code
1) EEPROM reset sketch (upload this first)
This clears addresses 0..9 to zero and prints EEPROM before/after. Fixes the i/k bug you had.
// EEPROM Reset Sketch
// Upload this first to zero first 10 bytes of EEPROM
//------------------Program Developed by R.GIRISH (cleaned)------------------//
#include <EEPROM.h>

void setup() {
  Serial.begin(9600);
  delay(200);

  Serial.println("Reading EEPROM (before):");
  for (int i = 0; i < 10; i++) {
    Serial.print("Addr ");
    Serial.print(i);
    Serial.print(" = ");
    Serial.println(EEPROM.read(i));
  }

  Serial.println("Writing null values to first 10 addresses...");
  for (int a = 0; a < 10; a++) {
    EEPROM.write(a, 0); // write zero
  }

  Serial.println("Reading EEPROM (after):");
  for (int i = 0; i < 10; i++) {
    Serial.print("Addr ");
    Serial.print(i);
    Serial.print(" = ");
    Serial.println(EEPROM.read(i));
  }

  Serial.println("Done!!!");
}

void loop() {
  // nothing
}
2) Main Password Controlled AC Mains ON/OFF Switch (upload this second)
Cleaned, modular, no goto, same messages & keypad flow. Uses arrays for 6-digit pin, uses Keypad.waitForKey() like original so user interactions remain the same.
// Main program - cleaned version without goto, uses functions and arrays
// Keeps same behaviour and LCD messages as original
//------------------Program Developed by R.GIRISH (cleaned)------------------//

#include <Keypad.h>
#include <EEPROM.h>
#include <LiquidCrystal.h>

// LCD pins (same mapping as your original)
LiquidCrystal lcd(A5, A4, A3, A2, A1, A0);

// Hardware pins
const int RELAY_PIN = 10;
const int LED_PIN = 11;

// EEPROM addresses (same as original)
const int WORD_ADDR[6] = {0, 1, 2, 3, 4, 5};
const int OUTPUT_STATUS_ADDR = 6;
const int PASSWORD_EXIST_ADDR = 7;
const int TOGGLE_ADDR = 8;

// Keypad layout (same)
const byte ROWS = 4;
const byte COLS = 4;
char keys[ROWS][COLS] =
{
  {'D', '#', '0', '*'},
  {'C', '9', '8', '7'},
  {'B', '6', '5', '4'},
  {'A', '3', '2', '1'}
};
byte rowPins[ROWS] = {6, 7, 8, 9};
byte colPins[COLS] = {2, 3, 4, 5};
Keypad keypad = Keypad(makeKeymap(keys), rowPins, colPins, ROWS, COLS);

// runtime buffers
char entry[6];     // for input / new password
char confirm[6];   // for re-typing or verification
char saved[6];     // read from EEPROM for verification

// helper forward declarations
void showWelcome();
void showStatus();
void updateHardwareFromStatus();
bool readSixDigitsInteractive(char *buffer, const char *line1, const char *line2);
bool isSpecialKey(char k);
void setNewPasswordFlow();
bool verifyPasswordInteractive();
void changePasswordFlow();
void toggleMainsFlow();
void savePasswordToEEPROM(const char *buf);
void readPasswordFromEEPROM(char *buf);
void safeEEPROMWrite(int addr, byte val);

void setup() {
  lcd.begin(16, 2);
  pinMode(RELAY_PIN, OUTPUT);
  pinMode(LED_PIN, OUTPUT);

  // Safety: if EEPROM uninitialized, set sensible defaults.
  // If you ran the EEPROM reset sketch before, these are already zero.
  if (EEPROM.read(OUTPUT_STATUS_ADDR) > 1) EEPROM.write(OUTPUT_STATUS_ADDR, 0);
  if (EEPROM.read(PASSWORD_EXIST_ADDR) > 1) EEPROM.write(PASSWORD_EXIST_ADDR, 0);
  if (EEPROM.read(TOGGLE_ADDR) > 1) EEPROM.write(TOGGLE_ADDR, 1); // default toggle expects ON next time

  showWelcome();
  delay(2000);
}

void loop() {
  // main menu loop (equivalent to your normal/goto states)
  showStatus();

  char k = keypad.waitForKey(); // waits like original
  if (!k) return;

  if (k == 'A') {
    // A in original was used in many places as Enter/Yes during flows;
    // At top-level it does nothing special in original main loop.
    // We'll treat top-level A as no-op (original had no top-level A action).
  }
  else if (k == 'B') {
    // No-op at top-level (original used B for cancel inside flows)
  }
  else if (k == 'C') {
    // Change password
    changePasswordFlow();
  }
  else if (k == 'D') {
    // Toggle mains
    toggleMainsFlow();
  }
  // otherwise ignore at top-level
}

/* -------------------- UI / helper functions -------------------- */

void showWelcome() {
  lcd.clear();
  lcd.setCursor(0, 0);
  lcd.print(" WELCOME");
  lcd.setCursor(0, 1);
  lcd.print("****************");
}

void showStatus() {
  lcd.clear();
  lcd.setCursor(0, 0);
  lcd.print("STATUS:");

  byte outStatus = EEPROM.read(OUTPUT_STATUS_ADDR);
  if (outStatus == 1) {
    lcd.print("MAINS ON");
    lcd.setCursor(0, 1);
    lcd.print("----------------");
  } else {
    lcd.print("MAINS OFF");
    lcd.setCursor(0, 1);
    lcd.print("----------------");
  }
  updateHardwareFromStatus();
}

/*
  updateHardwareFromStatus:
  - sets relay/LED depending on OUTPUT_STATUS_ADDR
  - writes TOGGLE_ADDR as inverse of current output status (this preserves original toggle logic)
*/
void updateHardwareFromStatus() {
  byte outStatus = EEPROM.read(OUTPUT_STATUS_ADDR);
  if (outStatus == 1) {
    digitalWrite(LED_PIN, HIGH);
    digitalWrite(RELAY_PIN, HIGH);
    safeEEPROMWrite(TOGGLE_ADDR, 0); // next toggle should turn it OFF
  } else {
    digitalWrite(LED_PIN, LOW);
    digitalWrite(RELAY_PIN, LOW);
    safeEEPROMWrite(TOGGLE_ADDR, 1); // next toggle should turn it ON
  }
}

/*
  readSixDigitsInteractive:
  - collects 6 keypad digits into buffer (no terminator written)
  - shows incremental stars and the "YES 'A' NO 'B'" prompt like original
  - returns true if six digits entered successfully, false on immediate cancel
  - rejects special keys (#,*,A..D) as digits (same as original)
*/
bool readSixDigitsInteractive(char *buffer, const char *line1, const char *line2) {
  for (int i = 0; i < 6; i++) buffer[i] = 0;

  // Prompt top lines (if provided)
  lcd.clear();
  lcd.setCursor(0, 0);
  lcd.print(line1);
  lcd.setCursor(0, 1);
  lcd.print(line2);

  for (int i = 0; i < 6; i++) {
    char k = keypad.waitForKey();
    if (isSpecialKey(k)) {
      // show help message and request to re-enter (mimics original)
      lcd.clear();
      lcd.setCursor(0, 0);
      lcd.print("Enter 6 digit,");
      lcd.setCursor(0, 1);
      lcd.print("then press 'A/B'.");
      delay(2500);
      // re-display prompt
      lcd.clear();
      lcd.setCursor(0, 0);
      lcd.print(line1);
      lcd.setCursor(0, 1);
      lcd.print(line2);
      i = -1;                  // restart input from scratch
      continue;
    } else {
      buffer[i] = k;
      // show stars count and YES/NO prompt like original
      lcd.clear();
      lcd.setCursor(0, 0);
      for (int s = 0; s <= i; s++) lcd.print('*'); // show entered stars
      lcd.setCursor(0, 1);
      lcd.print("YES 'A' NO 'B'");
    }
  }
  return true;
}

bool isSpecialKey(char k) {
  return (k == '*' || k == '#' || k == 'A' || k == 'B' || k == 'C' || k == 'D' || k == 0);
}

/* -------------------- Password & flow functions -------------------- */

/*
  setNewPasswordFlow:
  - replicates original "Set new 6 digit pin number" flow
  - first entry -> press A to confirm, B to cancel
  - then re-type -> press A to confirm saving or B to go back
*/
void setNewPasswordFlow() {
  // First entry
  if (!readSixDigitsInteractive(entry, "Set new 6 digit", "pin numer:")) return;

  // Wait for A/B
  char ab = keypad.waitForKey();
  if (ab == 'B') {
    // Cancel -> return to top
    return;
  }
  if (ab != 'A') {
    // Unexpected key -> prompt and abandon to be safe
    lcd.clear();
    lcd.setCursor(0, 0);
    lcd.print("Enter 6 digit,");
    lcd.setCursor(0, 1);
    lcd.print("then press 'A/B'.");
    delay(1500);
    return;
  }

  // Re-type step
  lcd.clear();
  lcd.setCursor(0, 0);
  lcd.print("Re-type PIN NO:");
  lcd.setCursor(0, 1);
  lcd.print("----------------");

  if (!readSixDigitsInteractive(confirm, "Re-type PIN NO:", "----------------")) return;

  // wait for A/B after re-type
  char ab2 = keypad.waitForKey();
  if (ab2 == 'B') return;
  if (ab2 != 'A') {
    lcd.clear();
    lcd.setCursor(0, 0);
    lcd.print("Enter 6 digit,");
    lcd.setCursor(0, 1);
    lcd.print("then press 'A/B'.");
    delay(1500);
    return;
  }

  // compare
  int check = 0;
  for (int i = 0; i < 6; i++) if (entry[i] == confirm[i]) check++;

  if (check == 6) {
    // save to EEPROM
    savePasswordToEEPROM(entry);
    safeEEPROMWrite(PASSWORD_EXIST_ADDR, 1);
    lcd.clear();
    lcd.setCursor(0, 0);
    lcd.print("Password has");
    lcd.setCursor(0, 1);
    lcd.print("been saved.");
    delay(1500);

    // show status and update hardware like original
    if (EEPROM.read(OUTPUT_STATUS_ADDR) == 1) {
      lcd.clear();
      lcd.setCursor(0, 0);
      lcd.print("STATUS:");
      lcd.print("MAINS ON");
      lcd.setCursor(0, 1);
      lcd.print("----------------");
      digitalWrite(LED_PIN, HIGH);
      digitalWrite(RELAY_PIN, HIGH);
      safeEEPROMWrite(TOGGLE_ADDR, 0);
    } else {
      lcd.clear();
      lcd.setCursor(0, 0);
      lcd.print("STATUS:");
      lcd.print("MAINS OFF");
      lcd.setCursor(0, 1);
      lcd.print("----------------");
      digitalWrite(LED_PIN, LOW);
      digitalWrite(RELAY_PIN, LOW);
      safeEEPROMWrite(TOGGLE_ADDR, 1);
    }
    delay(1200);
  } else {
    lcd.clear();
    lcd.setCursor(0, 0);
    lcd.print("Password");
    lcd.setCursor(0, 1);
    lcd.print("Mismatched !!!");
    delay(2000);
    // go back to top (function ends)
  }
}

/*
  verifyPasswordInteractive:
  - prompts "Enter current PIN" and returns true if matches saved password
  - uses same UI flow as original (stars and prompts)
*/
bool verifyPasswordInteractive() {
  if (!readSixDigitsInteractive(entry, "Enter current", "PIN:")) return false;
  char ab = keypad.waitForKey();
  if (ab == 'B') return false;
  if (ab != 'A') {
    lcd.clear();
    lcd.setCursor(0, 0);
    lcd.print("Enter 6 digit,");
    lcd.setCursor(0, 1);
    lcd.print("then press 'A/B'.");
    delay(1500);
    return false;
  }

  // read stored
  readPasswordFromEEPROM(saved);
  int check = 0;
  for (int i = 0; i < 6; i++) if (entry[i] == saved[i]) check++;
  if (check == 6) return true;

  lcd.clear();
  lcd.setCursor(0, 0);
  lcd.print("Incorrect");
  lcd.setCursor(0, 1);
  lcd.print("Pasword !!!");
  delay(2000);
  return false;
}

/*
  changePasswordFlow:
  - triggered by 'C' (Change Password)
  - asks current password, if correct -> then call setNewPasswordFlow()
  - this matches original behaviour
*/
void changePasswordFlow() {
  // if no password exists, go directly to set new
  if (EEPROM.read(PASSWORD_EXIST_ADDR) != 1) {
    setNewPasswordFlow();
    return;
  }

  // verify existing
  if (verifyPasswordInteractive()) {
    // now set new password
    setNewPasswordFlow();
  } else {
    // incorrect; verifyPasswordInteractive already showed message and returned
  }
}

/*
  toggleMainsFlow:
  - triggered by 'D' to toggle mains on/off
  - asks for PIN, verifies, then toggles as original:
    uses TOGGLE_ADDR to decide whether to set OUTPUT_STATUS_ADDR to 1 or 0
*/
void toggleMainsFlow() {
  if (EEPROM.read(PASSWORD_EXIST_ADDR) != 1) {
    // If no password set, do nothing (original required password)
    lcd.clear();
    lcd.setCursor(0, 0);
    lcd.print("No Password");
    lcd.setCursor(0, 1);
    lcd.print("Set first !!!");
    delay(1500);
    return;
  }

  if (!readSixDigitsInteractive(entry, "Enter the PIN:", "")) return;
  // after six digits, expect A or B
  char ab = keypad.waitForKey();
  if (ab == 'B') return;
  if (ab != 'A') {
    lcd.clear();
    lcd.setCursor(0, 0);
    lcd.print("Enter 6 digit,");
    lcd.setCursor(0, 1);
    lcd.print("then press 'A/B'.");
    delay(1500);
    return;
  }

  // verify entered PIN with EEPROM
  int check = 0;
  for (int i = 0; i < 6; i++) {
    if (EEPROM.read(WORD_ADDR[i]) == (byte)entry[i]) check++;
  }

  if (check != 6) {
    lcd.clear();
    lcd.setCursor(0, 0);
    lcd.print("Incorrect");
    lcd.setCursor(0, 1);
    lcd.print("Password !!!");
    delay(1500);
    return;
  }

  // If verified, set OUTPUT_STATUS_ADDR based on TOGGLE_ADDR like original logic
  byte toggleVal = EEPROM.read(TOGGLE_ADDR);
  if (toggleVal == 1) {
    safeEEPROMWrite(OUTPUT_STATUS_ADDR, 1);
  } else {
    safeEEPROMWrite(OUTPUT_STATUS_ADDR, 0);
  }
  // update hardware and show status
  showStatus();
  delay(600);
}

/* -------------------- EEPROM helpers -------------------- */

void savePasswordToEEPROM(const char *buf) {
  for (int i = 0; i < 6; i++) {
    safeEEPROMWrite(WORD_ADDR[i], buf[i]);
  }
}

void readPasswordFromEEPROM(char *buf) {
  for (int i = 0; i < 6; i++) {
    buf[i] = (char)EEPROM.read(WORD_ADDR[i]);
  }
}

/*
  safeEEPROMWrite:
  - uses EEPROM.update to minimize writes (like EEPROM.write but skips if same)
  - keeps code close to original style while being write-friendly
*/
void safeEEPROMWrite(int addr, byte val) {
  EEPROM.update(addr, val);
}
Super Optimized Code
EEPROM RESET CODE (Optimized + Fixed)
#include <EEPROM.h>

void setup() {
  Serial.begin(9600);
  Serial.println("EEPROM clearing...");

  for (int i = 0; i < 10; i++) {
    EEPROM.write(i, 0);
  }

  Serial.println("EEPROM Contents:");
  for (int k = 0; k < 10; k++) {
    Serial.println(EEPROM.read(k));  // FIXED BUG
  }

  Serial.println("Done.");
}

void loop() {
}
2) MAIN PASSWORD PROGRAM (Optimized, NO GOTO, Same Logic)
#include <EEPROM.h>
#include <LiquidCrystal.h>
#include <Keypad.h>

LiquidCrystal lcd(12, 11, 5, 4, 3, 2);

// Keypad setup
char keys[4][4] = {
  {'1','2','3','A'},
  {'4','5','6','B'},
  {'7','8','9','C'},
  {'*','0','#','D'}
};
byte rowPins[4] = {9, 8, 7, 6};
byte colPins[4] = {13, A0, A1, A2};
Keypad keypad = Keypad(makeKeymap(keys), rowPins, colPins, 4, 4);

// Password buffers
char storedPW[6];
char inputPW[6];

const int outputPin = 10;
const int outputStatusAddress = 6;

// ---------------------------------------------
// HELPER: Read 6-digit password
// ---------------------------------------------
bool readPassword(char *buffer) {
  lcd.clear();
  lcd.print("Enter Password");
  lcd.setCursor(0, 1);
  lcd.print("6 Digits:");

  int index = 0;

  while (index < 6) {
    char key = keypad.getKey();
    if (key) {
      if (key >= '0' && key <= '9') {
        buffer[index] = key;
        lcd.setCursor(index, 1);
        lcd.print("*");
        index++;
      }
    }
  }

  delay(300);
  return true;
}

// ---------------------------------------------
// HELPER: Load stored password from EEPROM
// ---------------------------------------------
void loadStoredPassword() {
  for (int i = 0; i < 6; i++) {
    storedPW[i] = EEPROM.read(i);
  }
}

// ---------------------------------------------
// HELPER: Save password to EEPROM
// ---------------------------------------------
void savePassword(char *buffer) {
  for (int i = 0; i < 6; i++) {
    EEPROM.write(i, buffer[i]);
  }
}

// ---------------------------------------------
// HELPER: Compare password
// ---------------------------------------------
bool passwordMatch(char *A, char *B) {
  for (int i = 0; i < 6; i++) {
    if (A[i] != B[i]) return false;
  }
  return true;
}

// ---------------------------------------------
// HELPER: Ask YES(A) or NO(B)
// ---------------------------------------------
bool yesNoPrompt(const char *msg) {
  lcd.clear();
  lcd.print(msg);
  lcd.setCursor(0, 1);
  lcd.print("YES 'A'  NO 'B'");

  while (1) {
    char key = keypad.getKey();
    if (key == 'A') return true;
    if (key == 'B') return false;
  }
}

// ---------------------------------------------
// HELPER: Show stored password (D-command)
// ---------------------------------------------
void showStoredPassword() {
  lcd.clear();
  lcd.print("Stored Password");

  lcd.setCursor(0, 1);
  for (int i = 0; i < 6; i++) {
    lcd.print(storedPW[i]);
  }

  delay(2000);
}

// ---------------------------------------------
// HELPER: Toggle Output C-command
// ---------------------------------------------
void toggleOutput() {
  bool want = yesNoPrompt("Toggle Output?");
  if (!want) return;

  bool status = EEPROM.read(outputStatusAddress);

  status = !status;  // toggle
  EEPROM.write(outputStatusAddress, status);

  digitalWrite(outputPin, status);

  lcd.clear();
  if (status) lcd.print("OUTPUT ON");
  else lcd.print("OUTPUT OFF");

  delay(1000);
}

// ---------------------------------------------
// SET PASSWORD (A-command)
// ---------------------------------------------
void setPassword() {
  readPassword(inputPW);

  bool wantSave = yesNoPrompt("Save Password?");
  if (wantSave) {
    savePassword(inputPW);
    lcd.clear();
    lcd.print("Saved Successfully");
    delay(1500);
    loadStoredPassword();
  }
}

// ---------------------------------------------
// CHECK PASSWORD (B-command)
// ---------------------------------------------
void checkPassword() {
  readPassword(inputPW);

  if (passwordMatch(inputPW, storedPW)) {
    lcd.clear();
    lcd.print("Password Correct");
  } else {
    lcd.clear();
    lcd.print("Wrong Password");
  }
  delay(1500);
}

// ---------------------------------------------
// MAIN
// ---------------------------------------------
void setup() {
  lcd.begin(16, 2);
  pinMode(outputPin, OUTPUT);

  loadStoredPassword();

  bool status = EEPROM.read(outputStatusAddress);
  digitalWrite(outputPin, status);
}

void loop() {

  lcd.clear();
  lcd.print("A:Set  B:Check");
  lcd.setCursor(0, 1);
  lcd.print("C:Toggle D:Show");

  char key = keypad.getKey();

  if (key == 'A') setPassword();
  if (key == 'B') checkPassword();
  if (key == 'C') toggleOutput();
  if (key == 'D') showStoredPassword();
}
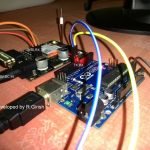
Author’s Prototype:
If you have any specific question regarding this password based AC Mains ON/OFF switch circuit project, express in the command section, you may receive a quick reply.


Comments
Please I want a beginner tutorial on C programming language. Can you help me.?