• Skip to main content
  • Skip to primary sidebar

Homemade Circuit Projects

Need circuit help? Post them in the comments! I've answered over 50,000!

Blog | Categories | About | Contact | Calculators-online
You are here: Home / Meters and Testers / Digital Voltmeter Circuit Using IC L7107

Digital Voltmeter Circuit Using IC L7107

Last Updated on August 28, 2019 by Swagatam 75 Comments

In this post I have explained a very simple digital panel type voltmeter circuit using a single IC L7107 and a few other ordinary components. The circuit is able to measure voltages right up to 2000 AC/DC V.

Table of Contents
  • About the IC L7107
  • Circuit Operation

About the IC L7107

Making this simple digital panel voltmeter circuit is particularly easy due to the availability of the  A/D voltage processor chip in the form of IC L7107.

Thanks to Intersil for providing us with this wonderful little IC L7107 which can be easily configured into a wide range digital voltmeter circuit using a few number of common anode seven segment displays.

The IC 7107 is a versatile, low consumption 3 and 1/2 digit A/D converter IC which has in-built processors such as seven segment decoders, driver for displays, set reference levels and clock generators.

The IC not only works with ordinary CA seven segment displays but also with liquid crystal displays (LCDs) and has an in-built multiplexed back plane illuminator for the connected LCD module.

It ensures auto zero correction for inputs less than 10uV, a zero drift for inputs below 1uV/oC, bias current for inputs of maximum 10pA and cross over error of less than a single count.

The IC can be set with ranges as high as 2000 V AC/DC, and as low as 2mV, the later makes the IC very suitable for measuring low inputs from sensors like load cells, piezo transducers, strain gauges and similar bridged transducer networks.

In other words, the chip may be simply configured for making products like digital weighing scale, pressure meters, electronic strain gauge, vibration detector, shock alarms and many similar circuits.

Needless to say, the IC L7107 can be also rigged into a simple yet accurate panel digital voltmeter circuit, which is what we are presently interested in.

Circuit Operation

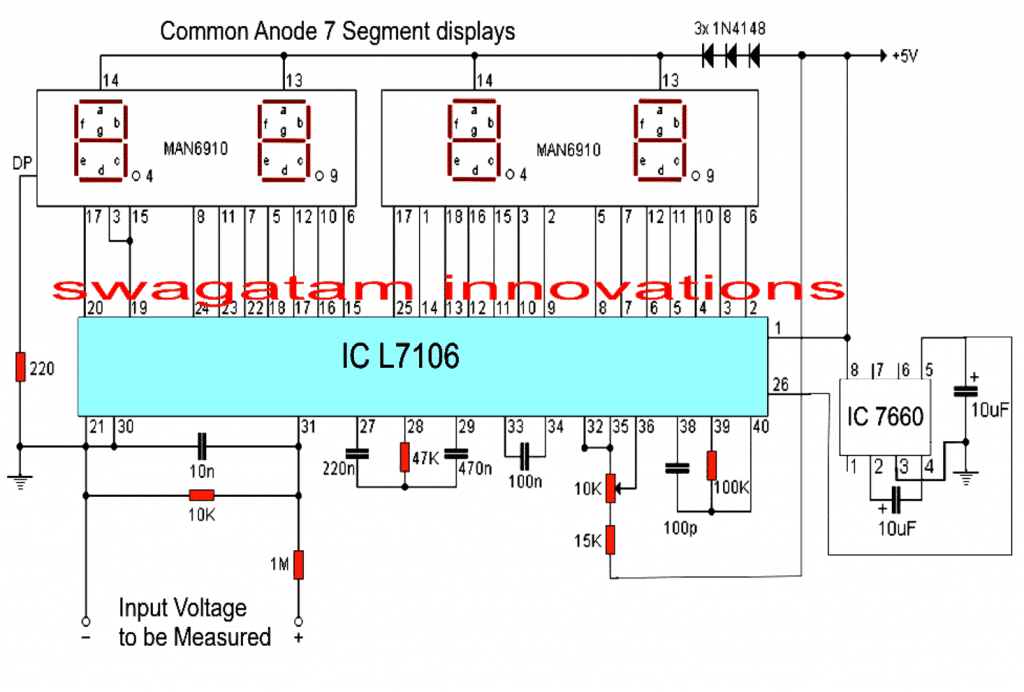
Referring to the circuit diagram below, the unit is a full fledged digital voltmeter circuit which can be used for measuring direct voltages right from zero to 199 volts.

The range can be appropriately widened or shortened simply by altering the value of the 1M resistor positioned in series with the input terminal. With 1M, the range gives a full scale of 199.99V, with 100K in place the range would become 19.99V full scale.

The circuit requires a dual +/-5V supply for operating, here the +5V may be strictly acquired from a standard 7805 IC regulator circuit, the -5V is automatically created by the IC 7660, and fed to pin#26 of the IC L7106.

The three 1N4148 diodes connected in series with the display supply line ensures optimal operating voltage to the displays for illuminating them with correct intensity, however for brighter illumination, the number of diodes may be experimented, as per personal preferences.

The 10K preset across pin#35/36 is used for calibrating the voltmeter correctly and must be set such that exactly 1V appears across pin#35/36. This will set up the circuit for displaying the measured magnitudes accurately as per the given specs, and datasheet of the IC.

digitalpanelvoltmetercircuit

Parts List

All resistors are 1/4 watt unless specified

  • 220 Ohm - 1
  • 10K = 1
  • 1M = 1
  • 47K = 1
  • 15K = 1
  • 100K = 1
  • preset/trimmer 10K = 1

Capacitors

  • 10nF Ceramic Disc = 1
  • 220nF Ceramic Disc = 1
  • 470nF Ceramic Disc = 1
  • 100nF or 0.1uF Ceramic Disc = 1
  • 100pF Ceramic Disc = 1
  • 10uF/25V Electrolytic = 2

Semiconductors

  • 1N4148 Diodes = 3
  • 7 Segment Displays MAN6910 or Equivalent = 2
  • IC L7106 = 1
  • IC 7660 = 1

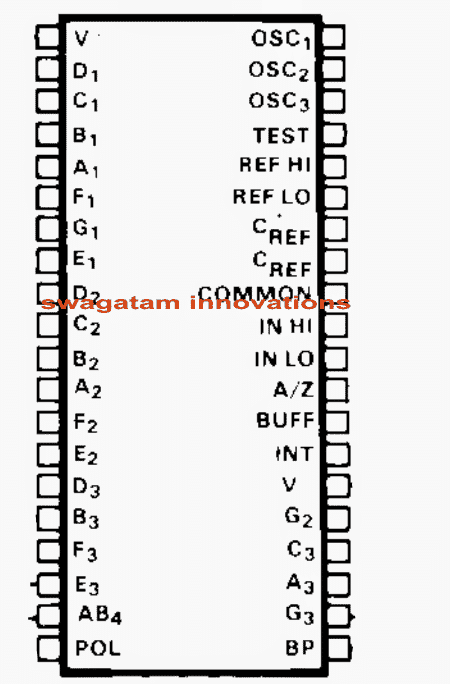
Pinout details of IC L7106 for interfacing with a 3 and 1/2 digital LCD display.

L7106 pinout details for interfacing 3 and half LCD display 1

You'll also like:

  • 1.  AC Millivolts Meter Circuit Using IC 741
  • 2.  How to Check a MOSFET Using a Digital Multimeter
  • 3.  Bicycle Speedometer Circuit
  • 4.  Make this Advanced Digital Ammeter using Arduino
  • 5.  Simple Transformer Winding Tester Circuit
  • 6.  3 Frequency to Voltage Converter Circuits Explained

About Swagatam

I am an electronics engineer with over 15 years of hands-on experience. I am passionate about inventing, designing electronic circuits and PCBs, and helping hobbyists bring their projects to life. That is why I founded homemade-circuits.com, a website where I share innovative circuit ideas and tutorials. Have a circuit related question? Leave a comment.... I guarantee a reply!

Previous Post: « 15V 10 Amp Voltage Regulator Circuit Using IC LM196
Next Post: Car Turn Signal Flasher Circuit with Lamp Malfunction Indicator »

Reader Interactions

Comments

  1. mahandharma says

    February 12, 2025 at 10:41 am

    Dear Sir,
    I am not a Electronic student and of chemistry. I don’t know how to design the needed PCB. Hence I requested in my last letter.
    In Ic 741 Work bench multimeter can we change the analog signal to digital using Tl 071 IC and then feed it to LCD display/
    please understand my problem.
    Thanks and best regards.

    Reply
    • Swagatam says

      February 12, 2025 at 11:24 am

      mahandharma, yes you can get any readymade digital meter and replace it with the analogue meter in a IC 741 circuit. Readymade digital meter modules are cheaply available on amazon.

      Reply
  2. suat says

    November 3, 2023 at 5:13 pm

    Mr Swagatam hi;

    when I test the circuit with 3 single displays assigned for measuring the 0-99 volt, I can see the value 00.0 and the decimal display fluctuates between 1 and 2 (100-200 mV). however there is no any voltage value if other 12 volt voltage source is added to the circuit as their grounds are common.
    Another point is that there is no display of the numbers but except dot if the capacitor
    10 uf is placed between the pins 5 and 3 of the 7660. When I remove it then again displays show the 00.0 value.
    so please I need your help.

    Reply
    • Swagatam says

      November 3, 2023 at 6:32 pm

      Hi Suat,
      This circuit is not designed me, it was referred from an external source, so unfortunately I cannot provide any help with this circuit. You can perhaps try referring to the datasheet and see if you can find any relevant information….

      Reply
      • suat says

        November 4, 2023 at 10:13 am

        thanks in according to the 7107 datasheet I think the problem is the pins 32 and 35 should be conected to the Vin(-) too since they should be low while measurement process

        Reply
        • Swagatam says

          November 4, 2023 at 10:38 am

          OK great, glad you could find the solution so soon…

          Reply
  3. Joseph says

    September 3, 2023 at 2:09 am

    Hi. I am trying to make a bipolar DC voltage polarity detector circuit that is able to receive voltage within the range of -10V to 10V and indicate the polarity of that voltage. Initially I had tried to solve this using 2 comparator op amps, one for negative and the other for positive polarity detection however, the output of the op amps give a voltage close to -Vcc as I’m using a dual rail power supply. I am also using a atmega microcontroller which reads the Analogue outputs from the 2 op amps and in order to visually indicate the polarity of voltages however they can’t take any voltages out of the range of 0-5v. How can I solve this problem?

    Reply
    • Swagatam says

      September 3, 2023 at 9:11 am

      Sorry, no ideas about it…I am having difficulty figuring out the issue.

      Reply
  4. Dylan says

    August 3, 2023 at 6:33 pm

    Thanks Sir. I am making a DC Voltmeter. I have a dual rail power supply unit and was uncertain as to what purpose the Dual Slope integrator circuit serves for a DC Voltmeter especially when dealing with voltages of different polarity such as in this case. Could you please provide some clarity if possible

    Reply
    • Swagatam says

      August 4, 2023 at 9:01 am

      Hi Dylan,
      The dual slope integrator is a type of analog-to-digital converter (ADC) that is commonly used in digital voltmeters. Its primary purpose is to measure the voltage level of an input signal and convert it into a digital value that can be displayed. The “dual slope” part refers to the two slopes or ramps that are used in the integration process.

      Reply
  5. Dylan says

    August 3, 2023 at 12:33 am

    Hi Sir , Do you have an email that I can use to get into contact with you to ask further circuit related queries.

    Reply
    • Swagatam says

      August 3, 2023 at 8:43 am

      Hi Dylan,
      I usually discuss the issues through comments only, so you can feel free to ask your questions here.

      Reply
  6. Sreeraj Pai says

    July 18, 2022 at 12:28 am

    Sir, This circuit has been very helpful. Is there any option or circuit to view ampere. (I searched for 3161 ic but I couldn’t find anywhere)

    Reply
    • Swagatam says

      July 18, 2022 at 10:24 am

      Thank you Sreeraj,
      I think I have a related post on the IC 3161, you can check it out here:
      https://www.homemade-circuits.com/how-to-make-digital-voltmeter-ammeter/

      Reply
      • Sreeraj Pai says

        July 19, 2022 at 10:38 pm

        Thank you sir…

        Reply
  7. Fazrul says

    July 2, 2021 at 1:54 pm

    hi, can this circuit measure for ac voltage?

    Reply
    • Swagatam says

      July 2, 2021 at 5:48 pm

      Hi, sorry no, this circuit cannot measure AC voltage

      Reply
      • Fazrul says

        July 2, 2021 at 10:52 pm

        Ouh, but I’ve seen that you replied someone comment that him wan to use this circuit for house hold ac voltage? Can u guide me .

        Reply
        • Swagatam says

          July 3, 2021 at 2:07 pm

          You can measure mains ac voltage after rectifying it through a bridge rectifier, but it will not show the RMS value of the mains rather it will show the peak value, meaning, for a 220V AC input the reading will be 310V and so on.

          Reply
  8. keith McRoberts says

    April 7, 2021 at 10:07 am

    The electrolytic, (10mfd), attached to pin 26 of the 7106 is the wrong way around. This is the negative voltage input pin from pin 5 of the IC7660.

    Reply
    • Swagatam says

      April 7, 2021 at 3:41 pm

      OK, thank you for the feedback, it will help the readers to correct the schematic appropriately.

      Reply
  9. Ahmed lotfy says

    January 25, 2021 at 3:39 am

    would it work if I use 4 single 7 segment display? I can’t find MAN6910 in my area

    Reply
    • Swagatam says

      January 25, 2021 at 5:59 pm

      if the pins are correctly matched then it might work

      Reply
  10. Davide Crescini says

    April 4, 2020 at 11:38 am

    Hi Swagatam,

    I have 2 questions:
    1. Why i cannot leave a reply under this post “Transformerless AC Voltmeter Circuit Using Arduino”? It is a site bug?
    2. Still refering to “Transformerless AC Voltmeter Circuit Using Arduino” how much current it can handle? It can be used to measure home-devices like 2500W vacuum cleaner?

    Reply
    • Swagatam says

      April 4, 2020 at 6:09 pm

      Hi Davide, it is not a bug, the comment box is disabled since I am not an expert with Arduino and therefore cannot answer related questions.

      Current is never relevant to voltmeters. The current can be any value as long as the voltage is within the maximum specified range of the meter. Similarly it can handle any wattage as long as the volt is within the specified max range

      Reply
  11. Hedi says

    March 8, 2020 at 6:19 pm

    Hi. As always good explanation and good project. Meanwhile i have some questions :
    – By setting Vref = 1v The max vinput is then set to 2v . Isn’t it?
    – The voltage divider across pins 30 and 31 is here for setting the range of the voltmeter. Then is it correct that removing the 1M resistor will allow to have a range of 2v (equal to the max vinput) ?
    – In case of a range of 2v what is the resolution (accuracy) in mv ?

    Thanks again.

    Reply
    • Swagatam says

      March 9, 2020 at 8:31 am

      Hi, sorry I don’t remember the working and the specifications of the IC, it was written a long time ago.

      I think the datasheet of the IC will have the answers.

      Reply
  12. LamNH says

    February 17, 2020 at 7:05 am

    Dear Sir,
    IC 7106 is desisgned to drive LCD display (meanwhile 7107 is for 7seg LED display). In ur circuit, I wonder if the IC could supply current eanough for 7 seg LED display? The circuit is only work with dual supply voltage or it could works with single voltage?
    Thanks and best regards,
    LamNH

    Reply
    • Swagatam says

      February 17, 2020 at 9:22 am

      Dear Lam, the circuit will work if connected exactly as suggested in the diagram.

      Reply
      • Lam NH says

        February 17, 2020 at 10:12 am

        The title is “Digital Voltmeter Circuit Using IC L7107” but the circuit showing IC 7106. Is that corect? Pls confirm. Thanks!

        Reply
        • Swagatam says

          February 17, 2020 at 10:29 am

          Both have similar features except the digital display, so you can use any one of them depending on the display.

          Reply
  13. Mark says

    August 28, 2019 at 6:36 am

    Thank you for doing this kind of website. I love it. One problem however, a seperate bom would be awesome. I am old and kinda blind. Hard to see the values of the components. I think they are capacitors, but the “n” is throwing me off. Please enlighten me. Thank you kindly sir.

    Reply
    • Swagatam says

      August 28, 2019 at 8:18 am

      Thanks very much for liking my website! I have added the parts list for your reference!
      “n” means nano, or nanoFarad (nF) for the designated capacitors.

      Reply
  14. Alwin says

    April 29, 2017 at 10:30 am

    hello sir
    I wanna measure 0.001v – 5v, which ic is good for this (analog to digital converter ), Is this possible to measure this voltage range

    Reply
    • Swagatam says

      April 29, 2017 at 2:51 pm

      hello alwin, digital will be obviously better….yes it is possible to measure this range with any good quality DMM

      Reply
  15. dada neamul says

    September 4, 2016 at 3:05 am

    sir
    You Use Two 7 Segment display. If I Want To Use One 7
    Segment Display ..! What Should I do…… Sir I using A Variable DC Power Supply Unit But I Have No ckt Diagram for Digital Volt Display.

    Reply
    • Swagatam says

      September 4, 2016 at 11:48 am

      Dada, I don't think a single display would be possible with this IC, because the IC is specifically designed to drive a 3.5 digit display

      Reply
    • dada neamul says

      September 5, 2016 at 5:27 am

      thanks for your compliment.

      Reply
  16. Shreyansh Likhar says

    September 3, 2016 at 5:00 pm

    can i interface it with any microcontroller(8051 or AVR)?

    Reply
    • Swagatam says

      September 4, 2016 at 7:46 am

      yes, you can do it…

      Reply
  17. Nitin Sarda says

    February 17, 2016 at 12:44 am

    Sir,

    I have a digital voltmeter which measure the 24 volt dc.

    When it was new then voltage was measuring ok. But after 2 months, voltage reading fluacting in display. I mean it show 25,32,47 volt etc.

    How to stop the wrongly fluction on display??

    Reply
    • Swagatam says

      February 17, 2016 at 9:08 am

      Nitin, if it has a selector switch then the problem could be in the switch, just move it rapidly up/down and then check the response….loose prod connectors could also be an issue, so you can check it as well.

      if these are OK, then your meter is surely malfunctioning.

      Reply
  18. Bradley Nelson says

    February 19, 2015 at 7:37 pm

    Sorry if this comment posted more than once. I've had a hard time submitting it.

    I'm wondering if this circuit could output the voltage reading to an Arduino instead of the LEDs? I'd like an Arduino to be able to read voltage and store the value as a variable in a program.

    Will this meet that need?

    Reply
    • Swagatam says

      February 20, 2015 at 4:42 am

      I am sorry I have no idea how this circuit may be configured with an Arduino…

      Reply
  19. Bhaskar Srivastava says

    February 7, 2015 at 3:29 pm

    Can this Circuit can be used to measure AC house hold Supply. ??

    Reply
    • Swagatam says

      February 8, 2015 at 3:59 pm

      yes, after appropriately rectifying and calculating the input resistors

      Reply
  20. frank rebosura says

    November 6, 2014 at 6:19 am

    Sir it is directly connected to the AC output voltage of the generator set to measure its output voltage or it is only used to measure DC voltage?

    Reply
    • Swagatam says

      November 6, 2014 at 6:36 am

      convert AC to DC and then the 10K preset across pin#35/36 could be used for calibrating the voltmeter correctly and must be set such that exactly 1V appears across pin#35/36. This will set up the circuit for displaying the fed magnitudes accurately.

      Reply
  21. style says

    October 29, 2014 at 2:03 pm

    Thanks for reply sir. Why its called 3 and half digital display ..

    Reply
  22. style says

    October 23, 2014 at 4:25 am

    Hello Sir
    Thanks for reply. can u tell me the address in mumbai.
    regards

    Reply
    • Swagatam says

      October 23, 2014 at 7:44 am

      you can many good shops in lamington road (grant road)

      Reply
  23. sinu sivadas says

    October 22, 2014 at 4:36 pm

    Hello Sir
    Is this IC is available in India particularly in Bangalore and what is its cost

    Regards

    Reply
    • Swagatam says

      October 23, 2014 at 4:04 am

      Hello sinu, it's available in Mumbai, I am not sure about other states or Bangalore

      Reply
  24. vishwas poojary k says

    July 15, 2014 at 6:56 am

    what is the indian price of that ic?

    Reply
    • Swagatam says

      July 16, 2014 at 6:26 am

      no idea, sorry

      Reply
  25. currentviews says

    May 27, 2014 at 7:58 pm

    Sir,
    Its really excellent Project Post. i liked it too much, already i bought every parts . here i did not get ICL7106. but i got ICL7107 they told me its similiar like ICL7106 , i need to know how can i connected it with 7 segment display, is it like ur instruction numbering, basically i considering number 1 pin from left side and continuously from right. like IC pinout perhaps its not right way about pin connect among IC and 7 segment display. please i need to know about 7segment display pin setup configuration ..

    Reply
    • Swagatam says

      May 28, 2014 at 5:04 am

      thanks currentviews,

      the best place to get the information is to look in its datasheet.

      Please type "datasheet" with the "part number" or simply "7-segment display datasheet" in Google search…… you will get a comprehensive info regarding the same.

      Reply
  26. Tanmay Deshmukh says

    March 5, 2014 at 6:58 pm

    And sir where should the preset to be connected?

    Reply
    • Swagatam says

      March 6, 2014 at 5:30 am

      Hello Tanmay,

      pin36 is connected to the slider arm of the preset.

      The preset has three pins, the center pin will go to pin36 and the other two pins will connect with pin35 and the 15k resistor…..

      Reply
  27. Tanmay Deshmukh says

    March 5, 2014 at 12:54 pm

    Hello sir,
    As am a very beginner, confusion is How is the pin 36 of ic 7106 connected, i think is in between two resistors given.is it ?

    Reply
  28. Saroj Panda says

    December 26, 2013 at 5:00 am

    it showing only a point in the second display nothing else

    Reply
    • Swagatam says

      December 26, 2013 at 3:33 pm

      did your apply any input voltage?

      Reply
  29. farkhana says

    December 4, 2013 at 8:26 am

    Hi there,

    I have made using same IC. However, my input is 4-20mA and the output is indicator that shows -30 to120.
    Is it possible to show -30 on 7-segment?
    Do you have any idea how to do that?
    Many thanks for your help.

    Reply
    • Swagatam says

      December 4, 2013 at 2:17 pm

      Hi, There should be a way definitely, however I have no idea how to do it.

      Reply
  30. Abu-Hafss says

    December 4, 2013 at 4:26 am

    Hi Swagatam

    Is it possible to convert/modify a digital AC voltmeter to use as a DC voltmeter?
    AC voltmeters are cheap and easily available in various sizes.

    Reply
    • Swagatam says

      December 4, 2013 at 10:10 am

      Hi Abu-Hafss,

      I am not sure how to make an RMS detector, without this it would be impossible to convert AC meter into DC.

      Reply
  31. Subhramanyam says

    December 1, 2013 at 8:51 am

    I am expecting your reply soon sir!!!!!!

    Reply
  32. Subhramanyam says

    November 30, 2013 at 2:08 pm

    It is ok sir. But i have a small doubt.
    Eventhough i am caliberating this circuit with a known frequency signal, will it be same for another signal having a different frequency but having the same peak to peak voltage of the known one since it is not functioning as a frequency to voltage converter, otherwords saying the circuit functions only as a voltage finder. If anything wrong i have said, please correct me Sir

    And also tell me is it possible to adjust the reading to 50 when 50 Hz is fed ( i think only the voltage equivallent will be shown)

    Reply
    • Swagatam says

      December 1, 2013 at 4:26 pm

      Subhramanyam , the above circuit is a voltmeter not a frequency meter, so you cannot feed frequency directly to this circuit, as mentioned in the above comment and as per your previous comment under the "simple frequency meter" article, you will have to integrate the frequency meter circuit output with the as above circuit to get a digital reading….I think this is what you had asked in your first comment, right?

      Reply
    • Swagatam says

      December 1, 2013 at 4:27 pm

      ..the frequency meter circuit using IC 555 can read right from 10Hz to 10kHz comfortably, so 50Hz won't be an issue.

      Reply
  33. Subhramanyam says

    November 29, 2013 at 5:33 am

    How can i use this circuit to measure frequenc SIR?
    Directly feding the input signal into the voltage measuring terminals'???
    I have 4 no.s of 7 segment single LCD displays ( each having 10 legs ) with me. Can they be used? How to wire them?

    Reply
    • Swagatam says

      November 29, 2013 at 2:42 pm

      yes connect the frequency meter output to the shown points and adjust the 10k preset for calibrating it with the known frequency value.

      You will have refer to the datasheet of the displays online and identify the pinouts and then integrate with the above circuit.

      Reply
  34. Abu-Hafss says

    November 17, 2013 at 6:48 pm

    Hi Swagatam

    I am bit confused for the connections of ICL7106 to a 3.5-digit LCD (H1331C).

    a) Where to connect pin 19 (AB4) of the IC?
    b) Where to connect pin 20 (POL) of the IC?
    c) Where to connect pin 21 (BP) of the IC?

    d) What is pin 8 (DP3) of the LCD for and where to connect?
    e) What is pin 12 (DP2) of the LCD for and where to connect?
    f) What is pin 16 (DP3) of the LCD for and where to connect?
    g) Where to connect pin 1 (COM) and pin 40 (COM1) of the LCD?

    Reply
  35. Swagatam says

    August 9, 2013 at 3:32 am

    You can refer to the datasheet of the IC and check if this option is enabled in it.

    Reply
  36. Swagatam says

    August 6, 2013 at 1:36 pm

    don't use a pot, instead use a preset, it's more firm and will keep the setting intact, if possible glue it after the setting is done.

    Reply

Need Help? Please Leave a Comment! We value your input—Kindly keep it relevant to the above topic! Cancel reply

Your email address will not be published. Required fields are marked *

Primary Sidebar

Subscribe to New Circuit Ideas

Categories

  • Arduino Projects (87)
  • Audio and Amplifier Projects (132)
  • Automation Projects (17)
  • Automobile Electronics (101)
  • Battery Charger Circuits (83)
  • Datasheets and Components (104)
  • Electronics Theory (143)
  • Free Energy (37)
  • Games and Sports Projects (11)
  • Grid and 3-Phase (19)
  • Health related Projects (25)
  • Home Electrical Circuits (12)
  • Indicator Circuits (14)
  • Inverter Circuits (87)
  • Lamps and Lights (142)
  • Meters and Testers (69)
  • Mini Projects (46)
  • Motor Controller (64)
  • Oscillator Circuits (27)
  • Pets and Pests (15)
  • Power Supply Circuits (108)
  • Remote Control Circuits (50)
  • Security and Alarm (64)
  • Sensors and Detectors (101)
  • Solar Controller Circuits (59)
  • Temperature Controllers (42)
  • Timer and Delay Relay (49)
  • Transmitter Circuits (29)
  • Voltage Control and Protection (37)
  • Water Controller (36)

Calculators

  • Battery Back up Time Calculator
  • Capacitance Reactance Calculator
  • IC 555 Astable Calculator
  • IC 555 Monostable Calculator
  • Inductance Calculator
  • LC Resonance Calculator
  • LM317, LM338, LM396 Calculator
  • Ohm’s Law Calculator
  • Phase Angle Phase Shift Calculator
  • Power Factor (PF) Calculator
  • Reactance Calculator
  • Transistor Astable Calculator
  • Transistor base Resistor Calculator
  • Voltage Divider Calculator
  • Wire Current Calculator
  • Zener Diode Calculator
  • Filter Capacitor Calculator
  • Buck Converter Calculator
  • Boost Converter Calculator
  • Solar Panel, Inverter, Battery Calculator
  • Wire Current Calculator
  • SMPS Transformer Calculator
  • IC SG3525, SG3524 Calculator
  • Inverter LC Filter Calculator

People Also Search

555 Circuits | 741 Circuits | LM324 Circuits | LM338 Circuits | 4017 Circuits | Ultrasonic Projects | SMPS Projects | Christmas Projects | MOSFETs | Radio Circuits | Laser Circuits | PIR Projects |

Recent Comments

  • Swagatam on EGS002 Datasheet, Circuit Diagram Explained
  • Swagatam on How to Make IC LM339 Circuits
  • Swagatam on How to Make Dog Barking Preventer Circuit using High Frequency Deterrence
  • Swagatam on How to Buy and Use RF Remote Control Modules – Control Any Electrical Gadget Remotely
  • Swagatam on How to Generate PWM Using IC 555 (2 Methods Explored)

Company

  • Privacy Policy
  • Cookie Policy
  • About Me
  • Contact
  • Disclaimer
  • Copyright
  • Videos
  • Sitemap

Social Profiles

  • Twitter
  • YouTube
  • Instagram
  • Pinterest
  • My Facebook-Page
  • Quora
  • Stack Exchange
  • Linkedin
  • © 2025 · Swagatam Innovations