• Skip to main content
  • Skip to primary sidebar

Homemade Circuit Projects

Need circuit help? Post them in the comments! I've answered over 50,000!

Blog | Categories | About | Contact | Calculators-online
You are here: Home / Lamps and Lights / Remote Controlled Solar Lamp Intensity Controller Circuit

Remote Controlled Solar Lamp Intensity Controller Circuit

Last Updated on January 4, 2024 by Swagatam 7 Comments

In this post I have explained a simple remote controlled solar lamp intensity controller circuit which can be used for controlling the street lamp LED intensity without practically reaching for the LED box. The idea was requested by one of the dedicated members of this website

Table of Contents
  • The Design

Circuit Objectives and Requirements

  1. I have successful build this current controlled driver circuit with a 50 watt LED (5 x 10 watt) for a garden light.
  2. So far i don't want to use it the whole night and because of its elevated position (it will be about 4-5 meter above the
    earth),manual Switching is not preferable.
  3. Therefore would you mind suggesting me any remote control circuit for Controlling LED Intensity? counting on your usual co-operation!

The proposed circuit can be built using the below shown circuit design.

warning message: electricity is dangerous, proceed with caution
Remote Controlled Solar Lamp Intensity Controller Circuit

The Design

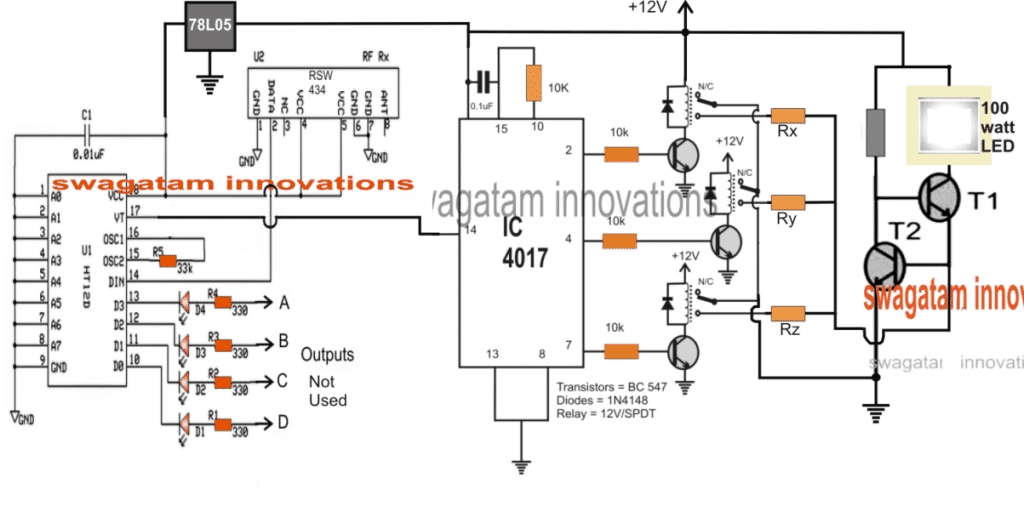
The design employs 3-step intensity control for the connected LED lamp which could be easily converted to a 10-step intensity controller by simply repeating the indicated relay driver stages across all the 10 pinouts of the IC 4017.

The circuit basically is made up of 3 distinct stages, which can be understood from the following explanation:

The first stage from right is a transistor based LED current controller circuit which has been already built by the user as the solar lamp, who requested this article.

The central IC 4017 stage is a 3 step relay selector switch circuit which toggles sequentially across the relay stages switching the relays ON/OFF one at a time in response to every single pulse at its pin#14.

The 3rd stage at the left side is an RF remote control receiver module, whose VT pinout is configured with the pin#14 of the IC 4017.

The pin VT of the remote module IC HT12D blinks once, each time the remote transmitter handset button is pressed (any button out of the 4 buttons).

This blinking of the VT pin is used as the toggling pulse for the IC 4017 which responds instantly causing the subsequent relay to latch, and releasing the previous relay in the sequence.

The relay contacts can be seen configured with current determining resistor Rx, Ry, Rz, which are correspondingly selected from a higher value to a lower value and vice versa by the relay contacts.

These resistors get linked with the current controlled LED driver stage altering the current restriction levels of the LED driver stage.

This action in turn renders the LED with a corresponding amount of current limit producing an equivalent level of  illumination on the LED, lower current causes the illumination to decrease and thesubsequent higher current selection allows the LED intensity to grow brighter depending on which resistor is toggled ON by relays.

The resistors Rx, Ry, Rz can be calculated by the formula provided in this 100 watt LED driver circuit article

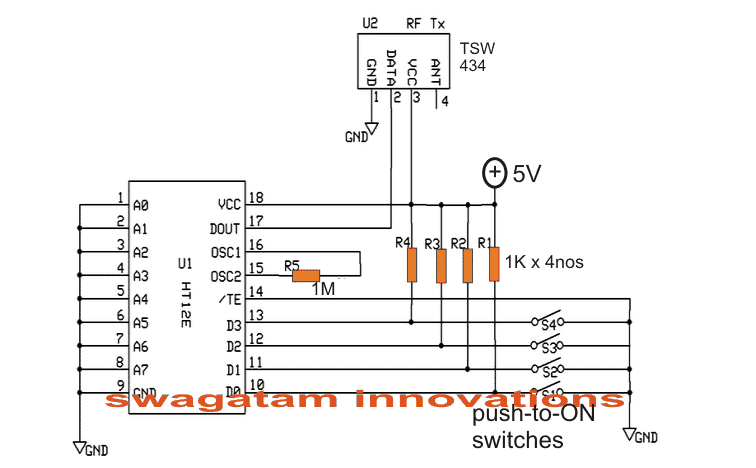
The transmitter circuit for the above explained remote controlled solar lamp intensity controller circuit can be witnessed in the following diagram and built accordingly for the lamp intensity control.

You'll also like:

  • 1.  Underwater LED Boost Converter Circuit with Dimmer
  • 2.  5V 3 Amp Fixed Voltage Regulator Circuit using IC LM123
  • 3.  Touch Dimmable LED Light Bar Circuit
  • 4.  LED Night Lamp with Dimmer Circuit
  • 5.  Make Your Own Rapid Sea Water Desalination Plant at Home
  • 6.  Solar Water Heater Circuit with Battery Charger

About Swagatam

I am an electronics engineer with over 15 years of hands-on experience. I am passionate about inventing, designing electronic circuits and PCBs, and helping hobbyists bring their projects to life. That is why I founded homemade-circuits.com, a website where I share innovative circuit ideas and tutorials. Have a circuit related question? Leave a comment.... I guarantee a reply!

Previous Post: « GSM Pump Motor Controller Circuit using Arduino
Next Post: Interface Accelerometer ADXL335 with LED and Arduino (Circuit Diagram) »

Reader Interactions

Comments

  1. Abba says

    May 8, 2020 at 11:53 pm

    Must pin 15 and pin 10 be connected together or i can connect pin 15 to any of the remaining unused output pins of 4017 ic

    Reply
    • Matrix says

      May 9, 2020 at 12:57 pm

      pin10 is just after pin7 so it resets immediately after pin7, any other pin will cause the reset to be delayed depending on the order of the pin number

      Reply
  2. Abba says

    May 7, 2020 at 11:50 am

    Hi Swag
    I understood your explanation above. But I’m a little bit confuse. Only three output pins were used. Since its a sequencial ic will the remaining output unused pins create an extra delay before we returned back to the above three used pins? I really hope my question will be understood. Thanks alot for the great work.

    Reply
    • Swagatam says

      May 7, 2020 at 7:51 pm

      Hi Abba, the pin 10 is connected to the reset pin of the IC, so after pin7 the sequence will quickly return to pin3 and repeat the procedure.

      Reply
      • Abba says

        May 7, 2020 at 11:00 pm

        Thanks alot for your timely reply. I appreciate it.

        Reply
  3. rafu says

    December 9, 2016 at 10:23 am

    Dear Sir, I note that you make a non conventionnal and original use of the 4017 in lots of your creations. The 4017 is a very common chip, easy to find and not expensive at all. I can only congratulate you for your work. Thanks.

    Reply
    • Swagatam says

      December 9, 2016 at 11:59 am

      Thanks Rafu, I appreciate your observation and interest…keep up the good work.

      Reply

Need Help? Please Leave a Comment! We value your input—Kindly keep it relevant to the above topic! Cancel reply

Your email address will not be published. Required fields are marked *

Primary Sidebar

Subscribe to New Circuit Ideas

Categories

  • Arduino Projects (87)
  • Audio and Amplifier Projects (132)
  • Automation Projects (17)
  • Automobile Electronics (101)
  • Battery Charger Circuits (83)
  • Datasheets and Components (104)
  • Electronics Theory (143)
  • Free Energy (37)
  • Games and Sports Projects (11)
  • Grid and 3-Phase (19)
  • Health related Projects (25)
  • Home Electrical Circuits (12)
  • Indicator Circuits (14)
  • Inverter Circuits (87)
  • Lamps and Lights (142)
  • Meters and Testers (69)
  • Mini Projects (46)
  • Motor Controller (64)
  • Oscillator Circuits (27)
  • Pets and Pests (15)
  • Power Supply Circuits (108)
  • Remote Control Circuits (50)
  • Security and Alarm (64)
  • Sensors and Detectors (101)
  • Solar Controller Circuits (59)
  • Temperature Controllers (42)
  • Timer and Delay Relay (49)
  • Transmitter Circuits (29)
  • Voltage Control and Protection (37)
  • Water Controller (36)

Calculators

  • Battery Back up Time Calculator
  • Capacitance Reactance Calculator
  • IC 555 Astable Calculator
  • IC 555 Monostable Calculator
  • Inductance Calculator
  • LC Resonance Calculator
  • LM317, LM338, LM396 Calculator
  • Ohm’s Law Calculator
  • Phase Angle Phase Shift Calculator
  • Power Factor (PF) Calculator
  • Reactance Calculator
  • Transistor Astable Calculator
  • Transistor base Resistor Calculator
  • Voltage Divider Calculator
  • Wire Current Calculator
  • Zener Diode Calculator
  • Filter Capacitor Calculator
  • Buck Converter Calculator
  • Boost Converter Calculator
  • Solar Panel, Inverter, Battery Calculator
  • Wire Current Calculator
  • SMPS Transformer Calculator
  • IC SG3525, SG3524 Calculator
  • Inverter LC Filter Calculator

People Also Search

555 Circuits | 741 Circuits | LM324 Circuits | LM338 Circuits | 4017 Circuits | Ultrasonic Projects | SMPS Projects | Christmas Projects | MOSFETs | Radio Circuits | Laser Circuits | PIR Projects |

Recent Comments

  • Swagatam on How Shunt Regulator TL431 Works, Datasheet, Application
  • SA on How Shunt Regulator TL431 Works, Datasheet, Application
  • Swagatam on Timer Based Cell Phone Charger Circuit
  • Nitesh Agrawal on Timer Based Cell Phone Charger Circuit
  • Swagatam on Timer Based Cell Phone Charger Circuit

Company

  • Privacy Policy
  • Cookie Policy
  • About Me
  • Contact
  • Disclaimer
  • Copyright
  • Videos
  • Sitemap

Social Profiles

  • Twitter
  • YouTube
  • Instagram
  • Pinterest
  • My Facebook-Page
  • Quora
  • Stack Exchange
  • Linkedin
  • © 2025 · Swagatam Innovations