An inverter is an equipment which will convert a battery voltage or any DC (normally a high current) into a higher mains equivalent voltage (120V, or 220V), however unlike an UPS inverters may lack one feature, that is these may not be able to switch from mains battery charging mode to inverter mode and vice versa during grid power failure and restoration situations.
Converting an Inverter to UPS
An inverter can be easily converted to an UPS with a few simple modifications or rather additions with their existing circuitry.
The lacking or missing changeover feature in an inverter can be upgraded by including a few number of relay stages within its circuit, as explained in the following sections:
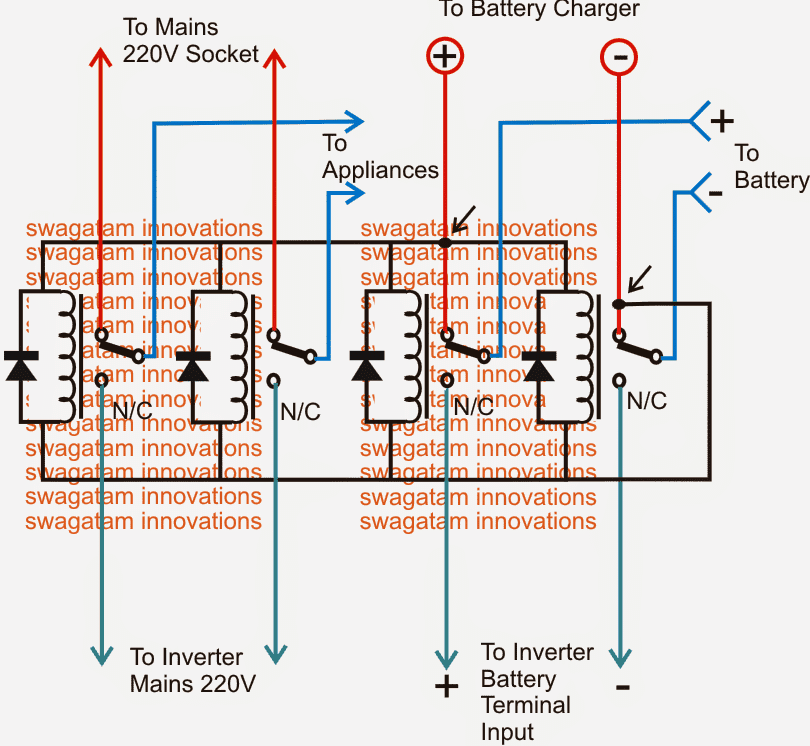
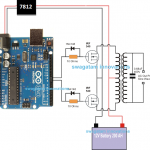
Referring to the figure below, we see that the above requirement is implemented by using 4 SPDT relays whose coils are wired up in parallel and joined with a mains operated DC source, which could very well be the battery charger DC output.
It means during the presence of mains input the relays would be energized such that their N/O contacts get connected with the individual relay poles and the respective electrical gadgets which could be seen connected with the poles..
The left two relays can be seen with their N/O contacts connected with the mains AC input, while the N/Cs are terminated with the inverter mains output.
The relays at the right side have their N/O contacts rigged with battery charger (+)/(-) inputs, and the N/Cs are integrated to the inverter DC input.
The above data ensures the following actions during mains presence and failure situations:
When mains AC is present, the appliances get connected to the available mains power via the left pair of relay poles, while the battery is able to get the required charging voltage through the right hand relay poles. This also ensures that the inverter is cut-off via the N/C points from the battery and is no longer able to operate.
In a situation when mains AC fails, the relay contacts revert to their N/C contacts, giving rise to the following actions:
The battery instantly gets connected with the inverter DC input via the right hand side relay N/C contacts, such that the inverter becomes operative and its output starts producing the required mains back up voltage.
At the same instant the above inverter mains voltage now gets switched to the appliances via the left hand side relay N/C contacts ensuring that the appliances do not experience an interruption while the positions revert in the course of the above actions.
Selecting the Relays
The relays must selected with low coil resistance type so that they operate under higher switching currents, and therefore are able to "hammer" the contacts much harder and quicker compared to the lower resistance coil relays.
This will ensure the changeover time to be rapid within milliseconds which happens to be the most crucial factor with UPSs and inverters needing to be converted into UPS systems.
In the above diagram if an automatic battery charger is used, the supply would be cut off once the battery is fully charged, which would also cut off the supply to the relays forcing the inverter to switch ON even while the mains is present.
To avoid this issue, the relays must be powered through a separate power supply as shown in the following diagram. A capacitive type of power supply circuit could be seen here, which makes the design much compact.
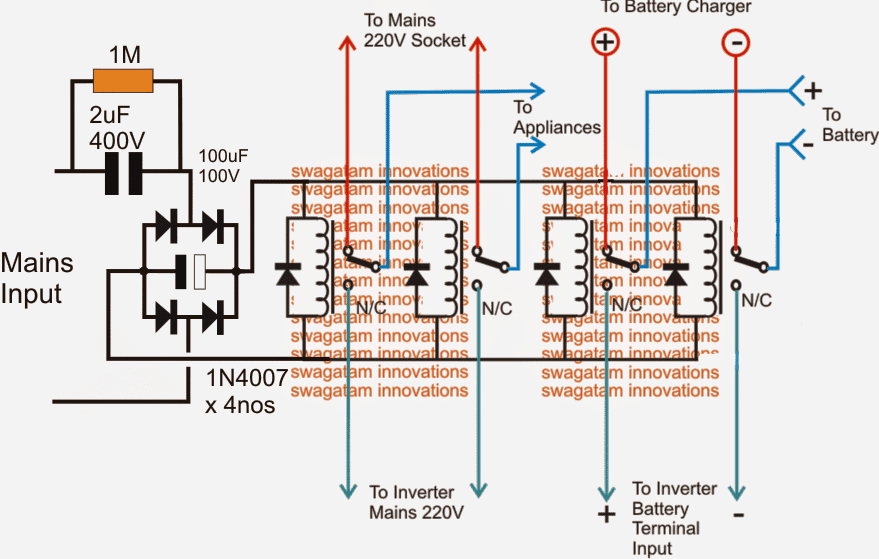
Note: Please connect a 1K resistor across the filter capacitor associated with the bridge rectifier, this is to ensure its quick discharging during a mains failure, and an instant switching of the relevant relays.
Main Components and Their Functions:
Bridge Rectifier (1N4007 x 4)
So we have this bridge rectifier that consists of four 1N4007 diodes and its main job is to take the alternating current (AC) from the mains and convert it into direct current (DC). This conversion is really important because we need that DC power to make the relays work properly.
Filter Capacitor (100uF/100V)
Next up we are looking at the filter capacitor 100uF rated for 100 volts. These capacitors are essential because they help smooth out the rectified DC voltage making it much more stable and reliable for our circuit.
Relay Coils
Now let us talk about the relay coils. These coils function like switches that allow us to toggle between using mains power and inverter power. They play a crucial role in controlling how our entire system operates.
Formulas and Calculations:
DC Voltage Across the Relay Coil
We can figure out the DC voltage across the relay coil using this formula:
Vdc = (Vrms * √2) - Vf
In this equation the Vrms represents the input mains AC voltage (for example we might say it is 220 volts) and Vf is the total forward voltage drop across the bridge diodes. For our 1N4007 diodes we can calculate that as
Vf = 2 * 0.7V = 1.4V.
If we do a quick calculation for a 220V mains input, it would look like this:
Vdc = (220 * √2) - 1.4
Vdc = 310.6 - 1.4
Vdc = 309.2V
Capacitor Selection (Ripple Voltage)
When it comes to selecting capacitors we need to think about ripple voltage which we can calculate using this formula:
ΔV = Iload / (f * C)
In this formula Iload is the load current drawn by the relay, f is the rectified AC frequency (which would be around 100 Hz if we are using a full-wave rectifier with a 50 Hz mains supply) and C represents the capacitance measured in Farads.
For example if we are working with a 100uF capacitor and our relay coil is drawing about 50mA of current then we can plug those values into our formula like this:
ΔV = 0.05 / (100 * 0.0001)
ΔV = 5V
Relay Coil Voltage
It is really important for us to ensure that the voltage rating of the relay coil matches up with the rectified DC voltage we calculated earlier. So if our rectified voltage is sitting at 309.2V then we need to make sure to use a relay that can handle that specific voltage.
Relay Switching Time
When we want to find out how quickly our relay can switch then we can use this formula:
ts = L / R
Here L stands for the inductance of the relay coil and R represents the coil resistance.
For instance if we have L = 50mH and R = 500 ohms then we can calculate it like this:
ts = 0.05 / 500
ts = 0.1ms
Current Limiting by a Capacitor in AC Circuits
The current limited by the 2uF/400V capacitor is given by the formula:
I = Vrms / Xc
Where:
- I = Current through the capacitor (in amperes)
- Vrms = Mains AC RMS voltage (e.g., 220V)
- Xc = Capacitive reactance of the capacitor (in ohms)
The capacitive reactance is calculated as:
Xc = 1 / (2 * π * f * C)
Where:
f = Frequency of the mains AC (e.g., 50 Hz)
C = Capacitance (in farads)
Step-by-Step Calculation
Calculate Xc (Capacitive Reactance):
Given:
C = 2uF = 2 × 10⁻⁶ F
f = 50 Hz
Formula: Xc = 1 / (2 * π * f * C)
Substitution: Xc = 1 / (2 * 3.1416 * 50 * 2 × 10-6)
Xc = 1 / (0.00062832)
Xc ≈ 1591 ohms
Calculate Current (I):
Given:
Vrms = 220V
Xc ≈ 1591 ohms
Formula: I = Vrms / Xc
Substitution: I = 220 / 1591 I ≈ 0.138 amperes (or 138mA)
Design Considerations:
As we design our circuit we need to make sure that the diodes are capable of handling both peak inverse voltage (which will be equal to Vpiv = Vdc) and also the current (which will be Ipeak = Iload).
We should also select a relay that has a sufficient contact rating so it can safely manage whatever load we connect to it.
Lastly do not forget about that 1M resistor, its job is to discharge the filter capacitors when we disconnect power to prevent any accidental shocks.

Questions & Answers
Gentile Inegnere Swagatam
Buongiorno, ringraziando per la gentile risposta, sono un ragazzo di 16 anni con poche risorse economiche, volevo chiederle se c’e’ una soluzione elettronica anziche’ meccanica al mio problema senza fare uso di rele’ ad alta tensione che potrebbero creare seri problemi di assemblagio,grazie
No problem tommy, I appreciate your interest in electronics at this young age.
I will try to design a triac based solid state design for you soon….
Please let me know the resistors in watts like the 1m resistor
All resistors associated with this circuit can be 1/4 watt 5% CFR
Hello Sir. I’ve tried the transformerless tip above but my relay keeps flickering as one powered by an AC source. What should I do?
Hi Jedidiah, Please increase the value of the 100uF filter capacitor to 220uF or maybe 470uF and check the response.
Thank you Sir. It worked!
Thanks Jedidiah, glad it worked.
please me I suggest let’s use 225j 400v 2.2uf, can’t we reduce voltage? because the 4 relay are all above 700 ohms
Voltage is not the concern, it is the current which will be higher than the load requirement. But You can use 2.2uF for the 4 relays without much issues, although the relays coils might slightly become warm due to excess current.
The 4 relays will require 70 ma current while the 2.2uF will supply around 120mA, so the excess 50mA will be dissipated as heat.
as I had told you earlier on that I have the non polar capacitor 2.2uf 400v
and then the rest I have very many pieces of 104j 400v
You will need 15 nos of 104/400V capacitors to make an equivalent of a 1.5uF/400V capacitor.
so the 105/400v and 474/400v should replace the 1uf capacitor because I thought you said the 25v should be in the filter in the middle of the bridge rectifier diodes
Yes that’s right, meaning the 2uF/400V input capacitor shown in the diagram must be replaced with a 105/400V and 474/400V capacitors connected in parallel. Together they will become 1.5uF/400V capacitor and provide sufficient current for your 4 relay coils.
there are 4 relay not 3 because we have relay number is charging the battery please re confirm the partlist I may need to use
Yes, I missed that there are 4 relays. In that case you can use a 105/400V capacitor and a 474/400V capacitor, both in parallel.
I have got the non polar capacitor 2.2uf 400v but I would like you to calculate because the second capacitor is 35v 100uf but the relay I’m having is written dc12v
3A 30v
3A 220v ac
so can’t the second capacitor of 35v be emitting much current than the 30v written in the relay?
Since your each relay is 729 ohms, that means each relay coil will consume around 16 mA current, and for 3 relays in parallel it will be around 50mA.
In that case the input capacitor can be a 1uF/400V.
Since the 1uF/400V will restrict the current to the relay to 60mA, so the input 300V DC from the 1uF/400V will drop to the relay level of 12V.
Because the voltage will drop to 12V, so 35V for the filter capacitor is OK….in fact you can also try a 25V capacitor instead of 35V.
I’m going to use electrolytic capacitor it is polarized 2.2uf 400v and 100uf 35v electrolytic capacitor, please confirm in case there should be some changes to be done
The 2.2uf 400v input capacitor must be strictly non-polar PPC, electrolytic will heat up and burst immediately.
I tested the two coil terminal using multimeter and I had set it in ohm meter 2k and it shows 729 this is how I tested one black wire from the meter to coil pin in the relay left and red wire from the meter to coil pin right and it shows 729 have I tested the right way?
You must connect the meter probes to the relay terminals which are labelled as “Coil”
If this gives you 729 ohms then it is ok…the input capacitor can be 2uF/400V, but strictly non-polar PPC.
when I placed the ohm meter I set it at 2k , I placed one wire of the multimeter to right coil and second wire to the left coil it was showing 729 and when I adjusted it to 1m it was showing 01.0
The 2k range is the correct range which is showing 729 ohms. Please Confirm this for all the relays.
if a multimeter can work how should I test, put the multimeter in continuity then test coil with n/o or n/c or with common too
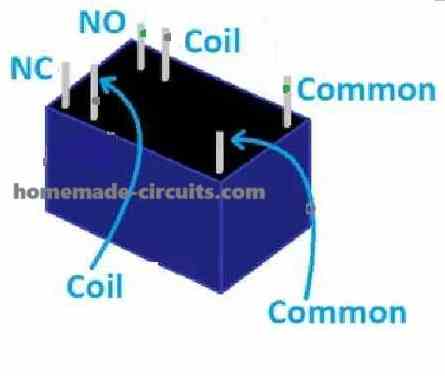
You can see in my previous 6 pin relay image, there are two terminals named as “Coil”, you must measure the resistance across these terminals.
my rela can not manage because they are 1ohm
You mean 1 ohm coil resistance, that’s impossible, please check it with a proper ohm meter.
can I use 2.2uf 400v capacitor instead of 2uf 400v capacitor?
Yes you can, assuming the resistance of each relay coil is not less than 300 ohms
and the first capacitor can I use 6.8 uf 400v?
It will depend on the coil resistance of the relay. What is the coil resistance value of your relay?
it’s becoming a little bit hard for me to get 100uf 100v capacitor, is there another option you can create for me?
You can try 100uF/50V or 35V instead.
is it okay to join the input AC mains of the bridge rectifier and the red arrow going to AC socket
Yes, it is ok to join the “Mains Input” points with the red arrow terminals “To Mains 220V Socket”
please help me with this circuit connection diagram using the 6pin 12v relays
here’s the image which shows the pinouts of a 6 pin relay, you can use this information for connecting the relay:
there are relays I’ve ordered from jumia but it’s 6pin and it’s written
HY4100-F DC 12v
3A 220v AC
3A 30v DC
can this relay work for the above project?
It can be also used. You can see the pinout details in the following post:
https://forum.arduino.cc/t/6-pin-relay-which-pin-is-which/555478
you have seen where the bridge rectifier is that an input for ac from ac socket mains, what about the red arrow pointing up isn’t it also for ac mains
The red arrow wires also go to the same mains input AC connected with the bridge rectifier.
meaning the 1k resistor should be in the middle of bridge rectifier the way the 100v capacitor is?
and mains input is two times
Yes, the 1k must be parallel to that filer capacitor.
Sorry, I could not understand what you meant by “mains input must be two times?”
Pls how is battery charging accomplished in mains tied inverter using bridge MOSFET configuration,? Thanks
Hello and thank you for this great info!
I have a 3000w (240vac from 24vdc) Inverter pv panels charge controller & 2,x200Ah batteries.
Sometimes at night i need a charger for the batteries. I had a good one victron ,but too powerful and not smart type, then the generator put it on fire!!
This one is old Inverter dc in ac out.
I want to make it self contained with ac in to a smart charger for 24 batteries only. A simple thing…how can I do this with components i already have, 12v chargers, 0.5 – 2.5A…2 x broken 24v chargers, not smart.
Then I have….6kVA transformet 240 vac down to 120… bug heavy strong solid thing….
What can i make with it that will be useful?
Inverter?
Thank you for any help!
Hi, thanks, and glad you liked the post.
From your explanation I understand that you want to make a charger for your 2 x 200 Ah batteries. However your existing 12V 2.5 amp charger cannot be modified for charging your 200 Ah batteries. Your 200 Ah batteries will required a minimum of 20 amp current to be charged.
Your 6kva transformer can be perhaps used to build a 120 V to 240 AC inverter.
Hi 120vdc is….not eaily achieved!?
As for 24vdc charger, i need trickle only not 1/10 Ah
OK, but still for your 24V batteries you will need 28V for charging them fully.