The ISD1820 is a small ready-made module which can record human voice for short time and then play it back. It is based on the ISD1820 IC which is a voice record and playback chip.
This module is very popular for DIY projects where we want to make some talking gadget or voice-alarm,or greeting system, or even robot with talking feature.
Technical Specs (in simple words)
Recording Time: around 10 seconds (can be changed using resistor)
Voltage: Works on 3V to 5V (best is 5V from adapter or Arduino)
Microphone: Already included on the board
Speaker Output: Can directly connect 8Ω 0.5W to 1W speaker
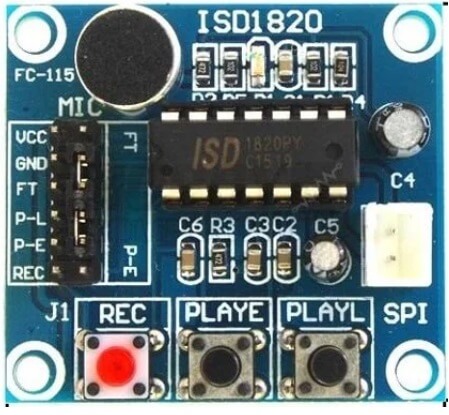
Buttons on Board:
REC → Press and hold to record
PLAYE → Press once to play full message
PLAYL → Press and hold to play, release to stop
LED Indicator: Shows when recording is happening.
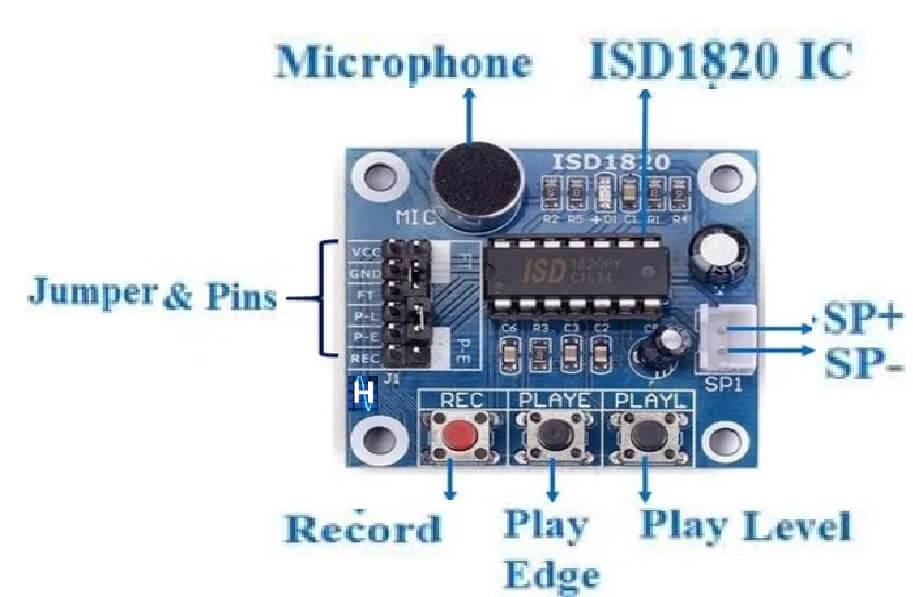
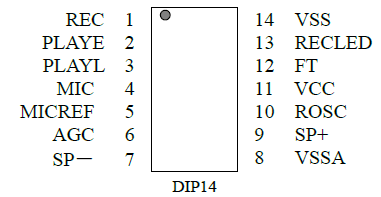
Pin Description (on the module)
| Pin Name | What It Does |
|---|---|
| VCC | +5V power input |
| GND | Ground |
| REC | Record control (active HIGH) |
| PLAYE | Edge-trigger playback (press once, it plays all) |
| PLAYL | Level-trigger playback (press and hold = play) |
| SP+ / SP- | Speaker output |
| FT | Feed-through (mic to speaker direct mode) |
| MIC | Electret microphone already fixed |
How to Use It Without Microcontroller
Super simple steps:
Power It Up
Give +5V to VCC and GND to GND from any 5V source or battery or Arduino 5V pin.
Record Voice
Press and hold REC button, say something into the mic.
Release REC to stop recording.
Red LED will glow during recording.
Play Voice
Press PLAYE button once → It plays full recorded audio.
Press and hold PLAYL → It plays only when you hold, stops on release.
Speaker Connection
Connect small 8Ω speaker to SP+ and SP- pins.
How to Connect with Arduino (if you want automation)
If we want to use Arduino to trigger recording or playback, then we connect pins like this:
| ISD1820 Pin | Connect to Arduino |
|---|---|
| VCC | 5V |
| GND | GND |
| REC | Digital pin (e.g. 2) |
| PLAYE | Digital pin (e.g. 3) |
| PLAYL | Optional (e.g. pin 4) |
Example code (for Arduino):
int rec = 2;
int play = 3;

void setup() {
  pinMode(rec, OUTPUT);
  pinMode(play, OUTPUT);
}

void loop() {
  // Record
  digitalWrite(rec, HIGH);
  delay(3000); // record for 3 sec
  digitalWrite(rec, LOW);
  delay(2000);

  // Play
  digitalWrite(play, HIGH);
  delay(500);
  digitalWrite(play, LOW);
  delay(5000);
}
Speaker Advice
- Use 8 ohm 0.5 watt or 1 watt speaker only.
- Do not use big speakers or audio amps here or chip may get damaged.
- Sound quality is OK but not studio type – just for basic voice use.
Some Ideas Where You Can Use ISD1820
- Talking robot
- Voice-controlled greetings
- Toy with pre-recorded voice
- Motion-detection alarm with sound
- Doorbell with custom voice
- Voice reminder device

Need Help? Please Leave a Comment! We value your input—Kindly keep it relevant to the above topic!