In this post, I will show how to construct a calculator using Arduino, which can perform far complex arithmetical calculation than an ordinary calculator.
The motto of this post is not to make a calculator using Arduino, but to showcase the arithmetical capability of Arduino, which performs various complex data interpretations and calculations from the sensors and other peripherals.
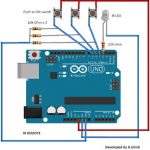
For this fun project you just need a USB cable and Arduino of your choice. We are going to get the result of our calculations via serial monitor of Arduino IDE. If you are familiar with basics of C language this project is a piece of cake, and you can create your own programs which does even more complex arithmetical calculations. Here we are going to use a header file #include<math.h> which is inbuilt in the Arduino IDE compiler, so you don’t need to download any library.
We can even connect a LCD display and keyboard to Arduino and make a scientific calculator, but it is subject of another article. If you are familiar with “Turbo C++” one of our first programs will be addition of two numbers, all the arithmetical calculations are carried within the CPU of the computer. But here, all the arithmetical calculations are carried out in the Arduino microcontroller. Let’s start with addition, subtraction, division and multiplication.
Here is a program with two variable a and b, using these two variables we can do the above stated calculations using “ +, -, * / ” operators, which are addition, subtraction, multiplication, division respectively.
Program:
//-------------------Program Developed by R.Girish---------------//
#include<math.h>
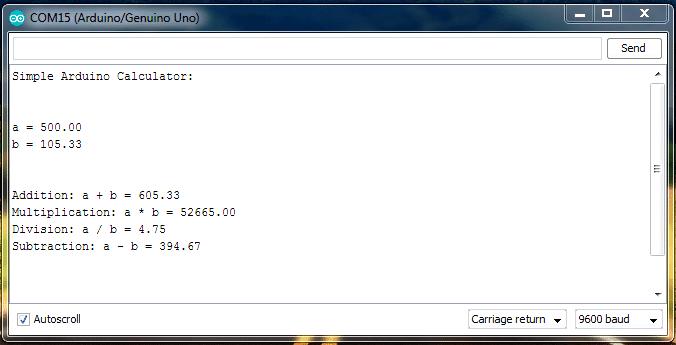
float a = 500;
float b = 105.33;
float add;
float sub;
float divide;
float mul;
void setup()
{
Serial.begin(9600);
Serial.println("Simple Arduino Calculator:");
Serial.println("n");
Serial.print("a = ");
Serial.println(a);
Serial.print("b = ");
Serial.println(b);
Serial.println("n");
Serial.print("Addition: ");
Serial.print("a + b = "); // add
add=a+b;
Serial.println(add);
Serial.print("Multiplication: ");
Serial.print("a * b = "); // multiply
mul=a*b;
Serial.println(mul);
Serial.print("Division: ");
Serial.print("a / b = "); // divide
divide=a/b;
Serial.println(divide);
Serial.print("Subtraction: ");
Serial.print("a - b = "); // subtract
sub=a-b;
Serial.println(sub);
}
void loop() // we need this to be here even though its empty
{
}
//-------------------Program Developed by R.Girish---------------//
OUTPUT:
In the above program we are using “Float” which performs decimal functions, we are using “Serial.print();” for printing the values in serial monitor, rest of the program is self explanatory. You can change the variable a and b in the program with your own values.
Let’s move something more interesting, area of circle. The formula for area of circle is: pi * radius^2 or pi times radius square. Since the value of pi is constant, we need to assign it in the program using “float” since the value of pi is 3.14159 where decimal point comes to play.
Program:
//-------------------Program Developed by R.Girish---------------//
#include<math.h>
float pi = 3.14159;
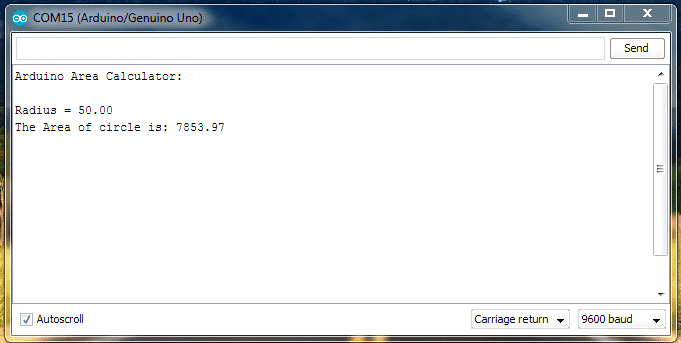
float radius = 50;
float area;
void setup()
{
Serial.begin(9600);
Serial.println("Arduino Area Calculator:");
Serial.print("n");
Serial.print("Radius = ");
Serial.print(radius);
Serial.print("n");
area = pi*sq(radius);
Serial.print("The Area of circle is: ");
Serial.println(area);
}
void loop()
{
// we need this to be here even though it is empty
}
//-------------------Program Developed by R.Girish---------------//
OUTPUT:
Again, you can change the values of your own in the program. We are using “sq()” which does squaring of the number with in the parenthesis. Now let’s move to next level. In this program we are going to use Pythagoras theorem for calculating the hypotenuse of a triangle. The formula behind this is: “hyp=sqrt(sq(base) + sq(height)); “ or square root of (base square + height square).
Program:
//-------------------Program Developed by R.Girish---------------//
#include<math.h>
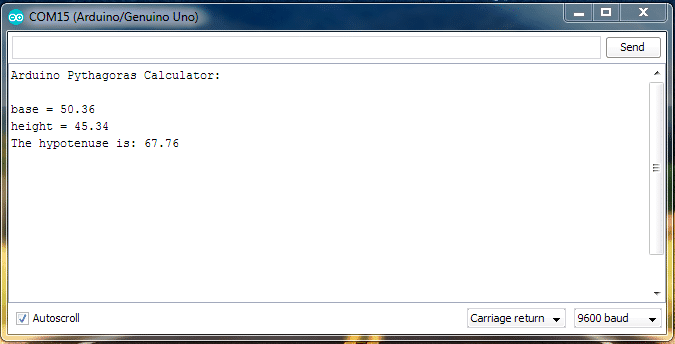
float base = 50.36;
float height = 45.336;
float hyp;
void setup()
{
Serial.begin(9600);
Serial.println("Arduino Pythagoras Calculator:");
Serial.print("n");
Serial.print("base = ");
Serial.println(base);
Serial.print("height = ");
Serial.print(height);
Serial.print("n");
hyp=sqrt(sq(base) + sq(height));
Serial.print("The hypotenuse is: ");
Serial.print(hyp);
}
void loop()
{
// we need this to be here even though its empty
}
//-------------------Program Developed by R.Girish---------------//
OUTPUT:
You can change the values of base and height with your own values in the program. We used “sqrt()” which does square root function values within the parenthesis. Now let’s do a popular program which we would have learned in our beginning of C language course, Fibonacci series.
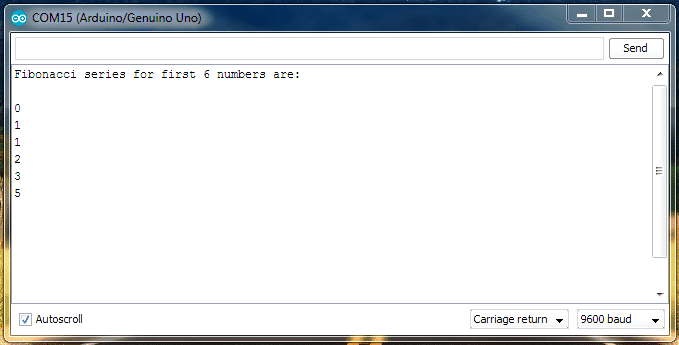
In a nutshell the Fibonacci series is addition of two previous numbers which gives next number and so on, it always starts with 0, 1. For example: 0, 1. So 0+1=1; next series is 0, 1, 1. So, 1+1=2. So next series is, 0, 1, 1, 2…..and so on. The program written here is to find the Fibonacci number for first nth digit. You can change the value of ‘n’ in the program to get the desired Fibonacci series.
Program:
//-------------------Program Developed by R.Girish---------------//

#include<math.h>

int n=6;

int first = 0;

int Second = 1;

int next;

int c;

void setup()

{

Serial.begin(9600);

Serial.print("Fibonacci series for first ");

Serial.print(n);

Serial.print(" numbers are:nn");

for ( c = 0 ; c < n ; c++ )

{

if ( c <= 1 )

next = c;

else

{

next = first + Second;

first = Second;

Second = next;

}

Serial.println(next);

}

}

void loop()

{

// put your main code here, to run repeatedly:

}

//-------------------Program Developed by R.Girish---------------//
OUTPUT:
So, this would have given enough doses to your brain and confused that something designed to control hardware peripherals is doing some nonsense math calculation, if so, you are not alone.
The math plays a major role in electronics that’s why our textbook is full of mathematical equations, that we don’t even understand and that point where calculators come to rescue us and here it is.
If you any queries regarding this simple calculator circuit using Arduino, you can express them through ever valuable comments.


Comments
I am one the regular follower of your blog and must commend you for a good job.
please, I am working on a serious project "12vdc to 230vac,
500w-1000w, transformerless inverter". And among all the wealth of
circuits on your website, this very design is missing. please help me
with it,
it's urgent. I will appreciate it if you reply me soon. please if possible, can you share your direct number…….. please.
regards.
that's impossible, unless huge capacitors and diodes are involved