Repairing a mosquito bat is a process in which a malfunctioning mosquito bat is checked for faults using meters and restored to its earlier working condition.
This post provides some general tips regarding how to repair a mosquito swatter bat or racket, through quick steps.
Mosquito rackets today have become an indispensable tool in every house, simply because it not only provides us with an effective way of terminating mosquito, the process also creates a sense of fun and satisfaction.
However these devices seem to have one drawback, they get damaged or nonoperational quite quickly. This is usually due to bad handling or some minor internal technical problems.
Let's discuss some general tips regarding the possible faults with a swatter mosquito bat, and ways to quickly investigate and repair them.
It would be interesting to know that 90% of the time the faults associated with a damaged mosquito swatter bat is due to shorted mesh net, or an exhausted battery.
90% of the time the fault is not associated with the circuit board or its components.
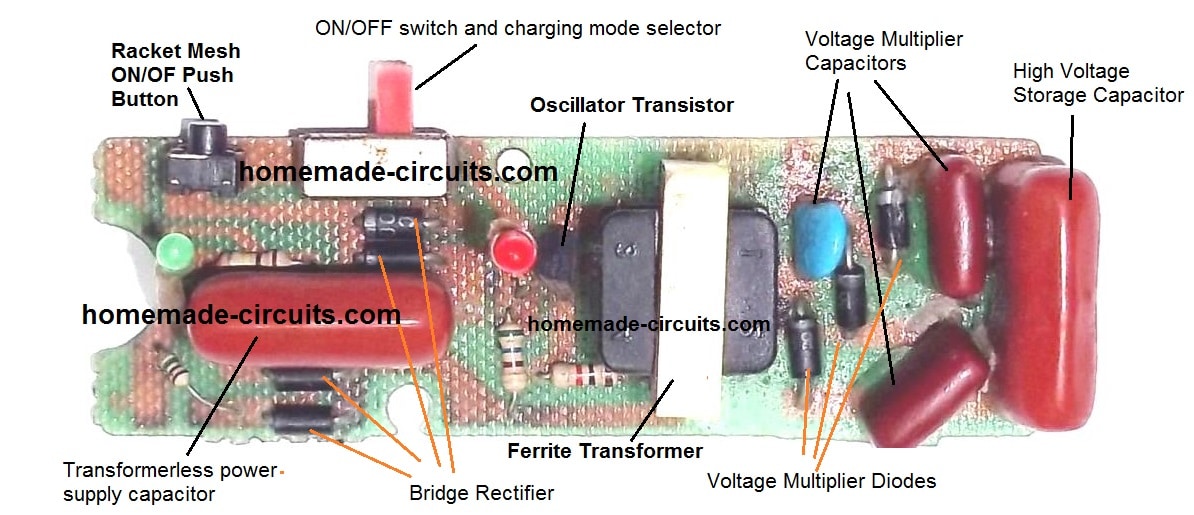
How does a Mosquito racket circuit look like
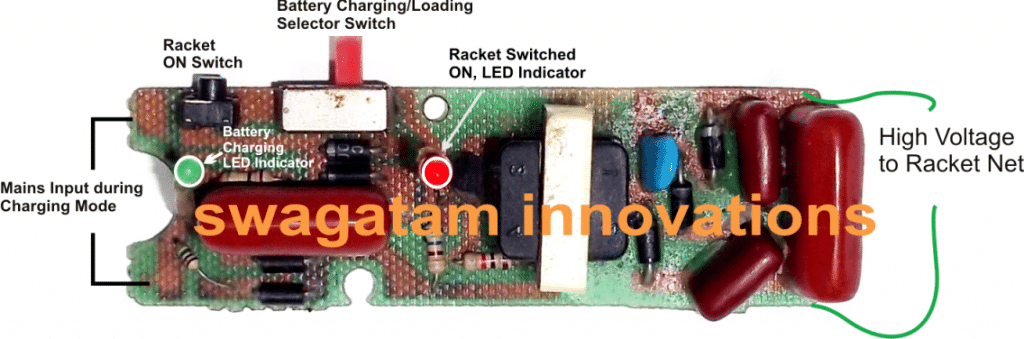
In the above image we can see a commercial mosquito bat circuit board, populated with many stages and electronic components.
If you find your mosquito bat is no more working (no lights, no sparks), then most probably none of the parts in the circuit may be faulty or damaged.
Do not throw it or submit it into a junk shop because most of the time the fault in a mosquito bat is too basic which can be easily repaired at home using ordinary tools such as soldering iron and a multimeter.
Frequently, it's either the battery that is completely exhausted or may have become unresponsive to the charging cycles.
How to Troubleshoot
For troubleshooting and repairing your mosquito bat you will need a soldering iron, a multimeter and some prior experience with electronic assembly and soldering.
If you are entirely new to this then these operations may not be recommended for you.
Next, follow the steps as given below:
- With great care and concentration open the bat enclosure and remove the circuit board. This is normally done by removing a couple of screws on the bat handle.
- Before disconnecting the wires, take a snap shot of the various wire connections in your mobile phone so that you can refer to the pic in case you forget any of the connections.
- After this, the first step would be to detach battery from the board by desoldering the soldered points. Likewise, detach the high voltage wire from the board associated with the racket mesh.
Check the Battery
- Next, check the voltage across the detached battery wire through V range of your DMM. The reading should be around 3V. A damaged battery might show below 2V indicating that the battery needs a replacement.
- If it shows 3V, then connect it back with the PCB and measure the DC side supply lines ON the PCB with the push button pressed. If the battery has lost its current delivering capacity you may find the voltage dropping drastically, again this may indicate the signs of a damaged battery.
- In the above case, remove the battery and connect the circuit board with an external 3V DC from an AC to DC power supply.
- Very likely, now the DC supply line of the PCB will show a perfect 3V.
Check Output Arc Voltage
Next, it's time to verify the high voltage side operations, which must be checked cautiously using the DC 1000V range in your DMM.
Be careful, and make sure none of your body part touches this side, which might otherwise inflict a painful electric shock.
Begin, by pressing the relevant switch or the push button and checking the response.
If the meter shows a high voltage, the problem may be deemed solved.
To further confirm the actions, try shorting the high voltage side terminals manually with a piece of flexible wire. It should respond with a powerful spark confirming the proper working condition of the board.
Since it's assured that the device needs a new battery, get it replaced with the new one. Get a new battery pack connect the wires across the respective points and reconfirm the procedure. Once done, you can now fix the wires accordingly and restore the board inside the cabinet and fasten the screws.
You have just repaired your mosquito bat.
Check Loose Connections, or Solder Points
In some cases you may find the battery is OK, and mesh network is also undamaged yet no response from the unit.
In such situations you may want to confirm the various joints and weak solder points. Touch-up all the possible solder points with your soldering iron and solder wire, so that all the joints are renewed.
If the problem is with a bad solder point or connection, this action might quickly resolve the issue and restore the working condition of your mosquito racket.
Look for Dented Mesh Net
This is another major issue which causes a mosquito bat to stop functioning and deplete battery quickly. It's a deformed or crushed bat mesh.
Very often while hunting for the mosquito we tend to hit the bat on hard surfaces or uneven surfaces, causing a dent or depression to form on the netting of the bat. This in turn causes the portion of the mesh to get depressed and come closer to the central net.
When this happens the sparks get an easy path across this "shorted" nearby points. This situation makes the actual zapping operations ineffective allowing the mosquito to escape unscathed between the net.
A quick way to check the above issue is to carefully observe the bat net in darkness with the push button pressed.
You may immediately witness a shiny arcing near the dent, indicating a leaking spark across the dented area.
Once the spot is located, check the area carefully and correct the fault by gently straightening the crooked mesh section with a screwdriver. This will quickly render the bat in a working condition, and restore snappy electrocution of the mosquito.
Faults in the Circuit Board
Faults in a mosquito swatter bat circuit board can be very rare. Because the circuit is operated with a 3V battery while most of the parts are rated at much higher levels.
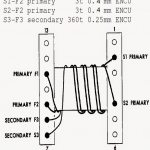
Basically this kind of circuits work using a blocking oscillator for pulsating a high voltage ferrite transformer. Here, the main active component is a small signal BJT which operates in a push pull manner for creating the required pulses across the transformer winding.
If none of the above mentioned troubleshooting ideas work, you may start checking the circuit board for a possible fault.
As specified earlier, begin by reinforcing all the solder points with fresh soldering touch ups.
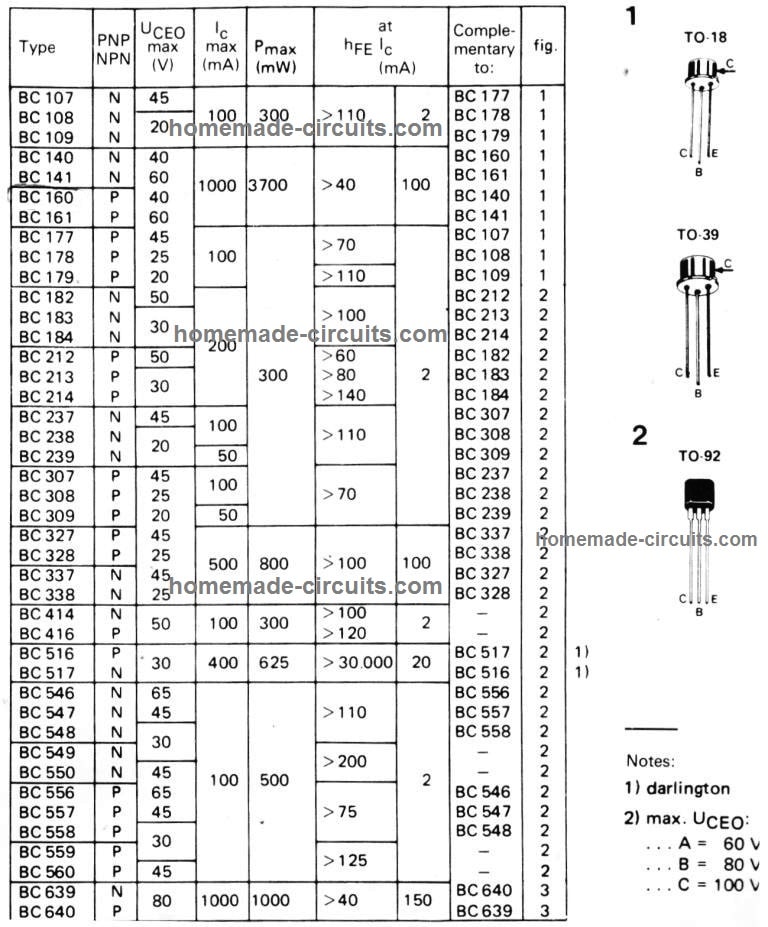
Verify whether or not the problem is solved. If not, remove the transistor and check it with a multimeter. If you find the reading suspicious simply replace it with an identical transistor or a close equivalent. Mostly this transistor will be an NPN and any equivalent having
collector/emitter voltage rating around 30V and current 200mA can be used as a replacement.
The range may include transistors like, 8050, BEL188, 2N2222, SL100, BC182, BC338. More equivalents can be found through this image:
Checking the Diodes
If replacing the transistor does not help, check the diodes by removing each one separately. The secondary side can be especially prone to diodes getting faulty due to high voltage.
So check the secondary diodes carefully, and replace the defective one with a new equivalent.
A Capacitor can be also Defective
The commercial units are notorious for using low quality, cheap components, in order to increase profit margin. This may lead to one of the high voltage capacitors going faulty. A faulty capacitor can give rise to two types of problems in a mosquito swatter bat.
On the secondary side this can result in a suppressed or low voltage output, and on the primary side a faulty capacitor may prohibit the battery from charging optimally or completely inhibit the charging process.
At the secondary side, a faulty capacitor may cause the output sparks to get feeble and weak. If your meter reads the transformer secondary producing a reasonable amount of voltage which may be anywhere between 300V to 700V, but the final terminals generating less, then the fault could be in one of the ladder capacitors.
Assuming you have already checked the diodes or replaced them with new ones, it's time to check the associated capacitors and replace the defective one with a new one. The checking can be done by removing the capacitor and testing them with a capacitance meter.
Battery not Charging
In the above paragraph the faulty capacitor was on the secondary side which was responsible for a suppressed output voltage. On the primary side also you may see a high voltage capacitor which is employed for creating a cheap 220V transformerless power supply.
This power supply is primarily intended for enabling a trickle charging for the battery. If this capacitor goes defective then no voltage will be reach the battery, or the voltage may be insufficient causing inefficient charging of the battery. Check and replace it with a new one and verify by checking the voltage across the points which leads to the battery terminals.
Remember the above explained transformerless charger is not isolated from mains voltage, therefore is lethal to touch, proceed with great caution while testing this stage.
Miscellaneous Faults
In the above sections we have talked about the major and the most likely faults that can render mosquito bat nonoperational. However there can be other faults resulting in the swatter bat shutting down completely.
One of the basic reasons could be a malfunctioning or a broken switch. A mosquito racket will normally have two switches. One is a selector-switch or the ON/OFF switch.
When this switch is in the ON position, the bat gets into a standby mode. In this position the second switch which is a push-button becomes enabled and allows the user to press it for activating the bat mesh for the required fly zapping actions.
In the OFF position the selector switch turns off and disables the bat completely, and also simultaneously turns on and enables the charging of the battery when the unit is plugged in to the mains socket.
If any of these switches become defective, the above explained operations of the bat can get hampered.
Repairing a faulty switch in a mosquito bat is actually quite easy. Disconnect the relevant connecting wires by desoldering them from the switch, and then check the continuity across the switch terminal with a DMM, in the diode range.
A short-circuit reading or loss of continuity on the meter will confirm a damaged switch. Remove and replace it with a new one to complete the repairing of the mosquito swatter bat.
Over to You
So folks these were a few tips regarding how to quickly and wisely repair a fly zapper or mosquito racket at home using ordinary tools. If you have any specific questions regarding this topic, please send them through the comments below, I'll try to solve them ASAP.


Questions & Answers
D882 getting faulty, after replacement emitter and collector shorted, could you help me regarding this to overcome such situation.
Most probably it could be because your transistor is bad quality or fake….as we know the mosquito battery just 4V and that can’t cause an over current in the transistor, unless of course the transformer itself is faulty which is very unlikely….you can try maybe a TIP31 and check again…
Hi, Our bat switch button is damaged inside and looks like we can replace the tactile button and also charger port also damaged. Can we replace both our own or any electrician can do this work?
I am located in Hyderabad.
Hi, you can do it yourself, no need to call any technician, just open the bat, carefully check the wire connections and remember it or take a picture on mobile, after that disconnect the wires and then replace the switch and the port with the new ones, and reconnect the wires as before…
Congratulations ! what a helpful article and site it is. Greatly appreciate your hard work in inspiring budding electronic fans like me. Thanks a ton. Please keep up the good work.
Thank you for your kind words, much appreciated!
Hi,
i opened the bat and the high voltage capacitor has dark spots so i feel it is burnt out. How ever i could not see the capacitor rating/ voltage. it is erased by the manufacturer i guess. Do you have any suggestions for the capacitor value?
the circuit looks similar to what you have posted in this article.
Regards,
Pradosh
Hi, I had a sample board, and in that board it is 223/2kv, or 22nF/2kv
I can produce big sparks with a wire connected between the mesh wires but can’t get a spark or sound if it hit a mosquito
Maybe the mosquito is too dry to produce any sparks, try a mosquito with blood full in its stomach…
Information was helpful. But my zapper racket net does not spark after charging. Even if it is not charged for weeks the UV light is always okay.
What could be the fault on the wire mesh?
You can open the bat handle cover and disconnect the mesh wires from the circuit, and manually try to generate a spark across the points where the mesh wires were connected. If you are able to get a powerful spark will prove that the circuit and the battery are OK, and the problem is with the mesh network….if there’s no spark across the PCB output then you may have to investigate the battery and the PCB components for the actual fault.n
there’s a continuous spark at the upper end of the handle by two led wires that are directly connected to the mesh. I can’t find the mesh being in contact.
The wires might be very near to each other, or the mesh might be getting short circuited in that area. You will have to open the bat handle to check the fault.
After charging bat for 6-7 hours the bat works for 20-30 seconds, should I put little distilled water into the battery; & then recharge it? will it solve the problem?
The mosquito bat batteries are sealed maintenance free, so water cannot be added and is not recommended. It is better to replace the battery with a new one. You can get the battery from amazon.
Hit Anti mosquito racket yellow slider charging pin holder fitted inside black colour is broken it is not sliding only one charging pin comes out when we try to charge the racquet; from where can we get the slider.
You can get it from any electronic spare part retail shop. You will have to open the racket, remove the PCB with the switch and then show it to any electronic spare part retailer, they should be able to help you to get the item and also possibly they might solder it for you with an extra cost.
ok will try thanks for your support !!
useful tips explained well.I have a problem is that the charging light does not getting on while charging.Checked all data found ok.Dh
Without the LED ON, is your bat still charging? If it is still charging then the fault could be only in the LED, or the LED resistor, or due to loose connections.
My local electrician is not interested in repairing and replacing battery .I want to send it for repairs to your factory .can you let me have the address . I stay in noida
I understand your problem, however I don’t have a factory to repair mosquito bats, so I can’t help you in this regard. If you are looking for a battery replacement for your bat, you can easily buy the battery from amazon and then get it soldered by any TV repair technician.
My hit mosquitto bat does not work anymore. please advise the service center contact details where I can get it repaired
Buying a new bat will be cheaper than repairing it. So please buy a new bat or try to repair it yourself. Try by changing the battery first.
Hi, Thanks a lot for your detailed article.
My cat broke the inner wire mesh today morning. It was dented (which I straightened) but I cudn’t make it as good as before, in the sense, the design is still warped in that small area and is broken at 1 place. Will the bat still work ?
If not, can it be repaired??
Thanks in advance
Hi, I am sorry to hear that, I think the bat cannot be used normally now since the mesh will keep leaking current from some or the other place….better to buy a new one!
hi, mine mosquito bat goes on sparking on various parts of the mash, mash is undamaged. looks like voltage is too high and i can notice the ozone smell.
yes, it is due to a brand new battery which may be fully charged and therefore causing an excessively high voltage to be generated across the mesh…
Sir About Swagatam,i am pensioner am helping to improve Stethoscope for doctor students, we are try make a very small amp about 3v very sensitive with mic that one can to put into tube of the stethoscope and then at the other end of the circuit output in small earphone like apple or any small ear phone mono with a volume control and led to pick up the sensitive sounds, can you sir help
regards
Rui
South Africa
Rui, please refer to the following article:
Making a Stethescope Amplifier Circuit
Please comment only under the above article for further questions.
I have an electricals repair shop. Can someone tell me what those connectors are called, that connects to the wire mesh in a racket to wire? They look like lugs but they are not available with lugs dealers in my area. Can someone confirm for me what those are called. The one to outer mesh is different and the one that attaches to the inner mesh is differnet. Thanks
My racket is not attaching mosquitoes. Current is flowing on the inner mesh on powering up. I think it is dented mesh net. How can I repair it?
you will have to repair the dent by carefully lifting the dented area of the net with a screwdriver
Nice ! Excellent !
Thank You!
You are welcome!!
Very interesting article!
I have spare rechargeable 9v battery. Can I use also use it to replace the stock battery?
No 9V battery will not work, you can use any 3 V 1000 mAh battery
I have a bat which somewhere got faulty I guess, and creates a spark and sound at the charging circuit (supply side) and glows. It also tripped the ECB once. So what could be repaired to make it working again?
The AC side of the circuit may be shorting something, please open it and check where exactly the sparking is happening, use a 100 watt series bulb with the AC wire input to prevent ECB tripping while troubleshooting.
Thank you for the very useful explanations. Now that we can understand better the reason for weakened performance of the bat, we would like to know what kind of repair person would best fix these issues. (As we ourselves are unfamiliar with DIY electrical projects).
Please suggest the right person . Electrician? Electricals shop staff ?
Thank you and glad the article helped you!
You can consult any TV repairing shop, and ask the person to test the bat with a new battery, or by disconnecting the wires from the net and then manually sparking the wire ends to confirm if the fault is with the battery or the net mesh….
Thank you for your prompt reply. And the helpful tip.
Looking forward to many more such segments of info in your concise, on-point approach, concerning faulty household gadgets, that would help the lay person in dealing with repair issues.!
Thank you, I am always glad to help!
My bat kills rarely, its working but only few sparks
How much time does Mosquito Racket take to get charged?
What is chopper coil ? Whether it has been used in mosquito killer bat?
Sir where to by the bat battery
you can use two Ni-Cd cells in series, or a single 3.7V Li-ion cell
Hey I have a mosquito racket in fairly new condition, it’s battery is giving 4.2v, capacitor also is giving proper capacitance but when I try to kill mosquito with it, it doesn’t create a spark, where as on shorting net with the screw driver while the button is pressed the sparking is perfect. I have tested it several times with mosquito the same result. Could you Identify the problem? Any help will be much appreciated.
You can check the response by disconnecting the high voltage wires from the net and check the sparking power by manually bringing the wire ends close to each other. If it sparks with a big banging sound across a 2mm wire gap, then the battery is OK, the fault could be somewhere in the net.
If the spark is feeble and happens at 1mm or closer distance, then the battery could be weak, you can then check with a new battery.
There was net shorting which I have corrected.After charging when switch is on red light is bright and after few minutes red light is too dim. While shorting the net spark is not strong as earlier.which part in circuit is damaged.
Assuming there’s no shorting in the net, it may be the battery that might have become very weak. Try replacing the battery with a new one and check again
Nice article.thanks. where do we get the battery from.what is the rating
Thanks, Battery can be a Li-ion 3.7/ 300 mAh battery
I bought a new Mosquito bat But it does not make sounds after killing the mosquito.
charge it for 24 hours and then use it…
Hello, I bought a new mosquito bat after just 2 weeks the bat started making buzzing sound, there’s current flow in the mesh but not enough. I even tried changing the front net but still it’s the same thing. It makes buzzing sound. Please suggest what to do.
Buzzing sound and weak spark clearly indicates that the high voltage is leaking from somewhere, you can open the bat and disconnect the mesh wires from the circuit board and check whether the buzzing sound stops or not…if it does then the leakage is somewhere in the mesh side…if not then the circuit board could be open or shorting somewhere.
Hello sir,
Is there any circuit that is effective that can repel mosquitoes?
The bat needs to be carried about but i need one that’s stationary or plugged in a power outlet.
Best regards.
Hello Jerry, only chemical alternatives are the other methods, there’s no other equivalent circuit
Sir, May I write my question in my mother language Tamil?
Sorry Mani, this is an Global site so please write only in English
Hello Sir, Thanks for all the information you have provided here about the troubleshooting of a mosquito bat……I have one question though….I have 5 mosquito bats which are around 1 year old….The condition of the bat is good and are in working condition except that they do not kill mosquitos…. When they were new, mosquitoes would burst with loud sound but now it’s spark has become feeble…..I even changed the battery with a new one but yet I couldn’t be ablevto restore its power like before….can you help me in this regard?
Daniel, If the sparks are weak, it should be most probably the battery. Make sure the battery is a 4V battery, or simply a fully charged 3.7V LI-ion Cell will also do. If it still doesn’t work you may have to remove the circuit and check the capacitive output response by bringing the terminals within 1mm distance, a proper circuit will cause a blast here…if not then you may need to diagnose the other parts such as the transistor or the switch etc
Can I use fr107 diode instead of rfc4k diode in secondary.pls reply and what is the output voltage of mosquito swatter
yes you can use FR107…the output can be as high as 2000 volts
But fr107 forward voltage is 1000v and reverse voltage is 700v.how can it tolerate 5000v
each diode will develop around 500 V or 700 V produced from the transformer, this will be doubled across the connected capacitors, but at the final load this all doubled voltages will get in series across the sprk gap to create 4 to 5 kv
you can get more info about the operation here:
https://en.wikipedia.org/wiki/Cockcroft%E2%80%93Walton_generator
Few more questions :
1. What is the Transformer called ?
2. During the process of hacking, the charging LED, and the LED when I press the Push button stopped glowing ! What should I look for ?
The transformer is a custom made ferrite core transformer.
you can change the LED and check again…use a 1K resistor in series with the LED
try a 8050 for the transistor instead of BD139
I got the Ferrite core transformer which looks similar to the one you have showed in the picture.
I would like to know the Input and Output pins ( Ignore my other post in the ferrite core transformer article on your other blog )
There are 3 pins on both sides and they both look alike ?
From where did you get the transformer? Is it intended for mosquito bat circuit? If not then there’s no chance of the transformer to work, because ferrite transformers need precise calculations for the windings.
I got it from a store here in Bangalore – There is a road called SP Road where all sorts of Electronic goods are sold.
The Transformer is exactly the same as the one that was on the Circuit board. In fact the transformer is called Mosquito Bat Transformer. ( I wish I could post photos on this blog – I can’t)
Next, I got some new DS882 – transistors . (thats the same on the circuit board ),
I got the Mesh End Cap – It is rated 2KV 22 something.
New capacitors rated 105K for the incoming end.
I replaced all of it.
Thanks for suggestion on how to debug the transistor – it worked.
So, I now have a new Mesh End cap, Incoming end cap(acitor), New Transistor DS882 and when I press the push button – the small red led lights up.
Now, I don’t get a zap, when I touch the Mesh end with a small wire ! yet.
I’m investigating it.
Could be the winding on the transformer – ( how do I debug it )
The IN4007 diodes are good too ( they show .7 something in a diode mode in MM ) Anode to Cathode and nothing Cathode to Anode.
What ‘s my next step ?
The Rechargeable battery shows 4.06v. I have not connected the mains ?
Should I not get a zap with just the Rechargeable batteries ?
Appreciate your time in helping me in this . Too Many Mosquitoes and House Flies are killing my peace !
There may be a 99% chance that your old transformer is not faulty. Still for confirming you can remove the existing transformer by first marking the primary/secondary so that it can be restored back without confusions. Once removed check the resistance values separately across the two sides of the transformer. One side will show smaller value, while the other side will show high value.
The high value side will be the high voltage side, while the low value side will correspond to the transistor side. Now you can compare the same with the new transformer, if it matches then you can try replacing it with the old one.
Mostly it could be the transistor which may be faulty, so I would recommend trying some other variant such as 2N2222 or 8050.
4V is enough for the circuit to start working.
The 4V cannot be used directly to get the zap, it requires over 1000 V for that.
What is the capacity of the High Voltage Capacitor, and the Cap at the supply end ? My bat is broke and so far I have checked the push button switch is good, the On/Off is Good. ( used a multimeter to check continuity )
The diodes are good. It shows 0.5 Anode to Cathode and 0 from Cathode to Anode.
1. I want to replace the cap. but don’t know the values to buy from store.
2. How to check that the Transistor is good – I replaced the D882 in it with BD139.
Yet no luck.
The connections visually and thru the DMM are good.
The high voltage capacitor for charging the battery is 0.47, 400V, and the one for charging the bat mesh is 22nF/1600V
For D882, the left side pin is base, center one is collector, right side is emitter.
In the diode range, keep the red prod on the base and place the black prod alternately on the other two pins….some value around 600 on the meter will indicate a good transistor. Now, change the prod polarity and repeat the procedure, the meter default reading should remain unchanged.
Good tip, I was able to check the Diode with your instructions. It works.
next, Isn’t there a negative positive side to this capacitor. I have seen some Electrolytic capacitors have + and – markings on them.
What about these ?
Appreciate a reply.
Glad to know it worked! Only electrolytic and tantalum capacitors have polarity, others mostly do not have a polarity. Especially the PPC high voltage capacitors are without any polarity, so you connect them any way round
Hi, after charge the battery remains for a while but after few minutes it dischages quickly, the led lights glows for a second or so.
Is it a ready made bat or built using the above circuits? If it’s a purchased bat, then is it new or old?
My mosquito swatter bat makes a hissing sound
My also make hissing sound from mesh when brought near ear ???? like air flow sound …
It is due to the flow of ions jumping out from the LIVE mesh. If your bat is sparking well when a mosquito is stuck in the mesh then everything is fine with the bat.
The spark may be leaking somewhere on the mesh, or the battery may be overcharged
Please swagatam, what is the voltage rating of a zapper transformer? Can i use a mobile phone charger transformer for making a zapper circuit? And is the zapper push button pushed for long or just for a moment to charge the capacitor? pls help me answer all questions. Thanks.
The push button actually connects the mesh with the capacitor, when a bug gets caught in the mesh, the capacitor discharges through it.
Sammy, you can find the details here:
https://www.homemade-circuits.com/mosquito-swatter-bat-circuit/
However a mobile transformer cannot be used directly.
While connecting mosquito racket with power supply it is not charging the battery.