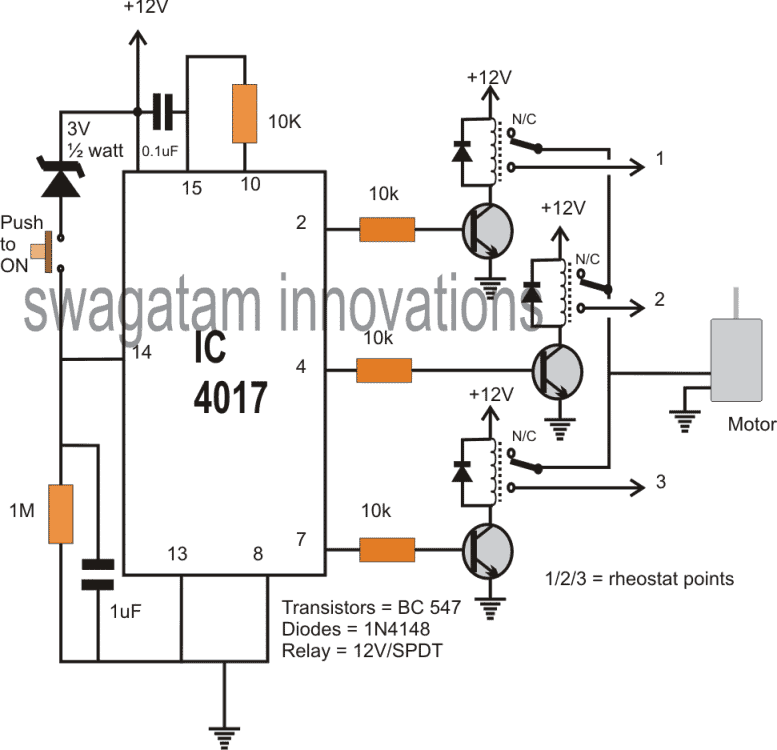
In this post I have explained a simple yet useful 10 step selector switch circuit which can be operated using a singe push-to-ON switch. In the following design the circuit is used as a 3 step, single push motor speed controller unit. The circuit was requested by Mr.Edalcor.
Technical Specifications
hi sir good day to to you, can you please design me a circuit with only one switch (a push button) to control the speed of my dc motor 1st push low, 2nd push medium and 3rd push high the output will go to my 12 volts relay there are 3 relay for low med and high, and the output of my relay will be going to my dc motor with rheostat to control the speed i want to use it for my car air-con. thank you and more power to your blog.
Circuit Diagram
How it Works
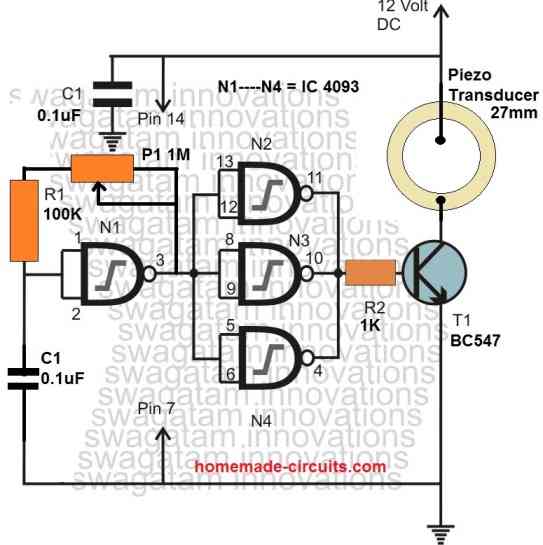
The IC 4017 is a johnson decade counter IC with 10 decoded output, designed to produce sequential logic high outputs in response to high/low alternate logic switching at its pin#14.
Here pin#14 of the IC is switched or toggled using a push button switch, which generates the shifting high logic pulses across the output pinouts of the IC starting from pin#3 to pin#11.
However in the shown design since only 3 outputs are used for implementing 3 relay based switches, the IC is resets back to the first pinout as soon as the logic sequence reaches pin#7 of the IC.
If you want to implement a 10 relay operation in that case you can configure the transistor relay driver stages across all the 10 output pins of the IC.
Application Circuit:
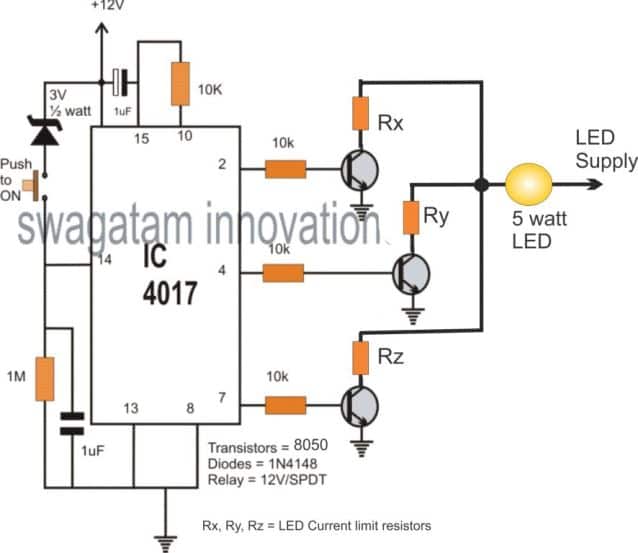
The above concept can be applied as a 3 step LED brightness controller through a single push button, as shown below:
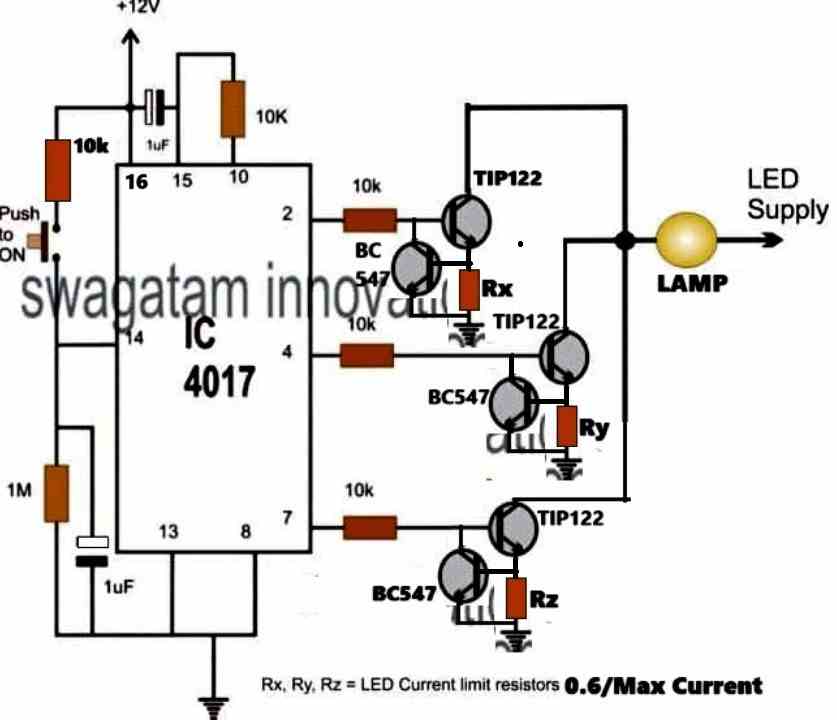
The above design can be further improved, as shown in the following diagram:
Comments
one press all the three output will enable ? is it possible to configure like for an example one switch toggle pin 2 output will activate and second toggle pin 4 will activate and in 2 deactivate .
One press all the 3 outputs ON together is not possible and it won’t serve any purpose… if you want to restrict the 10 outputs to lower number of outputs then you can simply use the reset pin#15 for that.
what i meant that . on press the out put 1 will activate and another on press output 1 will be deactivate and output 2 will be activate , third on press the output 2 will deactivate and output 3 will activate ..is it possible to do this configuration. my application is 3 in one led fog light . it had Low, normal, and high beam . so one switch on /off if i can toggle the low ,normal and high . it is much better
Yes, that is possible…
can you please upload the circuit diagram for as i mentioned application. is it possible using transistors or mosfet instead of using relays .
It is possible using transistors,…How many terminals are there in you fog lamp? Let me know the full specifications of the fog lamp, I will try to design the circuit…
hai…the fog lamp having 4 wires..one is negative and that is common..and other 3 for different levels of light and it takes almost 2A current with 12V supply ..
thanks
Ok, in that case you can try the following circuit:
https://www.homemade-circuits.com/wp-content/uploads/2024/11/car-fog-lamp-control.jpg
thank you brother for your kind support and really appreciated
No problem Rajesh, you are most welcome, let me know if you have any problems with this circuit…
Is there a way to do this with latching relays? For example, turning a logic high from the counter into a positive pulse, and a logic low into a negative pulse. Or any other circuits for driving latching relays? Thanks
The relays can be latched by employing a feedback across the N/O contacts and the transistor bases, via a 100k resistors.
Alternatively, the transistors can be replaced with SCRs to enable the latching feature.
hello, i have a question is that i seem the supply voltage is 12V which means that the output pin of the 4017 is 12V, however, your recommended transistor is 8050 which the maximum base-emitter on voltage is 1V. That my question is that will 4017 output burn out the transistor ?
Best regard,
Hello, the base of the transistor is supposed to have a resistor, this resistor will automatically bring down the base emitter voltage to 1V, or 0.7V, so there’s nothing to worry about.
Hi Sir, have a good day. Thank you so much for this wonderful circuit design.
You are most welcome Inzane.
Hi,
could you please tell me how to reset all if the button is pressed for 3 seconds?
Thanks
Hi, 3 second pressing is not required, you just have to momentarily connect pin#15 with the positive line in order to erset the IC.
The circuit will automatically reset after the 3rd sequence at pin7 is reached and the button is pressed.
Hi,
my application requirement is:
If the press is longer than 3 seconds reset the system.
short press will just go the other steps
You can add the following circuit with the above circuit:
Adjust C2 value appropriately to get the 3 second delay
Many thanks
Good day to you,
I am trying to control multiple loads via automotive style relays by using one push button switch. I have read through all the comments and I can understand how to change the output to a latching circuit. Why don’t you use output channel 0 on pin 3 as the first signal output? Is that so that the circuit has an off state?
Hi, you are right, pin#3 is not used to ensure that all the 3 relay stages can be kept switched OFF at pin#3
Please sir how can I configure this circuit to be controlled by remote
Muhammad, you can configure the pin14 of the IC in the same way as done in the following example concept:
https://www.homemade-circuits.com/laser-beam-light-activated-remote/
Hi
Its been a while , still working on my Decade counter to USB keyboard lighting control circuit.
I have 2 double poll foot switches directing signal routing to the usb interface PCB , removed from a keyboard. I want to have an indictor LED to show which pole of the switch is active. The switches are not carrying voltage, just matrix routing to the interface. There is 5 volts available to power if it can be done.
Thanks
Hi, without a current it can impossible to detect the switching actions according to me. Here’s a possible design which you try, only if the external current do not cause problems to the system…
https://www.homemade-circuits.com/wp-content/uploads/2021/02/foot-switch-routing-indicator-compressed.jpg
Thanks. I think for simplicity I will mechanically gang another switch to control the LED function, put them under a foot pedal or something like that. I have decided that i will limit my counter to 8 and reset. The usb interface card has 2 sets of 8 contacts that only require 1 wire common to all relay contacts and then 8 on the other side. So if i switch the common set of 8 (1 wire) through the foot switch I get 16 , Then add Shift and you get a complete different set of 16, all with 4 switches.
OK fine…. that sounds technically more appropriate
Hi Swagatam,
Works great! Thanks!
High Swagatam,
I want to drive 5m RGB strip LEDs using a 555 timer and a cd4017. I am powering the RGB strip with 12vdc. The 555 pin 3 is connected to pin 14 of the cd4017. Pin 3 of 4017 is connected to a bc548 transistor through a 1k resistor. Pin 2 of 4017 is connected to a bc548 transistor through a 1k resistor. Pin 4 of 4017 is connected to a bc548 transistor through a 1k resistor. Pin 7 of 4017 is connected to Pin 15. Pin 15 is connected to 12v through a 104 capacitor. Pin 15 is connected to ground through a 1M resistor. Each of these transistors is used to drive a 12vdc relay by completing the circuit to ground. Each relay’s normally open contact is connected to either the red or green or blue leg of the RGB strip. The common contact of each relay is connected to ground. 1N4148 diodes are connected across the relay coils. My problem is the relays chatter like crazy when the cd4017 advances. I am posting here as it is the closest circuit type I could find on your site. I am sending you a schematic of my circuit under separate cover as I don’t know how to attach it to this post. Thanks for your help! Happy Holidays!
Hi Norman,
please try the following modification at the base of all the transistors, this will prevent the relay chattering issue permanently.
If I have 10 output, it will be more simple on operation if it has two switches, 1st for up and 2nd for down. What to modify? Thank you.
up/down sequence may not be possible in this design
Hi all!
I would like to light 2 LED lamps that are series at 230v. They turn on with only one switch and I want to switch them on independently or both. how could i change the above scheme to have 2 outputs for 2 relays, and the switch to change it with a pushbutton type, i think.
Condition: 1- A, 2-B, 3-AB, 4-OFF, or 1-AB, 2-A, 3-B, 4-OFF
Thank you very much!
If you put two lamps in series, the brightness will become 50% less when lit together, and when they are lit individually the brightness will become 100%, is that something you wish to have?
Thanks, Happy to help!
Very nice it works with suggested changes. Thank you for your help.
Best regards!
You can try replacing the 3V zener with a 1N4007 diode as suggested by me in the previous reply, and check if that helps 5 V operation.
Glad it’s working, but not sure if I understood your question rightly, still you can do a few modifications and check the response. Change the 1M resistor to 10k, remove the zener diode and replace it with a 1N4007 diode (anode will be at the positive supply side, cathode at the switch side)
Ok I got it working. I used 0.1uf caps and switched resistor from pin 7 to pin 4. Now another thing I can’t figure it out is that it doesn’t work on 5v. When I press the button it lits up led#1 but it doesn’t switch to led #2. Any recommendations?
Thanx in advance
Thanx for response. I just tried it on bread bord and it works the way I wanted but there’s a little issue. When I press once led #1 goes on than I release the button it lots up led #2 but than I have to wait for 5-6 seconds for led #1 to light up. Is it possible to make it work constantly?
Best regards
Hi, you can try the following configuration:
Hi could you recommend ic for similar project except for momentary output ( press and hold momentary button led #1 is on as long as button is pressed ,let go of the switch and led one goes off ,press a button again and it’s turning led #2 as long as switch is held. Release the switch and it goes back to switch 1.
Best regards
separate 10K capacitors connected from each end of the capacitor to ground, meaning one 10K across positive pin of the cap and ground, another 10K from the negative pin of the cap to ground.
I have a 10 k between the counter and the cap. Do I need on between the cap and the base
If the input signal does not provide a zero logic the capacitor will not discharge. The capacitor must discharge during the off cycles. To solve this issue, you can connect resistors from both the sides of the capacitor to ground. The value can be 10K resistors.
And I hope you have a series resistor with the base of the transistor. All these values are somewhat critical.
Finally got my parts together and bread boarded it up. turns on the relay and works like a stuck key, which I expected, When I put the cap in series with the resistor and base, negative to base, I get nothing. tried a couple of different caps , still not momentary relay action. Any suggestions. I know the basic circuit is working ok as I can see the stuck key stroke on notepad.
Another question 🙂 Since I’m going for full 10 count should pin 15 be grounded. if so does it need a resistor to gnd or just strait to ground. In you original schematic there is a cap between 15 and Vcc . Can that be eliminated? Still getting parts together so no circuit progress yet.
Normally the pin#15 can be connected directly to ground but since we need the switch ON auto “reset” function through the indicated capacitor, pin#15 needs to be connected to ground through some resistor, any value between 10K and 1M will do. The capacitor should be around 0.22uF or 1uF max, connected between Vcc and pin#15