• Skip to main content
  • Skip to primary sidebar

Homemade Circuit Projects

Need circuit help? Post them in the comments! I've answered over 50,000!

Blog | Categories | About | Contact | Calculators-online
You are here: Home / Arduino Projects / Make this 7 Segment Digital Clock with Beep Alert Circuit

Make this 7 Segment Digital Clock with Beep Alert Circuit

Last Updated on December 5, 2024 by Swagatam 14 Comments

In this post I will show how to construct a digital clock using 7 segment LED display with Arduino controlled design.

How the Circuits Works

The proposed 7 segment clock circuit is inexpensive and even beginner in Arduino can accomplish it with ease. This clock consists of four 7 segment displays, two for hours and two for minutes.

The display is paired with IC 4026 which is designed for driving 7 segment displays. Each IC 4026 is controlled by Arduino.

This clock has beep alert function, which beeps every beginning of the hour, giving a rough idea about time without looking at the clock. This clock does not have alarm function.

The Arduino code doesn’t need any special library for compile the program. The clock has very minimalist design, just four displays and two LEDs for AM/PM indicator and no fancy functions other than beeping every hour.
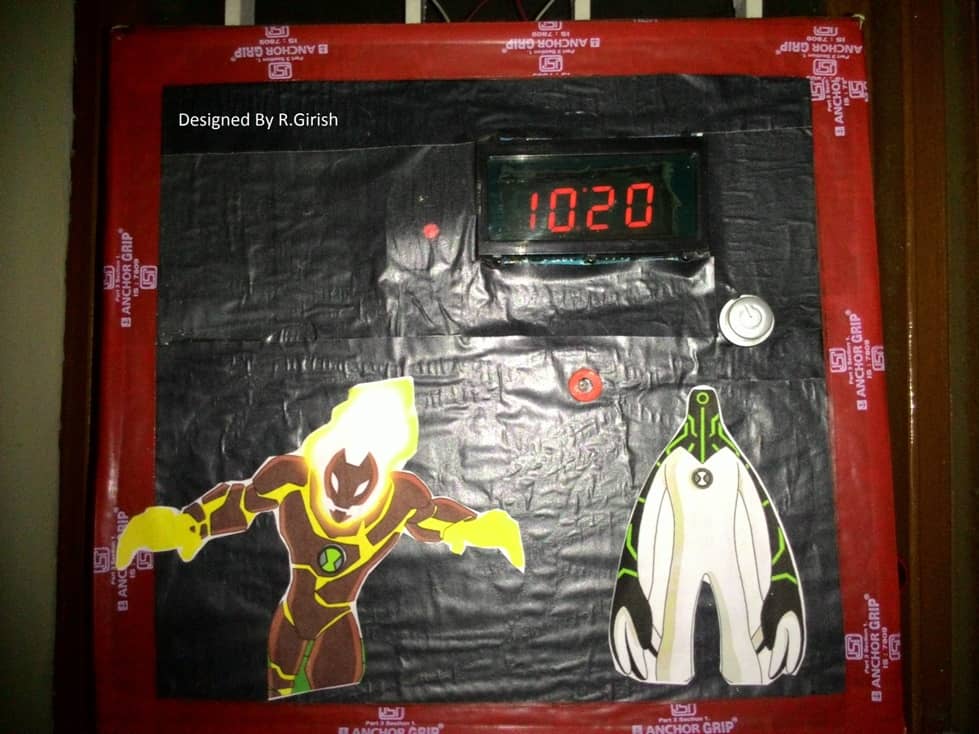
Author’s prototype:

Test Result of 7 Segment Digital Clock

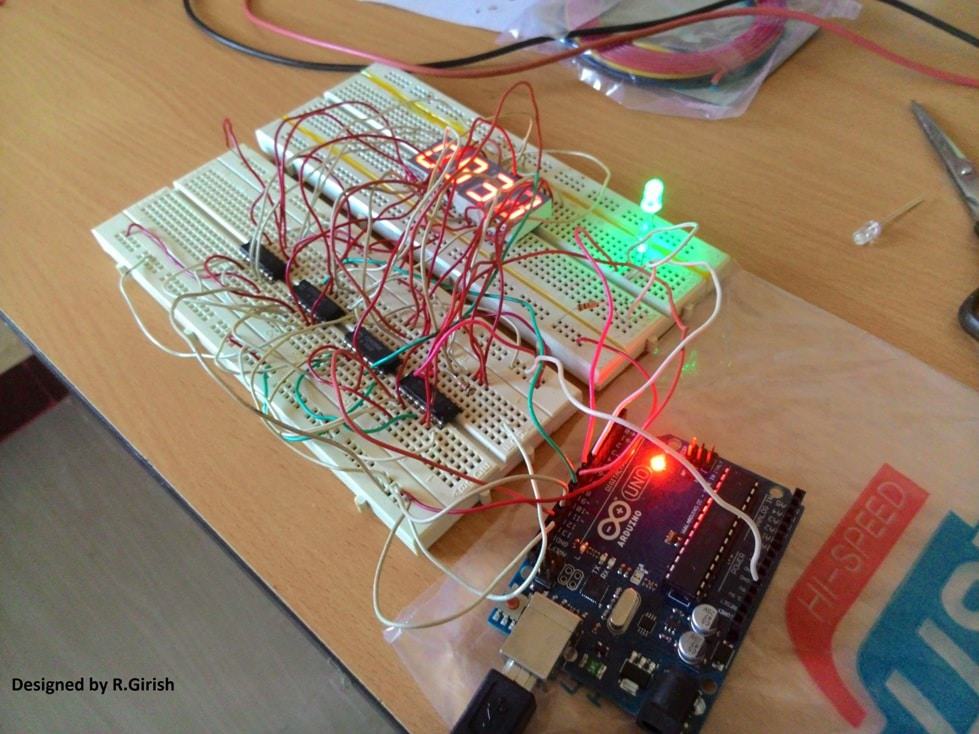
Here is a completed prototype using cardboard and scrap materials:
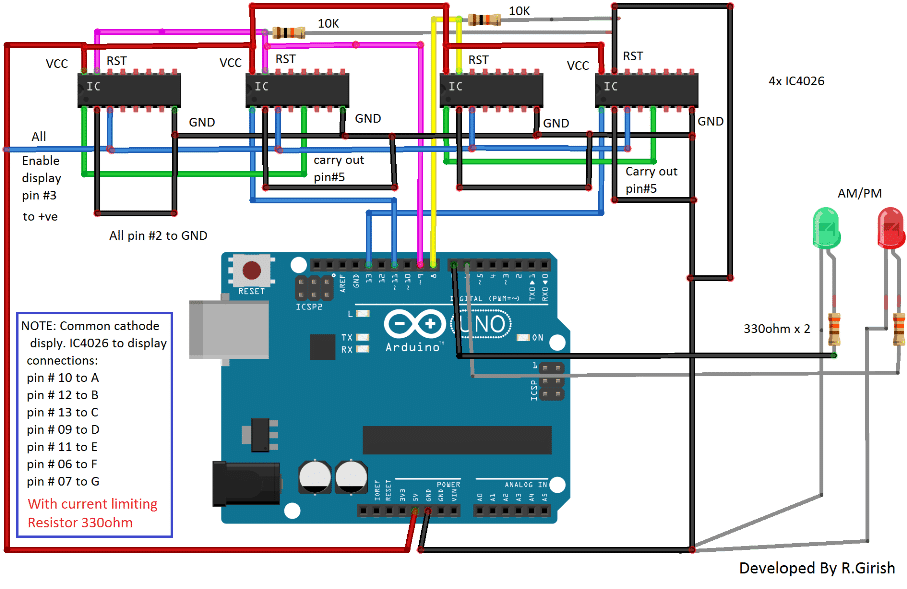
P 20160808 222200 1

The Design:

The circuit consists of four IC 4026 for controlling four 7 segment displays and the brain of the clock arduino. Two pull down resistors are connected to reset pin of IC 4026 to avoid accidental reset due to static charge. AM/PM indicator connected to arduino in combination with 330 ohm current limiting resistor.

Note: 220 ohm to 330 ohm resistor should be connected each segments of display. 

7 Segment Digital Clock with Beep Alert Circuit

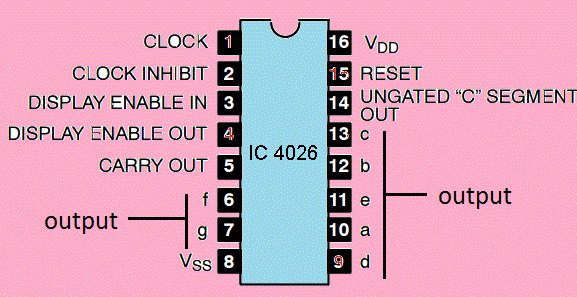
Pin configuration of IC 4026:
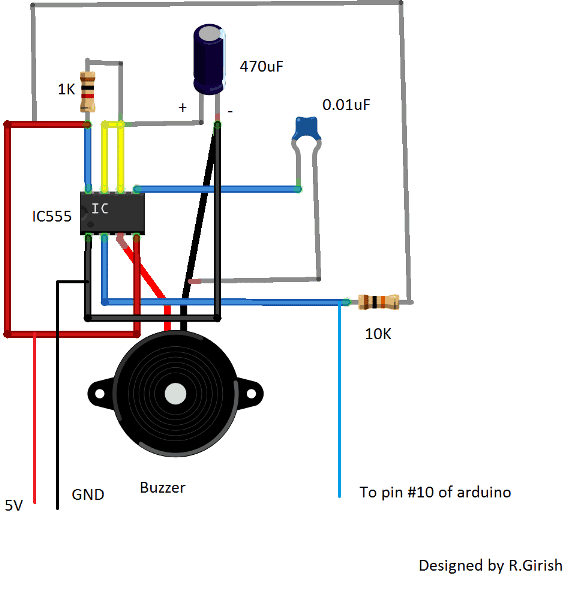
Pin configuration of IC 4026

The beeper circuit:

The beeper circuit is just a monostable multivibrator designed using IC555. When a negative pulse is fed to pin #2 of IC555, it beeps roughly for one second. This audio alert helps the user to keep a rough idea about the time. The pin #2 of IC555 should be connected to pin # 10 of arduino.

IC 555 buzzer circuit

Program Code:

//---------Program developed by R.Girish---------------//
int mint=13;
int hrs=11;
int beep=10;
int rst=8; // reset to mint ic.
int rsth=9; //reset to hrs ic.
int am=7;
int pm=6;
int y=0;
int t=0;
int x=0;
void setup()
{
pinMode(beep,OUTPUT);
pinMode(hrs,OUTPUT);
pinMode(am,OUTPUT);
pinMode(pm,OUTPUT);
pinMode(mint,OUTPUT);
pinMode(rst,OUTPUT);
pinMode(rsth,OUTPUT);
}
void loop()
{
digitalWrite(beep,1);
digitalWrite(13,0);
delay(10000);
delay(10000);
delay(10000);
delay(10000);
delay(10000);
delay(10000);
digitalWrite(13,1);
t=t+1;
if(t==60)
{
digitalWrite(rst,1);
digitalWrite(rst,0);
digitalWrite(hrs,1);
digitalWrite(hrs,0);
digitalWrite(beep,0);
digitalWrite(beep,1);
x=x+1;
y=y+1;
t=0;
delay(2000);  // error fixing (varies with temperature)
}
if(x==13)  // display 1'O clock after 12'O clock.
{
digitalWrite(rsth,1);
digitalWrite(rsth,0);
digitalWrite(hrs,1);
digitalWrite(hrs,0);
x=1;
}
if(y<12)
{
digitalWrite(am,1);
digitalWrite(pm,0);
}
if(y>=12)
{
digitalWrite(pm,1);
digitalWrite(am,0);
}
if(y==24) y=0;
}
//---------Program developed by R.Girish---------------//

How to set time:

Being very minimalist design the “reset button” can be used to set time. But the user has to set the time with the help of reference clock. The user has to reset the arduino at exactly 12’O clock. One this is done the clock updates the time on its own.

Note: Since the above explained 7 segment digital clock using Arduino does not have “real time clock chip”, for maintaining accurate time, there is possibility that the time may lead/lag due to change in the ambient temperature.

To rectify this here are the steps:

•    If your clock leads the time of reference clock by few seconds it need to be slow down, note down the difference and enter the value in the program in milliseconds.

delay(2000);  // error fixing (varies with temperature)  This will slow down few seconds every hour.

•    Replace 2000 with your value.

•    If you clock lags set the “delay(0); //error fixing(varies with time)” and make the following changes in the program:

delay(10000);
delay(10000);
delay(10000);
delay(10000);
delay(10000);
delay(10000);
to
delay(10000);
delay(10000);
delay(10000);
delay(10000);
delay(10000);
delay(9700);

Replace “delay(9700);” with your value to speed up the time every minute.

These steps do not guarantee that time will be always accurate, but it helps to maintain the time with minimal inaccuracy. The proposed design is 12 hour clock.

You'll also like:

  • 1.  Arduino PWM Signal Generator Circuit
  • 2.  Make this Simple Weather Station Project for Homes and Offices
  • 3.  How to Make a RFID based Attendance System
  • 4.  Automatic Irrigation Circuit using Arduino
  • 5.  Cellphone Controlled Dog Feeder Circuit
  • 6.  Arduino Musical Tune Generator Circuit

About Swagatam

I am an electronics engineer with over 15 years of hands-on experience. I am passionate about inventing, designing electronic circuits and PCBs, and helping hobbyists bring their projects to life. That is why I founded homemade-circuits.com, a website where I share innovative circuit ideas and tutorials. Have a circuit related question? Leave a comment.... I guarantee a reply!

Previous Post: « Battery Full Charge Indicator Circuit using Two Transistors
Next Post: Corona Effect Generator Circuit »

Reader Interactions

Comments

  1. Uttam Dutta says

    July 25, 2017 at 4:17 pm

    What modification hard ware and software will be required for common anode type display for little bigger size like 1.5 inches display

    Reply
    • Swagatam says

      July 26, 2017 at 7:32 am

      According to me, the same design can be used for the mentioned display also!

      Reply
    • kwintpy says

      December 10, 2017 at 1:46 pm

      ahh can you make an alarm clock?

      Reply
      • kwintoy says

        December 10, 2017 at 1:47 pm

        alarm clock, like the same with that 7 segment LED.

        Reply
        • Swagatam says

          December 10, 2017 at 5:42 pm

          If possible I’ll update the design soon

          Reply
          • kwintoy says

            December 11, 2017 at 6:03 am

            okay, hope you can make it this week .
            thanks..

            Reply
          • kwintoy says

            December 11, 2017 at 6:48 am

            Sir, instead of 4026 IC, we got 4511. Is there a way we could use this IC instead of the 4026?
            Thanks ^_^

            Reply
            • Swagatam says

              December 11, 2017 at 7:47 am

              Kwintoy, it is possible but the circuit configuration will be different

              Reply
          • kwintoy says

            December 11, 2017 at 3:18 pm

            can we use the same code?

            Reply
            • Swagatam says

              December 11, 2017 at 5:48 pm

              No that won’t work…

              Reply
  2. Uttam Dutta says

    July 23, 2017 at 3:41 pm

    What kind of 7 seg display is used, CA or CC type, can I use 1 inch size 7 seg display

    Reply
    • Swagatam says

      July 24, 2017 at 2:36 am

      common cathode, it's been provided in the diagram

      Reply
  3. Ujjwal Sikriwal says

    August 24, 2016 at 5:55 pm

    How can I write output of arduino to any txt file in my pc only…

    Reply
  4. Swagatam says

    August 11, 2016 at 3:51 pm

    That's great Mr.Devendar, I am glad you liked it!

    Wish you all the best!!

    Reply

Need Help? Please Leave a Comment! We value your input—Kindly keep it relevant to the above topic! Cancel reply

Your email address will not be published. Required fields are marked *

Primary Sidebar

Subscribe to New Circuit Ideas

Categories

  • Arduino Projects (87)
  • Audio and Amplifier Projects (132)
  • Automation Projects (17)
  • Automobile Electronics (101)
  • Battery Charger Circuits (82)
  • Datasheets and Components (102)
  • Electronics Theory (143)
  • Free Energy (37)
  • Games and Sports Projects (11)
  • Grid and 3-Phase (19)
  • Health related Projects (25)
  • Home Electrical Circuits (12)
  • Indicator Circuits (14)
  • Inverter Circuits (87)
  • Lamps and Lights (142)
  • Meters and Testers (69)
  • Mini Projects (46)
  • Motor Controller (64)
  • Oscillator Circuits (27)
  • Pets and Pests (15)
  • Power Supply Circuits (108)
  • Remote Control Circuits (50)
  • Security and Alarm (64)
  • Sensors and Detectors (100)
  • Solar Controller Circuits (59)
  • Temperature Controllers (42)
  • Timer and Delay Relay (49)
  • Transmitter Circuits (29)
  • Voltage Control and Protection (37)
  • Water Controller (36)

Calculators

  • Battery Back up Time Calculator
  • Capacitance Reactance Calculator
  • IC 555 Astable Calculator
  • IC 555 Monostable Calculator
  • Inductance Calculator
  • LC Resonance Calculator
  • LM317, LM338, LM396 Calculator
  • Ohm’s Law Calculator
  • Phase Angle Phase Shift Calculator
  • Power Factor (PF) Calculator
  • Reactance Calculator
  • Transistor Astable Calculator
  • Transistor base Resistor Calculator
  • Voltage Divider Calculator
  • Wire Current Calculator
  • Zener Diode Calculator
  • Filter Capacitor Calculator
  • Buck Converter Calculator
  • Boost Converter Calculator
  • Solar Panel, Inverter, Battery Calculator
  • Wire Current Calculator
  • SMPS Transformer Calculator
  • IC SG3525, SG3524 Calculator
  • Inverter LC Filter Calculator

People Also Search

555 Circuits | 741 Circuits | LM324 Circuits | LM338 Circuits | 4017 Circuits | Ultrasonic Projects | SMPS Projects | Christmas Projects | MOSFETs | Radio Circuits | Laser Circuits | PIR Projects |

Recent Comments

  • Swagatam on Simple Delay Timer Circuits Explained
  • Swagatam on The Role of Inductor Coil in SMPS
  • Swagatam on 7 Modified Sine Wave Inverter Circuits Explored – 100W to 3kVA
  • Swagatam on 7 Modified Sine Wave Inverter Circuits Explored – 100W to 3kVA
  • Victor on 7 Modified Sine Wave Inverter Circuits Explored – 100W to 3kVA

Company

  • Privacy Policy
  • Cookie Policy
  • About Me
  • Contact
  • Disclaimer
  • Copyright
  • Videos
  • Sitemap

Social Profiles

  • Twitter
  • YouTube
  • Instagram
  • Pinterest
  • My Facebook-Page
  • Quora
  • Stack Exchange
  • Linkedin
  • © 2025 · Swagatam Innovations