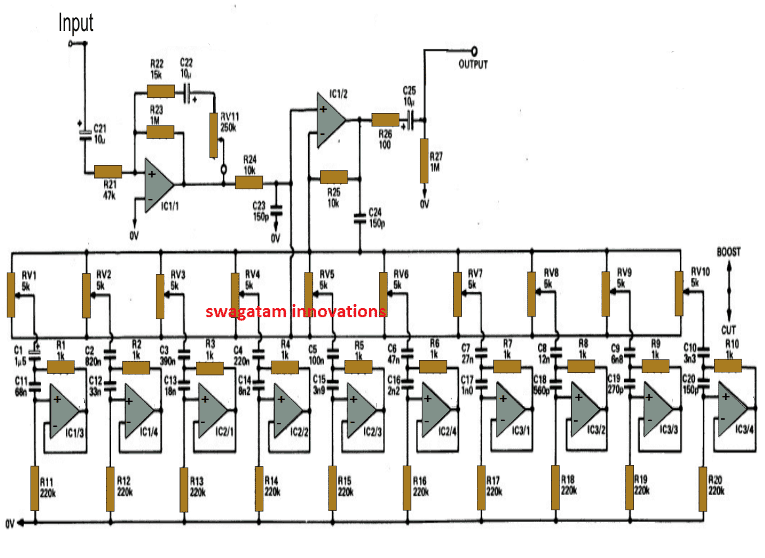
The proposed 10 band graphic equalizer circuit can be used in conjunction with any existing audio amplifier system to get an enhanced 10 stage audio processing, and customized tone control.
The circuit can be easily converted to a 5 band graphic equalizer by simply eliminating 5 stages from the shown design
The Circuit Concept
A graphic equalizer is a type of complex tone control circuit which can be applied to smooth out or enhance the frequency response of any hi-fi audio amplifier, or in a guitar effects unit. To be precise, the unit can prove effective in virtually any form of audio application.
The unit is quite simple to use. All one has to do is feed the TV or PC audio input to this circuit and hook the output with the existing home theater amplifier.
Next, it would be just a matter of adjusting the given 10 band controls and enjoying the vastly improved sound quality.
You would be able to tailor the sound as per your preferred tastes.As an example, the midrange controls of the equalizer can be adjusted to highlight dialogue or in order to reduce the harshness over a particular range of voice audio.
Or perhaps you can roll off the high pitched even to further extents in case you wished, or simply heightened the bas boost to your liking.
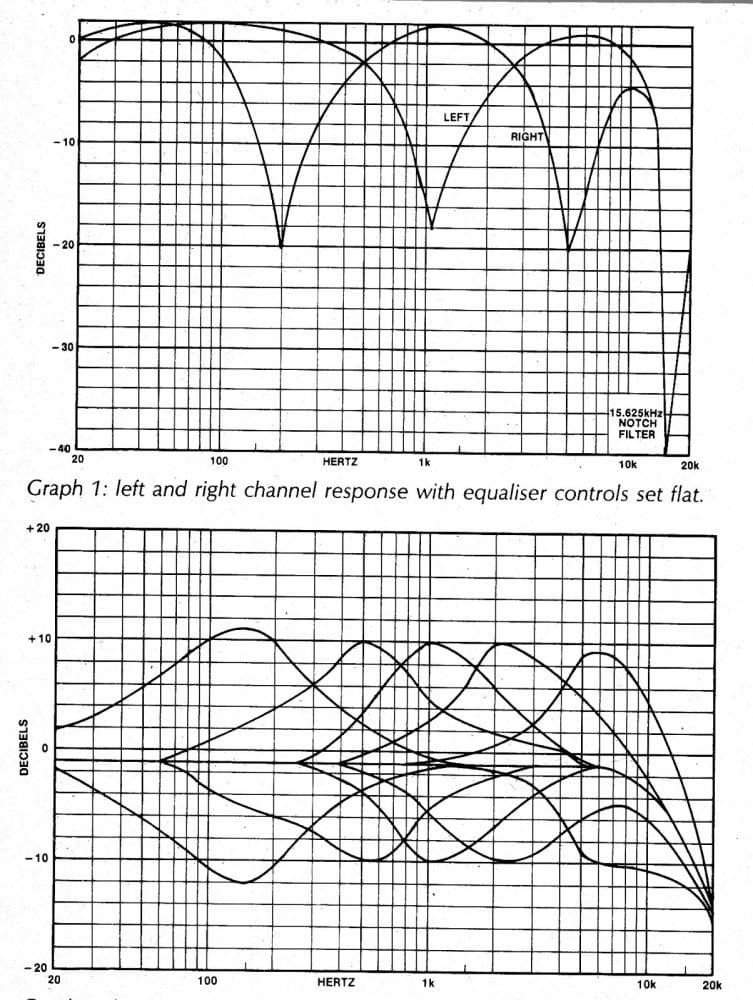
Typically the controls would be able to provide upto 10dB of boost or cut at nominal center frequencies of 150Hz, 500Hz, 1kHz, 2kHz, 5kHz, 7kHz, 10kHz, 13kHz, 15kHz, 18kHz.
The circuit also includes a fixed 10kHz low pass filter stage for cancelling out unwanted noise such as hiss or other high frequencies disturbances.
How the 10 band graphic equalizer circuit functions
Referring to the given circuit diagram we can see that the associated opamps form the main active component responsible for the required optimizations.
You will notice that all the 10 stages are identical, it's the difference in the values of the incuded capacitors and the pot which effectively varies the processing leves across the various stages.
For analyzing the operation we may consider any one of the opamp stages since all of them are identical.
Here the opamps act as "gyrators" which refers to an opamp circuit which effectively converts a capacitive response to an inductance response.
Consider an AC voltage source Vi connected to the opamp stage. This pushes a current Ic via the capacitor (C1, C2, C3 etc), which constitutes a proportional voltage across the connected ground resistance (R11, R12, R13 etc).
This voltage across the ground resistance is conveyed at the ouput of the opamp.
Due to this the voltage across the feedback resistor (R1, R2, R3 etc) becomes equal to the difference between Vin and Vout which causes current to flow via the feedback resistor and back into the input voltage source!
A careful assessment of the phases of the above developed current would show that as Ic leads the voltage Vin (as it can expected for any capacitive circuit) the net input current that may be the vector sum of Ic and Io in fact trails the voltage Vi.
Using Capacitors as Tuned Inductors
Therefore this implies that in effect, the capacitor C has gotten transformed into a virtual inductor due to the actions of the opamp.
This transformed "inductance" may be expressed by the following equation:
L = R1xR2xC
where R1 = ground resistance, R2 = feedback resistance while C = capacitor at the non-inverting input of the op amp.
Here C would be in Farads and the resistances in Ohms.
The pots effectively vary the input current to the opamps which results in a change in the value of the above explained "inductance", which in turn results in the required music enhancement in the form of treble cuts or bass boosts.
Circuit Diagram
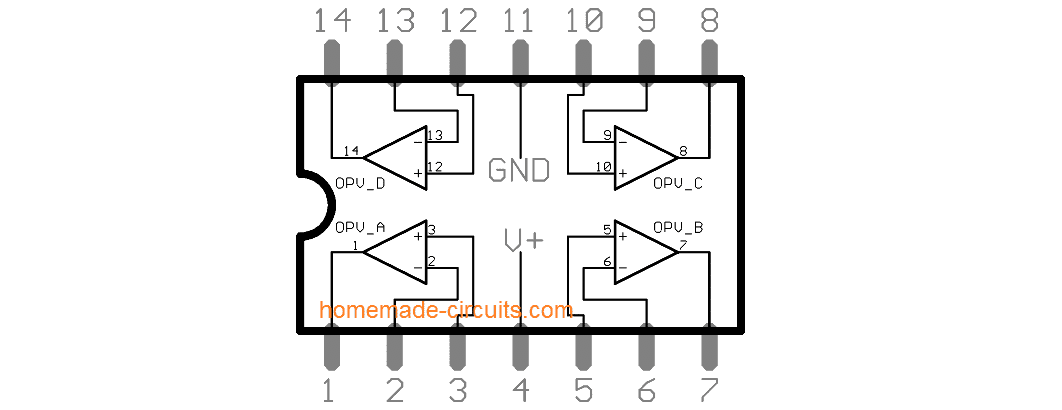
LM324 IC Pinout Details
Parts List
- All resistor are 1/4 watt 1%
- R1----R10 = 1K
- R11---R20 = 220k
- R21 = 47K
- R22 = 15K
- R23, R27 = 1M
- R24, R25 = 10K
- R26 = 100 ohm
- RV1----RV10 = 5K pot
- RV11 = 250K pot
- All pF and nF capacitors are metallized polyester 50V
- C1 = 1.5uF
- C2 = 820nF
- C3 = 390nF
- C4 = 220nF
- C5 = 100nF
- C6 = 47nF
- C7 = 27nF
- C8 = 12nF
- C9 = 6.8nF
- C10 = 3n3
- C11 = 68nF
- C12 = 33nF
- C13 = 18nF
- C14 = 8.2nF
- C15 = 3.9nF
- C16 = 2.2nF
- C17 = 1nF
- C18 = 560pF
- C90 = 270pF
- C20 = 150pF
- C21, C22, C25 = 10uF/25V
- C23, C24 = 150pF
- Op amps = 4nos LM324
Response Curve for the above 10 band graphic equalizer design
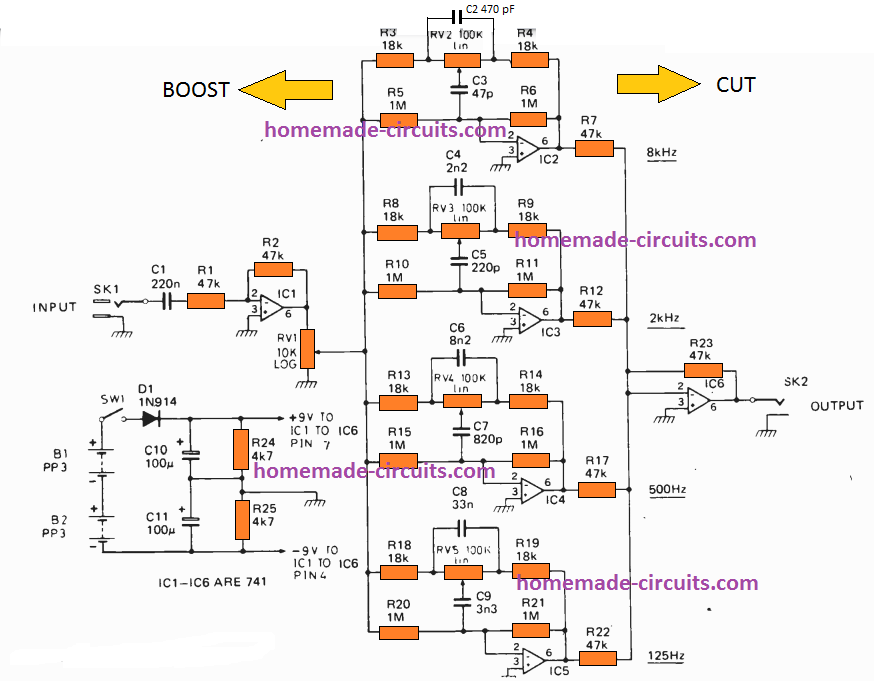
Simplified Version
The simplified version of the above explained graphic equalizer can be witnessed in the following image:
Parts List
RESISTORS all 1/4W, 5%
R1, R2 = 47k
R3, R4 = 18k
R5, R6 = 1M
R7 = 47k
R8, R9 =18k
R10, R11 = 1M
R12 = 47k
R13, R14 = 18k
R15, R16 = 1M
R17 = 47k
R18, R19 = 18k
R20, R21 = 1M
R22, R23 = 47k
R24, R25 = 4k7
POTENTIOMETERS
RV1 10k log slider pot
RV2, 3, 4, 5 … . 100k linear slider pot
CAPACITORS
C1 = 220n PPC
C2 = 470p PPC
C3 = 47p ceramic
C4 = 2n2 PPC
C5 = 220p ceramic
C6 = 8n2 PPC
C7 = 820p ceramic
C8 = 33n PPC
C9 = 3n3 PPC
C10, C11 = 100µ 25V electrolytic
SEMICONDUCTORS
IC1-1C6 = 741 op amp
D1 = IN914 or 1N4148
MISCELLANEOUS
SW1 spst miniature toggle switch
SKI, 2 mono jack sockets
B1, 2 9V 216 batteries
5 Band Active Equalizer Circuit
According to the circuit architecture shown below, the input signal is capacitively linked to the non-inverting input of IC1a, which is used to buffer the signal since at this point a low impedance is needed to reduce noise pickup on the potentiometer wires.
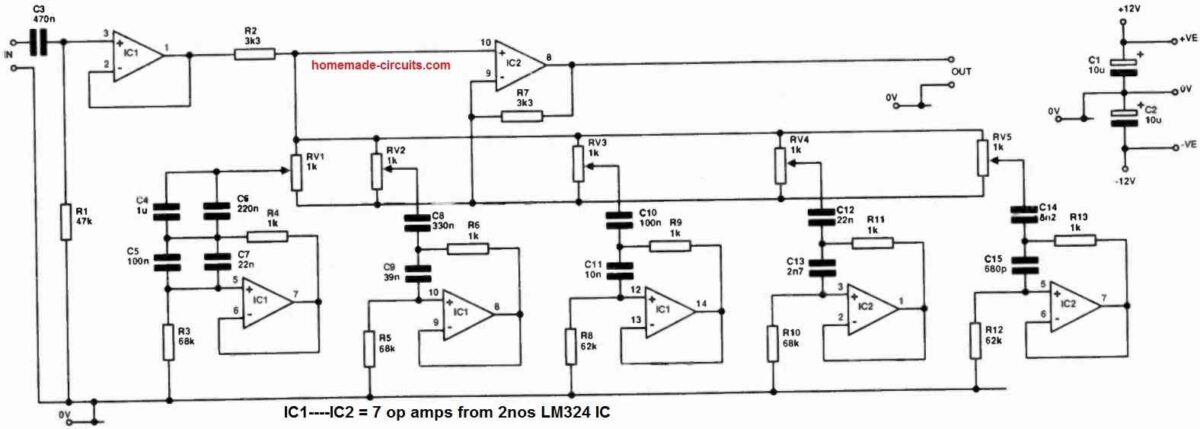
For now, let's ignore the potentiometers. The signal is sent through R2 to IC2c, which acts as a unity-gain buffer DC-coupled to the output.
If every potentiometer is set to its middle position, any loading on the sliders will pot down the input signal to the non-inverting input of IC2c, while also pot down the negative feedback and producing a gain that compensates for the potting -down of the input signal.
Consequently, we still have unity gain at all frequencies in this situation.
The system displays a net gain at 206 Hz if the slider RV2 is pushed to the inverting input end of its range.
This is because the effect of potting down the negative feedback is, at resonance, considerably stronger than the potting -down of the input signal.
The input signal is potted down but the negative feedback is not, therefore there is a decrease in the frequency response at 206 Hz when the slider turned to the non-inverting input end of its journey.
Each and every potentiometer follows the same logic.
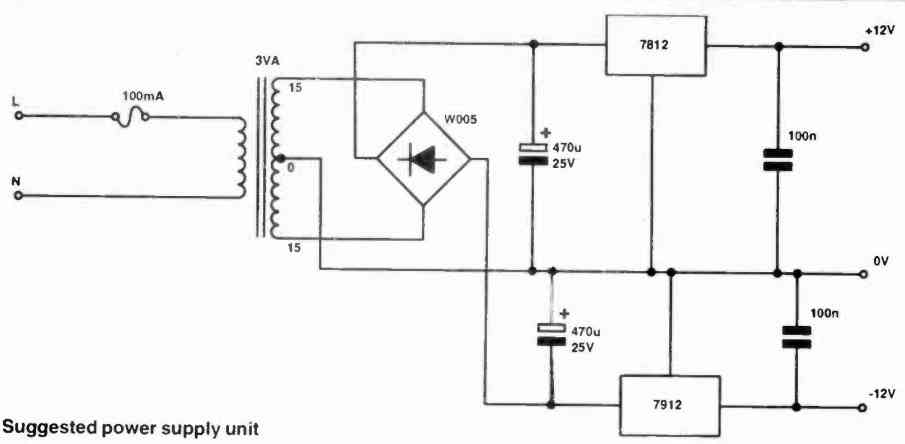
In order to reduce the impacts of crosstalk through the power supply, local decoupling is offered on the board.
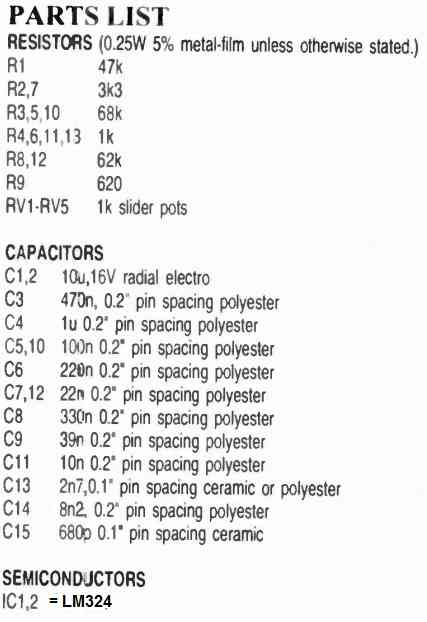
Parts List
5 Band Passive Equalizer Circuit
A very neat and reasonably efficient 5 band graphic equalizer circuit using only passive components can e built as shown in the following diagram:
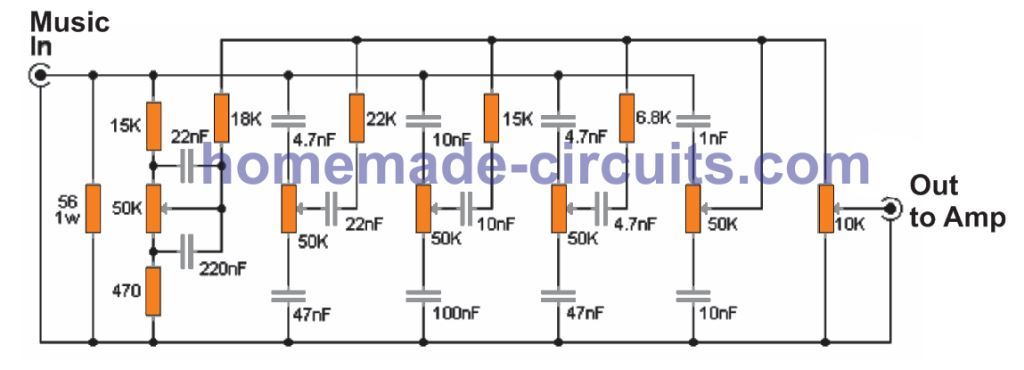
As can be seen in the figure above, the 5 band equalizer has five potentiometers for controlling the tone of the input music signal, while the sixth potentiometer is positioned for controlling the volume of the sound output.
Basically, the shown stages are simple RC filters, which narrow or broaden the frequency passage of the input signal, so that only a certain band of frequency is allowed to pass, depending on the adjustment of the relevant pots.
The equalized frequency bands are 60Hz, 240Hz, 1KHz, 4KHz and 16KHz, from left towards right. Lastly followed by the volume control pot control.
Since the design does not use active components this equalizer is able to operate without any supply input. Please note that if this 5 band equalizer is implemented for a stereo or multichannel system, it may become necessary to set up an equalizer in the identical manner for each of the channels.
Parametric Equalizer Circuit for Enhanced Effect
If you are not impressed with the above 10 band graphic equalizer results, then the following simple parametric equalizer circuit will surely make you feel a lot happier.
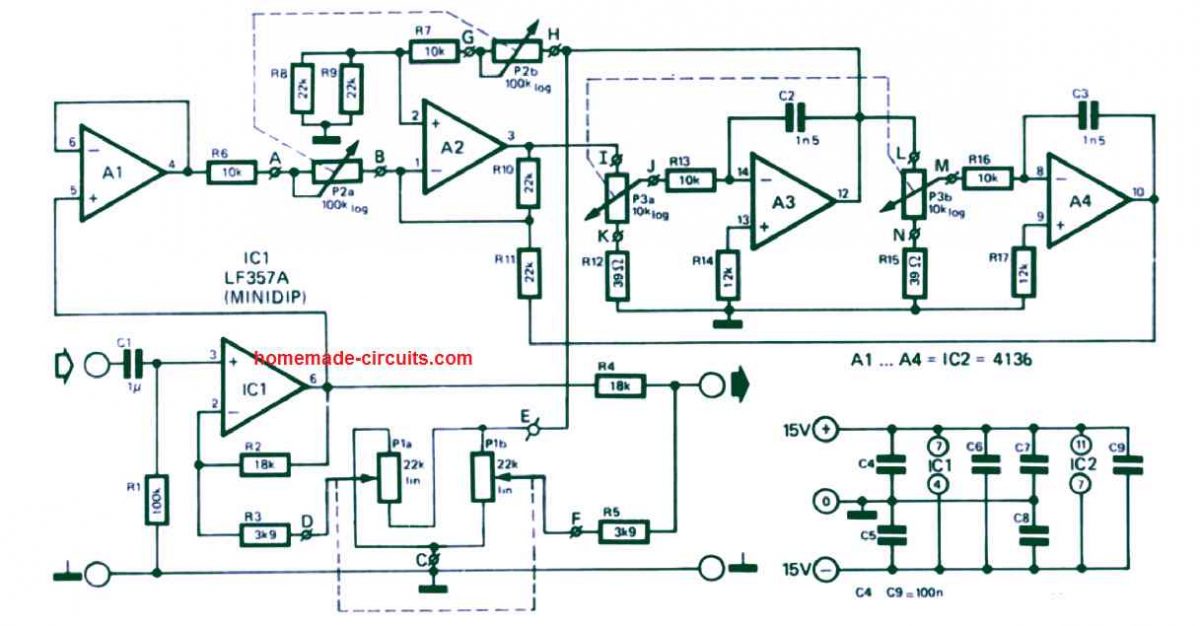
Audio input is sent from left side at the input of C1, while the enhanced equalizer effect is acquired from the right side R4 end which must be connected to the power amplifier.
The dotted lines indicate that the relevant potentiometers must be dual type pots, and must move concurrently.
The effect from such parametric equalizers or filter circuit is said to be similar to the effects that we normally get in concert halls, and auditoriums.



Questions & Answers
hmm, what's the supply voltage you give to the IC, it seems we don't need to use negative voltage here, right? 🙂
yes it needs a single supply, can be anywhere between 5 and 24V,
IC is LM324
What components are conected to inversor inputs?
please click the diagram to enlarge and see the details.
where is the + and – supply?
for LM324 IC, pin4 is the positive and pin11 is the negative….
thank you sir
Hi there. Nice circuit. Good for anyone who has the enthutiast in electronic. Is there a ready made pcb lay out for this project? Planning to build it. Thanks
I am sorry, PCB is not available at the moment, but I may surely try to update it in near future
Hi, you can probably try the formulas explained in the following article:
https://www.homemade-circuits.com/2016/01/design-high-pass-filter-circuit-quickly.html
Dual OpAmps that work: 1458's & 4558's. The latter has Lower Noise if I remember correctly.
hi my name is anthony and im fairly new to audio circuts and circuts in general, im just a kid but i got into makeing cool audio circuts and i wanna make this equalizer but i have two questions :/ i hope you can help, on the 250k pot there is a wire that kinda goes off into nothing, is that conected to anything, im asuming ground but i just wanted to check, and there is a circle on the wire going from the 250k pot to the 10k resistor :/ i know this is probobly a dumb question but if anything what does it mean??? i really hope you can help im getting a bunch of money for my birthday on the 18th os september(on sunday) and i wanna build a nice equalizer for my room and electronics projects and this is the best one ive seen so far, i hope you can help and im sorry if these are dumb questions im just learning. thanks 🙂
Hi, the lower end of the 250K goes nowhere meaning this terminal should be kept unused….to be precise the center lead of this pot needs to be connected with R24, and one of the outer leads to C22 while the other outer lead may be left unused, please ignore the circle you can replace it with a wire link.
Wish you all the best with this project and a Happy Birthday in Advance
Do you have a part list or bill of material for your system?
I have updated the parts list in the article, please check it out.
I know that we can use fr/BW formula but what if I want to design a gyrator for a specific use? Do you have any formula to calculate the quality factor of a typical gyrator? If the quality factor isn’t set correctly, then nearby bands can interfere. I didn’t get any information from the net and so I’m solely relying on you.
thankyou so much 😀
Maaf … Ijinkan saya bertanya.
Dalam skema .. Pada ic 1/1 PIN ( – ) diarahkan ke 0 volt, apakah artinya PIN tersebut juga bisa dihubungkan langsung dengan PIN 4 apabila saya menggunakan TL 072 atau RC 4558 ?
Terimakasih
If you are using TL072 then yes pin4 and all the 0V lines can be connected with each other.
Hi Swagatam, thanks for the circuit. I was wondering, in each filter the feedback is done througth the inverting terminal or the non inverging one?
Hi Guillermo, I have updated the design with signs, please check it out, you can use TL074 for the ICs, or even LM324, or RC4136 will work
Thanks for the circuit!
I recently bought a home theater system and found out it had a terrible software. the equilizer is simply awfull, hard to cut the bass and with a poor digital-only interface.
So I’m planning to build my own equilizer to improve it. the point is: it has 5 speakers + a sub.
If I wanted to equilize every single channel, how would you suggest me to do it? Maybe those multi-channel pots to equilize them together without mixing the outputs?
My pleasure!
for controlling tone individually and with maximum effectiveness and range, you can probably try any of the following concepts:
makingcircuits(dot)com/?s=bass
and build 5 of these modules together to get five separate equalizing options….you can also play with the values of the caps around the relevant pots to tailor the response levels.
can I make use of ic LM339 ?hope it will not affect d response output? I have interest in this cct I hv been looking for such pretty small smart Unique cct.sir If adding like another 5 freq to it or more,what will be d output status? I want to build it an use it for m church
LM339 might not work correctly, only an opamo is recommended such as LM324, or other similar….you can add as many stages as you like by suitably modifying the capacitor/resistor values
@Swagatham, how can I calculate the quality factor of the individual gyrators?
You can check each of the gyrators separately with an oscilloscope to confirm their quality individually
15band eq
How do you make this stereo? Do you make 2 PCBs one for the left channel and one for right channel?
Yes that’s right, you will need a pair of these units for a stereo output…
Is it possible to get away with making 2 amplifier stages and connecting them to the 10 pot row? Wouldn’t the signals get mixed?
For stereo you will need two separate amplifiers at the output of the two equalizer circuits.
I was thinking of making 2 sets of IC1/1 and IC1/2 and connect them in parallel to the pot row.
Sorry that won’t work. For stereo you will have to make two isolated sets.
The volume potentiometer is linear or logarithmic ? Some question about band poentiometers. Tnx.
All pots are linear
If u use a standard power module Vcc(+) and Ground(-) like a PC power supply, not a diff one (+Vcc 0v -Vee), the FIRST OP (+) entry must be connected to a Vcc/2 potential; i.e. a std. R+R divisor, let say 100k+100k, first R between +Vcc pin and OP (+) entry and the second one between OP (+) entry and the Ground(-)!!!
If we have to graphic equalizers for stereo, then I think the spectrum analyzers also two are required is it correct.
Yes that may be correct!
Where are the ICs in the 5band passive equalizer circuit diagram?
How can I convert the circuit into stereo?
It is a passive design so no semiconductors are involved here! Make two identical stages for the two channels.
Please can you explain the process for stereo output?
Make two identical units, join their grounds in common, join the right and the left input ends to the music inputs, and the join the outputs with the power amplifiers
Does using passive equalizer will reduce my music volume level?
You will have to use the equalizer between the source and the power amplifier, so volume will not affected….
Hello Swagatam,
Could you please explain how you calculate the capacitor values?
Hello Neils, the capacitor and Resistor calculation is given in the article.
Does this circuit require power? I am assuming the 0V are actually grounds. Is the polarity of C22 in the diagram correct? And is c24 connected to the pots or should it also go to ground like c23? Thanks
Yes it will require power to function. You will have to connect all the +Vcc pins of the IC LM324 to a +12VDC source. and all the (-) pins of the IC to the 0V line which is also the 0V line of the power supply. Rest everything can be exactly as shown in the diagram.
In the passive diagram, I do not see the standard ee symbol for the potentiometers. Whatever resistance are they;and, where do they go? Thank you.
Hello,
I know you posted the type of capacitors used, metalized polyester, 50VDC. This is probably a dumb question, can any non-polarized capacitor be used like ceramic or other film? Also do the capacitors need to be 50VDC or will any capacitor rated 50 or above work? (Just referring to the non-polarized capacitors.)
Thank you for taking the time to help
Hi, yes they can be used as long as they are of standard quality and from good manufacturers. As a rule of thumb the capacitor voltage must be 2 times more than the supply voltage used for the circuit, higher value than this will only enhance the safety of the capacitor, and will have no effect in their normal working.
Sir, how did you stimulate this? With LTspice?
Do you know any formula to calculate the quality factor of the gyrators without measuring any parameters?
Sorry not sure about it at this moment, will need to research it.
No probs sir
Sir, which simulator would you prefer; LTspice or Multisim?
Both are good, depends which is better equipped for a given schematic.
Personally, I’ve found Circuit Lab to be better than either
The LM324 is quite a high voltage chip. Can you suggest a 5v alternative?
Yes, 5v because that’s what comes out of USB, and that’s what fits in easily these days. I could use a step up to get 30v, but I would rather not.
LM324 will work with 5 V also.
Hello! I’m wanting to mod my Boss GE-7, but I can’t figure out how to calculate what frequency will be affected. Then, I will be able to adjust what frequencies are being affected. Would you be able to look and tell me either what needs to be changed to obtain the frequencies below or give me an equation of some sort to get the frequency I’m looking for! Thanks.
100 -> 400
200 -> 800
400 -> 1.2k
800 -> 1.6k
1.6k -> 2k
3.2k -> 2.5k
6.4k -> 4k
Hello, I have not yet used this device, so it can be difficult for me to solve your query.
Ideally, based on “5 Band Passive Equalizer Circuit”, I would like to build a 5-6 band EQ which each have adjustable “Q” and adjustable band frequency. (I want to use it as EQ for guitar-Bass instrument)
1) Can I make an adjust somehow of the “Q” in the Circuit”? If yes, how?
2) Can I use variable frequency bands tuned by each separate band pot,
or
how to calculate new “default” bands? *instead of default 60, 240, 1k, 4k, 16kHz, maybe, for example, I need to use 60, 120, 300, 650, 1.5k Hz (How to calculate band Hz?)
Sorry for my English and
Thanks in advance.
Not sure how Q factor can be controlled or calculated. The default bands could be calculated through the formula as explained in the article.
Hi and thanks so much for the circuit. I’m just wondering what is the wattage of the resistors with the passive eq? Are they all 1w like the 56 ohm one? also, what is the tolerance? I’m new to electronics so I guess I’m asking rather obvious stuff… Thanks again for the circuits, it’s brilliant!
You are welcome, resistor tolerance indicate the maximum voltage and current it can withstand before getting hot and burning.
Whenever the wattage of a resistor is not given, you can assume it to be 1/4 watt 5% rated.
Perfect, thanks again 🙂
Hi,Swagatam,
About “5 Band Passive Equalizer Circuit”:
How to calculate the frequency? For these frequencies, I calculated based on the above components, and the value obtained is far from the nominal value.Please give a few examples this Circuit.thanks.
Hi Wesky, which formula did you use, RC filter formula?
Hi,
I’m used basic calculation circuit:”f=1/(2πRC)”,for example:(about “5 Band Passive Equalizer Circuit”-240Hz)22nf,22k,calculation value:329hz,for example:(about “5 Band Passive Equalizer Circuit”-60Hz),calculation?
Hi, but the equalizer involves quite a few resistors and capacitors, so applying the above formula can be tricky, or may be the various RCs will have to be solved in steps.
Hi . Has this circuit been tested in practice? I connected the circuit to the first six bands. But the output is very low and has noise.
I used MKT capacitor. Is this the reason for my problem?
Will the problem be solved if I assemble the circuit to the end?
I used wire to connect the volume. Is this a problem?
If I did not receive an answer from this circuit. I try the last circuit that is without power.
Finally, if you have any advice to improve the output, please
It is 100% tested, for me worked extremely well. All types of capacitors will work for this project….nothing’s critical in the circuit, except the connections, which should be exactly as indicated..
thank you
What kind of capacitor is c1? I put the C1 capacitor electrolytic, with a capacity of 2.2 microfarads, is there a problem?
What is the circle on volume 250K?
You can see the symbol, it shows an electrolytic cap. 2.2uF will also work…the circle is nothing, just a connecting point.
Nice!! Building this in KiCad right now. Curious, what are the primary functions for blocks for IC1/1 and IC1/2? Looks like you’re doing some buffering/filtering?
Yes, those are basically for preamplification and buffer together…
Hello there, I’m currently building a head unit for my truck using a Jetson Nano Tea5767 some solid state relays(for windows, locks, possibly a snow plow). I’ve been knee deep reading The Art of Electronics 2nd Edition. Trying to wrap my head around the math for a passive EQ. Your 5 band passive uses 50K pots and I have 10K sliders I’d like to design a 10 band passive, just curious how to calculate resistor value to capacitor for a given Hz. Then from there I’m going to adjust fade and balance at my pre-amplifier planning on using NE5532 a I2C multiplexer and I2C digital pots for balance, and fade.
Hi, I do not have the calculations for passive filters, after some researching I could find the following article, which seems to have some in-depth information regarding the subject, you can check out the link here:
http://education.lenardaudio.com/en/06_x-over_2.html
Sweet thanks, that should be a excellent place to start
Hello sir i’m a student that study engineering electronic from french guiana (IUT de Kourou).
i’m on a firts year ! in my school every year we need to make a projet of our choice (i want to make an equalizer) the project will be presented on 11 juin.
on my researches i understood how to change frenquency depending of the values (resistor and capacitor) but still dont get it about the LM324. could you help ? and give more explanation in details !!!
Hello Yiu, I do not have any further information about the op amp functioning except what is posted above….but you can search online for op amp gyrators and know more about them and how they are used in filter circuits.
Okay, but first of all, for the LM324 component, can we use it to make our 5-band equalizer? because I saw the diagram for the 5-band equalizer there is no LM324!
The 5 frequencies we want to define are:
60hz (low pass filter with an RC circuit)
160hz, 400hz, 1khz (band pass filter with an RLC circuit)
16khz, (high pass filter with an RL circuit).
from the above frequencies do you think we will need the LM324 or not at all?
Passive filter will produce an low quality output with subdued effects, whereas the LM324 or any op amp based filter will give you clearer, and more effective Hi-Fi sound equalization and quality…
Is it possible to use small directional microphone as input to the equalizer and use it as a hearing aid?
Yes that’s possible!
Dear Sir!
What does it mean the circle with a line in it and a circle with line only on the two side around the circle?
I speak about the last circuit, the enchanted equaliser.
And where comes out the signal here in the same circuit? I mean it is okay that you use a Power equaliser, but were are the out signals? ON C9 Capacitor?
Thank you very much, Gabor
Dear Gabor, please don not worry about the circle with line marking, it only shows a few connections, that you have to make externally. that’s all. Out is from the black arrow and the ground line.
Sorry, that I have got an other question!
Right from the Out is an other circuit. May it be that this is the voltage support for the opamps?
And I just figured out that when this is the voltage support then it may be that it can be do otherwise?
Because I have got other ideas to do the 15V voltage and the -15 voltage I mean summa 30V for the opamps function voltage support.
Thanks a lot!
Gábor
Yes the other small circuit at the bottom right shows the supply details for the op amp supply pinouts. You can use voltage from 6V to 15V
I can do the supply for the op amps with an other circuit. I have to use an inverter from what does 30V from auto accu. 12V and after this again regulated to DC. After I use a stabilized voltage tranzistor circuit with the difference that on the B I use a resistor and a capacitor not diode. As I recognised many of the company using this to reduce incomming noise and this also chilling the interferency between the op amps.
Am I thinking good Sir?
Thank you for answer!
Gábor
If your power supply is regulated and has negative positive both supplies, then it is fine you can use it to power the op amp circuits.
Hey again!
Well, my question is: I want to supply this circuit from an auto accu. I have to use an inverter for more voltage, a so called stabilised voltage supply at the out what I can plan and implement.
This is just a thing. But, after the inverter I have to use again a AC/DC regulator cuz the opamp is functioning with nearly linear signal. Okay, he does have a tolerance to Frequency depends on producer and type. But I want to be sure this is why I want to implement a transistor circuit what is capable to filter ingoing noise and stabilises the interfequency and Voltage stability between the 5 opamp. <—huh this is my plan. Do I think it good? I recognise that your filter with the many of Capacitors also working on the +15..-15 circuit but I want to do otherwise.<— It is also a way what can be followed?
Thanks for answer, have a nice day. I
Hello, yes you can implement a transistorized voltage regulator. You must also keep the capacitors which are shown in the circuit diagram for proper filtration. The capacitors are required otherwise there may be a chance of noise getting inside the op amp circuit.
Hello,
I have found a very good circuit with transistor, what lot of producters like samsung are using.
And in there are capacitors also, but I think without any bad compliment what I found is better and requiers much more fewer element, and in this case is not as big on the plate.
If you are interested I can send to you and maybe you can help me to say the truth:).
Have a nice day!
Gábor
Hi, thank you and I appreciate your offer to provide me the transistor regulator, however I already have many good transistorized regulator circuits in this blog, so it’s fine! No problem!
Hello,
Am abasifreke essien, pls I need help, i wanan be train on circuit designing& circuit analyzing. Thanks.
Have gone through the knowledge &experience share in diz platform indeed is a wow.. Though most them in a short while I will understand…
Pls. Accept me!
Hello, Abasifreke welcome to this blog, you can learn by posting comments, asking questions and by building and testing small circuits initially.
Hello Sir i need a stereo 10 band equaliser circuit with pcb layout with good effect if any circuit pleace guide me
Ravichandren. K K