In this post I have explained how to make small homemade induction heater circuit for laboratories and shops for carrying out small scale heating jobs such as melting ornaments, or boiling small quantity of liquids using electricity or battery The idea was requested by Mr. Suni and Mr. naeem
- Circuit Objectives and Requirements
- Our challenge is to make an induction circuit for use from 12 V to 24 V with a flat spiral that can get half a liter of water to boil in as little time as possible.
- The primary goal is to get induction circuit to work but there are other challenges that are described below.
- The container in which the water should be boiling is of double-walled stainless steel and is insulated and the distance between the outer and the inner container where the induction works is about 5-7 mm.
- We have chosen induction in order to protect the electronic components from the heat of a conventional spiral heater coil which is possible when the tank is insulated.
- The outer container has a diameter of Ø 70 mm and the space for the electronic components is 20 mm high, so another challenge is to see if we have space for the components.
- In connection with the power supply there is connected a tilt switch which cuts the power to the induction loop in case the container is tilted 15 degrees or more. When the power to the induction circuit is interrupted this triggers an audio buzzer.
- Further, the induction loop is connected to two thermostats. One thermostat that interrupts power to the induction circuit when the water reaches boiling point and another thermostat that takes over to keep the temperature of the water at about 60 degrees - do not know if this will require a programmable circuit. I would also like to know if there are any infrared thermostats available.
- I know that this is a lot at once, but as mentioned, the primary aim is to get the induction circuit to work. Is it possible for you to send us a list of the necessary components and a diagram of the circuit.
- Looking forward to hear from you!
- Yours sincerely Súni Christiansen
- hello sir, i need a Induction Heater circuit diagram for our shop we have a silver jewelry shop
- so i want to silver melt and sometimes gold but if u send small circuit with transformerless power supply that will be good for me.
- I saw on internet very small project for induction heater but i cannot found power supply tansfomerless can you help me if u send both project Induction Heater and his power supply transformerless
The Design
In one of the earlier posts I have explained the basic method of designing a customized induction heater circuit by optimizing the resonance of the LC tank circuit, here we are going to apply the same concept and see how the proposed homemade induction heater circuit can be built for using in laboratories and jewellery shops.
The following figure show s standard induction heater design which can be customized as required by the user, as per their individual preferences.
Circuit Diagram
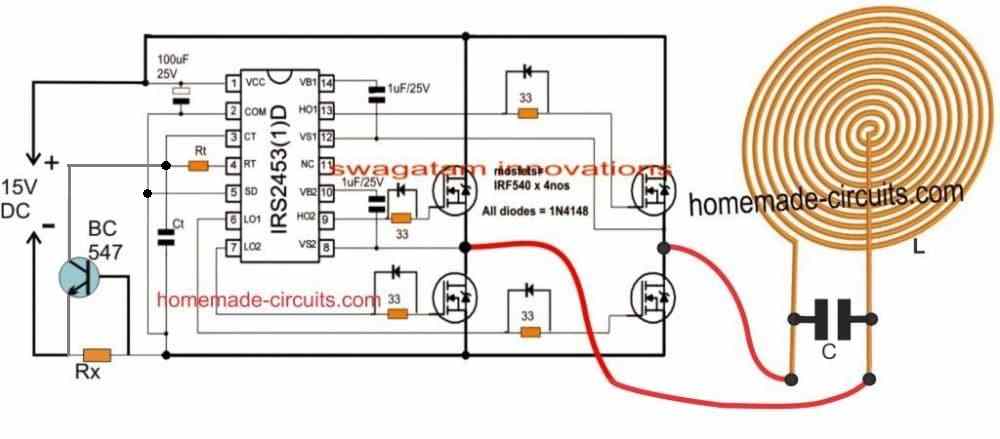
Circuit Operation
The entire circuit is configured around the popular full-bridge IC IRS2453 which indeed makes designing full bridge inverters extremely easy and foolproof. Here we use this IC for making a DC to DC induction heater inverter circuit.
As can be seen in the design the IC employs nothing more than 4 N-channel mosfets for implementing the full bridge inverter topology, additionally the IC involves an in-built oscillator and a bootstrapping network ensuring an extremely compact design for the inverter circuit.
The oscillator frequency can be adjusted by altering the Ct, and Rt components.
The mosfet H-bridge is loaded by the LC tank circuit using a bifilar coil which forms the induction work coil along with a few parallel capacitors.
The IC also incorporates a shutdown pinout which can be exploited for shutting down the IC and the entire circuit in case of catastrophic circumstances.
Here we have employed a current limiter network using BC547 transistor and configured it with the SD pin of the IC for ensuring a current controlled safe implementation of the circuit. With this arrangement in place, the user can freely experiment with the circuit without the fear of burning the power devices during the various optimization operations.
As discussed in one of the earlier articles, optimizing the resonance of the work coil becomes the key point for any induction heater circuit, and here too we make sure that the frequency is accurately tweaked in order to enable the most favorable resonance for our induction heater LC circuit.
It doesn't matter whether the work coil is in the shape of a spiral bifilar coil or a cylindrical coiled winding, as long as the resonance is correctly matched the result can be expected to be be optimal from the selected design.
How to Calculate the Resonance Frequency
The resonance frequency for the LC tank circuit can be calculated through the formula:
F = 1 / 2π x √LC Where F is the frequency, L is the inductance of the coil (with magnetic load inserted), and C is Capacitor connected parallel to the coil. Make sure to put the value of L in Henry and C in Farad. Alternatively you can also use this resonance calculator software for determining the values of the various parameters in the design.
The value of F can be selected arbitrarily, say for example we can assume it to be 50kHz, L can then be identified by measuring the inductance of the work coil, and finally the value of C can be found using the formula above, or the referred calculator software.
While measuring the inductance L make sure to keep the ferromagnetic load attached with the work coil, with the capacitors disconnected.
Selecting the Capacitor
Since a significant amount of current could be involved with the proposed induction heater for the lab works or for melting ornaments, the capacitor needs to be rated appropriately for the high current frequency.
To tackle this we may have to employ many numbers of capacitors in parallel, and make sure that the final value of the parallel combination is equal to the calculated value. For example if the calculated value is 0.1uF, and if you have decided to use 10 capacitors in parallel, then the value of each capacitor would need to be around 0.01uF, and so on.
Selecting the Current Limiter Resistor Rx
Rx can be simply calculated by using the formula:
Rx = 0.7/Max Current
Here, the max current refers to maximum current that may be permissible for the work coil or the load without damaging the mosfets and for optimal heating the load.
For example, if the optimal load heating current is determined to be 10 amps, then Rx could be calculated and dimensioned for restricting anything above this current, and the mosfets must be selected to handle in excess of 15 amps.
All these might require some experimentation, and Rx can be initially kept higher and then gradually lowered until the right efficiency is achieved.
Cooling the Work Coil.
The work coil can be built using a hollow brass tube, or a copper tube, and cooled by pumping tap water through it, or alternatively a cooling fan can be employed just below the coil for sucking out the heat from the coil from the reverse end of the enclosure. Other suitable methods can also be tried by the user.
Power Supply
The power supply unit required for the above explained induction heater for labs and shops can be built using a 20 amp, 12V transformer and by rectifying the output using a 30 amp bridge rectifier and a 10,000uF/35V capacitor.
Transformerless power supply can be unsuitable for an induction heater since that would require a 20 amp smps circuit which could be extremely costly.


Comments
suppose if I want to utilize your above circuit to make a DC to DC converter i.e. from 12 volt battery to 360 volts DC supply (to drive a small motor of 500 volts DC), would it be ok to use this circuit with an iron core transformer because I heard that it is ok to use iron core transformers if the frequency is less than or up to 10 khz or you may suggest some ferrite core one please guide me because I have least knowledge about transformer designing and calculations, in fact I only know the principal of the turns ratio and its relation to voltage and current transformation since power in is equal to power out minus losses, I also know that it requires less turns if frequency is higher, but I don’t know the relation between frequency and number of turns i.e. I don’t know the factors and formula to determine the core size and number of turns etc please guide me.
You can use an iron core transformer, but then the frequency must not exceed 500 Hz, otherwise the iron core transformer might start getting hot.
For higher frequencies you can use a ferrite transformer.
Yes, as the frequency increases the transformer winding turns reduces.
However, calculating a ferrite transformer is not easy and might require a lot of calculations to be done.
instead of using IRS 2453 ic, can we use simple H bridge circuit made of complementary pairs of Bipolar Junction Transistors (A pair of NPN and PNP Transistors) such as 2n3055 and 2n2955.
Yes, that’s possible, you can use any H-bridge, even PNP and NPN combination should work
How did I get Rt and cat calculation
what are the specification values of induction heater using lc oscillator like frequency,power supply,capacitor value,inductor value ,and if any other specification values
Hello,
Dear Swagatam.
Could you tell me if there is some type of circuit (as simple as possible) to handle a full wave bridge with regulation from 100 KHz to 1 Mhz. That is, to produce precise high-frequency alternating currents. I haven’t found anything on the internet.
Regards,
Paul.
Hi Paul,
High frequency sine wave from the full-bridge transistor circuit looks quite difficult. I do not have this design with me at the moment. I will try to find it, if I find one will surely let you know.
Distinguished Father of Knowledge
I want to be the best 50-1000 kg iron / steal melting induction furnance manufacturer in Ethiopia and in Africa as a whole
Dear Father, I hope you will help me make this dream a reality
I would like to thank you for providing this opportunity for discussion
From Ethiopia
I need 3000 watts for getting 1000 centigrade.
3000 watts is too high, I don’t have this circuit right now with me.
Hello Elias,
I appreciate your thoughts, however melting 50 to 1000 kg iron or steel might require a immensely huge induction heater circuit. Presently I do not have any information regarding how to design an induction heater of such proportions.
Dear Swagatam, I am electrical engineering student, trying to design 2000W induction cooktop. Please give me detailed idea to select components and design it using concept you explained.
Hi Omkar, designing and calculating an induction heater can be difficult, therefore it is better to buy a smaller readymade unit and then upgrade it to higher wattage unit.
You can buy the unit which is explained in the following article and then upgrade it by replacing its coils and mosfets with higher rated ones.
2 Simple Induction Heater Circuits – Hot Plate Cookers
Thanks for replying
I alredy read this article you mentioned.
Where I can buy these units where same topology/technique is used. I will buy and study them.
You can easily buy one of these induction heaters at reasonable rates from amazon or eBay.
Dear Swagatam, I would like to point out that your statement “Transformerless power supply can be unsuitable for an induction heater since that would require a 20 amp SMPS circuit which could be extremely costly.” is incorrect. A 12V, 20 Amp conventional transformer is much more expensive than a 20 Amp SMPS. Nowadays these SMPS supplies are very easily available online as well as in the local market at very competitive rates. By the way, as usual your articles are very interesting. Keep up the good work.
Thank you Chinmoy, I think you are correct, I agree with you!
Hey Swagatam, I really like your circuit and understand most of it, but i cant find out the Purpose of the diode. Whats its Point?
Also, sadly the IRF540 isnt available anymore, so i just thought about using the IRFB7545. This should work, right?
Kind regards.
Thank you Joel, the diodes across the gate resistors is to ensure quick discharge of the mosfet internal gate capacitance during off periods so that the mosfets can work efficiently.
Yes the mentioned mosfet can be used instead of IRF540
Thank you for your answer Swagatam.
Im now thinking about the Rx, it has to handle quite high currents, so i guess the power it has to handle is also really high, isn’t it? Also im thinking about controlling the power by using a Potentiometer as Rx.
And, another question, sorry to bother you, I would use 48V as voltage for the coil, and regular 15V for powering the IC. This should work, right?
You are welcome Joel.
Yes Rx wattage should be calculated as per the load current and this can be quite high.
First I would recommend using a fixed resistor for Rx, if it works you can think about using a variable one.
You can use 48V by isolating the mosfet drain line from the 15V line, and by using the 48V across the drain line of the mosfets. Just make sure the grounds of both the supplies are connected in common with each other.
Hey Swagatam.
I was wondering about how to controll the current flowing in the coil. Because im not really seeing anything resisting the current from just being really high.
Now i’ve settled with just using rectified mains voltage (about 200V when rectified) for the Induction coil, so i cant really have more than 16A flowing in the circuit. I would prefer to have about 10A to get about 2000W in the End.
Thank you in advance,
Joel
Hi Joel, the current can be controlled by setting up RX appropriately. However, this design is only on a concept basis and might require a lot of improvements. I checked online for a full bridge induction heater, and I realized that a link coil and a resonant series capacitor is recommended for a full bridge induction heater. The link coil and the capacitor can be adjusted to set the maximum current through the coil.
Here’s the reference article:
https://www.researchgate.net/figure/Full-bridge-inverter-fitted-induction-heating-equipment_fig1_275406215
http://www.richieburnett.co.uk/indheat.html
Hello Swagat ; what I say is that instead of using 15v for powering coil through mosfets , if we use 150V by using DC-DC booster ckt , will it help? I think it will draw less current for same power. 15V – 300w will draw 20A. But 150V – 300w will draw only 2A. Hence coil diameter will reduce so much. will it help? How we have chosen 15V for supply.
thanks
Hello JK,
yes the mosfets can be separately fed with 150V DC, and the work coil calculated to match the 150V parameters. This will help to reduce the current to the coil and keep it much cooler. But the size of the coil may increase, because the number of turns depends on the voltage.
Dear Swagatam,
I have come several times to your site looking for a 60Hz 120v induction heater. I am VERY clumsy with electronics, it just doesn’t sink in. I would like to make a coil about 1″ inside diameter and just use house current to power it. I am not looking for instant red-hot metal heating, just more of a low grade heater. I see some companies making this type of induction heater but they are very expensive. I understand that the higher frequencies are very efficient. I’ve tried to figure out the wire/coil size for that frequency but I just don’t understand enough to do it. I would make sure the coil would not be touched to get shocked. Any help would be very appreciated.
John
Dear John Gile use a solid cylindrical threaded (triangular threads) block of pure iron (soft iron and not even MS (mild steel)) having dimensions of 6 inch dia and 6 inch height, hence wrap an enameled wire of copper within threads and thickness of wire should be according to the pitch of threads for instance a wire with the thickness of 3mm then after completing this task you can apply directly (without using any electronic circuit) 110 volt AC 60 HZ.
That sounds dangerous to me.
Dear John, you can try the first circuit from the following article, or simply purchase the kit from amazon which can save you from unnecessary constructional hassles:
https://www.homemade-circuits.com/simple-induction-heater-circuit-hot/
Or if you want a low tech design, then you can try working with the following concept:
https://www.homemade-circuits.com/small-induction-heater-circuit-for/
Hi. Is the 33 resistor 33k or just 33 ohm ? and can I use a 15v battery instead of the power supply ? Lastly For inductor coil, if I use just single winding of coil, is there any modification needed in the circuit? (does it depend on no. of winding of coil)? Thanks in advance.
When only number is given for a resistor, then it is always in just Ohms.
This circuit is not easy and not recommended for newcomers…the circuit will require proper adjustment of frequency and RC resonance, and coil inductance.
Good morning Swagatam,
I have this wireless night light that has stopped working and when I opened it up I saw a burnt resistor I have no Idea how these things work would you be able to help please.
Hello Siamak, can you upload the image on any free image hosting site online and provide the link here? I will check the image link and try to understand the fault!
Hi Swagatam, first of all I want to thank you for your quick response. I appreciate it so much!
But there is still a second question that lies with my heart. Are there any options on the market to have the whole circuit designed? I would need to be able to control the entire circuit with an on/off controller created by LabView for instance. Which companies would you recommend to me?
Again, thank you very much for your time, it means a lot to me.
You are welcome David, there are actually plenty of induction heater kits available in the online market that you can buy, here’s one example posted in this link:
https://www.homemade-circuits.com/simple-induction-heater-circuit-hot/
After this, you only have to measure the inductance of the work coil, and then replace it with your version having exactly the same inductance.
Hi Swagatam, I would like to ask you, if it is possible to assembly this circuit on the white breadboard. Are there some limitations/restrictions for the white breaboard in term of coil power?
Thank you very much in advance.
Hi David, breadboard assembly can lead to loose connections and cause problems in critical circuits like the above therefore it s not recommended, so assembly by soldering is recommended for such designs. Coil connection is absolutely not recommended in breadboard due to low current handling capacity of the breadboard
No problem Siamak., yes it is better to buy and research a ready made unit instead of risking failures and investments…
Good morning Swagatam,
I have given up making one, it is too complicated and the results may not be what I want, so I am going to buy ready-made one form e-bay or Amazon, much easier and more reliable.
Many, many thanks for trying anyway, I appreciate it.
Cheers
Siamak
Good morning Swagatam,
Thank you very much,
That is not what I wanted, I have PID to control the temperature, what I would like is to calculate how much resistive wire I need, i.e the gauge, the length etc. to reach the temperature of 140°C for a surface of 500mm by 500mm, I don’ know how to calculate this at all, I am not an electrical engineer just mechanical one and retired too so I have lost all I have learned at Uni, would you be able to help me please?
Many thanks.
Hello Siamak, for resistive heating you can use a light dimmer circuit for controlling the heat to any desired level, as per your working specs.
For setting the temperature you will need a accurate thermometer.
The circuit of light dimmer can be studied in the following artciles:
How Triac Phase Control Works
Simple Light Dimmer and Ceiling fan Regulator Switch
Siamak, I do not have the calculation details with me either. If you only need an accurate practical result then that can achieved through experimentation, but if you are looking for formulas then sorry I do not have it with me right now…I may have to investigate it.
Good morning Swagatam,
Sorry for miss leading you, I meant resistive heating elements, I don’t know how to calculate it at all, I would like you to help me to make the it.
If you would please from the information i.e. the temperature, and surface to heat up.
I would like to heat an Aliminium plate (The Printing Bed) 3mm thick and on top there would be a glass plate of 3mm thick too, and 500mm by 500mm area to get to the temperature of 140°C max, I don’t have any preference on the power supply, it could either be 24V or 240V, so would you be able to help me please?
Many thanks
Siamak
Thanks Siamak, Designing the coil dimension of an induction heater might involve many critical calculations by considering many different parameters, which may be actually not easy and might require plenty of time and practical verifications. That is the reason it is better to buy a readymade unit and then try modifying it accordingly…or may be simply use an ordinary resistive heater coil for the heating purpose by controlling its heat with a light dimmer, which can be also quite efficient.
Good evening Swagatam,
I am so sorry to bother you again, but as you know I have knowledge of electrical things at all, so here it goes; I would like to heat the 3D printer bed to 140° C the actual one reaches 110°C, I would use heating elements to do so, what I am asking is would you please let me know the length and the wire size to get this wright for the 3D bed size of 500mm by 500mm, of Aluminium and glass.
I would be really more than happy and appreciative if you would please help.
Many thanks
Siamak
You are welcome Siamak!
Hi Swagatam,
Many thanks for you honest reply, really appreciate it.
I will follow your advise and get a 2500W one to see how that may pan out for me.
Cheers
Siamak
Hi Siamak, making a induction heater can be quite difficult unless you know all the practical details. So it is better to buy a ready made unit which may be quite cheap nowadays. After buying you can check the details, and then may be replicate it for future applications.
Even I do not ahve the necessary details regarding the coil diameters for a kiln application
Hi Swagatam, I have got hold of many items in order to fulfill the project I have in mind, one of them is induction cooker, my question is; would it possible to change the coil on induction cooker in order to make it a high temperature furnace or a Kiln to fire Ceramics and a like, (1200° C or 2192 F ) if yes how please, I was thinking using copper pipe to make water flow through it in order to cool the coil, but no idea how many turns, but I know the diameter, 90mm, so would you please guide me in this?
Many thanks in advance.
Siamak