• Skip to primary navigation
  • Skip to main content
  • Skip to primary sidebar

Homemade Circuit Projects

Get free circuit help 24/7

  • 1000+ Circuits
  • Privacy Policy
  • About Us
  • Contact
  • Disclaimer
  • Videos – Circuit Test Results
You are here: Home / 324 IC Circuits / How Flex Resistors Work and how to Interface it with Arduino for Practical Implementation

How Flex Resistors Work and how to Interface it with Arduino for Practical Implementation

Last Updated on July 6, 2019 by Swagatam 2 Comments

As electronics enthusiasts we may come across many kinds of resistors, from small fixed resistor to high current bulk rheostat. There are humongous classifications among resistors, but here we will focus on a particular kind of resistor called “flex resistor” and learn how it works.

As the name signifies a flex resistor is flexible and also changes its resistance when it gets bend. This sensor device is boon for those who may be working in the field of robotics, medical devices, angular displacement measurement, motion sensing game development, etc.

There are limitless numbers of applications if you peak your imagination to maximum.

Flex Resistor

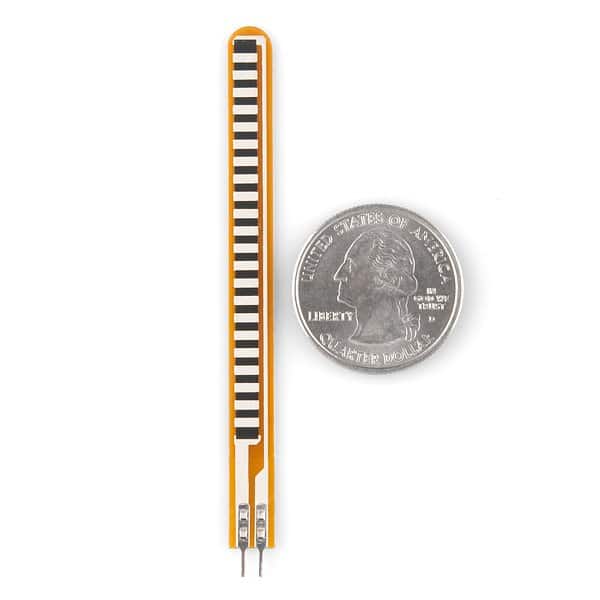
Flex resistor compared with a coin.

Specifications overview:

The flex resistor measures 2.2 inch on length (may vary), having a resistance around 10K ohm when it is flat and has a huge tolerance range of +/- 30%. This means if you bought two similar flex resistances, its resistance to angular bend ratio may vary a bit. This parameter must be considered when you calibrate your design.

It has working temperature range of -35 degree to +80 degree Celsius. It has power rating of 0.5 watt continuous and 1 watt peak. The predicted life cycle is greater than 1 million times.

There is bend limit for every flex resistor please check the data sheet for the respective flex resistors; if you exceed those limits you may damage your flex resistor.

There are two classifications of flex resistor:

1) Unidirectional

2) Bidirectional

Unidirectional: This type of flex resistor can be bent only in one direction within their bend limit. If we do the same on the other direction, we may damage it.

Bidirectional: This resistor can be bent on either direction within their bend limit.

So, choose the right flex resistor depending on your application.

How Flex Resistors work?

There is a conductive ink sandwiched between two plastic films. Electrodes are placed either sides of conductive ink. The conductive ink consists of microscopic particles which are electrically conductive.

When the resistor is flexed the microscopic particles move away from each other, and the resistance increases. Vice versa is also true.

Basic schematics on how to use:

Here is a basic schematic of a flex resistor application.


basic schematic of a flex resistor application

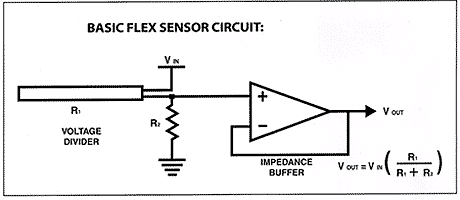
The flex resistor has limitless applications if you know how to use them. Here is a simple op-amp circuit paired with a flex resistor. You can set threshold to trigger the output, if you use an op-amp in comparator mode. The suggested op-amps are LM324 and LM358; you may also give a try for 741.

You can also pair it with arduino, by giving the flex resistor to analogue read pin of arduino with pull down resistor. No additional libraries are required.

Arduino Interface


how to interface flex resistor with Arduino

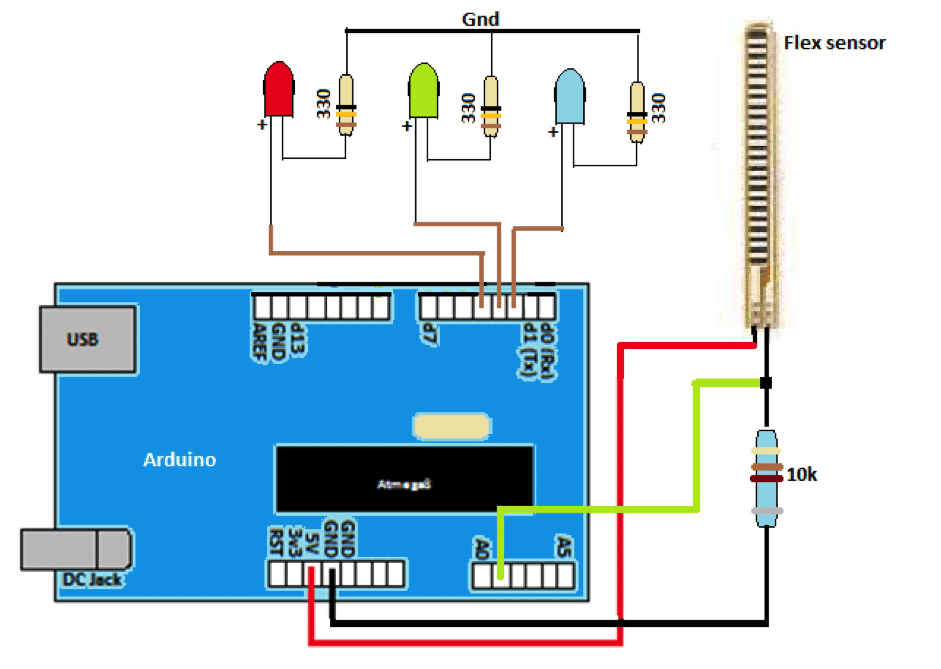
Here is an illustration of simple angle sensing for flex resistor. If the flex resistor is flat, blue LED illuminates, if the resistor is flexed to an angle x (say) green LED illuminates, if it flexes greater than x then, red LED illuminates.

Flex resistors can be also seen in applications which demand simulation of complex movements and patterns, for example it's used for studying precise human finger movements, where the motion of the finger is tracked by flex resistor, decoded and displayed on a screen. This principle may be adapted by game developers to develop motion based game.

Conclusion:

Through this simple electronic component, we find huge spectrum of applications. There is no limitation to deploy the component on our daily used electronics, the only limitation may be in our imagination to deploy those in the right way.


Previous: Understanding Capacitor Codes and Markings
Next: Understanding Color Codes of Resistors with Practical Examples

About Swagatam

I am an electronic engineer (dipIETE ), hobbyist, inventor, schematic/PCB designer, manufacturer. I am also the founder of the website: https://www.homemade-circuits.com/, where I love sharing my innovative circuit ideas and tutorials.
If you have any circuit related query, you may interact through comments, I'll be most happy to help!

You'll also like:

  • 1.  Photodiode, Phototransistor – Working and Application Circuits
  • 2.  IC 4047 Datasheet, Pinouts, Application Notes
  • 3.  How to Connect a TSOP1738 IR Sensor
  • 4.  How Boost Converters Work
  • 5.  MOSFETs – Enhancement-Type, Depletion-Type
  • 6.  Transistor 2N3904 – Pinout and Specifications

Please Subscribe (Only if you are Genuinely Interested in our Newsletters)


Reader Interactions

Comments

    Your Comments are too Valuable! But please see that they are related to the above article, and are not off-topic! Cancel reply

    Your email address will not be published. Required fields are marked *

  1. Search Related Posts for Commenting

  2. Sonja Sinor says

    I will immediately grab your rss as I can not find your e-mail subscription link or e-newsletter service. Do you have any? Kindly let me know so that I could subscribe. Thanks.

    Reply
    • Swagatam says

      Thank you, you can find the subscription link just under the article posts.

      Reply


  3. COMMENT BOX IS MOVED AT THE TOP


Primary Sidebar

Electronic Projects Categories

  • 3-Phase Power (15)
  • 324 IC Circuits (19)
  • 4017 IC Circuits (51)
  • 4060 IC Circuits (25)
  • 555 IC Circuits (92)
  • 741 IC Circuits (18)
  • Amplifiers (49)
  • Arduino Engineering Projects (82)
  • Audio Projects (83)
  • Battery Chargers (75)
  • Car and Motorcycle (87)
  • Datasheets (44)
  • Decorative Lighting (Diwali, Christmas) (31)
  • DIY LED Projects (81)
  • Electronic Components (96)
  • Electronic Devices and Circuit Theory (34)
  • Electronics Tutorial (99)
  • Fish Aquarium (5)
  • Free Energy (34)
  • Games (2)
  • GSM Projects (9)
  • Health Related (17)
  • Heater Controllers (23)
  • Home Electrical Circuits (98)
  • Incubator Related (6)
  • Industrial Electronics (25)
  • Infrared (IR) (39)
  • Inverter Circuits (94)
  • Laser Projects (10)
  • LM317/LM338 (21)
  • LM3915 IC (24)
  • Meters and Testers (52)
  • Mini Projects (152)
  • Motor Controller (64)
  • MPPT (7)
  • Oscillator Circuits (12)
  • PIR (Passive Infrared) (8)
  • Power Electronics (32)
  • Power Supply Circuits (65)
  • Radio Circuits (9)
  • Remote Control (46)
  • Security and Alarm (55)
  • Sensors and Detectors (115)
  • SG3525 IC (4)
  • Simple Circuits (72)
  • SMPS (30)
  • Solar Controllers (60)
  • Timer and Delay Relay (51)
  • TL494 IC (5)
  • Transformerless Power Supply (8)
  • Transmitter Circuits (37)
  • Ultrasonic Projects (12)
  • Water Level Controller (45)

Follow Homemade Circuits

Facebook
Twitter
YouTube
Instagram
My Facebook-Page
Quora

Feeds

Post RSS
Comment RSS

Circuit Calculators

  • AWG to Millimeter Converter
  • Battery Back up Time Calculator
  • Capacitance Reactance Calculator
  • IC 555 Astable Calculator
  • IC 555 Monostable Calculator
  • Inductance Calculator
  • LC Resonance Calculator
  • LM317, LM338, LM396 Calculator
  • Ohm’s Law Calculator
  • Phase Angle Phase Shift Calculator
  • Power Factor (PF) Calculator
  • Reactance Calculator
  • Small Signal Transistor(BJT) and Diode Quick Datasheet
  • Transistor Astable Calculator
  • Transistor base Resistor Calculator
  • Voltage Divider Calculator
  • Wire Current Calculator
  • Zener Diode Calculator

© 2021 · Swagatam Innovations

We use cookies to ensure that we give you the best experience on our website. If you continue to use this site we will assume that you are happy with it.Ok