Here we are going to talk deeply about snubber circuits and why we must use them with MOSFET H-bridge circuits. Because if we do not put snubber in H-bridge then that MOSFETs might blow off during switching. Specially when we drive inductive loads like transformer, motor, relay, solenoid, etc. then this thing becomes very serious.
So let us start from the beginning.

What is a Snubber Circuit?
Snubber is a simple extra small circuit which we connect across MOSFETs or IGBTs or any switching device. We do this to absorb or kill the high-voltage spikes which come suddenly during switching OFF.
These spikes come mainly because of inductive kickback which happens when we switch OFF current in inductive load. That current wants to continue flowing but suddenly MOSFET turns OFF, so high voltage is generated across drain-source pins of MOSFET. This high voltage can be even more than 500V or even 1000V if not stopped. So this huge spike can punch through the MOSFET and kill it instantly.
So snubber is like a safety device. It eats up that spike and protects the MOSFET.
Why Snubber is Very Important in MOSFET H-Bridge?
Now in H-bridge we are using 4 MOSFETs or 4 IGBTs, right? Two high side and two low side. And we are switching them ON/OFF alternately to create AC from DC or to drive motor back and forth.
But now the problem is, when we switch OFF any MOSFET and we are driving inductive load like motor or transformer primary then the load tries to push back high voltage spike to the MOSFET. Now if no protection is there, then that spike will break the MOSFET.
Also during dead time, when all MOSFETs are OFF for a tiny time to prevent shoot-through, that time also spike can hit hard.
So if we do not use snubber, then we will keep replacing MOSFETs every day.
What Type of Snubber We Can Use?
There are mainly 3 types of snubbers:
- RC Snubber – Resistor + Capacitor in series.
- RCD Snubber – Resistor + Capacitor + Diode.
- TVS Diode Snubber – Only Transient Voltage Suppressor diode.
- Zener or MOV – Not proper but sometimes used.
For most MOSFET H-bridge we use simple RC snubber or if we want better efficiency then we use RCD snubber.
RC Snubber: Most Common and Easy One
So this one is super simple. Just connect one resistor and capacitor in series and then put that series combo across the MOSFET drain-source.
Example:
- Capacitor = 100nF to 1uF (rated for 400V or more)
- Resistor = 10 Ohm to 100 Ohm (1W to 2W)
That RC combo absorbs the spike and converts it to heat in resistor.
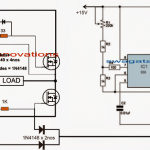
Connection Diagram:

We put one such RC snubber across each MOSFET.
But problem is that this will always eat some power and get hot. So efficiency reduces. Also value of R and C must be selected carefully.
RCD Snubber: Little More Efficient
This one is better for high power H-bridges.
Here we add a diode in series with capacitor, so that the capacitor does not get charged continuously. It gets charged only when spike comes.
Then that capacitor discharges through resistor slowly. So less power loss.
Here the diode must be fast recovery diode like UF4007 or FR107.
Connection Diagram:

TVS Diode: Compact and Precise
If we do not want RC or RCD then we can also put a TVS diode directly across drain and source.
TVS will instantly break down and absorb the spike if voltage goes above safe limit.
But cost is more and we must select exact voltage rating.
Example: For 100V MOSFET, we can use 120V TVS diode like 1.5KE120A.
Real Life H-Bridge Example
Suppose we are making a 12V to 220V sine wave inverter with IRF540N MOSFETs in H-bridge. Then the transformer primary is like an inductor, right?
So when MOSFET turns OFF, then that primary sends back a sharp spike to MOSFET drain pin.
So we must connect RC snubber across each MOSFET.
Let us use:
- R = 47 Ohms 1W
- C = 0.1uF (100nF), 400V polyester
Connect one R+C combo directly across drain and source of each MOSFET.
This will catch spike and save our IRF540N.
How to Calculate Snubber RC Values?
Here is one crude method to calculate RC snubber to suppress any form of high voltage spike in an electronic circuit:
Step 1: Calculate load inductance (L) – optional, approx.
If you do not know exact L, no problem, we can guess.
Step 2: Use below formula to select C:
C = Ispike * tr / VspikeWhere:
- Ispike = expected spike current (A).
- tr = rise time of spike (seconds), like 100ns to 1us.
- Vspike = spike voltage we want to limit.
Example: Calculations:
Ispike = 5A
tr = 100ns = 100 × 10^-9 s
Vspike = 100V

C = 5 × 100n / 100 = 5nF
Use 10nF to 100nF for margin.
Or roughly 10 Ohm to 100 Ohm. We use trial-error method if L is unknown.
Start with 47 Ohm + 100nF, check waveform using scope. If spike is less, then keep it. If more, then reduce R or increase C.
But What is the Link Between "L" and above Formula?
Actually Bro, L is hiding inside the tr (rise time).
Let us say:
Vspike = L × di/dtThen:
dt = L × di / VspikeWhich means that if we dont know L, then we also don’t know the exact dt (rise time).
That is why, estimating L helps us guess tr (rise time) more correctly. If L is big, spike rises slowly, then tr is longer.
So:
We estimate L to estimate spike rise time so that we can choose C using the formula.
Series RC Snubber for Slow-Switching MOSFET Circuits
For inverter circuits or motor drivers running below 1kHz PWM or 50Hz AC, we can use a classic series RC snubber across each MOSFET.
Connection Details: Connect a small capacitor (e.g 10nF to 100nF, 400V rated) in series with a resistor (e.g 100 Ohms, 1/2 watt), and join them across Drain and Source of the MOSFET.
This helps to absorb inductive spikes during turn-off.
Example:
- For 100V DC bus, 50Hz PWM
- C = 100nF / 400V
- R = 100 Ohms / 0.5W
This is effective and simple but not efficient for fast switching.
Things You Must Remember
- Always use snubber close to MOSFET legs.
- Snubber capacitor must be non-polar like polyester or ceramic.
- Resistor must be non-inductive and 1W or 2W rated.
- Use separate snubber for each MOSFET.
- Never use electrolytic capacitor in snubber.
- If still MOSFETs heat up, use RCD or TVS diode.
- Snubber improves life and reliability of H-bridge.
Final Words
So guys, we saw that snubber is like bodyguard for our H-bridge MOSFETs. It saves them from getting destroyed due to back EMF or switching spikes. Without this small helper circuit, our inverter or motor driver will not last even one week.
We can use RC, RCD or TVS snubber depending on how much spike is coming and how much cost and space we can afford.
We must try different R and C values and check waveform using oscilloscope to find best values.
So always add snubber in your H-bridge design, specially when driving inductive load like transformer, motor, coil, etc. That will make your design super strong and long lasting.

Comments
Thanks for your feedback.
The reversed diode in parallel to the gate resistor is a normal diode or a Zener diode.
Connect between gate to gate or gate to source .
That diode is a rectifier diode such as a 1N4148
Does the diode connect the gate to the source or the gate resistor in parallel?
Please let me know .
Which diagram are you referring to, is the RCD snubber, or the reverse diode which is usually connected parallel with the gate resistor?
Reverse diode parallel .
Which one is more efficient?
Both have different functions, diode across the gate resistor ensures efficient switching and less heating of the MOSFET, and RCD snubber gives protection to the MOSFETs from sudden voltage spikes….so both are useful…
How to calculate the RC value for my application
I choose the R – 4.7kohms, C -100 nF.
Please provide the max voltage and current for your application, I will calculate it for you…or you can calculate it yourself using the following calculator:
https://www.homemade-circuits.com/rc-snubber-calculator-for-mosfets-relay-contacts-and-triacs/
use ceramic capacitor in smd because ppc is most expensive
Thank your for your feedback.
In case MOSFET is short-circuited at that time, stop the supply to load without give gate pulse time
If you add a current limiter with the MOSFET then there will be no short circuit happening…
Thank you for your value feedback.
In Case MOSFET get short in field condition how to protect ?
You can configure a current limiter for the MOSFET as shown in the following article:
https://www.homemade-circuits.com/universal-high-watt-led-current-limiter/
But inductive load spikes in nanoseconds only. That time we take tr is nanoseconds, for example. 100 nanoseconds
Sure, in that case you can use the following calculator and tweak the values appropriately:
https://www.homemade-circuits.com/rc-snubber-calculator-for-mosfets-relay-contacts-and-triacs/
You can try ceramic capacitor if it is available with 400V…
V = 24V DC
A = 50 AMPS
P MOSFET MPN XPH3R114MC, L1XHQ
Application = Solenoid
Kindly calculate the value
Thanks for the continuous feedback.
Thank you for feedback.
Here are the values as per your application specifications:
Resistor = 1.5 ohms 1 watt CFR 5%
Capacitor = 2uF/400V PPC
How to connect diode in gate of a P-channel MOSFET
For P channel MOSFET, the diode parallel to the gate resistor must have its cathode towards the MOSFET, and anode towards the signal source….
We recently used a P-channel MOSFET.
The P-channel MOSFET is used to switch a 45 A 24 V solenoid.
After two to three switching MOSFETs failed, how can I solve this
The MOSFET MPN is NVMFS3D0P04M8LT1G
did you put a freewheeling diode across the solenoid coil?
Kindly give the solution for this
Please read the following article, and try adding all the suggested protections around your MOSFET, and also add snubbers as suggested in the above article:
https://www.homemade-circuits.com/mosfet-protection-basics-explained-is/
Thank you for your feedback. But we use only one P channel MOSFET for switching .The MOSFET maximum switch time is one 10sec for starter motor appliaction
For P channel mosfet also the rules will be the same as N channel mosfet.
Please put snubber across drain/source as explained above, and put the following protections, as explained in the previously linked article;
Resistor Between Gate and Source
reverse diode parallel with the gate resistor (cathode to gate for P channel)
external diode across drain/source terminals.
Or you can send the diagram to my email, i will check it out…
Yes, we put a diode across the solenoid
Hallo Mr. Swagatam, this is the Solution. It’s important in induction heaters circuit, where after two or three switching off, mosfet never get on again ! I’ am using the RCD method now on my circuit, it works fantastic ! Your site is nice and full of valuable stuff. Thank You Mr Swagatam.
Thank you so much Luca, for your kind words and understanding, I appreciate it very much.
I agree with you! These snubber concepts are a real life saver for all types of MOSFET switching circuits, especially with inductive loads….