• Skip to main content
  • Skip to primary sidebar

Homemade Circuit Projects

Need circuit help? Post them in the comments! I've answered over 50,000!

Blog | Categories | About | Contact | Calculators-online
You are here: Home / Motor Controller / Bluetooth Motor Controller Circuit

Circuit Simulator: Assemble and Simulate

Bluetooth Motor Controller Circuit

Last Updated on January 4, 2024 by Swagatam 8 Comments

In this post I have explained how to use Bluetooth technology for transmitting PWM wirelessly, the circuit application could be used for controlling various appliances such as motors, lights, RC gadgets etc using your Android phone.

Table of Contents
  • The Bluetooth PWM Transmitter
  • How to Obtain the PWM Transmission for the Bluetooth Headset

The Bluetooth PWM Transmitter

In one of my earlier posts I explained how to hack and modify a Bluetooth headset for making a Bluetooth Home-theater system, the same concept can be employed here for controlling a preferred appliance such as a motor using Bluetooth PWM.

There are actually two options to transmit Bluetooth PWM, one is by using a specialized Bluetooth transmitter module and a function generator circuit, or a much simpler modified Bluetooth headset gadget.

In this article I have explained how the second option could be used for implementing the proposed Bluetooth PWM motor controller circuit.

The idea is actually as simple as integrating the Bluetooth headset speaker wires with a mosfet or BJT motor driver stage, that's all.

The details can be seen in the following figure.

warning message: electricity is dangerous, proceed with caution
Bluetooth PWM Motor Controller Circuit

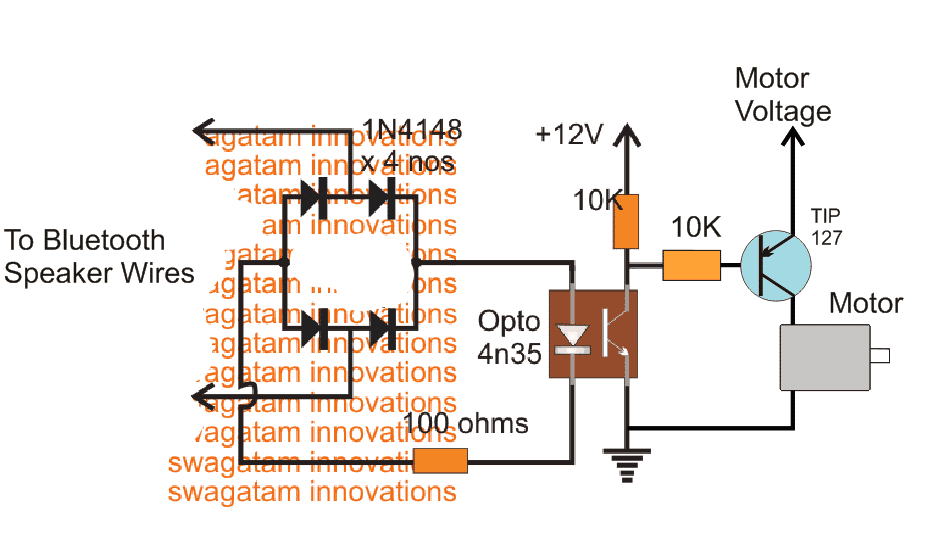
The above set up shows an external PWM motor driver simply configured using some diodes, an opto-coupler and a BJT stage.

The PWM from the Bluetooth Headset is passed through a bridge diode network and then applied at the input of an opto coupler.

The output from the opto coupler is finally fed to a motor driver stage.

Now as the PWM from Bluetooth headset is changed, the motor responds to the PWM and correspondingly changes its speed.

How to Obtain the PWM Transmission for the Bluetooth Headset

pwm 2

The PWM transmission for the Bluetooth headset can be obtained from your Android phone.

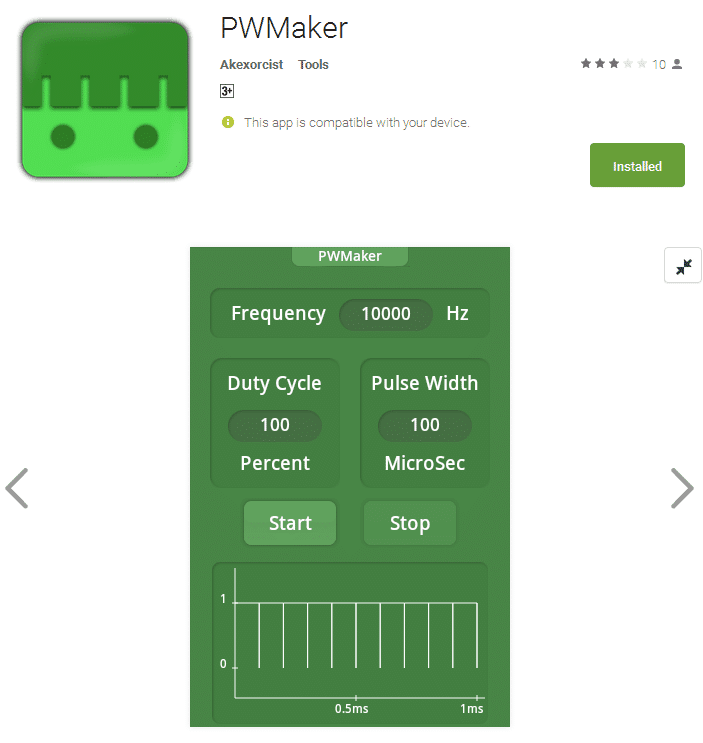
For this you may have to install any standard PWM generator application and then "pair" it up with your Bluetooth headset.

Next, you would be prompted to adjust the duty cycle, PWM, frequency etc within the application, which you can fix as per your preferences.

Once all these initial set ups are completed, the PWM transmission for the Buetooth headset could be initiated for executing the motor control operations.

The PWM or the frequency could be changed as per your wish and will, from your android phone application whenever the speed of the motor is required to be altered.

This concludes our tutorial on Bluetooth PWM motor controller circuit, which looks extremely simple and useful, thanks to the all latest technology like android applications and Bluetooth features.

You'll also like:

  • 1.  Motor Protection Circuits – Over Voltage, Over Heat, Over Current
  • 2.  How to Interface Servo motors with Arduino
  • 3.  How to Control a Servo Motor using IC 555
  • 4.  High Wattage Brushless Motor Controller Circuit
  • 5.  How Stepper Motors Work
  • 6.  Operating a DC Motor Clockwise/Anticlockwise with a Single Switch

Filed Under: Motor Controller Tagged With: Bluetooth, Controller, Motor

About Swagatam

I am an electronics engineer and doing practical hands-on work from more than 15 years now. Building real circuits, testing them and also making PCB layouts by myself. I really love doing all these things like inventing something new, designing electronics and also helping other people like hobby guys who want to make their own cool circuits at home.

And that is the main reason why I started this website homemade-circuits.com, to share different types of circuit ideas..

If you are having any kind of doubt or question related to circuits then just write down your question in the comment box below, I am like always checking, so I guarantee I will reply you for sure!

Previous Post: « Password Security Lock Circuit Using 4×4 Keypad and Arduino
Next Post: How to Send and Receive SMS Using GSM Modem »

Reader Interactions

Comments

  1. Tomas Fritsvold says

    November 26, 2017 at 2:30 pm

    I hope this forum could help me with a little drone project… I have a PWM signal that I need to transfer to a device attached to a moving gimbal. This makes the use of wires impossible.

    Would it be possible to send this PWM signal wirelessly, then back to PWM?

    Alternatively, my gimbal has S. BUS and CAN-BUS, so I am wondering if I can convert PWM to BUS and back again.

    Thanks in advance for *any* input

    Cheers

    Reply
    • Swagatam says

      November 26, 2017 at 6:50 pm

      Hi, I am not sure how S.BUS or CAN-BUS can be used for the pwm communication, however PWM can be sent wirelessly through 433MHz RF modules, if integrating these modules is possible, then I can perhaps help…

      Reply
  2. Manas Mallick says

    September 9, 2016 at 12:56 am

    Ok I got it,I will try and inform you.
    Thanks.

    Reply
  3. Manas Mallick says

    September 8, 2016 at 10:57 pm

    Many thanks for quick reply.Your advise
    Very helpfull to me but I have tried to search on google your suggested link " fly-back regulator" but failed.

    Reply
  4. Davis Kakumba says

    September 8, 2016 at 4:12 pm

    hi SWAGATAM thanks for all your work and this massive technology , now what if i want to add more motors like three of them how can i modify this

    Reply
    • Swagatam says

      September 9, 2016 at 6:22 am

      Thanks Davis, you can add all the 3 motors in parallel….

      Reply
  5. Manas Mallick says

    September 8, 2016 at 11:37 am

    Sir if kindly answer my question I will be thankfull to you. I have a battery charger build with Ic 3843
    8 pin ossilator. How to increase amp and voltage with simple change of Ic biasing.

    Reply
    • Swagatam says

      September 8, 2016 at 3:01 pm

      Manas, please refer to the datasheet of the IC, and check out the diagram titled "27 Watt Off−Line Flyback Regulator", you will e able to see a 0.5 ohm resistor connected with the source of the mosfet…this resistor determines the current limit of the circuit, so you can change this resistor for the current adj….and the voltage will need a feedback loop using an opto coupler connected with a the Ct pin of the IC…that will be a little complex…

      http://www.onsemi.com/pub_link/Collateral/UC3842A-D.PDF

      Reply

Need Help? Please Leave a Comment! We value your input—Kindly keep it relevant to the above topic! Cancel reply

Your email address will not be published. Required fields are marked *

Primary Sidebar


Subscribe to New Posts

Categories

  • Arduino Projects (89)
  • Audio and Amplifier Projects (132)
  • Automation Projects (17)
  • Automobile Electronics (101)
  • Battery Charger Circuits (83)
  • Datasheets and Components (104)
  • Electronics Theory (143)
  • Free Energy (37)
  • Games and Sports Projects (11)
  • Grid and 3-Phase (19)
  • Health related Projects (25)
  • Home Electrical Circuits (12)
  • Indicator Circuits (14)
  • Inverter Circuits (88)
  • Lamps and Lights (142)
  • Meters and Testers (69)
  • Mini Projects (46)
  • Motor Controller (64)
  • Oscillator Circuits (27)
  • Pets and Pests (15)
  • Power Supply Circuits (108)
  • Remote Control Circuits (50)
  • Security and Alarm (64)
  • Sensors and Detectors (101)
  • Solar Controller Circuits (59)
  • Temperature Controllers (42)
  • Timer and Delay Relay (49)
  • Transmitter Circuits (29)
  • Voltage Control and Protection (39)
  • Water Controller (36)


Other Links

  • Privacy Policy
  • Cookie Policy
  • Disclaimer
  • Copyright
  • Videos
  • Sitemap


People also Search

555 Circuits | 741 Circuits | LM324 Circuits | LM338 Circuits | 4017 Circuits | Ultrasonic Projects | SMPS Projects | Christmas Projects | MOSFETs | Radio Circuits | Laser Circuits | PIR Projects |

Social Profiles

  • Twitter
  • YouTube
  • Instagram
  • Pinterest
  • My Facebook-Page
  • Quora
  • Stack Exchange
  • Linkedin


  • Recent Comments

    • Swagatam on How to Make HHO Fuel Cell Circuit in Automobiles for better Fuel Efficiency
    • Swagatam on How to Repair Mosquito Swatter Bats
    • Pradosh on How to Repair Mosquito Swatter Bats
    • eq on How to Make HHO Fuel Cell Circuit in Automobiles for better Fuel Efficiency
    • Swagatam on 100A AC Load Monitoring Circuit using Arduino, Watt Limit, LCD, Alarm, Auto Shutdown

    © 2025 · Swagatam Innovations