The following article provides a simple yet very decent solution for driving powerful LEDs rated at 3 watt or 5 watt.
Circuit Objective
These 3 watt 5 watt and similar high watt LEDs are able to produce highly intense and powerful light outputs, however these are extremely vulnerable too with their operating parameter. I have explained more how to operate these devices very safely using a simple power supply.
We have seen quite many power supply and driver circuits in this blog using the IC LM338, that's because this particular device is so versatile with power regulation and control functions.
The same IC yet again takes the center stage in this application too. Here the IC LM338 has been configured in its standard mode and it perfectly executes the expected current as well as voltage regulations for driving a 3 watt or a 5 watt LED.
Circuit Operation
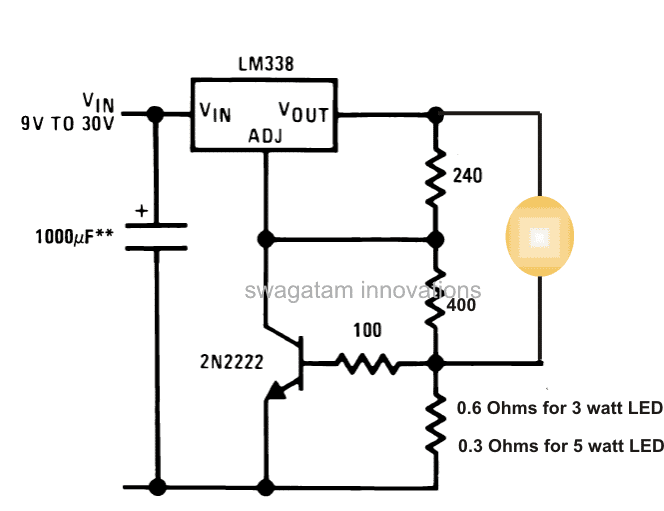
As shown in the circuit diagram below, in its standard mode the resistor 240 ohms is a regular placement, and the next resistor connected to it is the one which decides the voltage at the output of the IC. Here it has been calculated and set for producing around 3.3V at the output, which is the optimal voltage value for driving all types of white LEDs.
However the IC itself cannot control the current and normally would allow about 5 amp at the output.
We can see that the IC is associated with an additional active component which is the transistor connected to its ADJ pin.
The transistor here is employed solely for controlling the current at the output to the specified limits.
The resistor across ground and base decides how much current would be allowed to the output.
As indicated in the diagram, 0.6 ohms will pass about 1 amp maximum current which becomes suitable for driving a 3 watt led safely, and if a 5 watt LED needs to be driven safely, this resistor must be replaced with a 0.3 Ohms, which will allow a maximum of 2 amps of current.
The input to the IC can be derived from a standard transformer bridge capacitor power supply or from a suitably rated battery supply.
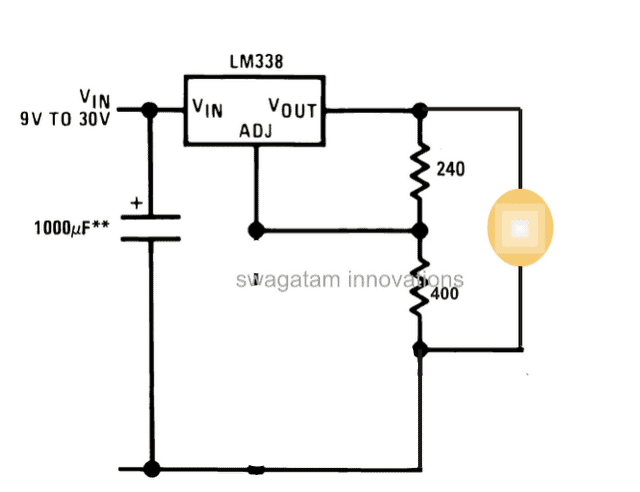
In fact, the transistor and the associated base/emitter resistors are absolutely not required, because once the voltage is set to precise 3.3V, the current would automatically get adjusted as per the LEDs specs.
So the correct circuit should be as given below:
Update:
The above suggestion is not recommended if the ambient temperature is above 25 degrees Celsius. Therefore users are requested to go with the first universal design using the BC547 as the current limiter stage, for enabling the intended current control function.
LED Driver Request
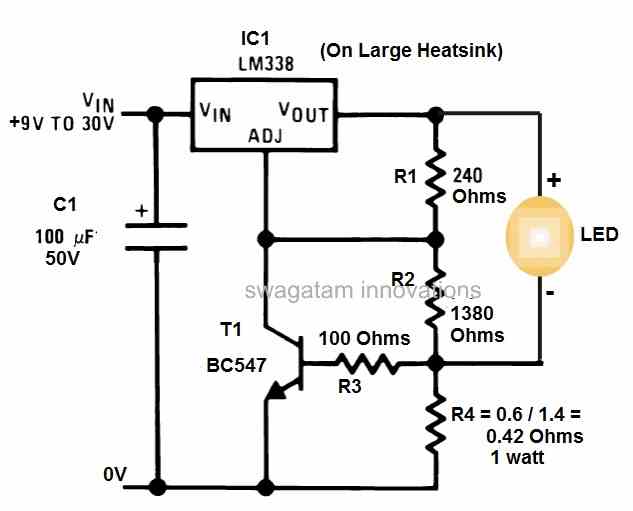
The following request for a customized 9 watt LED driver with constant current was requested by one of the avid readers of this blog
We need constant current LED driver. Supply in put is 11.0 vTO 15.0 vdcOut put required is constant current 1400 mA, 8.4VDC. The Load is 3 White Power LEDs, having Vf - 2..7 to 2.8V. This cluster will operate in flashing (Blinking mode). The circuit should have utmost high reliability, minimal number of components. We were using ONSEMI Linear LED Driver NSI 50350AST3G, (qty. 4 nos. connected in parallel)which is now not available Can you please suggest us some suitable Part or Circuit?
The following circuit diagram was suggested for the above application:


Comments
Hii sir
I want to make same dc to dc circuit but with 3 led of 3v, 750mA , all three in series.
Hi Naveen,
You can use the following calculator to fix the voltage for your 3 LEDs:
https://www.homemade-circuits.com/lm317-lm338-lm396-calculator-software/
The voltage must not exceed 9V at the output across the 3 series LEDs.
For the current sense resistor using the following formula:
R = 0.6 / 0.75 = 0.8 ohms
power = 0.6 x 0.75 = 0.27 watts or simply 1/2 watt
Thank you so much sir.
You are welcome naveen…
Can you help? I need to light from inside a box with a glass cover above using (I think) a small LED Mini Bulb Diode lamp (3W Warm White) that is powered by a rechargeable 12v (?) Lithium battery. I need to know which components (drivers?) I need plus a wiring diagram. Much appreciated if you can resolve.
What is the voltage rating of the LED?
How can I extend this for 10 watt
Please provide the voltage spec of the LED, I will try to solve it.
Design a constant current LED driver of 5watts.
Hi Sir,
I appreciate your work, i always visiting your website for learn something new.
There is a driver (mr16 led driver) on internet, i want to know how can we build it own. It work with 3w led input of 12v dc. Please check out the driver and make a article on it.
Thank you ????
Thank you Rohit, M16 LEDs are just like any other power LED, enclosed inside a multifaceted reflector (MR). So these LED do not require any special driver rather can be operated by any other LED driver which satisfies the exact voltage and current specifications of the LED, therefore if you know the V and I specs of the LED you can drive it with any SMPS having matching specs and current control feature.
Yes you make it as explained in my above reply.
I want to have glow a led lamp with the help of a power bank of 5v dc supply and usb
Hi Swag,
Do you any circuit with a 10W LED?
Hi Nelio, do you want an LM338 based circuit?
Hi,
One possibility. But if you have another, you are welcome.
The LM338 actually works like a current limiter, which can be also implemented through transistors. If you have a suitable power source from an SMPS or transformer then you can try any of these current limiters, as explained in the following article:
2 Best Current Limiter Circuits Explained
Hi Swagatam,
In the 1st circuit, what are the power ratting for the 0.6 and 0.3 ohm resistor?
Best Regards.
Hi Nelio, it can be calculated using the formula:
W = 0.6 x Max LED current limit
Can i use this circuit with 6 volt 4.5ah battery as input with 3 watt led 3 or 4 numbers in parallel, or can u suggest me a voltage regulator circuit
The first circuit can be used for your specific purpose.
Sir where is the link
Which link are you referring to?
Ok sir, thank you. How to calculate the resistance required?
You can replace the 400 ohms with a 4k7 preset and adjust it to get a precise 3.3V output for the LED.
The lower vertical resistor can be calculated using the formula:
R = 0.6 / LED max current
Thank u. Working fine.
Hi Swagatam, Please let me know if I can use this 3w LED circuit, in parallel to light up 12 LEDs from a single source of 15amp 12v power adapter. Will using the capacitor for each branch make it risky?
Hi Anish, you can use the single supply for all the LEDs, but you will have to incorporate individual current limiters for each of the LEDs. You can use a LM317 based current limiter as explained in the following ost for each of the LEDs separately:
https://www.homemade-circuits.com/universal-high-watt-led-current-limiter/
I already have 12nos LM338 with me. How do I use these instead of the 317s for each of the 12 LEDs (3W each). What are resistors to be used and the point where they’re to be inserted. Don’t I need the 2N2222 for each LED?
You can apply the first circuit, replace the 400 ohms with 4k7 pot and adjust the output to suit your LED’s exact voltage specs.
calculate the current limiter resistor using this formula:
R = 0.6 / LED Current.
To find LED current divide 3 watt with LED voltage
Hello, I have the following scheme but i dont know how to calculate resistors and stuffs since i am using a little more difficult scheme.
All the LED diodes are 3W and need 700mA to light in full power.
As power supply i am using PC power supply with 12V as input.
Check the image and i will be really happy if u can help me and give me guidinence.
prntscr.com/ietal9
Thanks
Hello, if you are using a fixed 12V then no resistors would be required, because you have 4 LEDs in series which will be getting only 3V across each of them.
Hello Sir,
My 3 wheel head lamp have 1w x 6 leds. 3 for dim and all 6 for head lamp. But Alread damaged its PT 4115. So which circuit is the best out of ur two ? Or need modification ?. Should I make 2 circuit that u selected for me for dim & head lamp. Reply me soon. buddhiws@gmail.com
Tks
Buddhi
Hello Buddhi, I cannot suggest until I know how these LEDs are configured, are they in series, or are they in parallel?, do they have resistors associated with them? please specify all these details or simply build a fresh new circuit for your bike headlights using my suggested design….
Hello Sandeep, yes it's possible, but I am not sure about the discharge rate and the back up specs of the battery, so I cannot confirm the 4 hour estimate.
you can use a 9V/2 amp solar panel, and regulate the output to 4V though a LM338 circuit, and supply this to the solar garden light design, this will allow you to get the intended results.
Hallo.. I need power supply with 0-6volt max output voltage for 6v 20watt halogen lamp. I use 10k potensio to adjustment 0-6volt lamp. Please how get it ..
Hello, you can use an Lm338 based power supply and adjust its output to the desired level
Hello Sir, I am Sunil from Pune (INDIA). Please can you guide me to design a circuit for 5W LED (the flat one) using mains.
Hello Sunil, provide all the details of your requirement, regarding the type of power supply you plan to use
What value of Capacitors and Resistors would I need if I had a 12V input ?
It can be same as shown in the diagram
Sir is this circuit suitable for 9 watt and 12 watt
As I want to use 9 parallel led of 1.2 watt and want to operate circuit at for 12 volt battery source led spec is 9- 10 Voff and 120 MA current please tell me what change is exaxtky required and Lm 338 required heat sink or suggest any other good ckt for different combination like strings of 4 led 3 volt Voff and 3 parallel series of this
Tarehi, you can configure this circuit to handle upt 150 watt LED….so yes you can operate the mentioned LEDs with the above circuits after changing the resistor values appropriately.
Hello sir
Sir can please tell me how many current does 3 watt led consume…how many miliamp current??
divide 3 by the LED voltage rating
Hi Swagatham,
I have 3.3V battery to power on the LED. But i wanted to control the brightness of it by PWM function from micro-controller output. Microcontroller also operates on same 3.3V battery. Can you suggest a way?
Hi Nishanth, presently I do not have this article in my website, but possibly I may soon post it with the required data.
Can this circuit be made dimable
since the current requirement is below 500mA, you can easily use a LM317 IC for the same….LM338 is not required….the circuit design for LM317 will be exactly similar to LM338
sorry , its my mistake …. yes my battery is 12 volt 7.2 Ah…… thank you very much sir… but one problem is that the LM338 currently unavailable in our local shop…… so is there any alternet for LM338, such as TO- series???
Nanigopal, Input is 12V 3amps?? sorry I did not understand? I thought the input was supposed to be from the battery 12V 7.5 AH (not mAH, right?
yes the LM338 along with the BC547 will control the current for the LEDs
5/12 = 0.41amps
Resistor = 0.6/0.41 = 1.46 or 1.5 ohms
wattage = 0.6 x 0.41 = 0.246 watts