In this post I have explained how just a single IC MBI6001 can be used as a transformerless constant current LED driver circuit for illuminating a chain of many LED in series.
The MBI6001 series of ICs are designed to work with mains AC inputs and convert it into a lower voltage DC output which may be suitably used for driving a group of series connected LEDs.
The IC features a pulsed current PWM output which enables setting of current to the precise levesl as per the rating of the LEDs.
The IC marked N1x are specified to operate with 110V AC inputs while the N2x series with 220V inputs.
Using the IC MBI6001
Warning: Circuits I have explained below are not isolated from mains AC, and therefore are extremely dangerous to touch in the powered and open condition. You should be extremely careful while building and testing these circuits, and make sure to take the necessary safety precautions. The author cannot be held responsible for any mishap due to any negligence by the user.
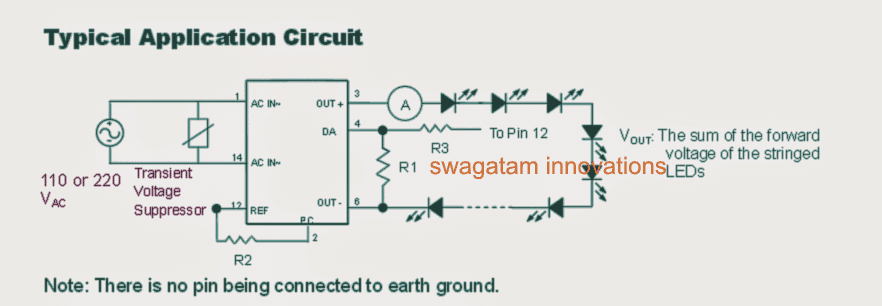
Referring to the standard transformerless constant current LED driver circuit using the IC MBI6001, we can see hardly any external components being used except a few resistors.
Here the resistors R1, R2, and R3 help to determine the correct PWM setting for achieving the intended constant current output from the IC.
The values of the resistors are recommended by the manufacturer and may be used as per the given instructions. We’ll talk about this in the later part of the article.
How many LEDs can be used at the Output.
The number of LEDs that can be safely used at the output of this IC is actually not critical. One may use any number of LEDs across the shown output pins of the IC, the voltage across the series is automatically adjusted by the ICs internal circuitry.
However the maximum combined forward voltage of the connected LED series cannot exceed the the input AC voltage value, otherwise the light from the LEDs may get reduced and dull.
Selecting Constant Current Limit for the LEDs
As explained earlier the IC uses PWM for controlling the current to the LED, and this may be set as per the requirement or the maximum safe limit of the LED string.
The above is determined by the various resistors included externally with the IC and is implemented by either increasing the PWM duty cycle or by decreasing the duty cycle of the PWM.
However 90mA is the highest amount of current that may be achieved from this IC, that implies high watt LEDs cannot be used with this transformerless constant current LED driver IC circuit.
Also, above 23mA the IC might start heating up, reducing the overall efficiency of the circuit, therefore above this limit the IC must be stuck with a piece of aluminum heatsink in order to maintain optimum response.
LED Specification Chart
The following table shows the values of R2 which may be appropriately selected by the user as per the preferred LED specs.
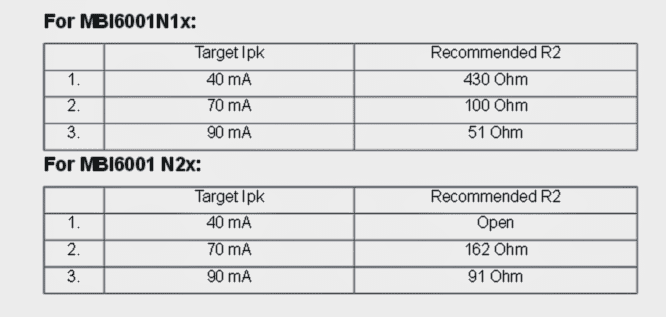
The resistor R1 may be replaced with a 1K resistor and is not much critical, although its purpose is intended for fine tuning the intensity of the connected LED string, therefore may be tweaked a bit for getting the desired intensity from the LEDs.
R3 is optional and may be simply omitted, its use is restricted for some advanced requirement and may be ignored for general application as described above.
Using a MOSFET
If you find the above mentioned IC obsolete, you can try the following universal MOSFET based constant voltage, constant current transformerless LED driver circuit.
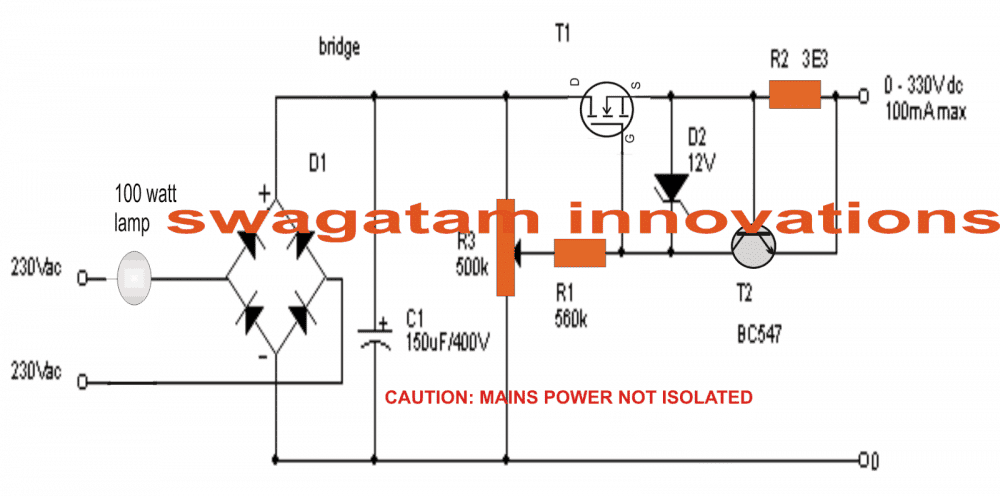
The series bulb can be eliminated if the load current is within the MOSFET's handling capacity.
R2 can be calculated using the following formula:
R2 = (Supply Voltage after bridge - LED total forward voltage) / LED Current



Questions & Answers
i have series of leds each led 3 volt. the driver is broke. The led driver name is “Mean Well” with DC 48volt and 1.3Amp. Can you give the circuit diagram based on that. Thanks in advance
I can definitely help you with a driver circuit for your LEDs. Please provide the specifications of the LED, in terms current and total wattage. And do you want the power supply to be capacitive and transformerless, please specify?
There are 2 circuits in the LEDs, 12 LEDs each 3 volts connected in series and then parallel to 12 more LEDs assembled in series. So there are a total of 24 LEDs. the wattage about 40 watt
OK, you can try the following design. Remember the circuit is not isolated from mains AC so it is extremely dangerous to touch in switched ON condition….
https://www.homemade-circuits.com/wp-content/uploads/2025/01/40-watt-led-driver.jpg
Many thanks for your speedy reply. i will try this scheme. god bless you sir
You are most welcome, Kurnia!
I am in need of ” Industrial Grade Adjustable 5 Ampere Constant Current Led Driver ” circuit.
If you have so kindly share to my mail id : shereesubahan@orangesorter.com
Vs=48V
Is=5 to 8A
P=385 W (max)
What is the LED specifications? Should it be a variable voltage output or constant 48V?
hello sir, i am working on a project of making an led strip constant voltage driver of 12v 5amps 60w. please help me to make it with easily available material and not much costly with transformer and transformer-less both
please provide your knowledge by which i make it . please it’s a humble request to you sir as i have already searching in various site but no one replied yet but please you help me out.
Hello Alok, for a 12v 5 amp LED you will need an SMPS only. You can purchase a new 12V 5 amp smps, the output will be constant since all good quality smps output is always constant.
Making and optimizing a 5 amp smps can be very difficult if you are not an electronic expert.
Please help me to make it
Dear Swagatam, thanks for this schematic, I had been looking for a circuit of this type for quite some time. The simplicity of this circuit is amazing, especially considering the fact that this circuit is meant for 220V mains operation.
I have a request for you, can you please publish a circuit using the LED driver IC type HW9316, which seems to be a very common chinese IC used in commercial LED bulbs of 7 or 9 watts. I have opened a few faulty bulbs and found this IC on the PCB. I could not find any application circuits for this IC on the internet.
Thanks
Thanks Chinmoy, I appreciate your interest very much…I tried to find the datasheet and some relevant information regarding the mentioned chip on the net, but could not find anything. Without the datasheet it wouldn't be possible for me to update the required article for you. I'll keep looking for it and when found will surely investigate it deeper and try to provide an appropriate circuit design using that IC
IC no you mentioned mbi6001 is not available to purchase anywhere online and also not sure where can i purchase.
Plz make a constant current power supply for high power leds too.
Would LM338 based current controlled driver work if I use a pc smps?LM338 is good upto 5amps.Right?Would it need heat sink(big/small?) if used at that high currents?
And if I am working on above 5A,say around 10-12A.Would LM338 still work?
yes LM338 would be able to control upto 5amps only, you can try an LM396 version for getting upto 10 amp control, or use the following transistorized version which can be modified to any desired level.
https://www.homemade-circuits.com/2011/12/make-hundred-watt-led-floodlight.html
Hi I want to make 24w Ac powered LED Tube Light. Please give me a safe Circuit Diagram.
Hi, you can try the following design:
https://www.homemade-circuits.com/2016/07/scr-shunt-for-protecting-capacitive-led.html
use 80V zener in place of the shown 12V zener….the 1K resistor must be rated at 2 watt
Hi thanks for your reply .. But. I thought of some more sophisticated circuit … Like a boost converter or buck converter .. With a coil or a booster circuit 12 to 200V..tengo several toroid … But I do not calculations to build the coil … From already thank you very much.
OK, then you can try the following circuit
https://www.homemade-circuits.com/2013/03/how-to-convert-12v-dc-to-220v-ac-using.html
Hi good afternoon … Can you help me with a circuit to test LED backlight TV screens .. I think you have to give 200v and 20 / 25mA constant … And with indicator, when current is flowing a LED indicator … Something like this. https://youtu.be/-BObg0K3IS4. Here in Argentina it is very expensive. Thank you very much ATTE Mario
Hi, you can implement this through two 0-12/220V/100mA transformers connected back to back.
the 220V of one transformer can be connected to the mains, its output 12V AC connected with the second transformers 0-12V wires….and then the output from the second transformer's 0-220V wires can be rectified through a bridge rectifier for obtaining the required 200V for the LED back light testing….a current limiter resistor can be employed in the middle for restricting the current to 10 or 25mA
can i get a circuit for 100 watt smd driver ,36 volts 5 amps
you can try this one
https://www.homemade-circuits.com/2014/09/32-v-3-amp-smps-led-driver-circuit.html
Sir,where can I find those ic ? I search online but nowhere I find it, please help me with this.
Sorry pintu, I too have no idea about it…
Sir, one more questions how many (mini-max) white led can I connect
90 LEDs max…..1 LED minimum
you can connect 90 LEDs in series according to me,
you can also try the following circuit instead which looks much easier and understandable:
https://www.homemade-circuits.com/2012/04/how-to-make-led-bulb-circuit.html
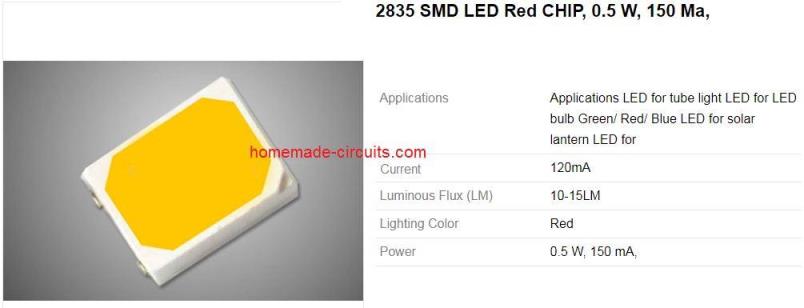
Sir,the single ic circuit, is it possible to use 5730 smd led 24 pic, if yes then what would be the value of resistor r1, r2, r3 and what is the meaning of the symbol is between 1&14 pin of the ic
Hi Pintu, any LED rated at below 90mA can be used with this circuit…
the symbol is of an MOV
bro,i use two series diodes 1N5408 with the positive line but still it heats up.pls do something.
bro that's impossible…that means either your input is much above the 4.2V level or your motor is drawing unnaturally high current…connect an ammeter in series with the motor and first confirm how much current the motor is consuming
I am interested with make 50 nos of 8 mm led series which vf=0.3v per led .
kindly suggest me value for R2 & R1
set output currrent 40ma min in MBI6001N2N
R1 can be 1K and R2 = 430 ohms
i like it, thank you master
you are welcome mas
Sir, plz help with any working circuit diagram for Mosquito , Insect Killer using Walton Voltage multiplier method. Output should be around 2kv. Wants to let it remain connected in ac mains like 'Insect Killer cum Night Lam' which are available on market but they are having 900-1000v in output and stop working in few days.
I tried to get help from Google but I am getting negative feedback most of the time. People are saying they getting dropped voltage at output. You have some circuit but they are battery operated and cant be remain on all the times.
Plz help with with a new topic on this Form.
Regards
Hi Ram, I'll try to post it soon…..
bro i have 3v DC motor but i want to run it by cell phone battery 4.25v.when i run that motor it become hot.So i used 4.7ohms 1w resistance to control the volt but resistance become hot like as fire.so pls help me to run that motor with cell phone battery.
yet = yes..
which diode did you use? use 1N5408 and yet two will help to drop more voltage and reduce heat…
I have used already one diode in positive line but diode become hot like fire.is it minimize by using two series diodes in positive line?
bro, use two series diodes 1N5408 with the positive line, that will solve the issue, remove the resistor it won't be required now,