In this article I will show how to construct an ultrasonic distance meter circuit using Arduino and 16 x 2 LCD. We are also going to see what an ultrasonic module is, how it works and how it can be used to measure distance.
What is ultrasonic?
An average healthy human being can hear frequencies ranging from 20 Hz to 20,000 Hz. Above 20,000Hz or 20 KHz human ear is incapable of detecting these frequencies. Any acoustic resonates greater than 20 KHz is called as ultrasonic and any acoustics resonates less than 20 Hz is called infrasonic.
Most of the domestic animals such cat or dog, can hear wide range of acoustic frequency greater than human beings. Some of our electronic devices may annoy them; that's why ultrasonic sound is being used in electronic mosquito repellents and also in dog repellents.
But many of the wild animals such as bats take advantage of ultrasonic, which helps them to determine the distance between the predator and prey. It has biological sensors which calculate the distance by emitting and receiving ultrasonic waves.
This principle is utilized in many modern electronic measuring equipment; I have explained how the same principle could be applied for the present project also.
Ultrasonic sensor:
We are going to use a special electronic device ultrasonic transceiver module HC-SR04 which is very popular and commonly available on e-commerce sites and electronic retail stores.
It consists of 4 pins Vcc, ground, trigger and echo. These pins are interfaced with arduino microcontroller.
It has a transmitter and receiver modules which look identical and are protected by aluminum cylinder and mesh at the opening of transmitter and receiver. The module also consists of microcontrollers which decodes echo signals.
To measure distance, we need to send series of ultrasonic bursts and listen for the echo. To do this we need to keep the trigger pin high for 10 microseconds, the transmitter sends out 8 pulses of ultrasonic bursts.
The receiver module listens to those bursts after hitting an obstacle. The echo pin gives out high signal proportional to the distance. The Arduino interpret the time of sent and received signals to determine the actual distance.
Since the sound travels at 340 m/s in air and the time can be determined by comparing sent and received signals, we can determine distance by using speed-distance formula:
Distance = speed x time
These values will be calculated by Arduino and print appropriate values on the 16 x 2 LCD display. The proposed ultrasonic distance meter circuit can show distance in centimeter as well as in meter.
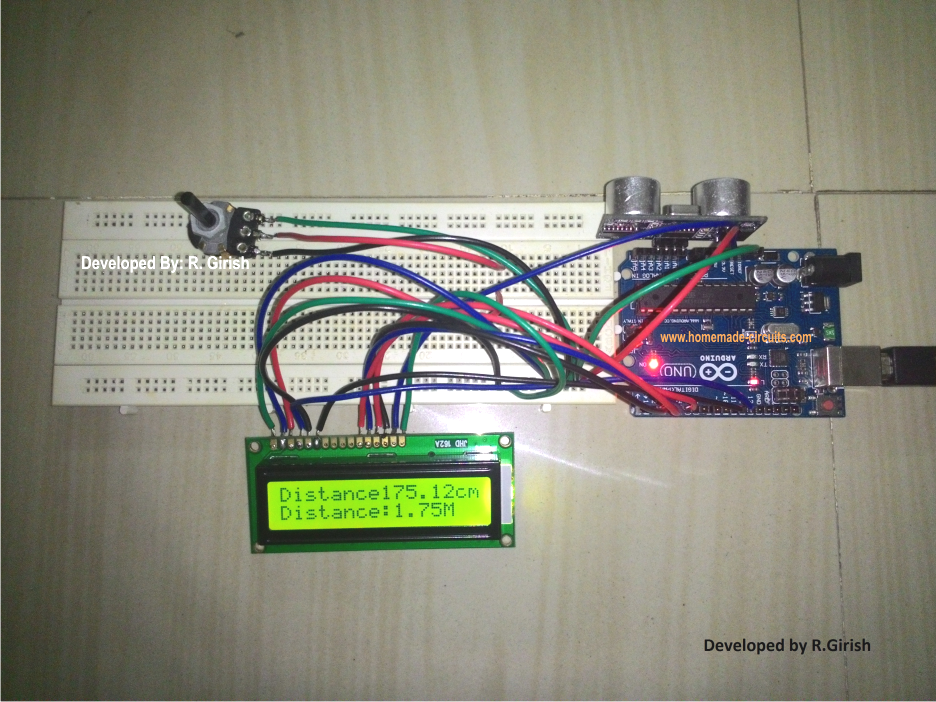
Author’s prototype:
Circuit diagram:
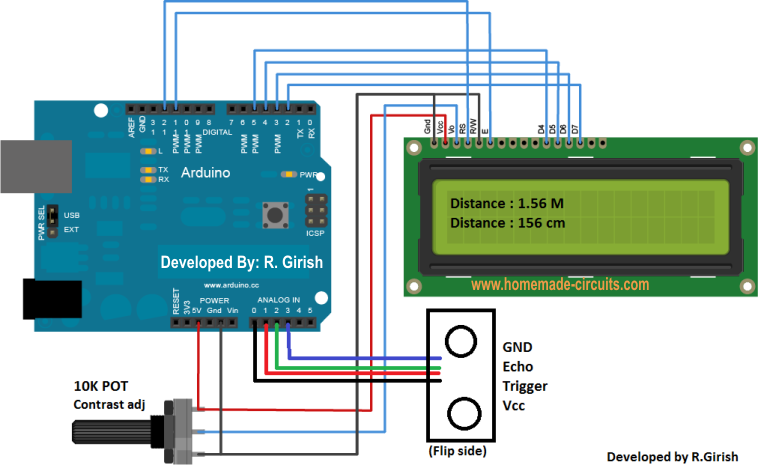
The ultrasonic distance meter circuit connection is done through a standard arduino-LCD interface, which we can also find on many other similar arduino-LCD based projects. The potentiometer is used to adjust the contrast of LCD display.
The ultrasonic sensor can be directly inserted on analog pin as shown in author’s prototype from A0 to A3, sensors facing outwards; this may reduce wire congestion while duplicating the above circuit.
Program Code:
#include <LiquidCrystal.h>
LiquidCrystal lcd(12,11,5,4,3,2);
const int trigger = A1;
const int echo = A2;
int vcc = A0;
int gnd = A3;
long Time;
float distanceCM;
float distanceM;
float resultCM;
float resultM;
void setup()
{
   lcd.begin(16,2);
  pinMode(trigger,OUTPUT);
  pinMode(echo,INPUT);
  pinMode(vcc,OUTPUT);
  pinMode(gnd,OUTPUT);
}
void loop()
{
  digitalWrite(vcc,HIGH);
  digitalWrite(gnd,LOW);
  digitalWrite(trigger,LOW);
  delay(1);
  digitalWrite(trigger,HIGH);
  delayMicroseconds(10);
  digitalWrite(trigger,LOW);
  Time=pulseIn(echo,HIGH);
  distanceCM=Time*0.034;
  resultCM=distanceCM/2;
  resultM=resultCM/100;
  lcd.setCursor(0,0);
  lcd.print("Distance:");
  lcd.print(resultM);
  lcd.print("M");
  lcd.setCursor(0,1);
  lcd.print("Distance:");
  lcd.print(resultCM);
  lcd.print("cm");
  delay(1000);
}


Questions & Answers
Can we have a hold data button to the circuit??
#include
this should be written as…
#include
Very good but I dont understand which distance how is working