• Skip to main content
  • Skip to primary sidebar

Homemade Circuit Projects

Need circuit help? Post them in the comments! I've answered over 50,000!

Blog | Categories | About | Hire Me | Contact | Calculators-online
You are here: Home / Sensors and Detectors / Industrial Valve Switching Detector Indicator Circuit

Industrial Valve Switching Detector Indicator Circuit

Last Updated on July 15, 2019 by Swagatam Leave a Comment

In this post I have explained a circuit idea which can be used for identifying the switching pattern of set of valves from a remote location, using just two wire from the valve sets to the indicator circuit at the distant location. The idea was requested by Mr. Andreas.

Table of Contents
  • Technical Specifications
    • The Design
    • 12 Channel Transmitter Circuit

Technical Specifications

Here is another circuit that could be need some solution. There are 12 valves that they serve filling actions. So what i need to do every time any of valve/s are getting ON,will activate a light indicator/s plus a buzzer to announce it from a distance of around 60-70m long.

In the analog world we need 12 light indicators and a buzzer plus a cable wire of at least 13 wires(12 for valves plus 1 for common).Since there is not any 13 wire cable, we must choose the next available which is 19x1mm and cost around $55.

Is there any other digital circuit that will do the same thing but with 2 wire only??(Buzzer will sound every time a new valve is ON also a muting switch)

The Design

The proposed 12nos valve activation indicator circuit can be implemented using only two wires with the help of the following circuit:
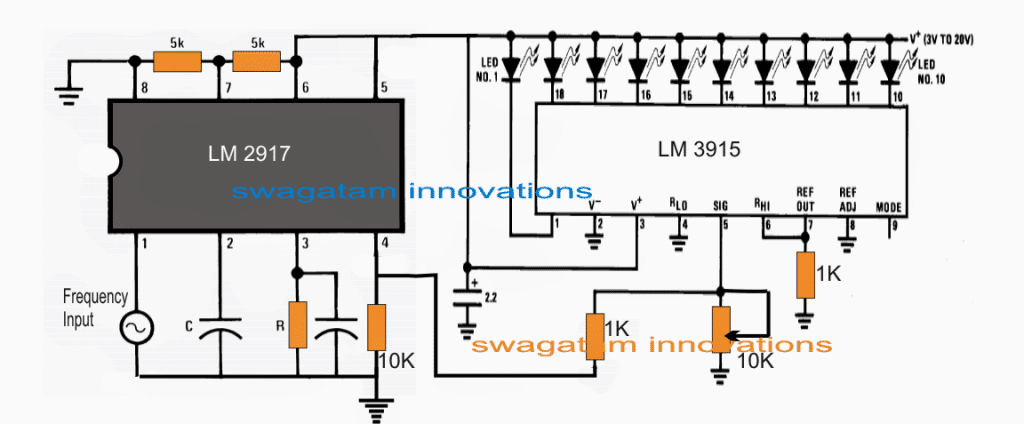
Referring to the above circuit schematic, we can see two IC stages, the left IC LM2917 forms a precise frequency to voltage converter, while the IC LM3915 is rigged as a LED dot mode voltage indicator stage.

The entire circuit is supposed to convert a varying frequency into a correspondingly shifting LED across the shown 10 LED outputs of the IC LM3915.

So basically any fluctuating frequency fed across pin#1 of IC LM2917 is appropriately converted into rising or declining voltage levels at its pin#4, which is fed at the sensing input pin#5 of the LM3915. This signal is instantly converted into an advancing LED "dot" across the given LED array from pin#1 to pin#10 of the IC LM3915.

The illuminated position of any of the LED across the given 10 outputs indicates the frequency level that may be available at pin#1 of the left IC.

The idea here is to set different frequency levels for the 12 valves through a IC 555 such that toggling of the particular valve produces a unique frequency, which may be further fed to the input of the above explained circuit.

Depending upon the frequency level, the corresponding LED may be expected to light up, thereby indicating which valve was activated at the remote location.

As we can see, a variety of signals (10 or 12) can be transmitted from the valve mechanism to the remote LED indicator location using just two wires, as requested in the above section of the article.

12 Channel Transmitter Circuit

The following figure shows the transmitter circuit which is supposed to be integrated with the 12 valves, although only 10 inputs are shown in the diagram, which may be appropriately upgraded to 12 or more by adding more capacitors to the IC 555 circuit, and also by cascading another LM3915 IC to the existing design for adding more LEDs in the sequence.
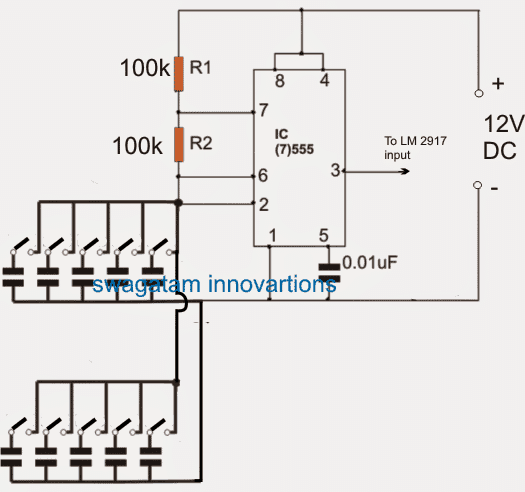
In the above diagram we are able to see, an IC 555 wired as an astable multivibrator circuit, wherein 10 individual capacitors with incrementing values are configured across the pin6/2 and ground of the IC. These capacitors are toggled by the 10 discrete relay contacts which in turn force the IC to generate the corresponding frequency at the calculated level, at its pin#3.

The relay coils attached with these contacts are rigged with the valve outputs such that the relevant relay coil gets energized as as soon as the matching valve is activated.

The above action causes the IC to generate a corresponding level of frequency which is transmitted through a pair of wires to the indicator circuit's input.

As explained in the initial section of the article, the IC LM2917 reacts to this input, converting it into a corresponding magnitude of voltage level for the IC LM3915.

LM3915 accepts the voltage level and illuminates the particular LED in response to the fed frequency level from the IC 555 circuit.

You'll also like:

  • How to Use IC LM393 as a Current Controller Circuit
  • How to Build a Rain Sensor Circuit
  • TTP223 touch pad side compressedHow to Use TTP223 Capacitive Touch Switch Module [Pinouts Explained]
  • Simple Soil Moisture Tester Circuit with a Single IC 741

Filed Under: Sensors and Detectors Tagged With: Detector, Indicator, Industrial, Switching, Valve

About Swagatam

I am an electronics engineer and doing practical hands-on work from more than 15 years now. Building real circuits, testing them and also making PCB layouts by myself. I really love doing all these things like inventing something new, designing electronics and also helping other people like hobby guys who want to make their own cool circuits at home.

And that is the main reason why I started this website homemade-circuits.com, to share different types of circuit ideas..

If you are having any kind of doubt or question related to circuits then just write down your question in the comment box below, I am like always checking, so I guarantee I will reply you for sure!


Previous Post: « Make this 2 Pin Bi-Color LED Flasher Circuit
Next Post: CREE XM-L T6 LED Driver Circuit – Specifications and Practical Application »

Reader Interactions

Need Help? Please Leave a Comment! We value your input—Kindly keep it relevant to the above topic! Cancel reply

Your email address will not be published. Required fields are marked *

Primary Sidebar


Categories

  • Arduino Projects (95)
  • Audio and Amplifier Projects (134)
  • Automation Projects (18)
  • Automobile Electronics (104)
  • Battery Charger Circuits (90)
  • Datasheets and Components (109)
  • Electronics Theory (150)
  • Energy from Magnets and Earth (41)
  • Games and Sports Projects (11)
  • Grid and 3-Phase (20)
  • Health related Projects (27)
  • Home Electrical Circuits (13)
  • Indicator Circuits (16)
  • Inverter Circuits (98)
  • Lamps and Lights (161)
  • Meters and Testers (72)
  • Mini Projects (28)
  • Motor Controller (68)
  • Oscillator Circuits (30)
  • Pets and Pests (15)
  • Power Supply Circuits (91)
  • Remote Control Circuits (50)
  • Security and Alarm (65)
  • Sensors and Detectors (107)
  • SMPS and Converters (46)
  • Solar Controller Circuits (62)
  • Temperature Controllers (44)
  • Timer and Delay Relay (50)
  • Voltage Control and Protection (44)
  • Water Controller (37)
  • Wireless Circuits (31)


Circuit Simulator

circuit simulator image


Subscribe to get New Circuits in your Email


Other Links

  • Privacy Policy
  • Cookie Policy
  • Disclaimer
  • Copyright
  • Videos
  • Sitemap

People also Search

555 Circuits | 741 Circuits | LM324 Circuits | LM338 Circuits | 4017 Circuits | Ultrasonic Projects | SMPS Projects | Christmas Projects | MOSFETs | Radio Circuits | Laser Circuits | PIR Projects |


Recent Comments

  • Swagatam on Simple Delay Timer Circuits Explained
  • Maddy on Simple Delay Timer Circuits Explained
  • Swagatam on HX710B Air Pressure Sensor Datasheet, How to Connect
  • Swagatam on Simplest One Transistor Regulated Power Supply Circuit
  • Luciano Orozco on HX710B Air Pressure Sensor Datasheet, How to Connect

Social Profiles

  • Twitter
  • YouTube
  • Instagram
  • Pinterest
  • My Facebook-Page
  • Stack Exchange
  • Linkedin

Calculators

  • ZVS Induction Heater + Tank Calculator Tool
  • Zener Diode Calculator
  • Wire Current and Thickness Calculator (Ampacity Calculator)
  • Voltage Divider Calculator
  • Transistor Base Resistor Calculator
  • Transistor Astable Multivibrator Calculator
  • TL431 Calculator
  • Solar Panel, Inverter, Battery Calculator
  • Ferrite Core Air Gap Calculator Tool
  • Parallel MOSFET Calculator Tool: How to Connect MOSFETs in Parallel Safely
  • LC Resonance Calculator for EV Battery Charger Circuits
  • LED String Series Resistor Calculator
  • Calculator to Design a High Power 3kW PFC (Power Factor Correction) Circuit
  • Passive Power Factor Correction (PFC) Calculator
  • LM567 IC Calculator Tool
  • SMPS Flyback Boost Converter Calculator
  • Shunt Resistor Calculator for Ammeters
  • SCR and Triac Gate Resistor Calculator
  • Battery Back up Time Calculator
  • Boost Converter Calculator (Non-Isolated)
  • Bootstrap Capacitor Calculator
  • Buck Converter Calculator
  • Buck-Boost Converter Calculator
  • Capacitance Reactance Calculator
  • DCM Flyback Transformer & Wire Gauge Wire Size Calculator Tool
  • Filter Capacitor Calculator
  • IC 4047 Calculator (Frequency and PWM)
  • IC 4060 Calculator
  • IC 555 Astable Calculator
  • IC 555 Monostable Calculator
  • IC SG3525, SG3524 Calculator
  • Inductance Calculator
  • Induction Heater Inductor and Resonant Frequency Calculator
  • Induction Heater Work Coil Calculator
  • Inverter LC Filter Calculator
  • LC Resonance Calculator
  • LED Current Calculator
  • LM317, LM338, LM396 Calculator
  • NAND/NOT Gate RC Values Calculator
  • NOT, NAND Gate Frequency Calculator
  • Notch Filter Calculator Tool
  • Ohm’s Law Calculator
  • Phase Angle Phase Shift Calculator
  • Power Factor (PF) Calculator
  • RC Filter Calculator
  • Reactance Calculator
  • Sine Table Calculator for SPWM Arduino Code
  • Small Signal Transistor(BJT) and Diode Quick Datasheet
  • SMPS Calculator for Toroidal Ferrite Transformers
  • SMPS Flyback Transformer Calculator – Design by Target Duty Cycle
  • TL431 Calculator

© 2026 · Swagatam Innovations