In this post I have explained how to set or adjust an opamp 741 IC based battery charger circuit for implementing an automatic cut-off for the connected battery once it reaches the full-charge level.
Since I have many such IC 741 battery charger circuits posted here, the instructions will be helpful for correctly setting up most of those relevant circuits. The query was put forth by Mr. Chaw.
How to Setup Charging Thresholds
I have finished with the universal Automatic 741 battery charger circuit prototyping. In order to test, can u explain me briefly about the settings for input and trimmers etc before i charge the battery ?
Let's say now I am going to charge Ni-MH 400mAh 7.2V battery:
(1) What is the power supply input voltage and current ? According to what u have mentioned, any voltage between 15-24V and 5A setting will do regardless of the battery voltage ?
(2) How can I predict and calculate my charging time to the battery ?
(3) What are the modification to 4k7 and 10k trimmer before charging ?
(4) Last but not least, if I want to add the LED showing the charging status, where should i add this to ?
I am sorry for asking too many questions, but thanks for all the way helping me out with my internship project. May god bless u for ur hardwork. Really appreciate it !! 😀
Video Explanation:
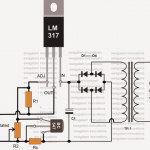
Circuit Diagram

PCB Design

Analyzing the Circuit Query
Hi Chaw,
The instructions given below will help you to understand regarding how to quickly set up an opamp 741 battery charger circuit for an auto cut-off operation.
1) First disconnect the 1N4148 diode link connected at preset center arm and also the LED 4k7 resistor end from the base of the transistor. Connect this 4k7 end to ground temporarily.
2) Do not connect any battery as yet.
3) Feed an input voltage that may be at least 3 to 5V higher than the battery voltage.
4) Adjust the 4K7 pot to get a 8.5V across the terminals which is to be connected with battery.
5) Now adjust the trimmer such that the red LED just lights up.
That's all, your circuit is all set now
Reconnect the 1N4148 end with the preset center terminal as before and restore the LED 4k7 connection with the BC547 base.
You can now charge the battery from this charger and witness an auto cut off when the 7.2V reaches 8.5V.
The back up time will depend on the input current, if it's at the full 1C rate then you can expect the cell to charge within 1 hour or time.
you can add another LED across positive rail and pin#6 (for IC 741) with a series 1K resistor for the charging ON indicator
Estimating Charging Time
Yes noted, I have followed ur instructions to make a setting before charging. I have mentioned that I will made use of a 7.2V battery to test. In this case, may i know the purpose of why u advice me to get a 8.5V at the battery terminal ?
Like for example, if I were to charge another battery (12V,24V,etc...) with different voltage, how do I know the voltage that I should achieve ? Additionally, adjusting 4k7 trimmer to get 8.5V at the battery terminals (cathode of 1N5408 and ground), do I also need to get this voltage at the Vout pin of LM338?
Since my battery is 400mAh, I try to use 40mA for my input current because I got read from some of the comments that u suggested to use the input current which is five or ten times lesser than the battery mAh.
Thus, the time taken will be up to 4 hours to charge my battery, am I correct ? Is there any way to shorten my time taken like increase the input current in the other way ?
One more thing to clarify is that if I test with my multimetre to the battery terminals while charging, the voltage will keep on increasing after some time and when it reaches 8.5V, it will auto cut off the current and said to have a full charging ? I do apologize for so many questions every time sir.
Since I am still doing an internship, I want to understand in depth about all this project. I really do appreciate your patience to me 😀 With regards, Chaw
Charging a 12V Battery Optimally
For a 12V battery the recommended full charge level is 14.3V, so with this yardstick we can easily calculate the full charge levels of other batteries using the following simple cross multiplication formula:
12/V(Batt) = 14.3/V(full)
Here V(batt) is the normal batt voltage of any battery, and V(full) is the required full charge result.
the charging voltage should be measured and set after the diode cathode so that the diode FWD drop is countered appropriately, meaning the LM338 terminal voltage will be 0.6V higher than the above level.
For a lead acid batt the 1/10th charging current becomes a crucial factor and is strongly recommended but for Li-Ion this may not be the case, these batts can be charged even at their full AH rates for achieving a quick 1 hour or 2 hour charging period (temperature of the batt may go significantly high and must be monitored in such cases).
Yes the battery voltage will gradually keep rising while it gets charged, and as soon as it reaches 8.5V, will be auto cut-off by the opamp circuit.
Wish you all the best!


Comments
can use 12v 7ah betterie
yes you can
thank sir..
and Maximum amount of AH battery can be used on this circuit. If you use Battery above 7AH, then how many VOLT input is to be given. And what to change
Deepak, 50Ah is the maximum if the LM338 is included, you can upgrade the LM338 with an outboard transistor in increase this limit
Dear Swagatam then I reconfigure the charger with the procedure and then connect a discharged battery, and then the red led will turn off and activate the power?
Patrick, if you do it with proper understanding then it will definitely work.
You can first try it without the 1N4148 feedback link.
check whether the red LED switches ON or not once the battery reaches full charge level. If it does then your charger is working correctly.
s
Dear Swagatam but in the article indicates that there should be no battery connected, then the battery that I connect in the configuration must be charged or discharged?
Patrick, yes that’s correct!
Actually I thought you had completed all the procedures and were seeing the RED LED ON during initial power switch ON, without a battery connected. but anyway after setting up the red LED if you connect the feedabck then the opamp will get latched, and you will find the red LED always ON until power is switch OFF and ON again, with a battery connected…you will have to understand how the feedback is designed to work, or you can simply remove it.
during setting up procedure the feed back should be removed, no battery should be attached, and the preset flipped up down to identify the red LED trigger point, and finally the preset should be set at the point where the LED just switches ON…this should be done with the correct supply fed to the circuit.
once this is done the feedback can be connected back in position.
next, for verifying the results, a discharged battery may be connected and power switched ON, you will find the red LED shut off and the battery charging… until the set charge threshold is reached.
Dear swagatan I do everything that you indicate in the configuration and then I connect the diode 1n4148 and the resistor of 4,7k when I connect I stay on the red led and there is no voltage output
Dear Patrick, if you do it without a battery connected then naturally the circuit will get latched through the red LED, and that means you have not followed the explanation and the instructions given in the article.
I hope you have adjusted the preset as mentioned in the article and I hope your oamp is switching the LED ON/OFF at the thresholds??
If it is then you must test it with a discharged battery connected, and using an input supply whose current much lower than the battery’s aH rating.
and just following my instructions will not help…you will have to understand how the opamp is designed to function, once you understand it will be matter of seconds solving any issues that may possibly arise.
…if you are not able to “handle” the feedback link, don’t bother,…remove it, just make sure red LED lights up at the full charge threshold level…that’s all, even in this condition it will still prevent the battery from getting over charged.
Ok thanks, Dear Swagatan another query the red led that indicates? How do I know my battery will be fully charged? another query instead of placing the lm338 could place a lm317, since the current of my battery is low?
The red LED will light up when the opamp detects full charge voltage level on the battery, as per the adjustment done on the preset.
yes, you can replace LM338 with LM317 for low current battery.
Dear Swagatan for an 18 V battery do you need to make any changes?
Dear Patrick, for 18V battery you will need a charging 22V input which is above the max limit of IC 741, therefore you may have to use a 7812 IC for supplying the pin#7 of the IC, and also use a 1K in series with the upper arm of the 10K preset. that’s all
Hello Swagatam,
Thank you for all your help. I'm trying to implement this circuit for a 20V (2Ah) Li-Ion battery, so what should I change to get that done? Since the cutoff setup seems to require removal of parts, how would set up take place if this circuit were built on a PCB?
you just need to insert and solder the feedback 1N4148 diode into the PCB as soon as the setting up procedure is completed.
Thank you wiseman, you can use the same circuit for safely charging your 20V Li-ion battery, just alter the following two things:
use a 22k pot for the LM338 voltage regulation instead of the shown 4k7, and use the 741 IC which is rated to work with 32V, if it's not available then replace the 741 with a LM321 IC and configure the pis accordingly.
Hello Swagatam,
Thank you for this circuitry. I am trying to modify this circuit for a 20V Li-Ion battery, so what should change? It appears that one has to remove circuit parts to set the voltage. How should it be set up if one is interested in building the circuit in PCB?
Thank you for your response.
Hi Swa,
Thanks for your kind support.
I have spare IC TL082, can use this IC istead of LM 741.
Thanks
Kanta
Hi Kanta, it can be used according to me.
Hi Swa,
The circuit that i use is using LM 741. You are right, pin 6 produces only arround 1.1V when the battery has not reached the preferrable full charge voltage. The reason why last time it can be 2.5V, because the LM 741 was not conducting yet as the pin7 is not properly connected to Vcc+, but pin 6 got the positive supply from the feed back voltage of the LED of the charging indicator (positive trail to pin 6 zener anode lead with 1K resistor).
I have done some modifiction as follows
-. Reduced the zener of the pin 2 to 4V3. Retained the resistor value of pin 2 as it is
-. Reduced the value of the resistor of pin 3
-. Removed the charging indicator LED, as it caused the feed back voltage which is adding the voltage of the anode lead of the pin 6 zener. This caused the BC 547 conducting all the time.
-. Installed beeper using IC555 and switching transistor 2N2222. The beeper will sound once the battery get fully charged.
-. installed a 2 poles 3 position selector for: 1. setting the cut-off; 2. connect discharged battery, then wait for few seconds untill the charger voltage come down, then; 3. Connect the cut off.
-. Increase the value of the relevant diodes to accomodate charging current up to 5Amp.
-. For charging indicator LED, i installed a LED differently.
By doing that, the charger is perfectly functioning for charging 6V to 24V battery with max 50AH.
Thanks for your support.
Kanta.
That's great Kanta! Although I believe few of the modifications were not required, if it's working for you then it's absolutely fine….
Hi Swa,
What if i lower the zener value of the pin2 from 6V2 to 4V7 and also change the resistor value on its cathode lead to 1K. I will also remove the resistor on the pin 2 and pin3. By doing this i hope the cut off can be workable for charging 6 V up to 24 V battery. Do you agree? You kind advice please.
For your information, as for the pin6, the lowest voltage comes out from pin 6 is ranging 3.1 to 3.3V, hence, the zener of the pin 6 should not be lower than 3V, otherwise the BC 547 will always be conducted. That happened when i used the 2V7 zener on the pin 6, the BC547 always conduct eventhough the trimmer of pin3 on the lowest position.
Thanks
Kanta
OK then no issues…
Hi Swa,
Off course i dont use 7812 for the charger. iC 7812 is only for dedicated power supply of the LM741, because my charger transformer produces 24 V.
Thanks
Kanta
Kanta, Which schematic are you using, because 7812 cannot be used in the above shown design?
I am assuming that you are using the following schematic
https://www.homemade-circuits.com/2012/07/make-6v-4ah-automatic-battery-charger.html
Pin6 should not produce more than 1.5V as offset voltage…3V is too high…may be your IC is not good something's not correct in your circuit.
You can use 4.7V as the reference zener but that may not be related with your issue.
The circuit explained in the above article will work only with IC LM317 or LM338…it won't work with 7812
Hi Swa,
I have constructed the charger using the above circuit. However, when i set the cut off, it only works when the voltage of the Power supply reach above 12.3 volt. When i measure the voltage of the pin 6 of the LM 741, if the power supply below 12.3V, the voltage of pin 6 is allways below 3.1 to 3.3V, eventhough i have trimmed the preset of the LM741 on the max level.
Can you please tell me what cause this. How do we modify the circuit in such a way so that we can use it to have automatically cut off for charging the battery below 12 V. I will use it to charge 6V, 9V and 12 V battery.
Thanks
Kanta
Kanta,
6.2V is OK…
pin#6 zener is only to block a possible leakage (1V) from the IC output which can be easily done with a 3V zener, so that's fine too.
If you wish you can remove the 10K resistors from pin3 and pin2 although that's irrelevant…
just adjust the preset at pin3 such that at the preferred over voltage pin3 voltage is set to be just above pin#2 reference voltage that is 6.2V
for example if the overcharge level is 9V then at this voltage pin3 voltage should be set at 6.3V or 6.4V which will trigger the output to go high.
I have explained the procedure thoroughly in the article you may want to go through it also for more info
Hi Swa,
I am using zener diode of 6V2 at the pin 2. I am using IC 7812 to feed the power of the IC 741. The zener for pin 6 is 3V. The charger power is supplied by 24V 5A transformer.
Could you please give me the proper value for the zener at pin 6 which can be used for cut off function for 6V up to 24 V. Should we also change the Resistor value at pin 2 and pin 3 ?
Thanks
Kanta
Hi Kanta, which zener diode did you use as the reference at pin#2?
the idea is simple, the pin#6 will become high whenever the voltage at pin#3 goes above the reference value set at pin#2, therefore pin#3 preset must be adjusted such that the voltage at pin#3 just goes above pin#2 reference at the preferred battery full-charge voltage level.
Hi Swa,
I am constructing the charger using the above circuit, i just notice that the shop gave me the wrong zener of 2V7 instead of 3V for the pin 6 of the IC. Can i use the 2V7 zener ?
Thanks
Kanta
Hi JK, that can never happen since the 220 ohm has no place to get shorted.
the 4k7 pot may short the ADJ pin and the 220 ohm to ground while adjusting, but that's a normal feature of the IC….therefore the 220 ohm has no reason to burn unless you have connected the IC pins wrongly or your IC itself is faulty.
Hi Sir,
I made the circuit. But the 220ohm resistor at the output of LM338 is burning after a few seconds. I believe this resistir does not need to be a high wattage as it does not expect high current here. I am using a 1/4w resistor.
Please guide me.
regards
JK
will do!
Sir,
can we use a 3.3V zener here as 3v rated is not available to me.
Regards
JK
Hi Kanta, 2v7 zener will also work, you can use it at pin#6 of the IC
Hi Swa,
I become confuse.
Can you please explain why the end lead of the trimmer is connected to the anode of the 1N5408 in the above circuit. While, I saw in your other charger circuit (please open the link beneath), it is connected to the cathode of 1N5408?
https://www.homemade-circuits.com/2012/07/make-6v-4ah-automatic-battery-charger.html
Thanks
Kanta
Hi Kanta,
Both the diode connections are OK, they are just connected in two different ways, that's all……
Hi Swa,
Sorry, to ask you again. The trimmer of 10K (on LM 741), should be connected to the Anode or Cathode of 1N 5408 ?
As for zener at pin 2 of LM 741, can i use 6.2V ?
Thanks
Kanta
Kanta, one of the end leads of the trimmer is connected with the anode of the 1N5408, center with the 741 pin#3, and the other end lead with ground.
any zener within 3 and 10V can be used.
Hi Swa,
LM 741 as shown in your circuit aboved, can take up to 24V ?
Thanks
Kanta
thanks for the update Kanta!
Hi Swa,
Can LM 741/UA 741 take supply voltage up to 24 volt ?
What if i use LM 321, can this IC take upto 24 volt ?
Thanks
Kanta
Hi Kanta, LM321 can take upto 32V, not sure about the other variants of 741
not in dis circuit sir ,just a personal question .need helpon that thanks
am not geting it right.wil try again .was too lazy to cross check my components.anyway,wl get newer ones.sir, one question is i need a zener diode of 12v 1watt bt all i can get is 12v 1/2watt pls hw can i add zener diodes to give 12v 1watt.tnx
which zener diode you are referring to in the circuit??
Good day sir,
Please can this circuit be used in an inverter to cut off full charge?
I see the input amps as just 50.
Thank you sir.
you can try the following circuit for a 200AH battery:
https://www.homemade-circuits.com/2011/12/high-current-10-to-20-amp-automatic.html
Thank you sir, but is there any modification you can make to make it habdle around 200Ah battery?
Thank you.
Hi Abubakar, yes it can be used but only for batteries below 60AH