Amazed to hear this! Yep that’s actually possible, you would need only one relay and a handful of diodes to make a simplest one relay automatic battery charger circuit.
How it Works
The idea struck me while trying to design the easiest possible battery charger circuit for one my clients.
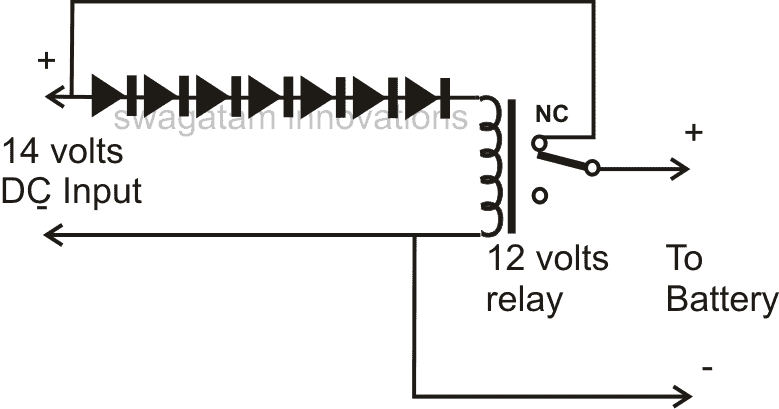
The concept is simple; just raise the operating or triggering voltage of the relay up to the optimal battery charging threshold voltage by dropping the required amount of supply voltage to the relay coil, with the help of series diodes.The idea may be understood from the following points:
Take an ordinary relay, measure its triggering voltage by carefully applying a variable voltage across its coil.Now suppose the triggering voltage of the particular relay was about 9 volts, and also assume you want to raise its voltage to 14 volts, which may be your 12 volt battery’s charging threshold voltage.
We know that a 1N4007 diode drops about 0.6 volts across it, so if we add sufficient number of diodes in series with the relay coil would hopefully pull its tripping or triggering voltage to about 14 volts.
That means, 14 – 9 = 5, we’ll require 5/0.5 = 10 diodes in series to achieve this rise in the triggering voltage of the relay.That’s pretty simple and interesting isn’t it?The rest may be done with the help of the shown diagram…..your simplest single relay automatic battery charger is ready.


Comments
there would be a problem with the triggering of the relay which will not be firm from the beginning and a transition period will create an imperfect contact with vibrations of the contacts
Why it will not be a firm triggering? Vibration issue can be solved with a 220uF capacitor connected across the relay coil…
i have an electric bike with a 48v battery the bike model is vivi ebike f26f…. i believe if in the brief research i did and hoping i wAS RIGHT IN my take from the information that was presented to me and was understood as it was intended to if my assumption is right then the battery(48v battery) can be charged with lowest voltage output of roughly 39.4v or lets just say 39v (obviously will take a longer time period to fully charge with this voltage output) and the actual charger provided to consumer who purchases this model ebike is 54.6v
2a output . so i need a 48v 13maH – 54.6v 2a if i am stating all accurately awesome if not could you help by one simplifying the correct electrical spesifications for this model for me and my main and most important inquiry for this is i have had my charger lost or stolen or w.e i have looked around in stores for a charger that will do the job and i have to if i want it as soon as say the following day it needs to be like amazon well amazon messed it up sent the wronf onw then sent it back from the locker . for the electrical v output i need from a power brick charger. i am now more determined to turn this 24v output power brick into the right voltage and ampage of my needs. it can be easily done?
If your battery is a Li-Ion battery (and it should be a Li-ion battery for a bike), then the actual full charge level of your battery has to be 50.4 Volts, and the lowest discharged level is supposed to be 36 Volts.
So your charge must be regulated to produce around 50 Volts with a maximum constant current of around 50% of the battery Ah rating.
Please let me know if you have any further questions…
Hi, Thank you for shearing the knowledge and well explanation. I have made a 2 battery charging circuit. I am having a problem of shattering relays when it cutting off the battery charging voltage. Please any suggestion much appreciated.
Thank You.
To prevent chattering of the relay you can try adding a 470uF capacitor parallel with the relay coil.
Thank you for the quick response. Could you please let me know type of capacitor, electrolyte or any kind. Thank you sir.
A 470uF capacitor will be always an electrolytic, so it should be an electrolytic.
Dear sir,
Can we use resistor or a pot instead of diodes.
No, pot or resistive divider will not work instead of diodes.
Dear sir,
I would like to know whether it is Ok if I charge the 12v 36 ah car battery continuously with a 14v 1amp charger without auto cutoff circuit. I appreciate your reply.
Hello MI,
yes it is perfectly OK. but with 1 amp your 36 Ah battery cannot charge properly, or might taken a very long time to get fully charged.
I want some simple 5 volt relay projects with led
i also purchase pcb boards of this project
You can use all the 12V relay projects from this website and convert them to 5V relay projects by replacing the 12V relay with a 5 V relay and replacing the 12V supply with 5 V supply
How to design a relay to fix between laptop charger plug and brick and to control the relay using mobile phone
Hi,
exactly what I was looking for (I was always thinking of a way with Z-Diodes).
But I believe there is a small error?
You write:
“14 – 9 = 5, we’ll require 5/0.5 = 10 diodes”
0.5 represents the Voltage drop of the diode, but in the N4001 example it would be 0.6 right?
That would change the calculation to 8 Diodes?
Thanks,
Markus
Thank you for your feedback and suggestions!
Please share a automatic charging cut off circuit for 12v 35Ah battery.
can I use 12v 2A tranfo.?
you can these circuits:
https://www.homemade-circuits.com/high-current-10-to-20-amp-automatic/
https://www.homemade-circuits.com/opamp-low-high-battery-charger/
Hi, friend this is can workout well charge SLA battery?
yes it will work….
yes relay starts to switch on and off. i have made this circuit.this is due to disconnection. it order to overcome this connect 14v dc to battery positive terminal not through the NC of relay.
Sir, thank you for sharing your idea on this simple circuit.
What components will be required if I need this same simple circuit to charge 48 volts battery made from 4 x 12. The battery AH is not important.
anticipating your quick response
Thank you once more
sorry this circuit is not recommended for a 48V battery because too many diodes will be required for the 48v operation …….moreover the design is not too accurate.
Actually, I was wrong in acknowledging the zener idea, it won't work.
It has to be done exactly as suggested in the diagram in the above article. 1N4007 or 1N4148 in series with the relay coil is the only correct way of doing it.
hi i take your idea and make this circuit …
im75.gulfup.com/3SLo5.png
Actually, I was wrong in acknowledging the zener idea, it won't work
It has to be done exactly as suggested in the diagram in the above article. 1N4007 or 1N4148 in series with the relay coil is the only correct way of doing it.
i take your idea and made this circuit :im75.gulfup.com/3SLo5.png
Please share a automatic cut off circuit so that , I can charge a mobile battery , with mobile charger.
you can try the second circuit published in this article:
https://www.homemade-circuits.com/2012/07/make-6v-4ah-automatic-battery-charger.html
12v input will not charge a 12V battery