In our previous article, I have explained how to interface temperature humidity sensor with arduino and read out displayed on serial monitor of arduino IDE. In this post I have explained how to display the reading on a 16x2 LCD display for the proposed digital temperature/humidity meter using Arduino.
Introduction
This project may be used as room thermometer as well as humidity meter, since both the functionality is integrated into one sensor.
If you haven’t read the previous article yet, please check it out. It covered the basics of DHTxx series sensors.
Now, you know quite a bit about DHTxx sensors. It is better to use DHT22 sensor for projects which you are going to use for long term.
Prototype Image:

The Design:
The connection between LCD and arduino is standard, where you can find similar connection on other LCD based projects.
The program is written in such a way that, you just need to insert the DHT11 into the right port on the Arduino. This will reduce wire congestion during prototyping this project.
If you want to sense the ambient temperature around some area/circuit you may extent the wires from the sensor. So that you’re whole setup may be made inside a junk box and sensor is extended out of the junk box, like a probe.
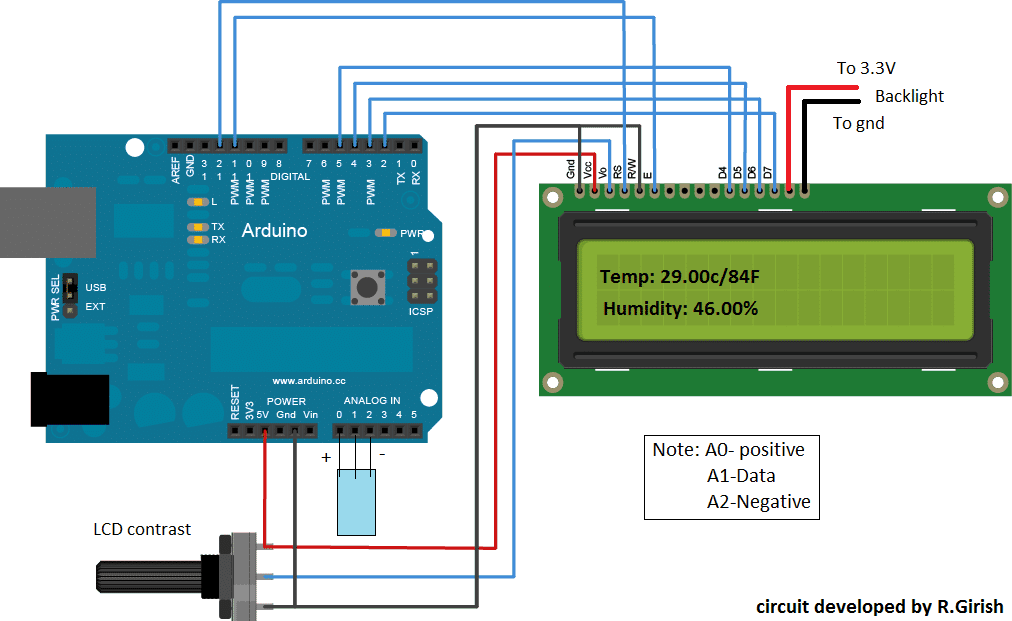
You can use your favorite Arduino board for this project, but my suggestion is to use “Arduino pro mini” which is less expensive and small in size, which could easily fit into a small junk box for such simple projects.
There are lots of error detection mechanisms written in the DHT library to inform the user about error. But to make the program simple I have just added one error detection mechanism which is illustrated below:
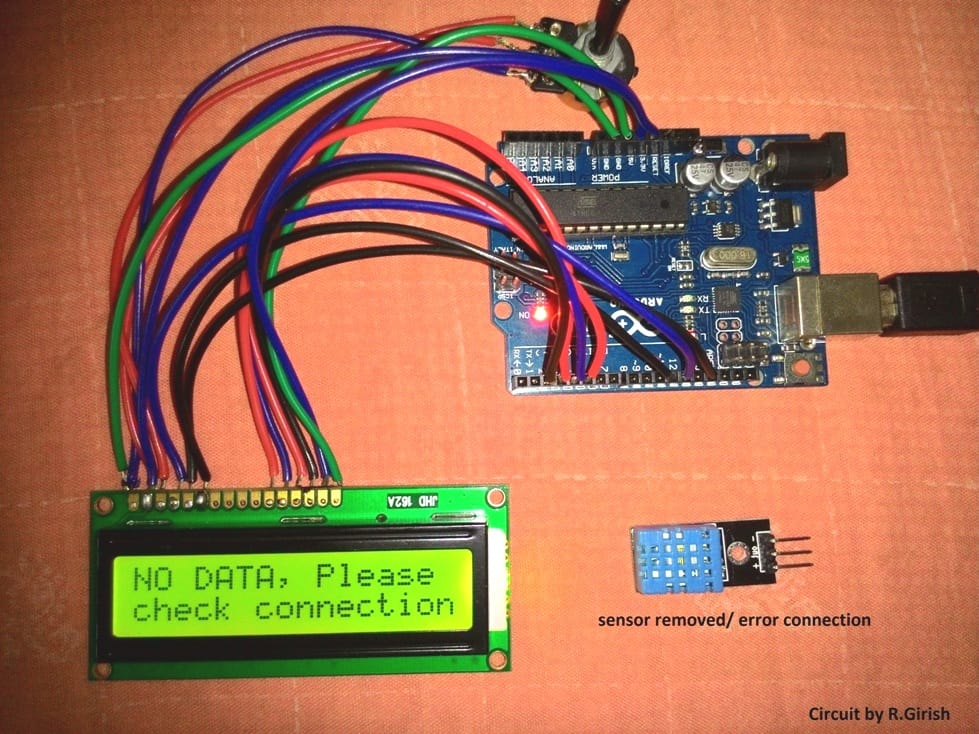
Mostly errors are due to faulty connection between sensor and arduino other errors less likely to occur, since tiny amount of data is transferred between arduino and sensor. This doesn’t mean that other kind of error won’t occur.
To get an idea about all kind of error associated with this sensor, please check out example code in “DHTlib”.
Program code for the above explained digital temperature, humidity meter using Arduino :
Program Code
//------------------Program developed by R.Girish-----------------//

#include <LiquidCrystal.h>

#include <dht.h>

dht DHT;

LiquidCrystal lcd(12,11,5,4,3,2);

#define DHTxxPIN A1

int p = A0;

int n = A2;

int ack;

int f;

void setup()

{

lcd.begin(16,2);

pinMode(p,OUTPUT);

pinMode(n,OUTPUT);

}

void loop()

{

digitalWrite(p,1);

digitalWrite(n,0);

ack=0;

int chk = DHT.read11(DHTxxPIN);

switch (chk)

{

case DHTLIB_ERROR_CONNECT:

ack=1;

break;

}

if(ack==0)

{

f=DHT.temperature*1.8+32;

lcd.clear();

lcd.setCursor(0,0);

lcd.print("Temp:");

lcd.print(DHT.temperature);

lcd.print("C/");

lcd.print(f);

lcd.print("F");

lcd.setCursor(0,1);

lcd.print("Humidity:");

lcd.print(DHT.humidity);

lcd.print("%");

delay(500);

}

if(ack==1)

{

lcd.clear();

lcd.setCursor(0,0);

lcd.print("NO DATA, Please");

lcd.setCursor(0,1);

lcd.print("check connection");

delay(500);

}
}
//------------------Program developed by R.Girish-----------------//
Note: The program is compatible only with DHT11 sensor


Comments
Hi.
I’m virtually completely new to modern electronics and Arduino, but am interested in constructing the Humidity meter, with the sensor built into a separate remote probe and connected to the Arduino by some sort of flexible lead.
For the remote, is it just a question of using a length of 3 core cable and appropriate connectors, and if so what connectors are available? Is there a restriction on the cable length due to resistance etc? Is a 16 x 2 lcd display a standard item? Any advice on where in the UK to obtain all this stuff, please?
Can you recommend a website for learning the basics of the Arduino and its programming, suitable for a technically minded, reasonably intelligent 75 year old, relative beginner, please?
Any other constructive comments appreciated.
Thanks.
Hi,
You can use a 3 core cable for the sensor, but this cable must be a shielded type cable. Any 3 pin connector will work which can tightly fit into the Arduino connector. The cable length should not be too long, not more than a couple of feet.
All the items shown in the diagram are standard items which can be procured from any good electronic spare part retailer.
Learning Arduino can be long process which will require a lot of understanding of the variables and then a lot of practice through practical experiments.
There are actually plenty of only tutorials that you search an get online.
In this website also there is one such tutorial which you can refer to for gaining some basic knowledge:
https://www.homemade-circuits.com/learning-basic-arduino-programming-tutorial-for-the-newcomers/