• Skip to main content
  • Skip to primary sidebar

Homemade Circuit Projects

Need circuit help? Post them in the comments! I've answered over 50,000!

Blog | Categories | About | Contact | Calculators-online
You are here: Home / Lamps and Lights / Blinking LED Bow Tie Circuit

Circuit Simulator: Assemble and Simulate

Blinking LED Bow Tie Circuit

Last Updated on January 2, 2024 by Swagatam Leave a Comment

In this article I have explained how to build an LED bow tie circuit which will activate and blink a few LED lights stuck on your bow tie in response to your voice sound. It means, the LED lights on your bow tie will flash and blink, whenever you speak, creating a very eye catching effect on your bow tie.
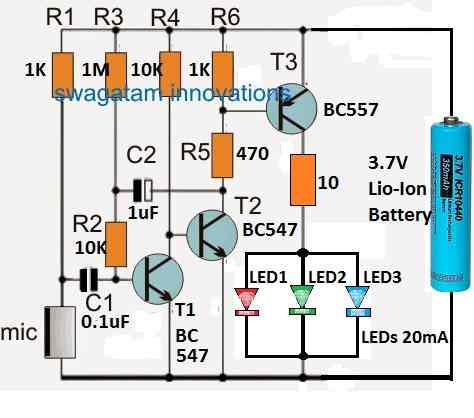
Table of Contents
  • Circuit Diagram
  • Parts List
  • Circuit Description
  • Battery Selection
  • LED Selection

LED bow tie

Circuit Diagram

blinking bow tie LED circuit

Parts List

  • Resistors 1/4 watt CFR unless specified
  • 1K = 2
  • 10k = 2
  • 1M = 1
  • 470 Ohms = 1
  • 10 Ohms = 1
  • Capacitors
  • 0.1uF Ceramic = 1
  • 1uF/25V Electrolytic = 1
  • Transistor BC547 = 2
  • Transistor BC557 = 1
  • LEDs = Quantity as Required, 20 mA, 5mm type
  • Electret MIC = 1
  • Battery 3.7 V = 1

Circuit Description

The following points can be used to understand how the bow tie LED light circuit operates, with reference to the circuit schematic above.

As a whole, resistors R1, R2, and R3 and transistor T1 work like a basic electret MIC preamplifier circuit.

This stage's primary job is to increase the MIC's tiny electrical pulses into comparatively bigger voltage pulses.

The resistors R4, R5, and R6, in conjunction with transistors T2 and T3, are set up to function as a power amplifier.

This power amplifier's function is to greatly increase the voltage and current output from the preamplified pulses at T1's collector.

At the collector of transistor T3, the set of 3 LEDs is eventually driven and illuminated by this increased voltage and current.

To provide the LEDs a delay OFF function, resistor R3 and capacitor C2 are utilized. This makes sure that even when the sound vibrations on the MIC stop, the LEDs continue to glow for a few seconds.

The delay OFF timing of the LED switch OFF period may be adjusted by increasing or decreasing the C2 value.

Formula for the delay off timing is:

t = −RC⋅ln(1−VS​/VC​​)

where:

  • t is the delay time in seconds
  • R is the resistance in ohms
  • C is the capacitance in farads
  • VC is the voltage across the capacitor at which the timer turns off
  • VS is the supply voltage

In order to enhance the battery efficiency you can completely eliminate this delay off feature by removing the C2 capacitor from the circuit.

The R1 resistor's value may be altered to change the circuit's sensitivity. Sensitivity is reduced as the value is increased, and vice versa.

Battery Selection

The battery can be any Li-ion AAA 3.7V type, or if you want it to be even more compact, you can use two Li-ion 3V coin cells, attached in series.

Since the LEDs would activate only in response to voice sounds, most of the time the circuit will be inactivate allowing a long life for the battery.

When the battery gets discharged you can charge them using a cell phone charger, but make sure to use a 6V incandescent flashlight lamp in series. If you don't have the lamp, you can use a 50 ohm 1 watt resistor in series.

LED Selection

The LEDs can be of different colors, all high bright 3.3 V, 20 mA type. You can put around 3 to 6 LEDs in parallel as shown in the diagram.

You'll also like:

  • 1.  Illuminating an LED using Wireless Power Transmission
  • 2.  Compatible LED Tube Light Circuit for Standard Ballast Fixtures
  • 3.  5630 SMD LED Driver/Tube light Circuit
  • 4.  Rechargeable LED Lantern Circuit Using Dynamo
  • 5.  RGB Light Strip Controller Circuits
  • 6.  Illuminated Crosswalk Safety Light Circuit

Filed Under: Lamps and Lights Tagged With: Blinking, LED

About Swagatam

I am an electronics engineer and doing practical hands-on work from more than 15 years now. Building real circuits, testing them and also making PCB layouts by myself. I really love doing all these things like inventing something new, designing electronics and also helping other people like hobby guys who want to make their own cool circuits at home.

And that is the main reason why I started this website homemade-circuits.com, to share different types of circuit ideas..

If you are having any kind of doubt or question related to circuits then just write down your question in the comment box below, I am like always checking, so I guarantee I will reply you for sure!

Previous Post: « Design your own Sine Wave Inverter Circuit from the Scratch [Tutorial]
Next Post: 5 Useful Power Failure Indicator Circuits Explained »

Reader Interactions

Need Help? Please Leave a Comment! We value your input—Kindly keep it relevant to the above topic! Cancel reply

Your email address will not be published. Required fields are marked *

Primary Sidebar


Subscribe to New Posts

Categories

  • Arduino Projects (89)
  • Audio and Amplifier Projects (132)
  • Automation Projects (17)
  • Automobile Electronics (101)
  • Battery Charger Circuits (83)
  • Datasheets and Components (104)
  • Electronics Theory (143)
  • Free Energy (37)
  • Games and Sports Projects (11)
  • Grid and 3-Phase (19)
  • Health related Projects (25)
  • Home Electrical Circuits (12)
  • Indicator Circuits (14)
  • Inverter Circuits (88)
  • Lamps and Lights (142)
  • Meters and Testers (69)
  • Mini Projects (46)
  • Motor Controller (64)
  • Oscillator Circuits (27)
  • Pets and Pests (15)
  • Power Supply Circuits (108)
  • Remote Control Circuits (50)
  • Security and Alarm (64)
  • Sensors and Detectors (101)
  • Solar Controller Circuits (59)
  • Temperature Controllers (42)
  • Timer and Delay Relay (49)
  • Transmitter Circuits (29)
  • Voltage Control and Protection (39)
  • Water Controller (36)

Tags

AC Alarm Amplifier Application Arduino Automatic Battery Charger Circuits Control Controlled Controller Current Datasheet DC Detector Digital Driver Electronic Explained Explored Generator High Indicator Inverter Lamp LED Light Meter Motor Power Regulator Remote Sensor Simple Single Solar Supply Switch Timer Transistor Voltage Water Watt Working


Other Links

  • Privacy Policy
  • Cookie Policy
  • Disclaimer
  • Copyright
  • Videos
  • Sitemap


People also Search

555 Circuits | 741 Circuits | LM324 Circuits | LM338 Circuits | 4017 Circuits | Ultrasonic Projects | SMPS Projects | Christmas Projects | MOSFETs | Radio Circuits | Laser Circuits | PIR Projects |

Social Profiles

  • Twitter
  • YouTube
  • Instagram
  • Pinterest
  • My Facebook-Page
  • Quora
  • Stack Exchange
  • Linkedin


  • Recent Comments

    • Swagatam on How to Make HHO Fuel Cell Circuit in Automobiles for better Fuel Efficiency
    • Swagatam on How to Make HHO Fuel Cell Circuit in Automobiles for better Fuel Efficiency
    • eq on How to Make HHO Fuel Cell Circuit in Automobiles for better Fuel Efficiency
    • Swagatam on How to Make HHO Fuel Cell Circuit in Automobiles for better Fuel Efficiency
    • eq on How to Make HHO Fuel Cell Circuit in Automobiles for better Fuel Efficiency

    © 2025 · Swagatam Innovations