• Skip to main content
  • Skip to primary sidebar

Homemade Circuit Projects

Need circuit help? Post them in the comments! I've answered over 50,000!

Blog | Categories | About | Hire Me | Contact | Calculators-online
You are here: Home / Lamps and Lights / LED Arrow Direction Indicator Circuit

LED Arrow Direction Indicator Circuit

Last Updated on June 8, 2026 by Swagatam Leave a Comment

The arrow-shaped LED direction indicator circuit utilizing the 74LS164 based IC and a configuration of 14 LEDs arranged in the shape of an arrow is a captivating and visually appealing project designed to create an eye-catching display.

Table of Contents
  • Circuit Description
  • PCB Assembly
    • Final Note

This circuit is designed to illuminate the LEDs gradually, forming the shape of an arrow, and once the full arrow shape is achieved, the entire arrow will shut off, marking the completion of one cycle.

The 74LS164, a serial-in, parallel-out shift register IC that controls the LED lighting sequence, is at the heart of this design.

The shift register functions as a serial-to-parallel data converter, activating individual LEDs based on the data provided into the IC. This enables exact control of the LED states, which is suitable for this dynamic arrow-shaped indication.

The 14 LEDs arranged in the shape of an arrow provide an artistic dimension to the circuit, making it an appealing visual indication for a variety of applications.

The LEDs' step-by-step lighting provides a fluid motion that attracts attention and may be utilized for directional signals or as an appealing visual display in many technological applications.

Circuit Description

The following figure presents the entire setup for the LED direction indicator circuit.
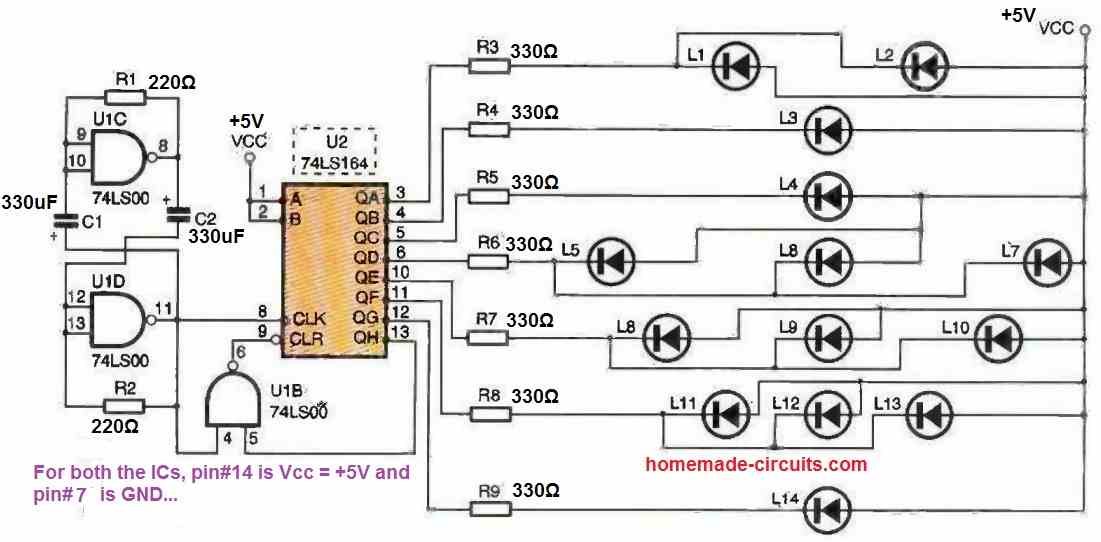
An oscillator drives the shift register. The outputs of the shift register control the LEDs.

The last output of the shift register controls the reset (RAZ). Whenever the CLK input of the shift register receives a rising edge, it copies the value from the DATA input to Q1, the value of Q1 goes to Q2, and so on.

The RAZ sets the outputs of the shift register to zero, which turns on all the LEDs.

After a reset, the next pulse on CLK sets the Q1 output to 1, turning off the first two LEDs, L1 and L2.

The other LEDs remain on since the shifted values are all 0. On the second pulse after a reset, we copy DATA into Q1, making it 1, and Q1 into Q2, which is also 1. The other shifted outputs remain unchanged.

Now, we have Q1 and Q2 set to 1, turning off L3 in addition to L1 and L2 from the previous phase.

This pattern continues until Q8. When Q8 becomes 1, it sets CLR to 0 through a NOT AND gate, which resets all the outputs to zero, turning off all the LEDs. Then, the cycle starts again.

PCB Assembly
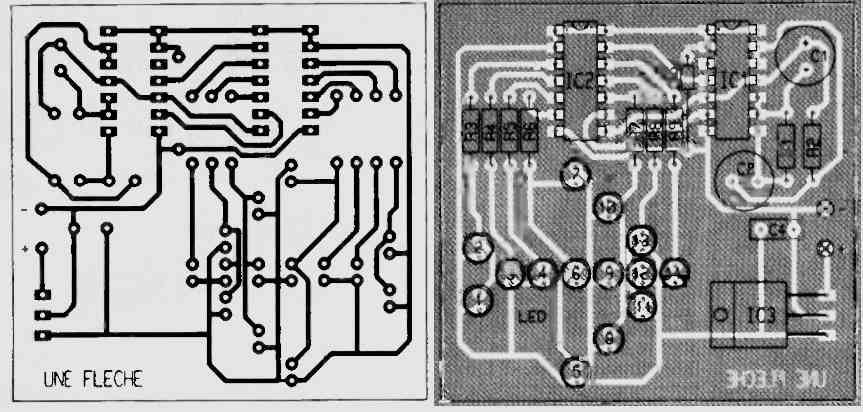
It is simple and requires little explanation. Some pads are close together, so be careful during the operations of assembling and soldering.

For the aesthetics of the setup, it is imperative to align the LEDs at the same height.

To achieve this, you can create a cardboard template of the appropriate height that you will place between the diode and the printed circuit board during soldering.

A 7805 IC regulator can be used to generate the intended voltage (5V). The power supply can be provided by a 7 V wall adapter or a 9 V battery.

Final Note

To produce a smooth arrow formation throughout the illumination process, it is critical in this project to maintain appropriate LED alignment and consistent height.

The circuit's cyclic nature adds an element of interaction, as the arrow will glow step by step until the complete arrow shape is created, and then the entire arrow will shut off, ready to begin a new cycle.

Because of the ease of wiring, the adaptability of the 74LS164 IC, and the compelling arrow-shaped LED arrangement, this circuit is an interesting and enjoyable electronics project for hobbyists, students, and enthusiasts alike.

You'll also like:

  • transformerless current controlled LED driver circuitTransformerless LED Bulb Circuits using Capacitors
  • bottleFish Aquarium Oxygen Generator Circuit
  • Make this 2 Pin Bi-Color LED Flasher Circuit
  • How to Add a Dimmer Facility to a LED Bulb

Filed Under: Lamps and Lights Tagged With: Arrow, Direction, Indicator, LED

About Swagatam

I am an electronics engineer and doing practical hands-on work from more than 15 years now. Building real circuits, testing them and also making PCB layouts by myself. I really love doing all these things like inventing something new, designing electronics and also helping other people like hobby guys who want to make their own cool circuits at home.

And that is the main reason why I started this website homemade-circuits.com, to share different types of circuit ideas..

If you are having any kind of doubt or question related to circuits then just write down your question in the comment box below, I am like always checking, so I guarantee I will reply you for sure!

Previous Post: « Vibration Sensor 801S Datasheet Explained
Next Post: 12 Amp Power Supply Circuit using Parallel LM317 ICs »

Reader Interactions

Need Help? Please Leave a Comment! We value your input—Kindly keep it relevant to the above topic! Cancel reply

Your email address will not be published. Required fields are marked *

Primary Sidebar

My YouTube Channel

Circuit Simulator: Draw and Simulate Schematics

circuit simulator image

Categories

  • Arduino Projects (95)
  • Audio and Amplifier Projects (134)
  • Automation Projects (18)
  • Automobile Electronics (104)
  • Battery Charger Circuits (90)
  • Datasheets and Components (109)
  • Electronics Theory (151)
  • Energy from Magnets and Earth (43)
  • Games and Sports Projects (11)
  • Grid and 3-Phase (20)
  • Health related Projects (27)
  • Home Electrical Circuits (13)
  • Indicator Circuits (16)
  • Inverter Circuits (98)
  • Lamps and Lights (161)
  • Meters and Testers (72)
  • Mini Projects (28)
  • Motor Controller (68)
  • Oscillator Circuits (30)
  • Pets and Pests (15)
  • Power Supply Circuits (91)
  • Remote Control Circuits (50)
  • Security and Alarm (65)
  • Sensors and Detectors (107)
  • SMPS and Converters (46)
  • Solar Controller Circuits (62)
  • Temperature Controllers (44)
  • Timer and Delay Relay (51)
  • Voltage Control and Protection (44)
  • Water Controller (37)
  • Wireless Circuits (31)

Subscribe to get New Circuits in your Email

Other Links

  • Privacy Policy
  • Cookie Policy
  • Disclaimer
  • Copyright
  • Videos
  • Sitemap

People also Search

555 Circuits | 741 Circuits | LM324 Circuits | LM338 Circuits | 4017 Circuits | Ultrasonic Projects | SMPS Projects | Christmas Projects | MOSFETs | Radio Circuits | Laser Circuits | PIR Projects |

Recent Comments

  • Michael on Electronic Circuit Projects, Tutorials, and Practical Engineering Solutions
  • Swagatam on 24V to 12V DC Converter Circuit [using Switching Regulator]
  • Swagatam on Automatic Battery Full Cut-Off Latching Circuit with Trickle Charging
  • Ramin on Automatic Battery Full Cut-Off Latching Circuit with Trickle Charging
  • Joss on 24V to 12V DC Converter Circuit [using Switching Regulator]

Social Profiles

  • Twitter
  • YouTube
  • Instagram
  • Pinterest
  • My Facebook-Page
  • Stack Exchange
  • Linkedin

Calculators

  • ZVS Induction Heater + Tank Calculator Tool
  • Zener Diode Calculator
  • Wire Current and Thickness Calculator (Ampacity Calculator)
  • Voltage Divider Calculator
  • Transistor Base Resistor Calculator
  • Transistor Astable Multivibrator Calculator
  • TL431 Calculator
  • Solar Panel, Inverter, Battery Calculator
  • Ferrite Core Air Gap Calculator Tool
  • Parallel MOSFET Calculator Tool: How to Connect MOSFETs in Parallel Safely
  • LC Resonance Calculator for EV Battery Charger Circuits
  • LED String Series Resistor Calculator
  • PFC (Power Factor Correction) Calculator Tool: 3kW
  • Passive Power Factor Correction (PFC) Calculator
  • LM567 IC Calculator Tool
  • SMPS Flyback Boost Converter Calculator
  • Shunt Resistor Calculator for Ammeters
  • SCR and Triac Gate Resistor Calculator
  • Battery Back up Time Calculator
  • Boost Converter Calculator (Non-Isolated)
  • Bootstrap Capacitor Calculator
  • Buck Converter Calculator
  • Buck-Boost Converter Calculator
  • Capacitance Reactance Calculator
  • DCM Flyback Transformer & Wire Gauge Wire Size Calculator Tool
  • Filter Capacitor Calculator
  • IC 4047 Calculator (Frequency and PWM)
  • IC 4060 Calculator
  • IC 555 Astable Calculator
  • IC 555 Monostable Calculator
  • IC SG3525, SG3524 Calculator
  • Inductance Calculator
  • Induction Heater Inductor and Resonant Frequency Calculator
  • Induction Heater Work Coil Calculator
  • Inverter LC Filter Calculator
  • LC Resonance Calculator
  • LED Current Calculator
  • LM317, LM338, LM396 Calculator
  • NAND/NOT Gate RC Values Calculator
  • NOT, NAND Gate Frequency Calculator
  • Notch Filter Calculator Tool
  • Ohm’s Law Calculator
  • Phase Angle Phase Shift Calculator
  • Power Factor (PF) Calculator
  • RC Filter Calculator
  • Reactance Calculator
  • Sine Table Calculator for SPWM Arduino Code
  • Small Signal Transistor(BJT) and Diode Quick Datasheet
  • SMPS Calculator for Toroidal Ferrite Transformers
  • SMPS Flyback Transformer Calculator – Design by Target Duty Cycle
  • TL431 Calculator
  • Op-Amp Hysteresis Resistor Calculator

© 2026 · Swagatam Innovations