The post describes a simple homemade RF signal jammer circuit that can be used for jamming any RF signal within a radial range of 10 meters. The idea was requested by one of the interested readers of this blog.
Technical Specifications
I am not a large business interest, but am in need of a circuit which would not only help me, but eventually be welcomed by just about everyone now alive.
I am in need of a circuit which will jam RFsignals. I realize jammers are illegal when they disrupt cellphone communication and commercial enterprise. I am only looking to jam (1.) remotely controlled harassment devices and (2.) spyware within the confines of my property. Jamming range limited to around a 25' x 25' area.
There is a growing community of victims of electronic harassment. We all experience an invasion of our personal lives/finances and private conversations, and are sometimes physically stalked and attacked.
Due to the nature of electronic harassment, it will take time for justice and protection to catch up and solve the problem. As for electronics, some circuits to control the misuse of flux & solder are long overdue in the marketplace.
Up until now, most of the interest has been placed on projects of invasion and abuse, such as those contained on many different website
I am not overly skilled in electronics, and only come to it in self defense. I am self taught and can follow a schematic and complete a project, and am slowly gaining understanding of the underlying theory.
Please advise regarding your interest to help, and your financial requirements. I look forward to hearing from you.
Circuit Diagram
Parts List
- All resistors are 1/4 watt 5% CFR
- 22 K = 3
- 330 Ohms = 1
- 4.7 K = 1
- 100 Ohm = 1
- 10 K = 1
- Capacitors are all Ceramic Disc, unless specified
- 22 nF = 4
- 2.7 pF = 1
- 6.8 pF = 2
- 33 pF = 2
- 15 pF = 2
- 18 pF = 1
- 10 nF = 1
- 1 nF = 1
- 10 uF / 25 V Electrolytic = 2
- Trimmers 33 pF = 2
- Semiconductors
- Zener Diode 16 V 1 watt = 1
- 1N914 Diode = 1
- TR1 = BC547
- TR2 = 2N2369
- IC7809 = 1
- IC 78L05 = 1
- Inductors = See Text
- Antenna = Telescopic antenna
Introduction
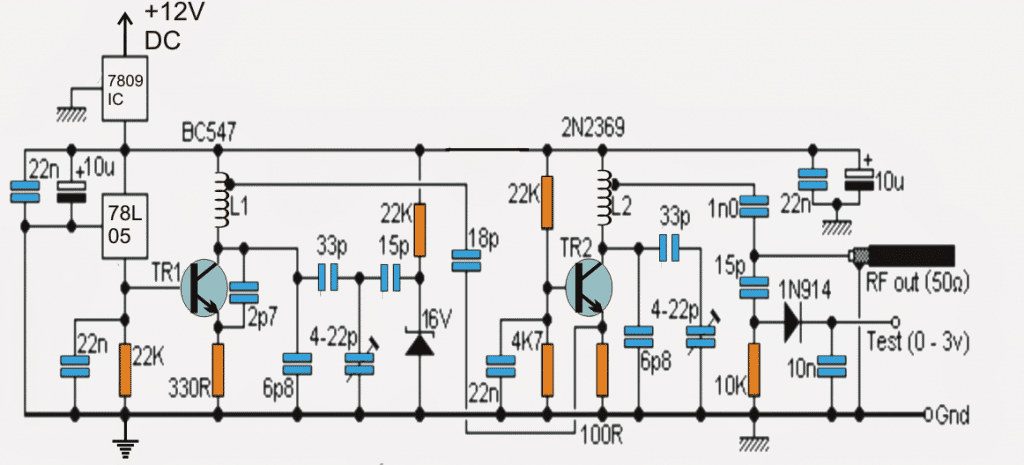
A simple looking RF signal jammer circuit can be seen in the above diagram, which may be capable of jamming all sorts RF signal within the range of 5 to 10 meters.
The circuit can be made suitable with any desired frequency to be jammed by merely using different sets of L1/L2 and by tweaking the 22pF trimmers accordingly.
The frequency that could be jammed using this circuit could be well in the range of 50 MHz to 1Ghz, however making it compatible with frequencies above 500 MHz could get much complex and parameters much critical owing to the fact that higher frequencies require shorter interconnections and may involve other stability issues.
The present design can be used for jamming FM radio stations situated in the within 40 meters radial distance or even higher.
The circuity of the proposed RF signal jammer is basically made of two distinct stages:
RF Circuit Stages
The one comprising T1 and the associated parts form the RF oscillator stage while the other stage consisting of T2 and the complementing parts for amplifying and transmitting the low voltage oscillations from T1 into the air.
The above strong RF carrier signals transmitted by T2 may be appropriately modulated with any external frequency such as an audio or speech by feeding the signal across the terminal indicated "Test".
The circuit is highly stable and doesn't falter with varying input supply voltages due to the presence of the 78L05 voltage regulator at the base of T1 which clamps the base of T1 with a constant biasing current making sure that the oscillations created by the T1 stage stays very stable and consistent.
The above feature is perfectly complemented by the T2 stage which accepts the oscillations from the T1 stage and amplifies and transforms the signals with much higher current so that the signals are able to travel across larger radial distances in the air.
However in order to implement an optimal transmission of the signals, 50 OHM impedance antenna must be used with the output of the circuit.
This could be any ordinary aluminum dipole yagi antenna. A simple flexible wire measuring about a meter would also do but would reduce the transmission strength by about 60 % making the unit much inefficient as far as the transmission range is concerned.
How to Peak the Resonance
The performance of the RF jammer could be highly improved by adjusting the presets to produce peak resonance. This can be done with the following points:
- Connect a 0 - 10V DC voltmeter across the point "test" and the ground line.
- Adjust the right side 22p trimmer such that the meter reads around a maximum of 3V on the meter.
- This might disturb the initial frequency of the system that you might have set for the jamming purpose.
- So go back to the left side 22p trimmer and fine tune it again to set the desired frequency back into place.
Your peak resonance for the circuit is set now, and you can expect maximum efficiency from it.
RF Jammer Coil Specifications
For making the RF jammer compatible with other frequencies, the coil L1 and L2 must be shortened in terms of their number of turns and/or also the diameter...this will need some experimentation until the right frequency is determined.
The adjoining trimmers may also tweaked for getting an optimal response from the jammer circuit or until a perfect jamming is achieved through the circuit.
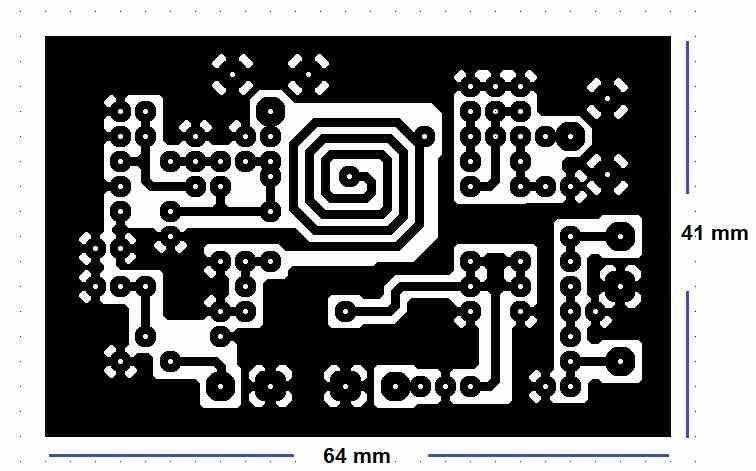
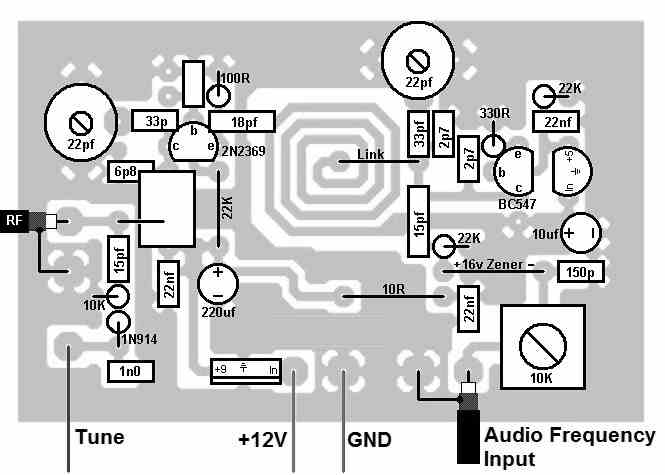
A good quality, well designed PCB is strictly recommended for constructing the RF jammer circuit
For jamming standard FM broadcasts within a range of 50 meters, L1 and L2 may be built as indicated in the following images:

PCB Etched RF Coil
The above image shows the construction L2 using a 7 turn, 1mm super enameled copper wire with a diameter of approximately 5 to 6mm (internal)....see how the tap is extracted from the relevant end of the coil.

The following image shows how L1 can be designed by etching the tracks on the PCB itself or the same could be built using pieces of diode leads as explained in this FM wireless MIC circuit
PCB Designs


Comments (140)
thank you for your site. my situation is audible rf from nearby tower. freq range about 50hz up to 15khz. which components are needed to acheive this?
ron
Hi, thanks!! I don’t think it may be possible to jam powerful RF from a tower using this small jammer.
Hello.
So the circuit isn’t safe to assemble, since I’ve seen comments that its electronics don’t match?
Please clarify…
Best regards.
Hello,
It is perfectly safe if you are well versed with RF transmitter circuits and know how to assemble and test them…
Dear Ing. Swagatam,
How can I increase action range of a jammer? Wich electronic components are responsible to provide the range?
Is it posible to change this components in a manufactured jammer in order to improve its range?
Many thanks in advance and blessings
Hi Arthur,
The output transistor associated with the LC tank circuit controls the output power, along with the length of the antenna.
It is difficult to modify an existing circuit unless all the parts around the output transistor are appropriately calculated and modified accordingly…
Thanks a lot Sir.!
You are welcome Arthur!
Hey, I was looking at these diagrams and got a little confused by it all, im just getting into the world of breadboards, basic electronics, and soldering, any books or sources that I should look at to help me understand all this?
Hey, thank you for your feedback! i do not know about any online books, but you may find many good you-tube videos which you can watch to learn the basics of electronics…
hi. can i have two of this?you can ship to italy?and can i have the bom of the components of this project?
Hello vivacedinotte, sorry, I no longer manufacture electronic items for sale, so it might not be possible to fulfill your requirement.
Hello, can you create a schematic of a device that can jam FM radio broadcasts? Because my sibling always plays radio broadcasts quite loudly and it’s very disturbing.
Hi, the circuit explained in the above article will do exactly the same.
Hi, can you make it for me? And how much does it cost? Thank You.
Hi, Very sorry, making and selling the unit may not be possible at this moment.
Can you make 13.56 mhz jammer I will pay.for it or diagram
Jeff, the diagram is already given in the above article, you just have to adjust and coils and the trimmer for aligning it to the desired frequency range in Mhz..
I have no idea I’m new.
Sorry, the above design is not recommended for newcomers. It is recommended only for users who are relatively experts with electronics and circuit building. In that case you can probably look for readymade boards or kits in amazon.
Hello
why do we need semiconductor
We need transistors to amplify the signal.
It will really jam all RF signal
Sir can this jammer jam Rc toy signal and IR signal
Abahy, the above circuit can jam only RF signals, not IR.
But that PCB design is not accepting in PCB website l am buying this PCB board from this website
Contact the PCB manufacturer through a phone call and ask them to help you with the above PCB design.
Hello sir, can you please send me the PCB board design.
PCB design is already given in the above article, there’s no other design available.
That’s actually close to them design I made… how would I get the 13.56 mhz range
I think that manufacturers specific. It a rf signal… can I send you my email I will show you a pic… I made one just not right signal…
I can help only with the circuit diagram explained in the above article, not with any other external design, that will be difficult.
I put one together I couldn’t get it to jam… I was wondering which ones I would need to change to jam 13.56 Mhz
How did you measure the 13.5 MHz adjustment? You will need to first confirm whether the initial circuit is able to jam FM radio or not?
You will have to tweak the L1, L2 inductors and the 22pF trimmer capacitors.
What does it take to make a 13.56 Mhz
Adjusting in MHz is simple, you just have to tweak the inductors and the trimmers. Adjusting in GHz can be complicated.
What does that mean???
What
Hi sir, can you tell me how many types of RF signal will it jam and what is the maximum range of it to jam
hello sir thank you very much
so, i would like two know this diagram can jammer all line i mean from 88- 108mhz? how range? if not can you make a diagram for me
Hello EMMANUEL, yes, it can jam the whole range of 88 to 108 MHz if correctly adjusted. Distance range will be around 20 to 30 meters radial…
Hi Abhay, You can customize the circuit to any desired frequency range, but as you increase the frequency you will need to strictly optimize the layout by the circuit by making the interconnection shorter and the inductor also will need to optimized with lot of care. All these can be very complex unless you are an expert with RF circuit designs.
Can I use it to jam mobile phones signal also
For jamming mobile phone you may have to set the frequency to GHz level, which can be very difficult and complex.
Hello sir, can you please make a little big size jammer so that I can make this in my project and also please send the link of video of making it.
Hello Abhay,
Making a video can be difficult for me due to lack of time.
I had tested this circuit long ago and it worked very nicely. I could jam most FM radio signals within 100 meter range using this jammer circuit.
Since I adjusted the circuit between 90 and 110 MHz I could jam FM signals within this range, however this frequency could be changed to other MHz values to jam other desired signal ranges also.
hello, I would like to know how to check that we have reached the frequency of 433Mhz for example
You will have to keep a 433 Mhz receiver and transmitter switched ON such that the receiver is tuned and activated by the transmitter. Then tune the jammer until the 433Mhz receiver’s switch ON response breaks.
What you need is to make a “Faraday cage” around your house and specially around your bed area.
You can make a “semi-effective” cage, by running strong copper wire, all-around the edges of the rooms, and connecting them all to the “ground”. Make a “ground” by inserting a 1 to 2 meter copper rod into the ground!
True “Faraday cages” would completely encase the areas with metal and ground it, so RF / EMF are blocked.
You could use special EMF blocking paint (expensive), or some LEAD PAINT! That really blocks everything properly (now banned, wonder why…)
Apart from those “blocking” options, you have these… let’s say “smoothing/filtering” options:
Orgone and/or Shungite “devices”, tthey turn most bad and aggressive emissions into a harmless environment around them.
Although I called it a Orgone “device”, they have no moving parts. They are made out of crystals (mostly quartz) and metals (copper wire and aluminum and other powdered or shaved metals), encased in epoxy or other constricting material (to make use of the piezo-electric effect) in usually small pyramids or other “paper-weight-like shapes and also wearable pendants and necklaces.
Shungite is a mineral found only in Russia, that has some protective effect on radiation, much like Orgone, and is made out in pendants and small objects too.
Hope this helps
Hello sir, can you please send me the video of making this jammer because I want it for my project before 20 October. So please send the link as fast as possible.