As an electronics enthusiast or a hobbyist, you probably yearn for an oscilloscope to check out those elusive waveforms in your amplifier or radio. However, the cost deters you. A reasonably good oscilloscope will set you back by several hundred dollars, unless you buy a pre-owned piece or get one at the flea market.
However, there is hope yet. As you probably own a PC, all the hardware needed to display waveforms is already available to you.
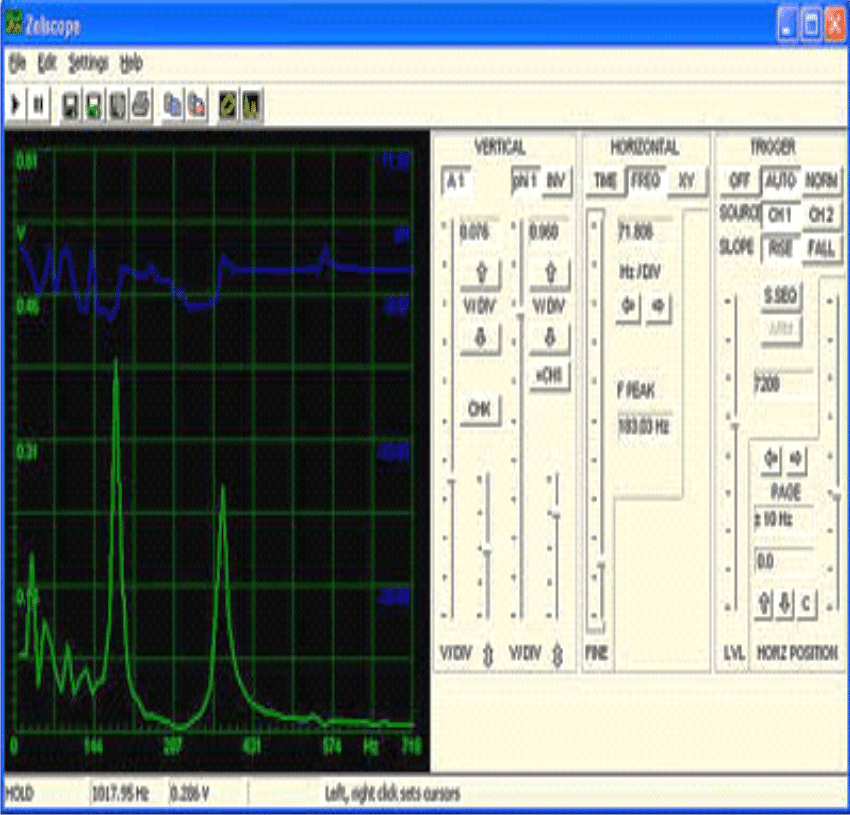
Using PC Like an Oscilloscope
What you now require is software that will enable your PC to work as an oscilloscope; you can purchase this from Zelscope. If you own a PC with a fast processor, about 1GB RAM, about 1MB of free Hard disk space, and at least one 32-bit sound card, you are set up for converting your PC into an oscilloscope. You can even use your PC as a Spectrum Analyzer.
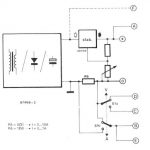
Some additional front-end hardware will be required to attach the oscilloscope probes and feed the test signal into the PC.
You can build your own following the instructions on the Zelscope site, or buy the front-end ready-made. Ordinary RG-58 coaxial cables can be used to make up the probes.
The probe end of the coaxial cable can have crocodile clips, while the end of the coaxial cable that connects to the front-end electronics could be terminated by a BNC.
There is a lot you can do with such a simple arrangement. You get up to two traces with a bandwidth of 10Hz to 20KHz, a sampling rate of 11KHz to 44KHz and an 8- to 16-bit acquisition (it all depends on your sound card).
The time base is from 5Sec to 10uSec with adjustable triggers, two independent cursors, direct frequency readout and time and voltage difference readouts.

The Zelscope-and-PC combination as a low-cost oscilloscope can help adjust audio circuits, take measurements in physics experiments, tune musical instruments, troubleshoot digital circuits, and do many other things. One limitation is that you cannot sense or display DC waveforms, since the sound card of the PC is capacitively coupled.
The spectrum analyzer mode can display amplitude and/or phase.
Apart from the display of waveforms, you can save screenshots, copy-paste functions for data files, save visible traces as text files and make printouts.
Your PC can now be used as a data logger as well. What if you are not satisfied with just an oscilloscope or spectrum analyzer in your arsenal?
Maybe you like to add a waveform generator and a ZRLC meter as well - for which you will need the Visual Analyzer. For those who are looking for something more professional, and willing to spend, Pico has a plethora of similar gadgets.


Comments
YOU STATED: Some additional front-end hardware will be required to attach the oscilloscope probes and feed the test signal into the PC.
MY PROBLEM: I WANT TO USE IT FOR DC AND AC SCOPE ANALYSIS AS THOUGH I WAS USING AN EXTERNAL SCOPE.
WHAT PROBES WILL BE NEEDED. I HAVE SCOPE PROBES WITH B.N.C. HOW MUCH VOLTAGE CAN THE SOUND CARD HANDLE? I WILL BE MEASURING UP TO 50 VOLTS.
AM I LIMITED TO AC ONLY AND TESTING ONLY 5 VOLTS?
COULD YOU FULLY EXPLAIN THIS SO I DO NOT BURN ANYTHING OUT.
This post was written many years back, so unfortunately I don’t remember the technical details of the post and the software, so I may not be able to solve your query.
Are there any USB PC type scope kits out there that do not use the sound card. I work mostly wit digital logic so square waves are important to me.
Hi Swagtagam, I used zelscope as described here, but I didn’t get the sinusoidal waveform with the utility supply, it is like triangle wave when I put the wave sequence on hold.
Hi Dayo, sorry I cannot troubleshoot it since I have not tried it yet…I would recommend buying any basic smallest oscilloscope, instead of relying on other forms of alternative.
Hi Swagatam
I am planning to buy a used analog oscilloscope.
Can you guide me what to check/how to check if the unit is fully working and it is trouble free.
Hi Abu-Hafss,
Although my last use of oscilloscope was way back in 2001, after that I got busy with my manufacturing job, i'll try to recollect my memories and assist you as far as possible.