• Skip to main content
  • Skip to primary sidebar

Homemade Circuit Projects

Need circuit help? Post them in the comments! I've answered over 50,000!

Blog | Categories | About | Contact | Calculators-online
You are here: Home / Audio and Amplifier Projects / What is ISD1820 Module? How to Connect and Use


What is ISD1820 Module? How to Connect and Use

Last Updated on April 15, 2025 by Swagatam Leave a Comment

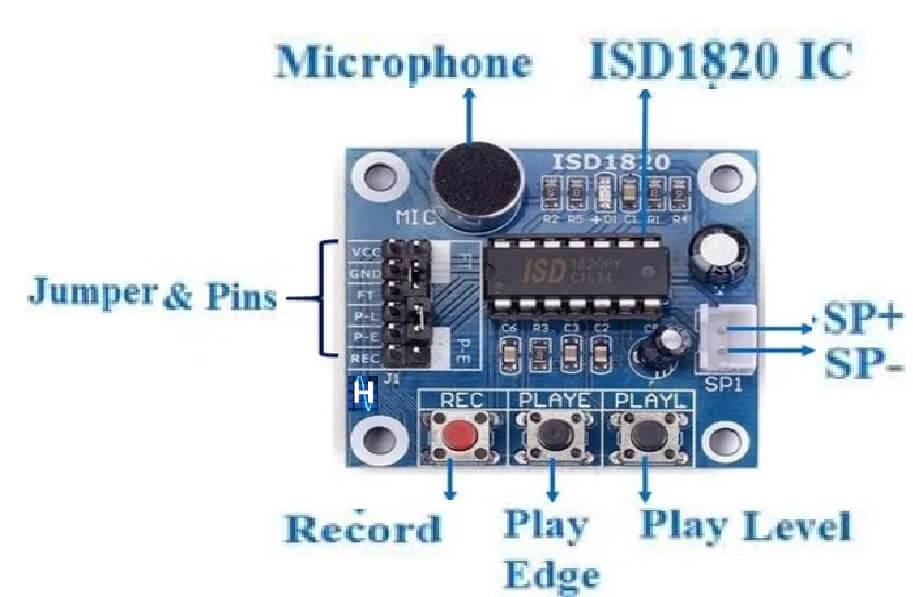
The ISD1820 is a small ready-made module which can record human voice for short time and then play it back. It is based on the ISD1820 IC which is a voice record and playback chip.

Table of Contents
  • Technical Specs (in simple words)
  • Buttons on Board:
  • Pin Description (on the module)
  • How to Use It Without Microcontroller
  • How to Connect with Arduino (if you want automation)
  • Speaker Advice
  • Some Ideas Where You Can Use ISD1820

This module is very popular for DIY projects where we want to make some talking gadget or voice-alarm,or greeting system, or even robot with talking feature.

Technical Specs (in simple words)

Recording Time: around 10 seconds (can be changed using resistor)

Voltage: Works on 3V to 5V (best is 5V from adapter or Arduino)

Microphone: Already included on the board

Speaker Output: Can directly connect 8Ω 0.5W to 1W speaker
Buttons on Board:

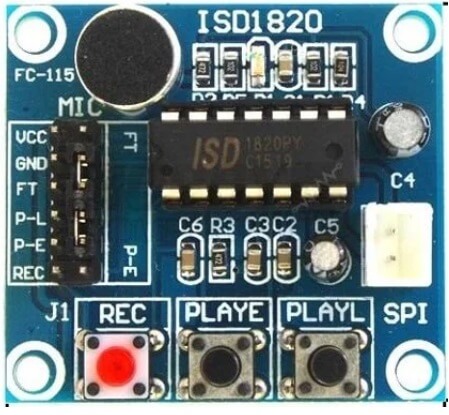
REC → Press and hold to record

PLAYE → Press once to play full message

PLAYL → Press and hold to play, release to stop

LED Indicator: Shows when recording is happening.

Pin Description (on the module)

Pin NameWhat It Does
VCC+5V power input
GNDGround
RECRecord control (active HIGH)
PLAYEEdge-trigger playback (press once, it plays all)
PLAYLLevel-trigger playback (press and hold = play)
SP+ / SP-Speaker output
FTFeed-through (mic to speaker direct mode)
MICElectret microphone already fixed

How to Use It Without Microcontroller

Super simple steps:

Power It Up

Give +5V to VCC and GND to GND from any 5V source or battery or Arduino 5V pin.

Record Voice

Press and hold REC button, say something into the mic.

Release REC to stop recording.

Red LED will glow during recording.

Play Voice

Press PLAYE button once → It plays full recorded audio.

Press and hold PLAYL → It plays only when you hold, stops on release.

Speaker Connection

Connect small 8Ω speaker to SP+ and SP- pins.

How to Connect with Arduino (if you want automation)

If we want to use Arduino to trigger recording or playback, then we connect pins like this:

ISD1820 PinConnect to Arduino
VCC5V
GNDGND
RECDigital pin (e.g. 2)
PLAYEDigital pin (e.g. 3)
PLAYLOptional (e.g. pin 4)

Example code (for Arduino):

int rec = 2;
int play = 3;

void setup() {
  pinMode(rec, OUTPUT);
  pinMode(play, OUTPUT);
}

void loop() {
  // Record
  digitalWrite(rec, HIGH);
  delay(3000); // record for 3 sec
  digitalWrite(rec, LOW);
  delay(2000);

  // Play
  digitalWrite(play, HIGH);
  delay(500);
  digitalWrite(play, LOW);
  delay(5000);
}

Speaker Advice

  • Use 8 ohm 0.5 watt or 1 watt speaker only.
  • Do not use big speakers or audio amps here or chip may get damaged.
  • Sound quality is OK but not studio type – just for basic voice use.

Some Ideas Where You Can Use ISD1820

  • Talking robot
  • Voice-controlled greetings
  • Toy with pre-recorded voice
  • Motion-detection alarm with sound
  • Doorbell with custom voice
  • Voice reminder device

You'll also like:

  • 1.  Simple Hum Filter Circuit for Amplifiers
  • 2.  100 Watt Power Amplifier Circuit Diagram using a Single IC TDA7294
  • 3.  Robot Voice Generator Circuit
  • 4.  5 Best 40 Watt Amplifier Circuits Explored
  • 5.  Audio Dithering Circuit for Enhanced Crisper Music
  • 6.  Guitar Distortion Generator Preamplifier Circuit

Filed Under: Audio and Amplifier Projects Tagged With: Connect, ISD1820, Module

About Swagatam

I am an electronics engineer and doing practical hands-on work from more than 15 years now. Building real circuits, testing them and also making PCB layouts by myself. I really love doing all these things like inventing something new, designing electronics and also helping other people like hobby guys who want to make their own cool circuits at home.

And that is the main reason why I started this website homemade-circuits.com, to share different types of circuit ideas..

If you are having any kind of doubt or question related to circuits then just write down your question in the comment box below, I am like always checking, so I guarantee I will reply you for sure!

Previous Post: « What is T856-C Power Bank Module? How to Connect
Next Post: Programmable 35238-MP Timer Module? How to Use it »

Reader Interactions

Need Help? Please Leave a Comment! We value your input—Kindly keep it relevant to the above topic! Cancel reply

Your email address will not be published. Required fields are marked *

Primary Sidebar

circuit simulator image

Subscribe to get New Circuits in your Email

Categories

  • Arduino Projects (89)
  • Audio and Amplifier Projects (132)
  • Automation Projects (17)
  • Automobile Electronics (101)
  • Battery Charger Circuits (83)
  • Datasheets and Components (106)
  • Electronics Theory (143)
  • Free Energy (37)
  • Games and Sports Projects (11)
  • Grid and 3-Phase (19)
  • Health related Projects (25)
  • Home Electrical Circuits (12)
  • Indicator Circuits (14)
  • Inverter Circuits (88)
  • Lamps and Lights (142)
  • Meters and Testers (69)
  • Mini Projects (46)
  • Motor Controller (64)
  • Oscillator Circuits (28)
  • Pets and Pests (15)
  • Power Supply Circuits (108)
  • Remote Control Circuits (50)
  • Security and Alarm (64)
  • Sensors and Detectors (102)
  • Solar Controller Circuits (59)
  • Temperature Controllers (42)
  • Timer and Delay Relay (49)
  • Transmitter Circuits (29)
  • Voltage Control and Protection (40)
  • Water Controller (36)

Other Links

  • Privacy Policy
  • Cookie Policy
  • Disclaimer
  • Copyright
  • Videos
  • Sitemap

People also Search

555 Circuits | 741 Circuits | LM324 Circuits | LM338 Circuits | 4017 Circuits | Ultrasonic Projects | SMPS Projects | Christmas Projects | MOSFETs | Radio Circuits | Laser Circuits | PIR Projects |

Social Profiles

  • Twitter
  • YouTube
  • Instagram
  • Pinterest
  • My Facebook-Page
  • Quora
  • Stack Exchange
  • Linkedin
  • Recent Comments

    • Swagatam on Crystal Radio Sets with Amplifier Circuit
    • Swagatam on SCR and Triac Gate Resistor Calculator
    • MOSES on SCR and Triac Gate Resistor Calculator
    • Lion on Crystal Radio Sets with Amplifier Circuit
    • Swagatam on Crystal Radio Sets with Amplifier Circuit

    © 2025 · Swagatam Innovations