• Skip to main content
  • Skip to primary sidebar

Homemade Circuit Projects

Need circuit help? Post them in the comments! I've answered over 50,000!

Blog | Categories | About | Contact | Calculators-online
You are here: Home / Sensors and Detectors / Simple Shadow Sensor Alarm Circuit

Circuit Simulator: Assemble and Simulate

Simple Shadow Sensor Alarm Circuit

Last Updated on January 3, 2024 by Swagatam 12 Comments

This shadow detector circuit operates using two LDRs and effectively detects the difference between the light levels and triggers a loud audible warning siren.

Table of Contents
  • Circuit Operation
  • Circuit Diagram

In circuits which uses a single LDR (photoresist), the detection may not be as sharp as with two LDRs discussed here.Operational details of the shadow detector circuit may be studied as follows:

The key elements of this circuit are the two LDRs and the active operational amplifier, which functions as a comparator.

Circuit Operation

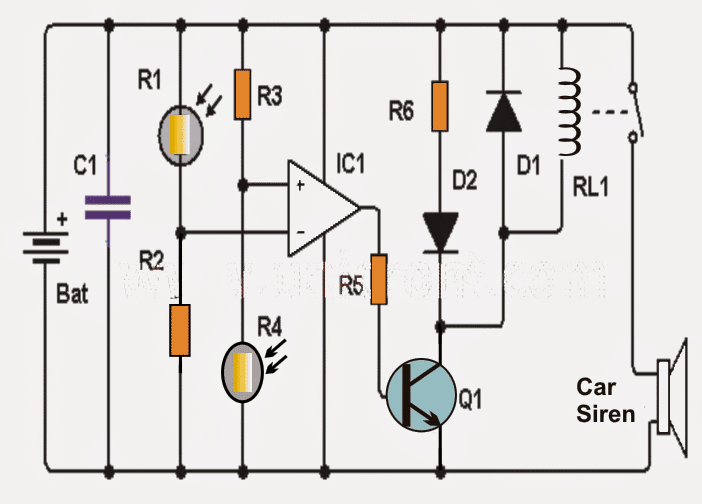
As may be seen in the diagram, the inputs of the opamp are carefully balanced using alternately positioned LDRs across the corresponding supply rails in conjunction with the respective resistors.

The two resistors may be possibly replaced with presets for getting a fine adjustment option and for ensuring an optimum balance and a perfect zero logic at the output of the opamp.

In normal light situations that is with no shadow detected (no shade) the two LDRs are able to receive the same amount of light across the sensing input of the opamp which renders a low logic level at the output of the IC.

In an event when one of the LDRs (for instance R1) experiences a shadow or less light than the other (R4), causes the voltage at the inverting input of opamp to go lower than in the non-inverting counterpart, causing the logic at the output of IC to switch to a high logic.

The above action activates transistor Q1, which in turn activates the LED and the relay. The LED allows to acquire a visual warning while the relay activates a siren device.

Preferably you may want to place a semiconductor diode (D1) in parallel with the relay, as shown in the diagram, to protect the transistor Q1 from the relay reverse EMFs.

Circuit Diagram

warning message: electricity is dangerous, proceed with caution
shadowdetectorcircuit 1

Things to be notes:
- The circuit is powered by 9 volt lead acid battery or any similar SMF battery.
- The LDRs should be placed with a separation of about 3cm. for an optimal response and to avoid incorrect triggering.

Parts list for the proposed shadow detector circuit

- 1 Operational amplifier: LM741 (IC1)
- 2 LDRs (photoresistor / LDR) (R1, R2)
- 1 NPN transistor 2N2222 or similar (Q1)
- 1 1N4007 diode (D1)
- 1 red LED diode (D2)
- 9 volt relay (RL1)
- Two 10K resistors (R3 and R4)
- 1 1K resistor (R5)
- 1 resistors 470 (R6)
- 1 100 nF capacitor (C1)

You'll also like:

  • 1.  Make this Insect Wing Signal Detector Circuit
  • 2.  Arduino Barometric Pressure Sensor Circuit – Working and Interfacing Details
  • 3.  Simple Vibration Sensor Circuit
  • 4.  How to Make a GHz Microwave Radar Security Alarm Circuit
  • 5.  Obstacle Avoiding Robot Circuit without Microcontroller
  • 6.  5 Simple Motion Detector Circuits using PIR

Filed Under: Sensors and Detectors Tagged With: Alarm, Sensor, Shadow, Simple

About Swagatam

I am an electronics engineer and doing practical hands-on work from more than 15 years now. Building real circuits, testing them and also making PCB layouts by myself. I really love doing all these things like inventing something new, designing electronics and also helping other people like hobby guys who want to make their own cool circuits at home.

And that is the main reason why I started this website homemade-circuits.com, to share different types of circuit ideas..

If you are having any kind of doubt or question related to circuits then just write down your question in the comment box below, I am like always checking, so I guarantee I will reply you for sure!

Previous Post: « Cyclist’s Safety Light Circuit – Nighttime Visibility for Cyclists, Walkers, Joggers
Next Post: Tuned Infrared (IR) Detector Circuit »

Reader Interactions

Comments

  1. li perciro everest says

    June 23, 2022 at 5:08 am

    Please I want practical videos for students.

    thanks

    Reply
  2. Umer says

    April 27, 2021 at 5:03 am

    I want to ask that why the 100nF capacitor is used in this circuit? Is it a necessary component or we can ignore it to make our circuit functional?

    Reply
    • Swagatam says

      April 27, 2021 at 9:48 am

      The C1 must be actually placed directly across the IC supply pins…it is used for cancelling the reverse voltage spikes generated due to the siren operation, and relay clicking…

      Reply
      • Umer says

        April 27, 2021 at 11:03 am

        Thank you very much for the kind help.

        Reply
        • Swagatam says

          April 27, 2021 at 11:10 am

          You are welcome…

          Reply
  3. Adam says

    August 18, 2020 at 8:01 am

    Please I will like a video to show me step by step in constructing Shadow Detector

    Reply
  4. adio kabiru says

    January 29, 2015 at 5:04 pm

    can i use ic 555 timer in place of ic lm741,is it a must i use a relay

    Reply
    • Swagatam says

      January 30, 2015 at 6:42 am

      two LDRs won't be possible with a 555

      Reply
    • Swagatam says

      January 30, 2015 at 6:42 am

      for a big siren, relay will be required

      Reply
  5. yasir ulhaq says

    January 28, 2015 at 7:03 pm

    hello sir,
    your website is awsome. iam working on a project can you please post wifi signal detector circuit

    Reply
    • Swagatam says

      January 29, 2015 at 5:01 am

      thanks yasir, presently I do not have it, i'll post it if I happen to get it….

      Reply
    • yasir ulhaq says

      January 29, 2015 at 4:53 pm

      ok

      Reply

Need Help? Please Leave a Comment! We value your input—Kindly keep it relevant to the above topic! Cancel reply

Your email address will not be published. Required fields are marked *

Primary Sidebar


Subscribe to New Posts

Categories

  • Arduino Projects (89)
  • Audio and Amplifier Projects (132)
  • Automation Projects (17)
  • Automobile Electronics (101)
  • Battery Charger Circuits (83)
  • Datasheets and Components (104)
  • Electronics Theory (143)
  • Free Energy (37)
  • Games and Sports Projects (11)
  • Grid and 3-Phase (19)
  • Health related Projects (25)
  • Home Electrical Circuits (12)
  • Indicator Circuits (14)
  • Inverter Circuits (88)
  • Lamps and Lights (142)
  • Meters and Testers (69)
  • Mini Projects (46)
  • Motor Controller (64)
  • Oscillator Circuits (27)
  • Pets and Pests (15)
  • Power Supply Circuits (108)
  • Remote Control Circuits (50)
  • Security and Alarm (64)
  • Sensors and Detectors (101)
  • Solar Controller Circuits (59)
  • Temperature Controllers (42)
  • Timer and Delay Relay (49)
  • Transmitter Circuits (29)
  • Voltage Control and Protection (39)
  • Water Controller (36)


Other Links

  • Privacy Policy
  • Cookie Policy
  • Disclaimer
  • Copyright
  • Videos
  • Sitemap


People also Search

555 Circuits | 741 Circuits | LM324 Circuits | LM338 Circuits | 4017 Circuits | Ultrasonic Projects | SMPS Projects | Christmas Projects | MOSFETs | Radio Circuits | Laser Circuits | PIR Projects |

Social Profiles

  • Twitter
  • YouTube
  • Instagram
  • Pinterest
  • My Facebook-Page
  • Quora
  • Stack Exchange
  • Linkedin


  • Recent Comments

    • Swagatam on How to Make HHO Fuel Cell Circuit in Automobiles for better Fuel Efficiency
    • Swagatam on How to Repair Mosquito Swatter Bats
    • Pradosh on How to Repair Mosquito Swatter Bats
    • eq on How to Make HHO Fuel Cell Circuit in Automobiles for better Fuel Efficiency
    • Swagatam on 100A AC Load Monitoring Circuit using Arduino, Watt Limit, LCD, Alarm, Auto Shutdown

    © 2025 · Swagatam Innovations