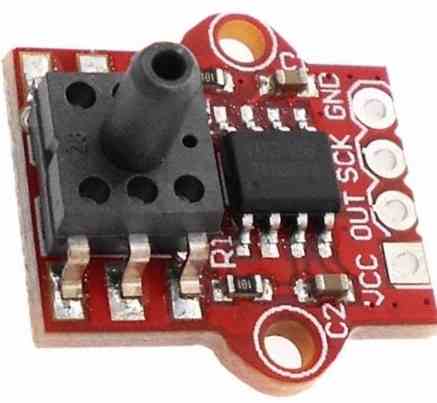
The HX710B Air Pressure Sensor Module monitors the air's pressure in the range of 0 to 40 kilopascals (kPa) and turns it into an electrical impulse which microcontrollers or other electrical gadgets can interpret and read.
It is a common and frequently utilized sensor in a wide range of applications that demand precise pressure sensing, including weather monitoring, industrial control systems, and medical equipment.
The HX710B device is a piezoresistive pressure sensor which determines pressure by detecting variations in electrical resistance produced by pressure-induced displacement of a sensing element.
The module is made up of a pressure sensing element, a signal conditioning circuit, and an output amplifier. The sensor chip is a tiny, thin-film device having a diaphragm and piezoresistive components.
The signal conditioning circuit boosts and purifies the electrical signal from the sensing element, and the output amplifier generates a voltage or current proportionate to the pressure detected by the sensor.
Technical Specifications
Here are some key specifications of the HX710B air pressure sensor:
- Operating pressure range: 30kPa to 110kPa
- Supply voltage: 1.8V to 5.5V
- Operating temperature range: -40°C to +125°C
- Sensitivity: 80mV/kPa
- Total error: ±2% FS
- Long-term stability: ±1% FS/year
- Response time: ≤ 1ms
Features of the HX710B Air Pressure Sensor Module
The HX710B sensor module offers several advantages that enable it to be a good option for a wide range of applications. These are some examples:
Broad pressure range: The module can detect pressure from 0 to 40kPa, making it appropriate for a broad range of low-pressure sensing applications.
High precision: The HX710B module offers a precision of 1% of full-scale pressure, ensuring dependable and accurate pressure readings.
Compact size: The module is modest in size and may simply be incorporated into different size and shape, which makes it ideal for projects that require little space.
Reduced energy consumption: The HX710B module consumes less power, which makes it perfect for battery-powered applications.
Simple to use: The module is simple to operate and can communicate with microcontrollers and other electronic equipment through conventional protocols, for example I2C or SPI.
Applications of the HX710B Air Pressure Sensor Module
The HX710B Air Pressure Sensor Module is utilised in a variety of applications where accurate and dependable pressure detection is required. The module is commonly used for the following purposes:
Environment monitoring: The module may be used to record air pressure and provide feedback on weather conditions including such variations in atmospheric pressure, that can contribute in weather pattern prediction.
The module can be utilized to measure pressure in diverse manufacturing systems, including such pneumatic and hydraulic ones, in order to verify that they are working under safe and appropriate pressure limits.
Healthcare devices: The device may be utilized to monitor the pressure of air or oxygen provided to patients who use medical instrumentation including respiratory machines.
Gas pressure measuring system: The module can be employed to monitor gas flow and diagnose leaks by measuring the pressure of gas in pipelines and other gas distribution networks.
Automotive: The module can be integrated into automobile applications including such tyre pressure monitoring equipment to detect air pressure in tyres and inform drivers if the pressure is not high enough.
How to Use the HX710B Air Pressure Sensor Module
The HX710B Air Pressure Sensor Module is simple to use. The steps below could serve as a reference:
Use conventional protocols such as I2C or SPI to attach the module to a microcontroller or other electric devices.
Connect the module to power and wait for it to stabilise.
To use a microcontroller or other electronic gadget, obtain the pressure value from the module's output.
To guarantee precise pressure measurement, calibrate the module if necessary.
How to use it in an Electronic Circuit
The HX710B Air Pressure Sensor Module is a pressure sensor which could be utilised in many different electrical applications. To interface it to an electronic circuit, you must first do the following steps:
Identify the power needs: The HX710B Air Pressure Sensor Module demands a 5V DC power source, therefore ensure your circuit can offer it.
Attach the power: Hookup the HX710B's VCC pin to the 5V power source, and the GND pin to ground.
Attach the signal output: Because the HX710B Air Pressure Sensor Module emits a digital voltage signal, you must connect it to a digital input pin on your microcontroller or other circuit.
Add a decoupling capacitor: To stabilise the power supply and decrease noise, connect a decoupling capacitor between the HX710B's VCC and GND pins. A 0.1uF capacitor is usually adequate.
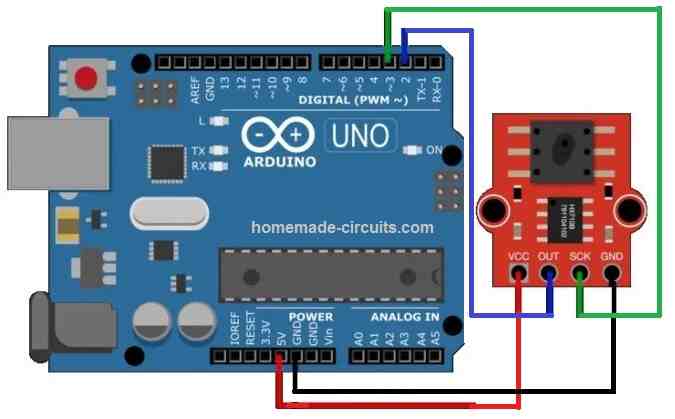
How to connect it with Arduino
You can adhere to these procedures to connect an Arduino and the HX710B Air Pressure Sensor Module:
Attach the power supply by connecting the GND and VCC pins of the HX710B module to the Arduino board's GND and 5V pins, respectively.
Connect the signal output: Join an Arduino board's digital input pin to the HX710B module's OUT pin. Any of the board's digital input pins, as illustrated in the image below, can be used.
The HX710B module's VCC and GND pins should be connected to a 0.1uF decoupling capacitor, as was previously described, to stabilise the power supply.
Program Code
// Define pins for HX710B
const int dataPin = 2; // DOUT
const int clockPin = 3; // SCK

void setup() {
  pinMode(dataPin, INPUT);
  pinMode(clockPin, OUTPUT);
  Serial.begin(9600);
}

long readHX710B() {
  long result = 0;

  // Wait for the module to be ready
  while (digitalRead(dataPin) == HIGH);

  // Read 24-bit data
  for (int i = 0; i < 24; i++) {
    digitalWrite(clockPin, HIGH);
    result = (result << 1) | digitalRead(dataPin);
    digitalWrite(clockPin, LOW);
  }

  // Apply clock pulse to complete the conversion
  digitalWrite(clockPin, HIGH);
  delayMicroseconds(1);
  digitalWrite(clockPin, LOW);

  // Return the 24-bit result
  return result;
}

void loop() {
  long pressureValue = readHX710B();

  Serial.print("Pressure (raw value): ");
  Serial.println(pressureValue);

  // Add a delay
  delay(500);
}
Checking the Output
Once you have configured the above setup, you can check the output by checking the LED lamp of the Arduino board.
Each time an pressure is detected on the sensor, the LED can be seen illuminating at some threshold point of the air pressure.
Using Analogue Pins
The HX710B Air Pressure Sensor Module can be also connected with the analog pin of the Arduino board by programming the following code.
Here is an example code to read the analog output from the HX710B module and print it to the serial monitor:
// Assign the analog input pin
int pressurePin = A0;

void setup() {
  // Start the serial communication
  Serial.begin(9600);
}

void loop() {
  // Read the analog input value
  int pressureValue = analogRead(pressurePin);

  // Print the pressure value to the serial monitor
  Serial.print("Pressure: ");
  Serial.print(pressureValue);
  Serial.println(" Pa");

  // Add a delay to prevent rapid reading of the same value
  delay(500);
}
This code reads the analog input from the HX710B module and prints the pressure value in Pascal (Pa) to the serial monitor every 500 milliseconds.
Note that you may need to adjust the scale factor to convert the analog input value to a pressure value in your specific application, depending on the calibration of the HX710B module.
Conclusion
The HX710B Air Pressure Sensor Module is a flexible and dependable sensor with excellent accuracy, low power consumption, and simple integration into electronic systems.
It is appropriate for a number of applications because because of its extended pressure range and compact size, namely gas flow measurement in automobiles, industrial control systems, medical equipment, and industrial processes.
It's crucial to calibrate the HX710B module before use to guarantee precise pressure reading. Yet with the necessary calibration and configuration, the module can deliver accurate and repeatable pressure measurement for a range of applications.


Questions & Answers
I need to use 7 of this sensors, how does i configurate each sensors?
There’s any way i can use the OneWire mode?
Sorry, No, HX710B cannot work in OneWire mode because it has no device addressing system like DS18B20 sensors.
For 7 sensors you can use:
separate DOUT pin for each sensor
one common SCK pin for all sensors
So only the clock line can be shared. The data outputs must remain separate to avoid communication conflict.
How i can use this on esp32? like the code and pins
You can use the HX710B with ESP32 exactly like with Arduino.
Just connect:
VCC to 3.3V
GND to GND
DOUT to any ESP32 GPIO input pin
SCK to any ESP32 GPIO output pin
For Example:
DOUT > GPIO19
SCK > GPIO18
Then in the code simply define the pins accordingly and use the same reading procedure as Arduino. The ESP32 works nicely because its GPIO pins are 3.3V compatible with the HX710B.
Okay, but i need some especial function or i just need to repeat the function 7 times?
No special function is required. You can simply create 7 separate sensor objects and read them one by one inside the loop. Only the DOUT pin number will be different for each sensor, while the SCK pin can remain common for all.
Hi folks. I am building some pressure sensors using the HX710B and ESP32. I am trying to calibrate the sensor to 40 kPa but it the raw value reaches the maximum value of 16,77,216 at less than 20 kPa. This happens using 5 differnt HX710B’s in any comination with 4 ESP32’s and a UNO using the the sketch provided on this site as well as others I have tried. Thinking it must be my pressure guage, I tested it using a water manoimeter an it is bang on at 10 kPa.
Has anyone else experience this and, if so can you share a solution? Many thanks.
saya sudah dengan arduino, kenapa hasil pembacaan cendrung naik ditunggu sampai 1 jam terus naik.
The slow upward drift with this HX710B module is mostly because of temperature and self heating…
This warm up drift can go on for 30–60 minutes, sometimes less sometimes more, but it settles after that, we just have to wait.
Best thing is to power the module and let it sit for around 30 to 45 minutes, then do zero tare calibration, do it only after it becomes stable…
Also keep supply voltage stable, Do not touch the sensor while testing, since body heat will affect it, and if there is airflow then also it can drift, so keep it steady and let it settle, then it behaves properly.
Thank you for your reply. I’ll try your recommendation with the hope that it will work for me. I was on the verge of buying just the sensor itself and going analog. Maybe I won’t have to. I’ll post my results.
Sure! thanks for your feedback…
Hey, This is actually normal behavior with the HX710B and it does not indicate a faulty chip…
The HX710B has a fixed high internal gain. Because of this the ADC can reach full-scale (16,777,216 counts) much earlier than the sensors rated pressure. If your pressure sensor outputs enough millivolts, then HX710B will saturate around 15–20 kPa, even though the sensor itself is capable of 40 kPa.
Once the ADC saturates, then calibration cannot help because there is no remaining measurement range left.
To fix this you need to either use a lower-gain input (if your HX710B module supports it), or reduce the sensor output level, or accept a lower usable pressure range and calibrate within that range.
This is a gain and scaling limitation, not a hardware fault.
Thank you for the clarification. I will try to find a workaround as per your suggestions. I need to get to at least 35kPa. I guess the adds for this chip are a bit misleading as none of these limitations are communicated to users.
Thanks again for the help.
You are welcome!
Hello sir, I want to ask if the air pressure sensor is connected to the ESP 32 without Arduino connecting it to the PCB, how do I do it?
Martua, if you are using ESP32 and you want to connect the HX710B air pressure sensor directly to that ESP32 without using any Arduino board or any Arduino UNO PCB or Nano PCB, then no problem, that is fully possible, we can surely do that.
But we need to remember one small thing, this HX710B module is working on digital I2C-like interface, not analog. That means we cannot just connect and read voltage directly, we need to read its data and clock using digital GPIO pins and a little code.
Why can’t my sensor read the pressure, it only shows the ‘raw value’?
Hi, I can’t get your arduino code to work. The circuit diagram shows a digital read set up using pins 2 & 3 but the arduino code uses analogRead of pin A0. Do you have the curcuit diagram for the analogRead code?
Hi, you can try the following code instead, because, sorry the given code may not be compatible because the above sensor cannot produce analogue signal output:
// Define pins for HX710Bconst int dataPin = 2; // DOUT
const int clockPin = 3; // SCK
void setup() {
pinMode(dataPin, INPUT);
pinMode(clockPin, OUTPUT);
Serial.begin(9600);
}
long readHX710B() {
long result = 0;
// Wait for the module to be ready
while (digitalRead(dataPin) == HIGH);
// Read 24-bit data
for (int i = 0; i < 24; i++) { digitalWrite(clockPin, HIGH); result = (result << 1) | digitalRead(dataPin); digitalWrite(clockPin, LOW); }// Apply clock pulse to complete the conversion digitalWrite(clockPin, HIGH); delayMicroseconds(1); digitalWrite(clockPin, LOW);// Return the 24-bit result return result; }void loop() { long pressureValue = readHX710B();Serial.print("Pressure (raw value): "); Serial.println(pressureValue);// Add a delay delay(500); }
Thanks for the quick reply will give it a go.
sure, let me know if you have any further issues!
Hello Sir. I would like to incorporate an I2C LCD or an OLED with this sensor. How do I go about it please?
Hello Jedidiah,
I am not good with Arduino projects, so I am not sure how that can be done.
You can go through the following article, you might find some relevant information here:
https://www.homemade-circuits.com/introduction-i2c-lcd-adapter-module/
Hello Sir. thank you very much. I am currently working on a project whereby I need a gas pressure sensor that will indicate the pressure level using LEDs and when the gas pressure is low a buzzer will sound. please help me.
Hello Jedidiah,
It may be possible to indicate the pressure through LEDs only if we have an analog output from an air pressure sensor module.
The HX710B does not have an analog output so getting an indication through LED array might not be possible.
If you know about any air pressure sensor that provides an analog output, let me know, then we can configure the LED driver circuit with it.
Hello Sir. So far I have come across CPT6030, an analogue pressure sensor.
Thank you Jedidiah, I checked the datasheet of the CPT6030, but could not find any clear information regarding its analog output voltage, so I am not sure how this can be used to interface with an LED driver.
However, we can convert the HX710B Arduino output into an analogue voltage and then use it to drive an LED driver such as LM3915.
So, please first build the HX710B Arduino configuration and confirm the PWM results, then I will guide you how to proceed with the LED integration.
Hello Sir.
How about MPS20N0040D-D air pressure sensor?
Hi Jedidiah, yes, I think this IC generates a linear analogue output and can be integrated directly with an LM3915 IC for getting the response over LED bar graph.
Please purchase it and first confirm its analogue output response, it should around 100 mV max, please check this and then we an provceed with the final integration with the LM3915 IC…
Can it’s output be fed into an LM3915 for graphical display?
This module requires a microcontroller interfacing, so i don’t think it can be directly integrated with an LM3915 IC, which requires an analogue input.
How do you use this with seeed Xiao rp2040? 3.3v input pins
What is the mV range HX710B gives out as like pH sensor generate? I want to know the range of out put from the sensor. Thanks
Range can be between 80 mV to 5 V.
How do I calibrate the sensor? is there any documentation?, if so where do I get it from?
Here’s a general process to calibrate the HX710B air pressure sensor:
Gather the necessary equipment: You’ll need a known reference pressure source, such as a barometer or a calibrated pressure gauge, as well as a microcontroller or development board to interface with the sensor.
Establish a baseline reading: Connect the HX710B sensor to your microcontroller or development board according to the manufacturer’s instructions. Write a simple program to read the sensor values and display them. Place the sensor in an environment with a stable and known pressure, such as at sea level.
Record the sensor output: Allow the sensor to stabilize and take multiple readings over a period of time. Calculate the average value of these readings and record it as the baseline output for the known pressure.
Compare with reference pressure: Using your known reference pressure source, measure the actual pressure value. Take note of the difference between the known pressure and the sensor’s baseline output. This difference represents the calibration offset.
Adjust the calibration offset: To adjust the calibration, you’ll need to modify the code in your microcontroller or development board. Add or subtract the calibration offset to the sensor readings to compensate for any deviation from the actual pressure.
Validate the calibration: After making the calibration adjustments, repeat steps 2 and 3 using the known reference pressure source. Compare the average output of the sensor with the actual pressure value. If you still find a major difference, you may need to fine-tune the calibration offset and repeat the process until more accurate readings are acquired.
is there a way to tare the sensor from arduino?
Sorry, no ideas about it.
Can we program the arduino uno to get 8 bit binary output by using the hx710p ( low Pressure senser)? or
a arduino program to read differential milivolt in 8 bit binary output.
thanks
Sorry, my Arduino coding knowledge is not good, so cannot solve it for you. The above article was contributed by an external author.